
Welcome to part 2 of the network programmability with Open NX-OS series of blogs! In the first blog we’ve setup our own instance of Cisco Nexus 9300v in Vagrant and are now ready to start exploring the programmability features that come with Open NX-OS.
But before we dive right in, let’s make a small change to the Vagrantfile. By default, Vagrant automatically forwards TCP port 22 on the guest Nexus switch to TCP port 2222 on the host machine. This is why `vagrant ssh` was able to open up a SSH connection to the management port of the virtual switch. In order to be able to get access to the Nginx web server on the virtual Nexus switch that exposes the API interface, HTTPS TCP port 443 on the guest virtual Nexus switch needs to be forwarded to a TCP port on the host machine. I chose to go with the next available TCP port, and forwarded port 443 on the guest virtual switch to port 2223 on the MacOS host. This is done by adding the following line to the Vagrantfile:
config.vm.network :forwarded_port, guest: 443, host: 2223, id: 'https'
After adding this line, the Vagrantfile becomes:
# -*- mode: ruby -*-
# vi: set ft=ruby :

Vagrant.configure("2") do |config|

config.vm.box = "nxos/9.3.3"

config.vm.network :forwarded_port, guest: 443, host: 2223, id: 'https'

end
Restarting the Vagrant Nexus 9300v instance with this new Vagrantfile by issuing the `vagrant up` command, should automatically forward port 2223 on the local machine to port 443 on the virtual Nexus switch. The terminal output confirms this as can be seen below:
Bringing machine ‘default’ up with ‘virtualbox’ provider…
==> default: Importing base box 'nxos/9.3.3'...
==> default: Matching MAC address for NAT networking...
==> default: Setting the name of the VM: nxos933_default_1588122363540_30772
==> default: Clearing any previously set network interfaces...
==> default: Preparing network interfaces based on configuration...
  default: Adapter 1: nat
==> default: Forwarding ports...
  default: 443 (guest) => 2223 (host) (adapter 1)
  default: 22 (guest) => 2222 (host) (adapter 1)
==> default: Booting VM...
==> default: Waiting for machine to boot. This may take a few minutes...
  default: SSH address: 127.0.0.1:2222
  default: SSH username: vagrant
  default: SSH auth method: private key
Similar to the majority of the features in Open NX-OS, the API interface is not enabled by default. In order to enable it, in configuration mode on the virtual Nexus switch issue the following command:
feature nxapi
NX-API CLI
This enables the Nginx web server that provides the REST API interface into the switch. The Open NX-OS API interface has two components: NX-API CLI and NX-API REST. We will cover NX-API CLI in this blog post, and NX-API REST in the next part of this blog series.
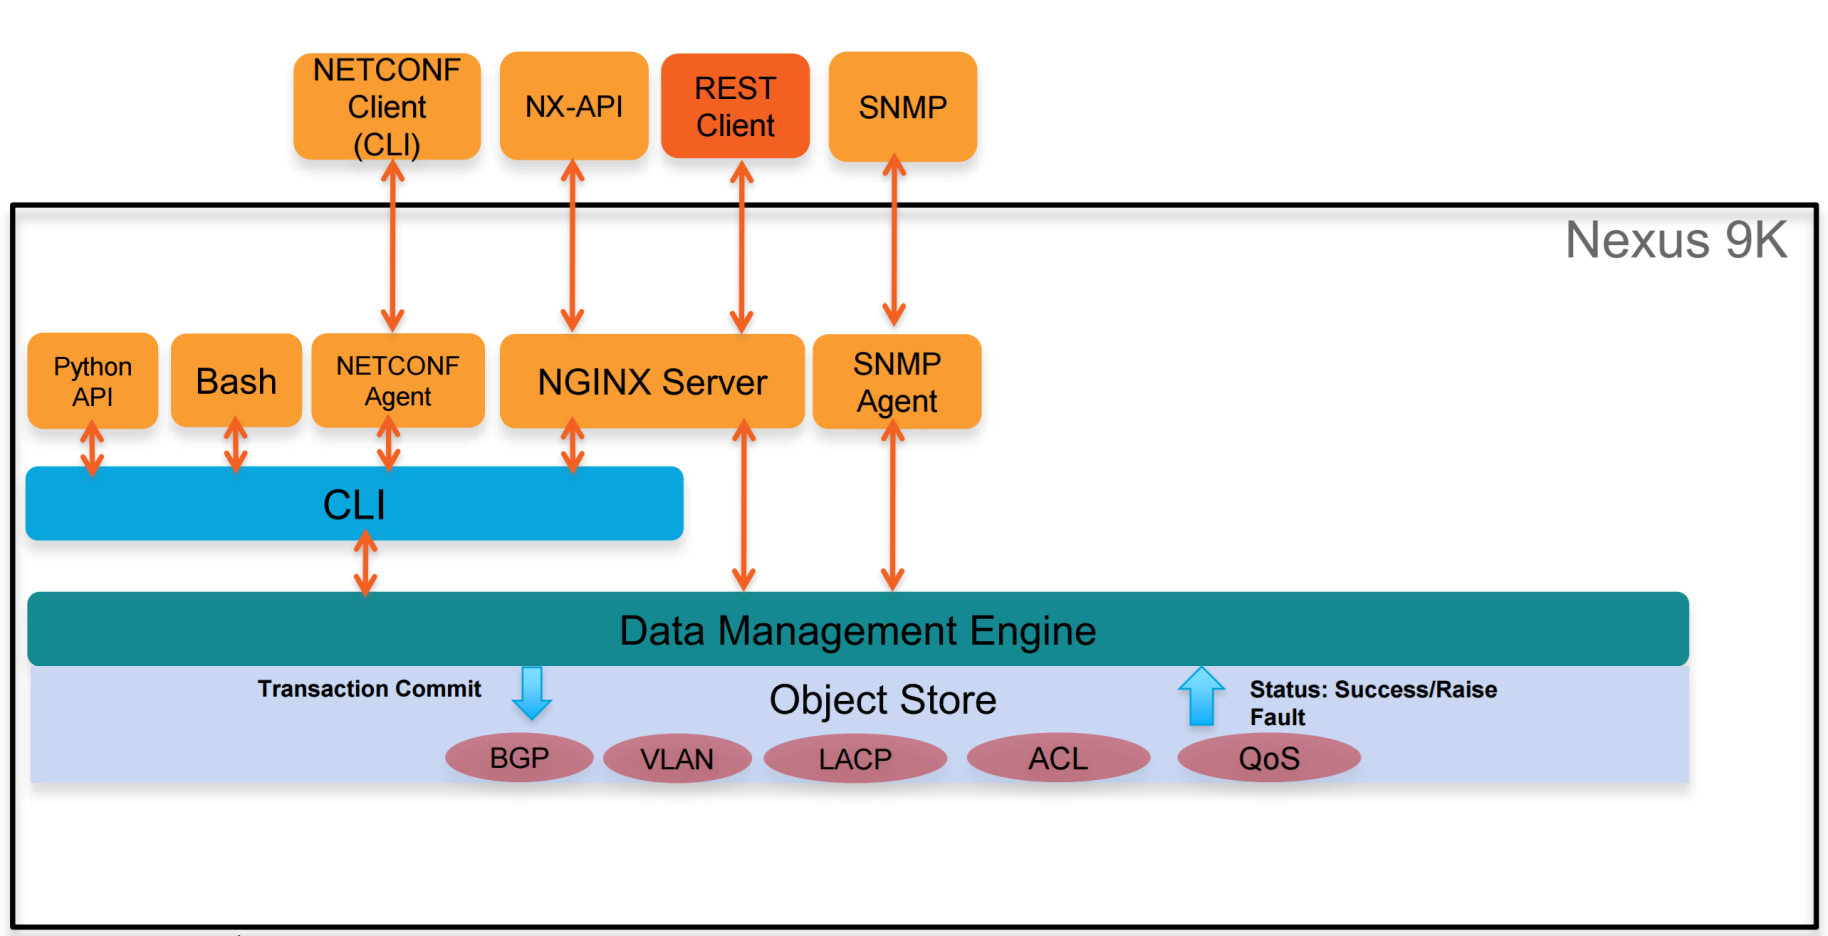 Fig1. NX-API CLI vs NX-API REST
NX-API CLI is a transition interface towards the full blown NX-API REST API. Normally the CLI commands on a switch are available only while connected to the device either to the console or through vty lines (telnet or SSH). With NX-API CLI, the CLI commands are available outside of switch by using HTTPS. Practically, the CLI commands are encapsulated in the body of a HTTP POST message and are sent to the Nginx web server that sends them via the CLI to the Data Management Engine (DME) as can be seen in Figure 1.
The role of the DME will be discussed in more detail in the next blog, but for now it’s important to know that it represents an interface to the object store where all the configuration options and the full state information of the switch are contained in Managed Objects (MOs). The response to the user NX-API CLI call, makes it back the opposite way, from the DME to the CLI process to the Nginx web server and then finally to the requester.
Automation scripts are consistent between code versions
Not only are the CLI commands encapsulated in the body of the HTTPS calls but the encapsulation is done in a standard and consistent way, both JSON and XML data formats being supported. This means that automation scripts that are using NX-API CLI can finally be consistent between different code versions to name just one advantage. Gone are the days when cumbersome screen scraping CLI outputs or Expect scripts are no longer working because a space or a tab that were added in the output of a CLI command in the new version of code. This of course ends up in adding more troubleshooting steps and frustration to your automation efforts.
NX-API Sandbox
Besides enabling the API interface on Open NX-OS, the `feature nxapi` command also enables the NX-API Sandbox. The NX-API Sandbox is a web form running on the switch that:
- translates between CLI commands and their equivalent JSON or XML payload,
- gives the user the option of performing API calls by simply pressing the Send button and seeing the response from the switch,
- as well as the option of generating Python 2 (please don’t do this), Python 3, Java, JavaScript or Go code based on the CLI commands that are sent to the switch. This code can then be easily used as part of your automation efforts.
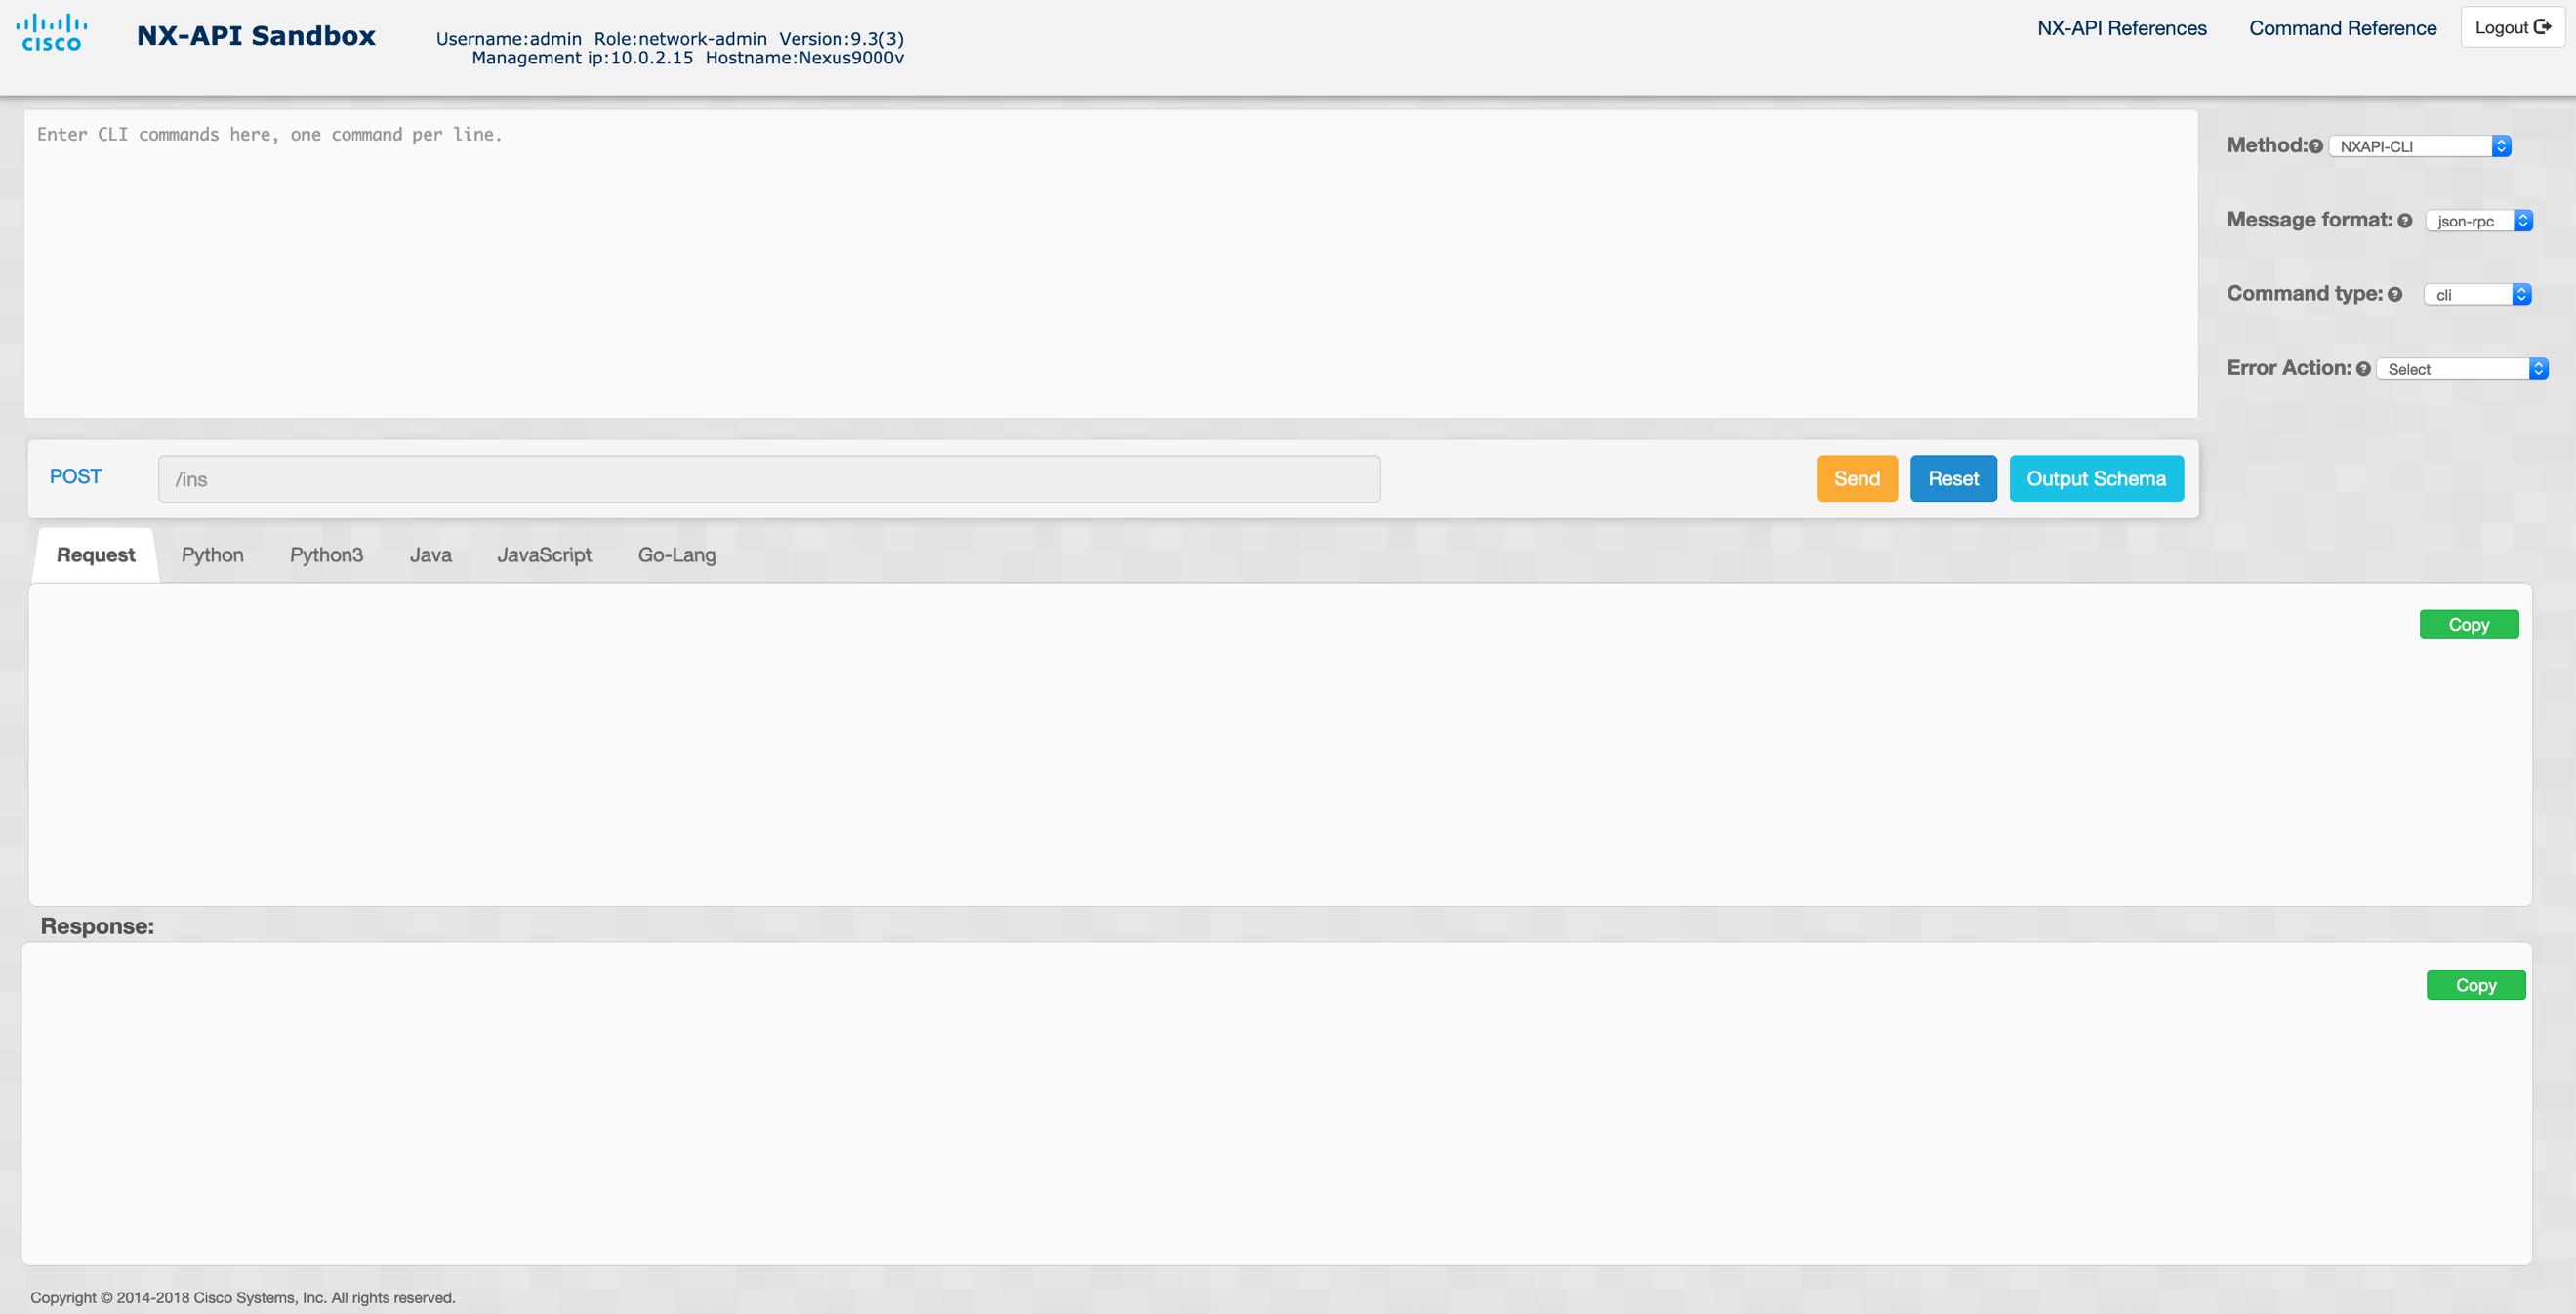 Fig2. NX-API Sandbox
In our Vagrant environment, the NX-API Sandbox web interface is available in your favorite browser if you navigate to https://127.0.0.1:2223. As you remember TCP port 2223 on the locahost is being forwarded to TCP port 443 on the virtual switch, the port on which the Nginx web server is running on the virtual switch. By default, the Vagrant box has already configured a network-admin account called admin with a password of admin. You can use this account to login into the NX-API Sandbox web interface. The NX-API Sandbox interface on Open NX-OS 9.3(3) looks like the one in Figure 2.
Let’s use the NX-API Sandbox to create a new VLAN, VLAN 100, call it Vagrant-TEST and assign the first 5 Ethernet ports to this new VLAN with a fitting port description. The CLI commands to accomplish these tasks are the following:
vlan 100
name Vagrant-TEST
interface ethernet1/1-5
switchport access vlan 100
description Modified through NX-API CLI
Make sure you write these commands in the NX-API Sandbox interface in the panel that has the “Enter CLI commands here, one command per line.” section. In the “Request” section of the NX-API Sandbox web interface, these 5 CLI commands get JSONyfied and each of them gets an ID:
[
  {
    "jsonrpc": "2.0",
    "method": "cli",
    "params": {
      "cmd": "vlan 100",
      "version": 1
    },
    "id": 1
  },
  {
    "jsonrpc": "2.0",
    "method": "cli",
    "params": {
      "cmd": "name Vagrant-TEST",
      "version": 1
    },
    "id": 2
  },
  {
    "jsonrpc": "2.0",
    "method": "cli",
    "params": {
      "cmd": "interface ethernet1/1-5",
      "version": 1
    },
    "id": 3
  },
  {
    "jsonrpc": "2.0",
    "method": "cli",
    "params": {
      "cmd": "switchport access vlan 100",
      "version": 1
    },
    "id": 4
  },
  {
    "jsonrpc": "2.0",
    "method": "cli",
    "params": {
      "cmd": "description Modified through NX-API CLI",
      "version": 1
    },
    "id": 5
  }
]
Pressing the Send button in the NX-API Sandbox web interface, the API request is sent to the switch and the response is captured in the “Response” section of the interface:
[
  {
    "jsonrpc": "2.0",
    "result": null,
    "id": 1
  },
  {
    "jsonrpc": "2.0",
    "result": null,
    "id": 2
  },
  {
    "jsonrpc": "2.0",
    "result": null,
    "id": 3
  },
  {
    "jsonrpc": "2.0",
    "result": null,
    "id": 4
  },
  {
    "jsonrpc": "2.0",
    "result": null,
    "id": 5
  }
]
A result of null for each of the 5 CLI commands that were sent over HTTPS to the virtual switch signifies the fact that they ran successfully. Verifying the running-configuration on the Vagrant virtual switch confirms that indeed the new VLAN was created, the first five Ethernet ports were configured as access ports in this new VLAN and the port description was applied to all five ports:
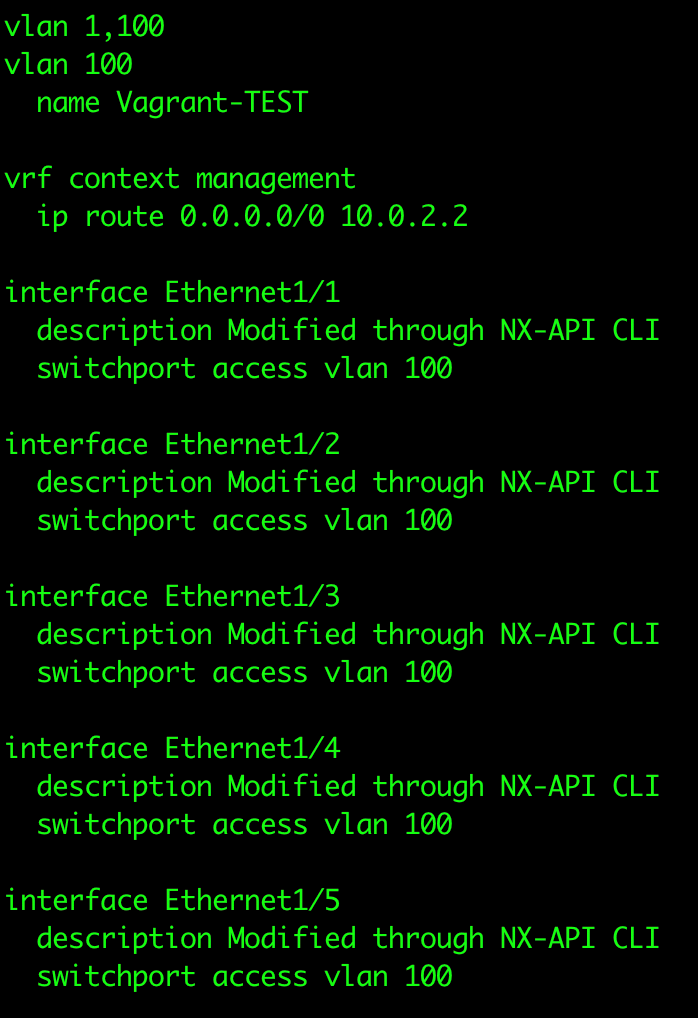 Fig 3. Snippet of running configuration confirming
successful configuration change through NX-API CLI
Try it yourself
As a take away for this blog post, the reader is encouraged to take the code that is generated by NX-API sandbox for these 5 CLI commands and change it to create a new VLAN, VLAN 200, name it Vagrant-HOMEWORK and configure Ethernet port 1/64 as a trunk port allowing only VLANs 100 and 200. You can choose your favorite programming language, with Python 2 and 3, Java, JavaScript and Go supported straight from the NX-API Sandbox web interface. You get extra points if your code is in a different language than the ones just mentioned.
Please share your code and ideas in the comments section of this blog post.
In the next blog post we’ll go over NX-API REST and start seeing the real value of an object-based system.
Related resources:
- DevNet Open NX-OS resources
- DevNet Networking Dev Center
- DevNet Network Automation Exchange
- Cisco DevNet Certifications
We’d love to hear what you think. Ask a question or leave a comment below.
And stay connected with Cisco DevNet on social!
Twitter @CiscoDevNet | Facebook | LinkedIn
Visit the new Developer Video Channel


Hi,Adrian,
When I deploy the python script from my MacBook to the Vagrant VM N9Kv, I encounter error said:ssl.SSLError: [SSL: CERTIFICATE_VERIFY_FAILED] certificate verify failed (_ssl.c:833). Do you know how could I bypass the ssl certification verification?
Hi Clark,
If you are using the Python code generated by NX-API Sandbox and a self-signed SSL cert on the N9Kv, make sure you skip the certificate authenticity verification by specifying verify=False in the requests POST API call as below:
if client_cert_auth is False:
response = requests.post(url,data=json.dumps(payload), headers=myheaders,auth=(switchuser,switchpassword)).json()
becomes,
if client_cert_auth is False:
response = requests.post(url,data=json.dumps(payload), headers=myheaders,auth=(switchuser,switchpassword), verify=False).json()
Let me know if that worked for you.
Adrian,
That works, Thanks.
One more question, how could I set the Nexus9000v mgmt port to be an “Bridge Adapter” so I can access the vagrant instance from my local subnet? In that case I can access from other linux host to do some testing rather than just test on local Mac?
Thanks,
Clark
Did you have a look at this: https://www.vagrantup.com/docs/networking/public_network.html ?
Vagrant.configure(“2”) do |config|
config.vm.network “public_network”
end
Clark,
Did you see this: https://www.vagrantup.com/docs/networking/public_network.html? Might want to try one of the options in that link depending on your setup.
Hi Adrian, I am using python3 in Visual Studio Code editor. I got the same SSL certificate error, however when i pasted your solution it gave me another error listed below.
“InsecureRequestWarning: Unverified HTTPS request is being made to host ‘10.6.188.21’. Adding certificate verification is strongly advised. See: https://urllib3.readthedocs.io/en/latest/advanced-usage.html#ssl-warnings“
Hi Adrian,
I also got the same SSL certificate error and i also added the code verify=False, however it still did not generate any output and gave me this message:
InsecureRequestWarning: Unverified HTTPS request is being made to host ‘10.6.188.21’. Adding certificate verification is strongly advised. See: https://urllib3.readthedocs.io/en/latest/advanced-usage.html#ssl-warnings
warnings.warn(
Maaz, that is just a warning message to notify you that an unverified HTTPS request is being made. This means that the SSL certificate authenticity is not verified but as the warning message says, in production environments make sure you use valid and authentic SSL certificates check for their validity. The Python code should still complete successfully even with this warning message displayed.
ok that helps i got it to work, Thank you