
Hey look! You made it to Part 2 of the Network Automation with DNAC SDK! Welcome!
In Part 1 of this series we went through setting up the SDK; importing into your python project; and making your first call using the SDK to authenticate against an instance of the DevNet Sandbox;
Let’s roll up our sleeves and dig into the next part of utilizing the SDK. In this installment of the blog series, we will look at how simple it is to leverage python to programmatically run IOS commands throughout your entire infrastructure with DNAC’s command runner APIs. We will also assume you already have installed the SDK and understand how authentication works.
What is Command Runner?
Command Runner is a feature in Cisco DNA Center that allows you to execute a handful of read-only (for now) IOS commands on the devices managed by DNAC
Here is how you can get a list of all supported IOS commands.
commands = dnac.command_runner.get_all_keywords_of_clis_accepted()
dnac – Our connection object we created from Part 1 of the series
command_runner – Command runner class. Calling it will allow us to access the underlying methods
get_all_keywords_of_clis_accepted() – This is the method we are after to display a list of all supported keywords.
Makes sense? Now that we understand what Command Runner is, let’s dig into using the APIs to build a simple use case.
Command Runner flow
The use case we are about to build together is a simple configuration backup. In order to accomplish this task we will need to:
- Retrieve a list of all managed devices
- Execute a `show run` on each device using Command Runner APIs
- Retrieve the results and save them to file
But before we do so, understanding Command Runner flow is prudent.
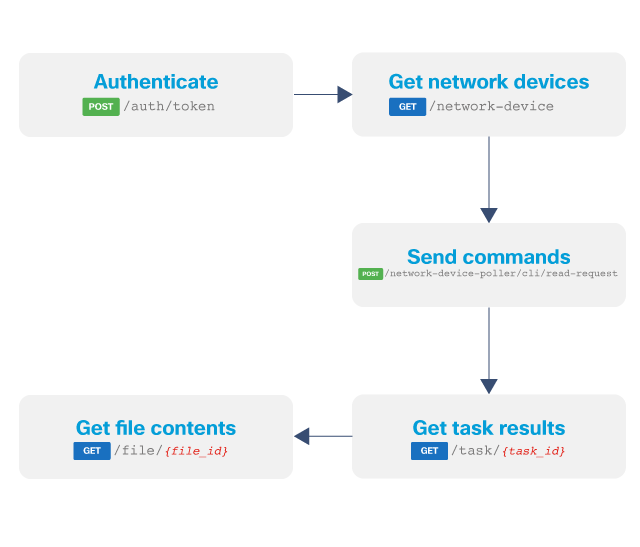
Cisco DNA Center API calls are asynchronous, which means for each executed task a Task id is created. Upon task completion content can be retrieved from /file endpoint.
Endpoints and methods used
- POST /dna/system/api/v1/auth/token
- GET /dna/intent/api/v1/network-device
- POST /dna/intent/api/v1/network-device-poller/cli/read-request
- GET /dna/intent/api/v1/task/{task_id}
- GET /dna/intent/api/v1/file/{file_Id}
This sounds too complex, right? Not really, with the help of our handy dandy SDK we are able to handle all of this very easily.
Let’s take it step by step
Authenticate
– Create a new connection object and assign it to a variable
dnac = DNACenterAPI(username=dnac_creds['username'], password=dnac_creds['password'], base_url=dnac_creds['url'])
Retrieve list of devices
– Using the devices class to call get_device_list() method to retrieve a list of all managed devices.
– Upon 200 OK loop through the list of Switches and Hubs and extract the device id, we need to leverage it to programmatically run the command on each device
– Access device id variable via device.id pass it to and call cmd_run() function
def get_device_list():
    devices = dnac.devices.get_device_list()
    devicesuid_list = []
    for device in devices.response:
        if device.family == 'Switches and Hubs':
            devicesuid_list.append(device.id)
    print("Device Management IP {} ".format(device.managementIpAddress))
    cmd_run(devicesuid_list)
Execute Command Runner
– As we iterate over each device, we will need to execute show run command. to do so use command_runner class and call read run_read_only_commands_on_devices() method. This method requires two inputs of type list: commands and deviceUuids
– Upon execution DNAC will return a taskId (asynchronous, remember?)
– Check its progress via task class by calling get_task_by_id() method. Once the task has been successfully executed (you can use the built-in error handling within the SDK to check but that’s for another blog post) grab the returned fileId
– Now simply access the file class and call the download_a_file_by_fileid() method et VOILA!
def cmd_run(device_list):
    for device in device_list:
        print("Executing Command on {}".format(device))
        run_cmd = dnac.command_runner.run_read_only_commands_on_devices(commands=["show run"],deviceUuids=[device])
        print("Task started! Task ID is {}".format(run_cmd.response.taskId))
        task_info = dnac.task.get_task_by_id(run_cmd.response.taskId)
        task_progress = task_info.response.progress
        print("Task Status : {}".format(task_progress))
        while task_progress == 'CLI Runner request creation':
            task_progress = dnac.task.get_task_by_id(run_cmd.response.taskId).response.progress
        task_progress= json.loads(task_progress)
        cmd_output = dnac.file.download_a_file_by_fileid(task_progress['fileId'])
        print("Saving config for device ... \n")
Congratulation!
That was a lot! Luckily the SDK handled a lot of the heavy lifting for us here. This is a great example of configuration management. You could use this as a base to start building out a simple configuration drift monitoring tool given that the config is returned as JSON data. We can easily use JSON query to check for any configuration drift and automatically rebase it to the original config. This can be taken a step further even by leveraging Git for version control of your device config.
Check out the resources below for complete code and see you in a couple of weeks with Part 3!
Resources
- Github Code Repo
- Cisco DNA Center Dev Center
- DevNet Network Automation Exchange
- Cisco DevNet Certification
We’d love to hear what you think. Ask a question or leave a comment below.
And stay connected with Cisco DevNet on social!
Twitter @CiscoDevNet | Facebook | LinkedIn
Visit the new Developer Video Channel


i”m looking for partnership opportunities