
Welcome to the four part blog series on the web-based network device monitoring tool – “johann”. Part one of the series serves as an introduction to johann. In part 2, you get a look behind the scenes of how I implemented the south-bound communication between the application and the network device with the network device API RESTCONF. Part 3 of the series focuses on the web-based application itself, with a focus on the Python Web-Framework Django. In part 4 of the series, we focus on johann deployment to production.
Did you also come across NETCONF, RESTCONF or YANG, but did not know exactly what to do with it? Why using network device APIs at all? I hope johann, which I introduced in Part 1, gives you some inspiration on the possibilities and some sort of a guideline for your own application.
In this Part 2 of the blog series, I will focus on the RESTCONF part of johann, especially:
- how the operational and configurational data is requested directly from the network device,
- why I am using that approach
- what you need to know when you would like to implement device level APIs in your application
Let’s start from ground up!
Programmability is the capability to configure and manage
networking devices using software protocols.
Getting device information via NETCONF, RESTCONF or CLI?
When you need information from your network devices in one central place, you need to request it in an automated way, more importantly you need to receive data in a structured and standardized format. This is where you can’t count on CLI anymore, because you are receiving a stream of text data (for example via SSH) which is difficult to parse and not usable for applications like johann.
Therefore, programmatic interfaces are used for device configuration, monitoring & automation. Model-driven programmability with open APIs and data models such as NETCONF, RESTCONF & YANG gives you the perfect toolset for requesting structured data.
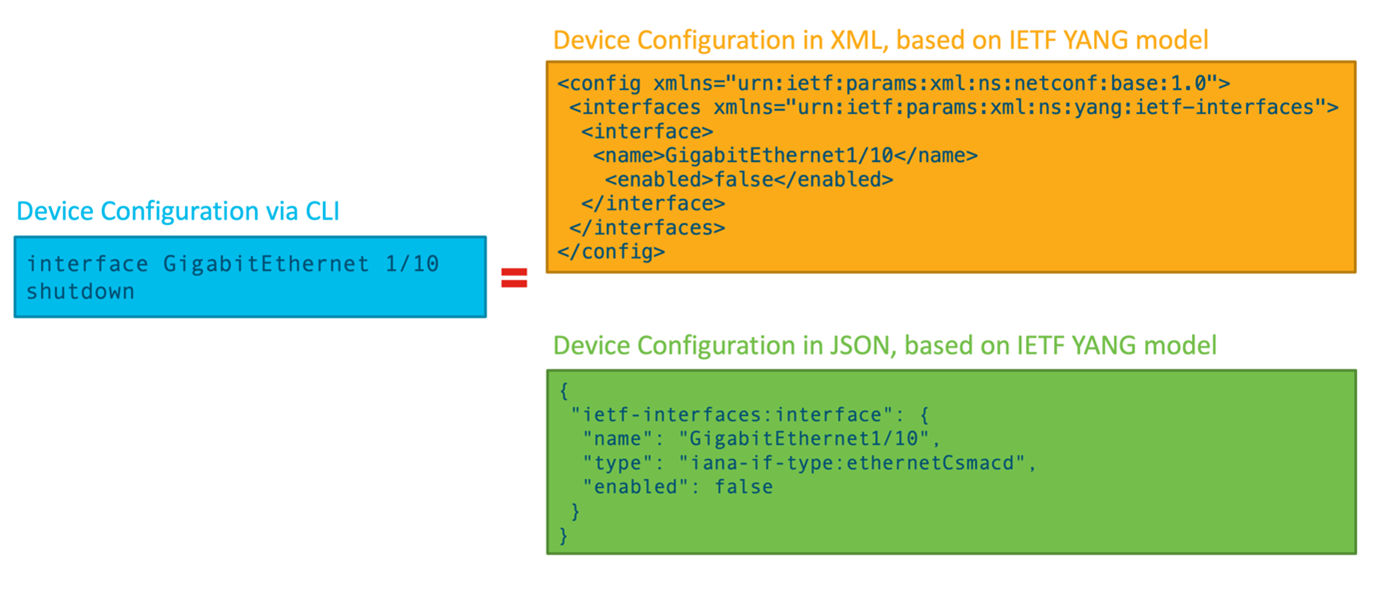 Disabling the interface GigabitEthernet 1/10 via CLI configuration (blue), via NETCONF in XML (orange) and via RESTCONF in JSON (green). Doing the same task in different formats.
Let’s start with an easy example to check out the image above
On the left side (in blue), you see the configuration which needs to be applied in the CLI on a Cisco networking device for disabling the interface GigabitEthernet 1/10. If you just need to execute this one-time task on one single device, nothing is wrong with that and just keep inserting your CLI commands. But what if you want to do that on lots of devices with more interfaces? Or what if you would like to check what interfaces are “shutdown” on all your networking devices?
This is where the programmatic approach comes way handier. On the right side in the image above you see the same configuration command in a structured format: In the orange box you see the XML format and below in green you see the JSON format of the exact same configuration. Does it look more complicated at first? Maybe, but remember with that format the networking device and also humans can understand and read it. This will save you a lot of time when it comes to many repetitive tasks.
Let’s visualize this!
In the graph below you see that if you would do this configuration change of disabling the interface GigabitEthernet 1/10 on lots of devices (for example more than 10 or 20) you can do this manually and are maybe faster in the beginning. But once you are done with your automation script, you can apply this configuration on thousands of devices and are saving yourself a lot of time. And this is just an easy example of how device level APIs can help you!
 When doing repetitive tasks, this graph visualizes how automation scripts can
help you in the long run. The larger the task the more time you will save.
Implementation in johann
I only used RESTCONF for requesting the data and not NETCONF at all. Why? (1) I wanted to make it as easy as possible for the user to leverage johann with a read-only access to the networking devices. (2) RESTCONF’s requirements can easily be met with enabling the API itself with a simple command on the networking device (Switch(config)# restconf) and also the HTTP secure server (basically HTTPS enabled). (3) More importantly, for just reading data from the devices RESTCONF is faster than NETCONF when it comes to response time.

What YANG model to choose from?
I knew that I want to get the data via RESTCONF, but now what? I needed to check what data I can get actually out of the devices. This is where the YANG models come in.
Yet Another Next Generation (YANG) is a data modeling language standardized by the IETF in 2010 (RFC6020). It describes all data sent between the client and the server in a standardized format. For example, how a switch configuration should look like: This data model tells you how to put your CLI IOS configuration into a XML or JSON format as we have covered above.
But no worries, you don’t need to create a YANG data model yourself, you will use these data models to see what configurations are possible on your specific device and in which correct format you need to put your IOS configuration.
Basically, there are 3 groups that are creating the YANG data models:
- The Internet Engineering Task Force (IETF)
- The working group OpenConfig, which is an informal working group of network operators
- Hardware vendors itself, the ones who are creating the network device (for example the IOS XE native models by Cisco)
Implementation in johann
I wanted to focus only on IOS XE devices and therefore, johann is getting the data solely via the Cisco IOS XE native models. Also, the native models are providing more information when it comes to device specific information compared to the models from IETF or OpenConfig. Maybe in the next version of johann, the support of other YANG models can be implemented and so non-IOS XE devices can be added to the johann database as well. Read this blog for more information on this topic.
How to implement the YANG models?
Now the fun part started to check in detail what data can I get out of the specific IOS XE native YANG models from the networking device. Before that, I also did a small survey and defined some variables which are important to gather, for example NTP-server configuration, SNMP groups, interface information, IOS XE version, device uptime etc.
I would split this task in 2 parts: Plan which YANG model to select and test with a real IOS XE device the actual JSON output which I am receiving.
Plan: Selecting the YANG model
I went on the official YangModels Github repository, chose the latest IOS XE version, and had access to all available IOS XE native YANG models. Be aware: Not all models are supported on every device! You can check directly on your IOS XE device or get the “Capability XML File” of your desired platform in the README on the Github to check what YANG models are supported.
Then, you can open any .yang file and check the YANG model, specifically the “containers” and meta information of the data fields. A good hint: For operational data, you want to check the models which are ending in “-oper.yang”.
There is a better way of having a good overview and understanding of what data you can request. We recently released the open-source tool YANG Suite which will help you a lot to read through the YANG models. I would highly recommend using this tool!

With YANG Suite you can easily read through YANG models. Here for example, you can nicely see in detail what data you can receive from the native IOS XE environmental-oper YANG model.
Test: Work with the received JSON output
I found the specific data fields I would like to receive and then I tried it out on a real device with a simple REST-API tool like Postman to see the response which will come back. But you may be wondering: What’s the URL for the GET command?
Let me show you the easiest method how I did it, which is also suitable if you are using several data fields within one YANG model. If you want to have a more detailed response, I recommend you read this blog.
To receive all data from a YANG model, you need to focus on the containers which are defined in the YANG model definition (.yang files). Also, you also need the RESTCONF API root resource which usually is “/restconf/data” for the datastore. And then we can formulate this URL blueprint:
https://{IP address of the device}:443/restconf/data/{name of the YANG model}:{container inside the YANG model}
Let’s try it with an example in Postman!
If we would like to receive data from the environmental sensors from the networking device, we will choose this YANG model “Cisco-IOS-XE-environment-oper” as seen above in the YANG Suite screenshot. You can see that there is one “folder” (icon) which is called “environment-sensors”, which also specified as a container in the YANG model: If you check out the .yang file, you will see that on line 182 the container is called the same like that. And so, we have already everything we need:
https://10.0.0.1:443/restconf/data/Cisco-IOS-XE-environment-oper:environment-sensors
 Postman screenshot: requesting network device environment data via RESTCONF
Together with YANG Suite and the .yang files you can easily request data with that approach for every model. Be aware, that you also need to add the Accept header “application/yang-data+json” and the device username/password with Basic Auth.
What to do with the received structured data?
We are nearly there! After we have gathered all REST calls and are familiar with what data we can get out of the device APIs, the implementation in our application starts and can be divided into 4 parts:
1. Implementation: Choose your framework and programming language for your project. The most popular choice would be Python with the requests library, which I also used in johann.
2. Handling errors: What if the device can’t be reached or RESTCONF is disabled (400 errors)? The username or password is wrong (401 error)? What happens when the response was successful but is empty (204 response code)? You definitely need to implement proper error handling when requesting the data from your devices.
In johann, I used try-except clauses, defined connection timeouts and the function .raise_for_status() from the requests library. This helped to give the user immediate information if the request was successful or not.
3. Parsing JSON: If the response status code is 200 and so the response successful, you can show off your JSON parsing skills. In Python, you usually decode your received JSON and put it into a dictionary format, which can be easily done with the built-in requests function .json(). Remember, also put here a try-except clause in case something is wrong in the JSON.
Now you can parse through the JSON response easily. Be aware of arrays or lists which are represented with “[]”, because then you need to iterate through them. If you want to learn more about JSON parsing, we have some cool learning labs which will help you:
In johann, I actually used try-except clauses for nearly all independent data fields. I did this because it is possible that a configuration setting does not exist as it is optional, for example setting an NTP-server configuration. As a result, if the application would like to add something which is not in the JSON, the script won’t stop and just get passed it as you see below in the source code snippet (https://github.com/flopach/johann-network-device-monitoring/blob/master/docker/johann/main/net_services/restconf_queries.py)

4. Inserting data into database: Bringing it home! Once all desired data has been put from the JSON response into your temporary object with your desired format (e.g. Python dictioniary), you can insert the values into your chosen database. In johann, I am using the Django database API to simply insert the values into the SQLite database which is a relational database. And that’s it.
Do you have a question or comment?
Please leave me a comment in the section below. I hope this blog was helpful to you in your NetDevOps / Device API journey! Stay tuned for Part 3 where we will take a closer look at Celery and Websockets with Django!
Important resources
- Flexing the Network Device API Muscles with johann – Part 1: Introduction
- Using Django with Celery & WebSockets – Flexing the Network Device APIs Muscles with “johann” Part 3
- Deploying Your Django App to Production – Flexing the Network Device APIs Muscles with johann, Part 4
- IOS XE Programmability guide for the latest IOS XE version
- Official IETF, OpenConfig and vendor native YANG models
- Download, Test and view the source code of johann
- Model-Driven-Programmability
We’d love to hear what you think. Ask a question or leave a comment below.
And stay connected with Cisco DevNet on social!
Twitter @CiscoDevNet | Facebook | LinkedIn
Visit the new Developer Video Channel


Thanks for the great post! Definitely helps answer several questions I’ve had regarding how to start leveraging YANG models.