
A couple of weeks ago, in Part 1 of this ChatOps blog series, you created your first bot. However, it could not do anything… What a shame, huh? Let’s get that fixed asap.
Time to take a look at the code required to implement your bot logic. We will be using Python and Flask as they offer a simple and convenient approach you can easily leverage.
Please make sure to install Python in your computer and also the Flask library (pip install Flask). Then you are ready to review the code for our first stab at implementing the required bot logic, available here. Please use your favorite editor or IDE to create a new file in your computer with the same content and call it “1_chatbot.py”.
As you’ll see our code does the following simple steps:
- Import the required Flask modules
- Define TCP port 5005 in your computer where it will listen for incoming POST messages
- Assign the received JSON payload into a data variable and display it on screen
Please run the code with:
python 1_chatbot.py
You’ll notice the terminal window displays the following and does not allow you interact anymore:
* Serving Flask app "1_chatbot" (lazy loading)
* Environment: production
   WARNING: This is a development server. Do not use it in a production
deployment.
   Use a production WSGI server instead.
* Debug mode: on
* Running on http://0.0.0.0:5005/ (Press CTRL+C to quit)
* Restarting with stat
* Debugger is active!
* Debugger PIN: 180-970-440
This means your code is running and waiting for messages to arrive to port 5005. Leave this terminal window running the code and open a new one to continue working.
Connectivity and webhooks
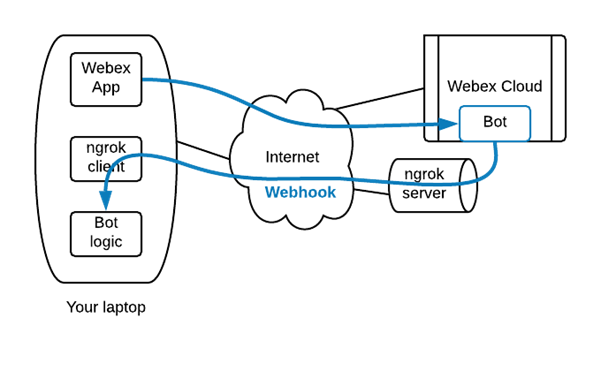
Now we would need to tell the bot when and how we want it to contact its bot logic. This means defining the events or messages that will trigger the bot in Webex Cloud to send a notification message to its bot logic in our laptop. The way to implement this is by configuring a webhook. Webhooks define the specific event types that will trigger a message, and what is the destination address (target URL) where those messages should be sent to. But wait… what might be the destination address of the bot logic that resides in your computer?!?
The bot logic running in your own computer will have to be reachable from Webex Cloud, where the actual bot lives. So how do we accomplish that? Your computer usually resides behind a NAT/PAT-enabled router and/or firewall, that makes your system virtually unreachable for inbound connections initiated from the Internet.
There are different workarounds you may use to solve this inbound reachability challenge (ie. mapping IP + port in your home router, or a reverse SSH tunnel) but for simplicity we will use a service called ngrok.
This way you will be able to tell your Webex bot the publicly reachable destination address it can use to reach the bot logic hosted locally in your computer.
Fire it up
Please download and install the ngrok client in your computer. In order to fire it up you will need to define the port in your computer where the bot logic will listen for messages coming from the Webex bot, so let’s use port 5005 for that. Configuring ngrok to provide connectivity to your local port 5005 is as simple as running:
ngrok http 5005
Please wait until Session status is online and write down the https URL displayed as Forwarding and ending with .ngrok.io (i.e., https://f21570cefdf4.ngrok.io). That URL is the publicly accessible address reachable through Internet for your Webex bot to access the bot logic (python script) you have running in your computer.
Now is the time to let your Webex bot know what events we are interested in, and the publicly accessible address where the bot logic resides so it can send notifications there when a new event occurs. We use webhooks for this.
Configure a webhook using Webex APIs
Webex APIs provide an easy way for you to configure a webhook by sending a simple HTTP message using the REST POST method. You can use the command below, where you will need to include the token obtained when you created the Webex bot and the ngrok URL you just got.
curl -X POST \
  https://webexapis.com/v1/webhooks \
  -H 'Authorization: Bearer <your_bot_token>' \
  -H 'Content-Type: application/json' \
  -d '{
      "name": "Webhook to ChatBot",
      "resource": "all",
      "event": "all",
      "targetUrl": "<your_ngrok_url>"
    }'
By now you should have a couple of terminal windows: one running your python script with the bot logic and another one running the ngrok client.
Please go to your favourite Webex client interface (app, web-based, mobile) and look for the address of your bot, the one that ended with @webex.bot. Send it a message that says “HELLO BOT!” and go back to your terminal windows. The one running ngrok should display an HTTP request with the POST method and a 200 OK answer. The HTTP 200 OK success status response code indicates that the request has succeeded.
Nice! Upon receiving a message your bot in the Webex Cloud is now able to send a webhook, through ngrok, to notify the bot logic residing in your laptop about the event… so cool!
The other terminal window running your bot logic will display a JSON payload with all the information received from the Webex bot and associated to the message you sent to the bot. There you’ll find for example your own address as personEmail, the name of the webhook generating this message and its target URL. However you will not find the “HELLO BOT!” message anywhere… strange, huh?
Coming up next
Next week we will explore how you can obtain all details about the received messages. See you then!
If you’d like to learn more about network programmability and Cisco networking platforms visit the DevNet Networking Dev Center.
Any questions or comments please let me know in the comments section below, Twitter or LinkedIn.
Additional resources
- Part 1 – Using a Bot to Operate Your Network!? – Getting Started with ChatOps
- Part 3 – Message Details – Getting Started with ChatOps
- Part 4 – Integration with Chuck Norris and Meraki APIs – Getting Started with ChatOps
- Networking Dev Center
We’d love to hear what you think. Ask a question or leave a comment below.
And stay connected with Cisco DevNet on social!
Twitter @CiscoDevNet | Facebook | LinkedIn
Visit the new Developer Video Channel


Hello Julio and thanks for the blog post!
Unfortunately, my current setup doesn’t allow me to use ngrok, but I did setup a flask server at pythonanywhere.com and was able to confirm that my webex messages to my bot are getting through…
18.221.216.175 – – [07/Jun/2021:14:16:53 +0000] “POST / HTTP/1.1” 200 1333 “-” “Squared Scheduler/1.0” “18.221.216.175” response-time=0.019
13.58.232.148 – – [07/Jun/2021:14:19:34 +0000] “POST / HTTP/1.1” 200 1188 “-” “Squared Scheduler/1.0” “13.58.232.148” response-time=0.003
Awaiting the next installment…
Thanks again!
@ittybittypacket
Nice workaround Vince, many thanks for sharing!