
Welcome back to our series of blog posts about network automation and programmability with Cisco Open NX-OS. In the previous post, we went over NX-API CLI and saw how CLI commands and responses get encapsulated into the body of HTTPS POST requests. We also had a look at the NX-API Sandbox and the code generation feature that comes with it.
Managing network automation at scale
In order for networks to be managed at scale, a uniform and consistent model-driven software interface needs to be available. Combine that with an API that makes that data model available to the outside world and you have a winning combination for network automation at scale. In the case of network devices like switches and routers, a data model is simply a specification or a schema that describes the configuration and state of the device. In this blog, we will cover NX-API REST.
Everything within Open NX-OS is a managed object
Cisco Open NX-OS implements a data model that is available over the NX-API REST interface. This data model is organized as a hierarchical tree made up of objects. The managed objects represent both all of the configuration features of the Cisco Nexus 9000 switches AND all the operational data. That means that everything within Open NX-OS is a managed object: a VLAN or a bridge domain in Open NX-OS lingo is an object, the name, operational state and status of that VLAN are child objects of the VLAN parent object and so on. Some objects are writable and can be created, modified, and destroyed while some are read only, like the status of a fan.
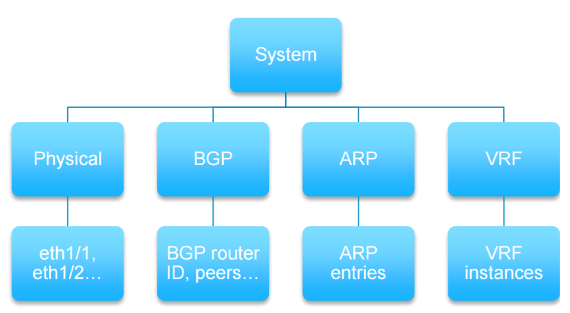 Figure 1
The Data Management Engine (DME) is the process that acts as the gate keeper to the data model. It provides both a northbound interface for easier interaction with the data model as well as a southbound API to back-end processes and applications running on the switch.
Single source of truth
The DME holds all the objects in the data model in a hierarchical tree called the Management Information Tree (MIT). The MIT is the single source of truth for the configuration and operational status of the Open NX-OS features and elements. It is organized as in Figure 01. The root of the entire MIT is the sys object. Through distinguished names (DN) and relative names (RN) each object in the MIT can be uniquely identified and referenced. This means that if you need to know the number of inbound errors on an interface, there is no need to issue the “show interface” CLI command for example and parse the output and extract the value you are interested in. You can directly read the managed object in the MIT that corresponds to the inbound errors on the interface you are interested in.
For example, in the case of interface Ethernet 1/33 on the Cisco Nexus 9300v virtual switch running in Vagrant, the inbound errors on this interface are stored in a managed object (MO) called rXNoErrors. The complete DN to this MO is sys/intf/phys-[eth1/33]/dbgEtherStats.
Finding the DN to the MO
At this point you might be asking yourself how can you find the path or the DN to the MO you are interested in, or how to explore the MIT and see how it is organized. Once you enabled the NX-API feature (see previous blog post), besides the NX-API Sandbox that became available to you, another component called Visore also became available.
Visore is a visual representation of the MIT. In the Vagrant setup it is available at the following link https://127.0.0.1:2223/visore.html and looks like Figure 02. In a normal Nexus switch setup it would simply be available at the https://Switch_management_IP_address/visore.html.
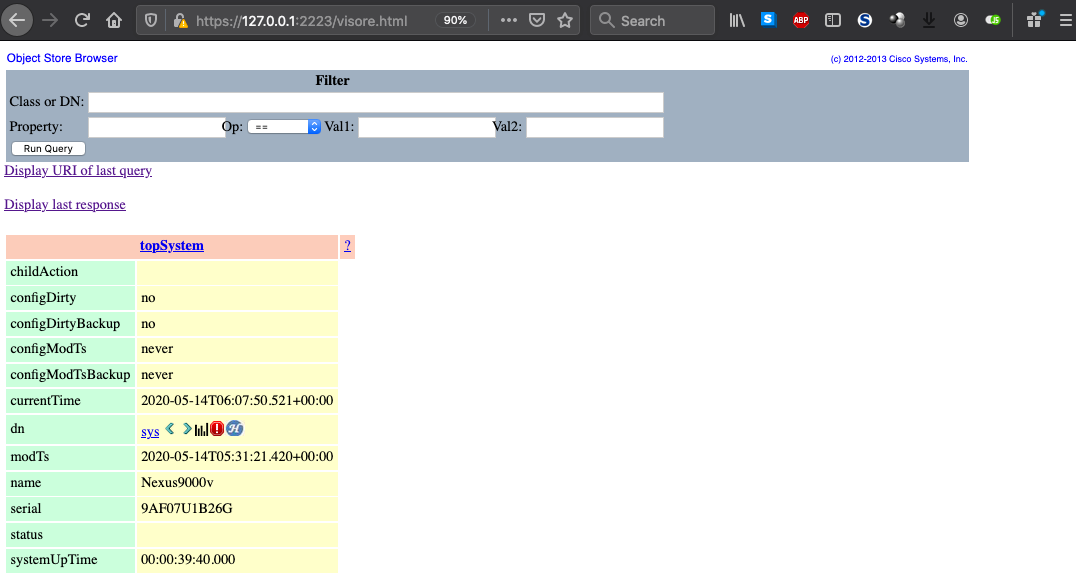 Figure 2
By default you can use the admin account with a password of admin to login into Visore. By pressing on the green < > arrows next to the DN attribute you can navigate the MIT and become familiar with all the MOs and how they are organized.
Another option to discover more about NX-API REST and the MIT structure is to check out the documentation available at https://developer.cisco.com/site/cisco-nexus-nx-api-references/.
Learn how to build API calls in the NX-API sadbox
You could also use NX-API Sandbox to learn more about NX-API REST and how to build API calls and generate source code in your favorite programming language. If you remember from the previous blog post, once you enable the NX-API feature on the Nexus switch, the NX-API Sandbox is automatically enabled and is available, in the case of our Vagrant setup, at the https://127.0.0.1:2223 link. You can login into the web interface with the admin username using a password of admin.
The NX-API REST option
We’ve already explored the NX-API CLI available with the Sandbox interface so next, let’s have a look at the NX-API REST option.
First, make sure you select NXAPI-REST (DME) in the upper right hand corner under the Method drop down option. Next, let’s go ahead and perform some basic switch configuration using the NX-API REST interface and the NX-API Sandbox interface. Let’s configure a new VLAN, VLAN 200, name it TEST and assign the first 5 Ethernet ports on the virtual switch to this new VLAN. The configuration mode commands to accomplish this are:
vlan 200
name TEST
interface e1/1 – 5
switchport access vlan 200
With NX-API REST, there’s one additional step that needs to be completed in the NX-API Sandbox interface before the commands are sent to the switch. The CLI commands need to be converted into their corresponding MOs and the correct path in the MIT or the DN. Make sure you press on the Convert button in the NX-API Sandbox interface before sending the API request to the switch. The NX-API Sandbox interface in this case looks like the one in Figure 03.
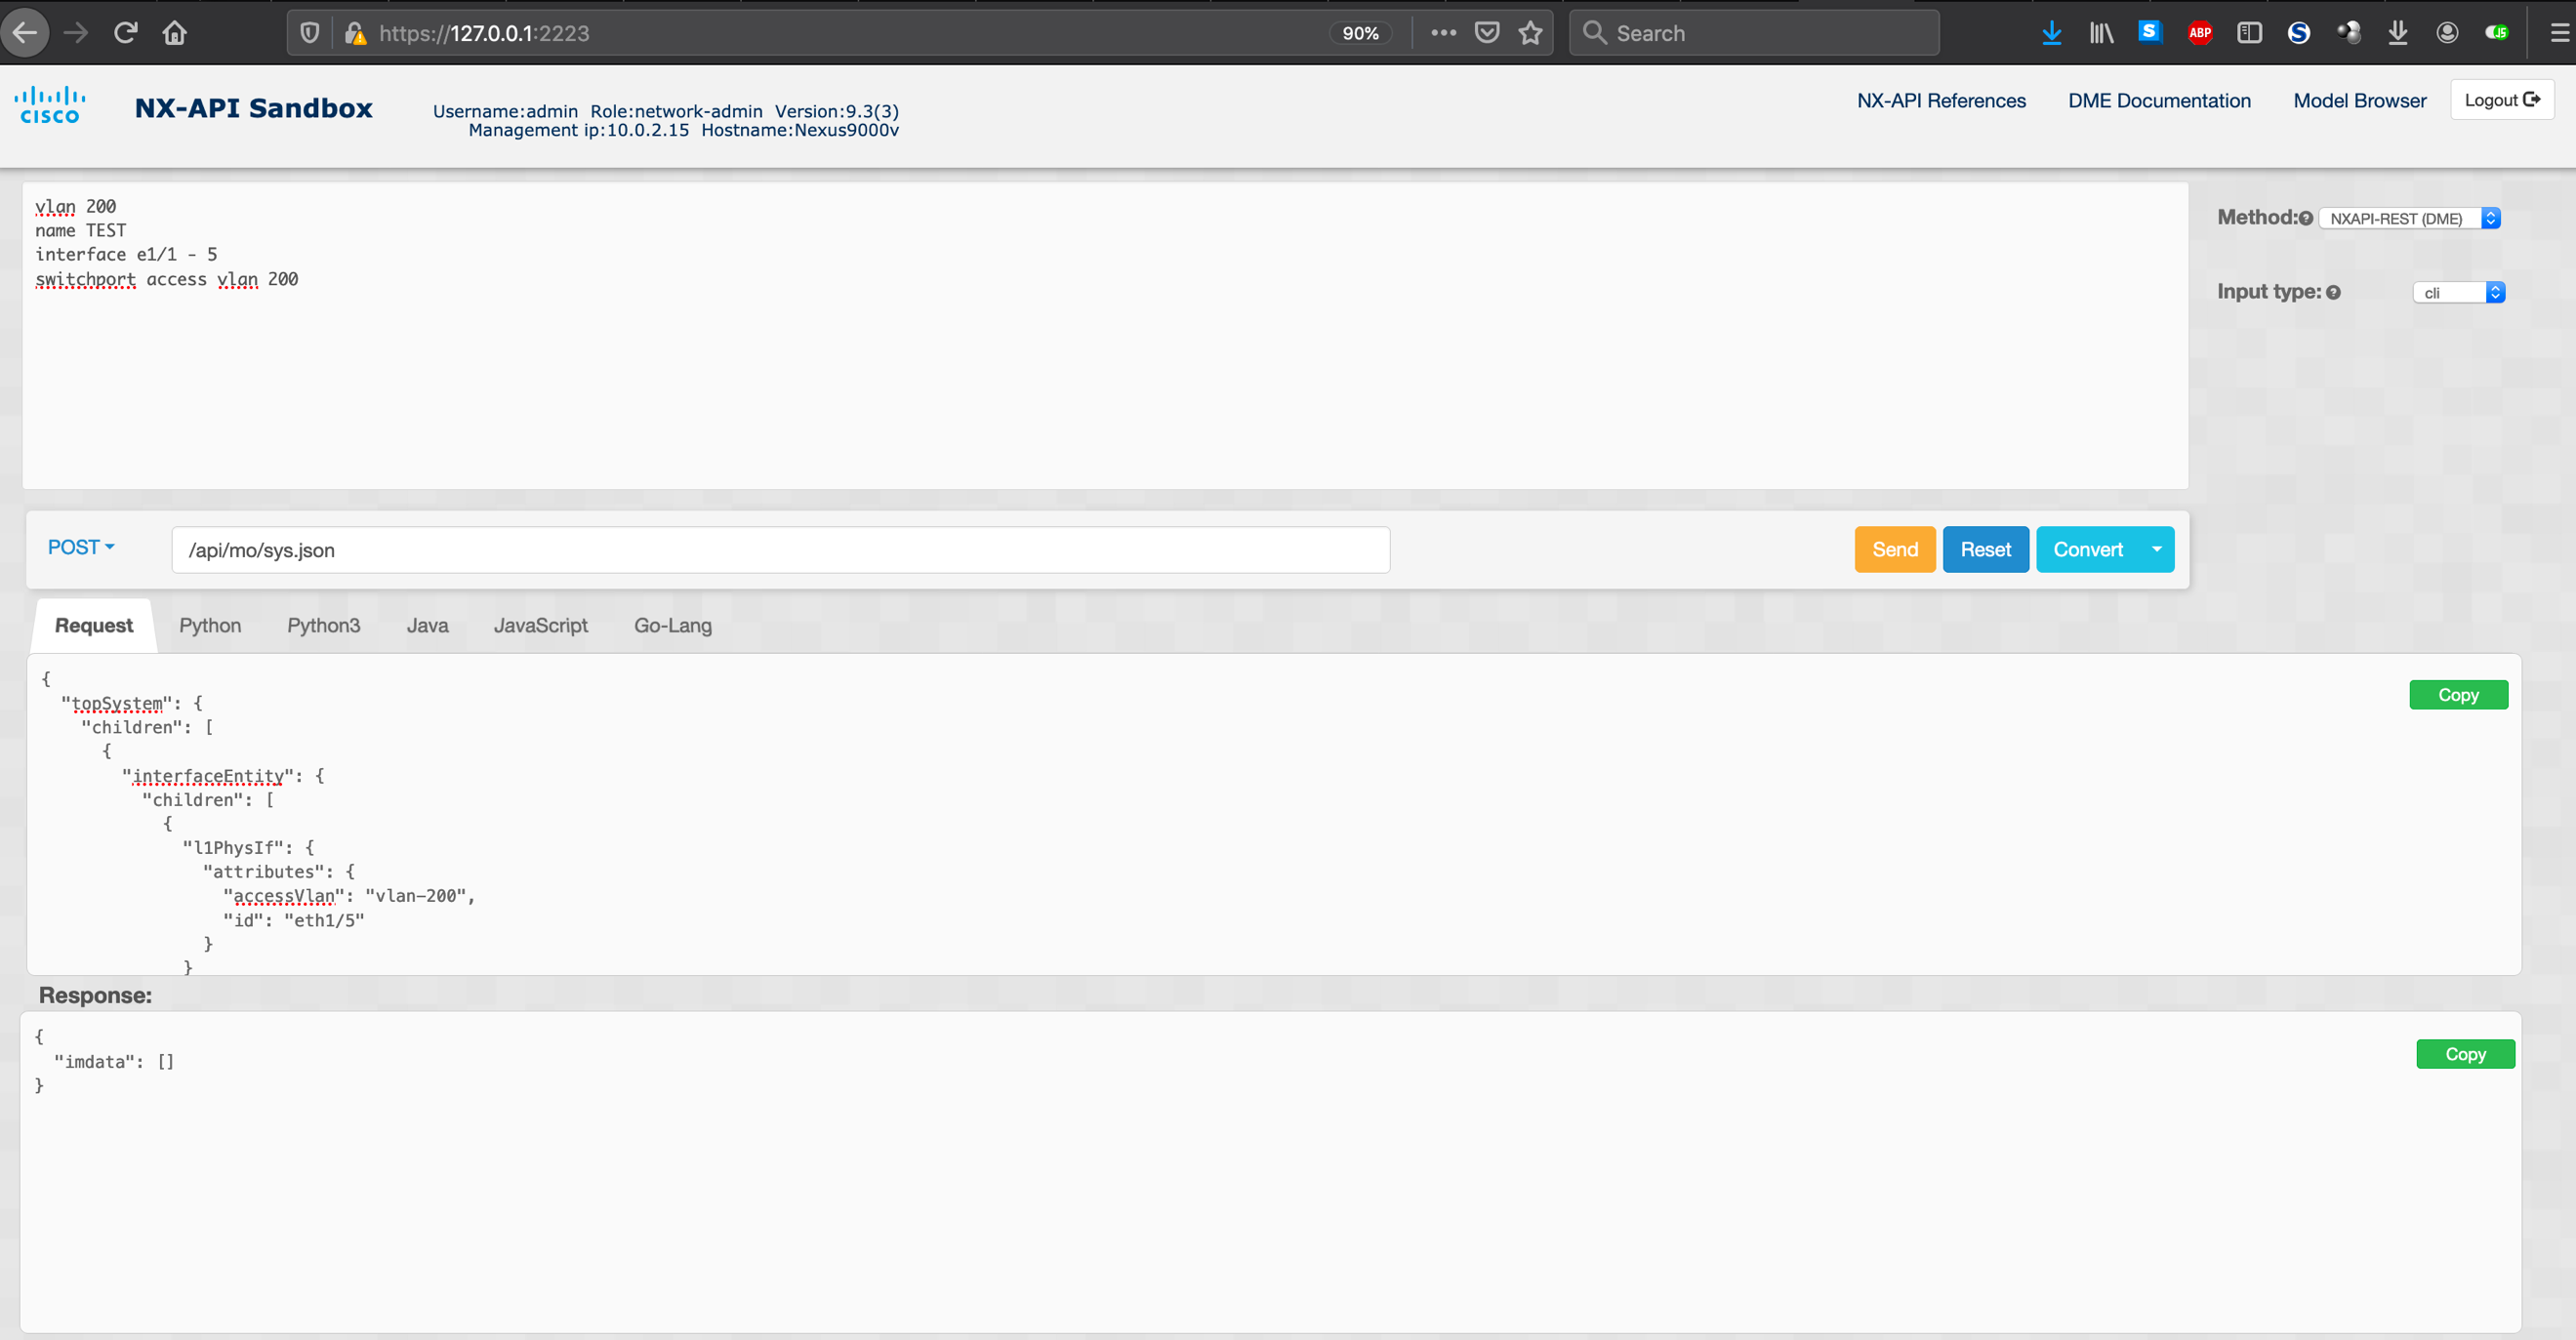 Figure 3
The JSON payload of the API request with the creation of the new VLAN and assigning the first 5 Ethernet interfaces to this new VLAN looks like the following:
{
  "topSystem": {
    "children": [
      {
        "interfaceEntity": {
          "children": [
            {
              "l1PhysIf": {
                "attributes": {
                  "accessVlan": "vlan-200",
                  "id": "eth1/5"
                }
              }
            },
            {
              "l1PhysIf": {
                "attributes": {
                  "accessVlan": "vlan-200",
                  "id": "eth1/1"
                }
              }
            },
            {
              "l1PhysIf": {
                "attributes": {
                  "accessVlan": "vlan-200",
                  "id": "eth1/3"
                }
              }
            },
            {
              "l1PhysIf": {
                "attributes": {
                  "accessVlan": "vlan-200",
                  "id": "eth1/2"
                }
              }
            },
            {
              "l1PhysIf": {
                "attributes": {
                  "accessVlan": "vlan-200",
                  "id": "eth1/4"
                }
              }
            }
          ]
        }
      },
      {
        "bdEntity": {
          "children": [
            {
              "l2BD": {
                "attributes": {
                  "fabEncap": "vlan-200",
                  "name": "TEST"
                }
              }
            }
          ]
        }
      }
    ]
  }
}
The response returned by the switch contains a JSON key value pair, with the key named imdata and the value containing the error code of the operation. If the request was successfully processed, the value of imdata is an empty array meaning there were no errors.
{
  "imdata": []
}
Verifying the running configuration on the switch, confirms that indeed the new VLAN was successfully created and the first 5 Ethernet interfaces were assigned to this new VLAN as you can see from Figure 04.
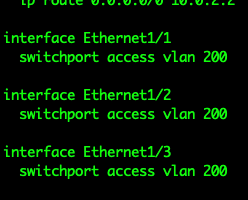 Figure 4
NX-API REST documentation available
As mentioned before, show commands are not supported with NX-API REST. In order to get the information you are interested in via the NX-API REST interface you need to know the MO and the DN for it and perform a GET API call for that value. The code generation option that was available with NX-API CLI is available with NX-API REST also.
In the case of Python, the code that is generated for NX-API REST included besides the JSON payload with the MOs and their respective DNs and values, three self-explanatory functions:
- aaa_login for logging into the switch,
- aaa_logout for logging out
- post for sending the API request to the switch.
Feel free to explore the Visore interface, the NX-API REST documentation available on https://developer.cisco.com and the NX-API Sandbox interface.
Your challenge this time
The challenge for you this time is to completely configure a Cisco Nexus switch by using the NX-API REST interface and your favorite programming language.
Let me know in the comments section about your progress and if you were able to build a configuration template for your Nexus switches that can be applied programmatically.
Stay tuned for our next blog post in which we will explore NX-SDK and how you can create your own Open NX-OS CLI commands.
We’d love to hear what you think. Ask a question or leave a comment below.
And stay connected with Cisco DevNet on social!
Twitter @CiscoDevNet | Facebook | LinkedIn
Visit the new Developer Video Channel


