
Welcome to the four-part blog series on the web-based network device monitoring tool – “johann”. Part one of the series serves as an introduction to johann. In part 2, you got a look behind the scenes of how I implemented the south-bound communication between the application and the network device with the network device API RESTCONF. Part 3 of the series focuses on the web-based application itself, with a focus on the Python Web-Framework Django. In part 4 of the series, we focus on johann deployment to production.
App Framework
The overall goal was to create a simple tool which gathers data from networking devices via device level APIs. To make it simple and platform-independent I targeted to create a web-based application. For the programming language I chose Python, mostly because of the already existing libraries for networking devices (for NETCONF I would have used ncclient for example) and also because of personal preference. When creating web-based Python applications, it basically comes down to use Django or Flask.
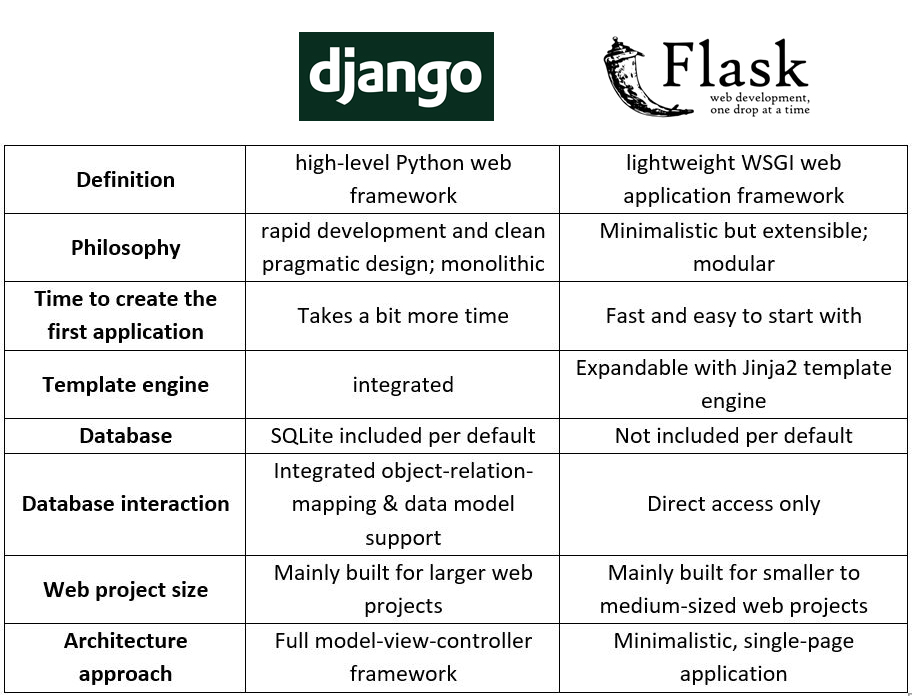
In the table above you can see the overall overview of the differences between these two most popular Python web frameworks. As you can see, Flask is at its core a WSGI framework (Web Server Gateway Interface). So basically, you create a simple Python web server based on the PEP 3333 specification with it. If you need more functionality, you can add it, for example a template engine for your HTML web pages with Jinja. Or if you want to interact with a database, you can just use any other Python library since Flask is very modular and using Python obviously.
Django, however, is a full Python web framework, which means that it has many features already integrated:
- You can simply create your HTML web pages with the integrated Django template language.
- Django official supports the following databases: PostgreSQL, MariaDB, MySQL, Oracle and SQLite (default). When using one of them, you can create your data model and even interact with your database (create, retrieve, update and delete objects) via the Django database-abstraction API. So you don’t need to know SQL and can just interact with Python code with the database.
- With the model-view-controller architecture Django gives you the ability to separately focus on these three components. You can control the exact path or URL to the resource which will be assembled out of the data you need from the database or your data model instances and with the requested HTML-page templates as well as other front-end components.
With these powerful features already integrated and the more “monolithic” approach, I decided to go for Django. For your application, I would recommend the following: If you are looking for a fast and easy implementation and just want to create a simple application to showcase some data in a browser and maybe do a configuration change via UI, stick to Flask. If you are looking for creating a larger web application similar to johann which you will use and extend also in the next years, I would go for Django.
Do you like celery?
Alright, imagine we are now in the middle of the development process: we are getting the data via RESTCONF and can display them via our Django app. But, when the user is adding devices on the web-dashboard, the user needs to wait until the operation (our RESTCONF calls) has been finished.
Why is it doing that? Well, when the user requests a page, this is usually done with a simple GET request and all the data should be available on the webserver (images, CSS, other static content, database results etc.). However, when we try to add a device, we are sending a POST request with the IP address, username and password of the device to initiate the RESTCONF calls to get the data. Especially if the user has many devices, this operation can take very long. The solution to that: Let’s start an independent background task for longer running tasks and update the front-end on its process. A popular tool to start and manage these background tasks is celery.
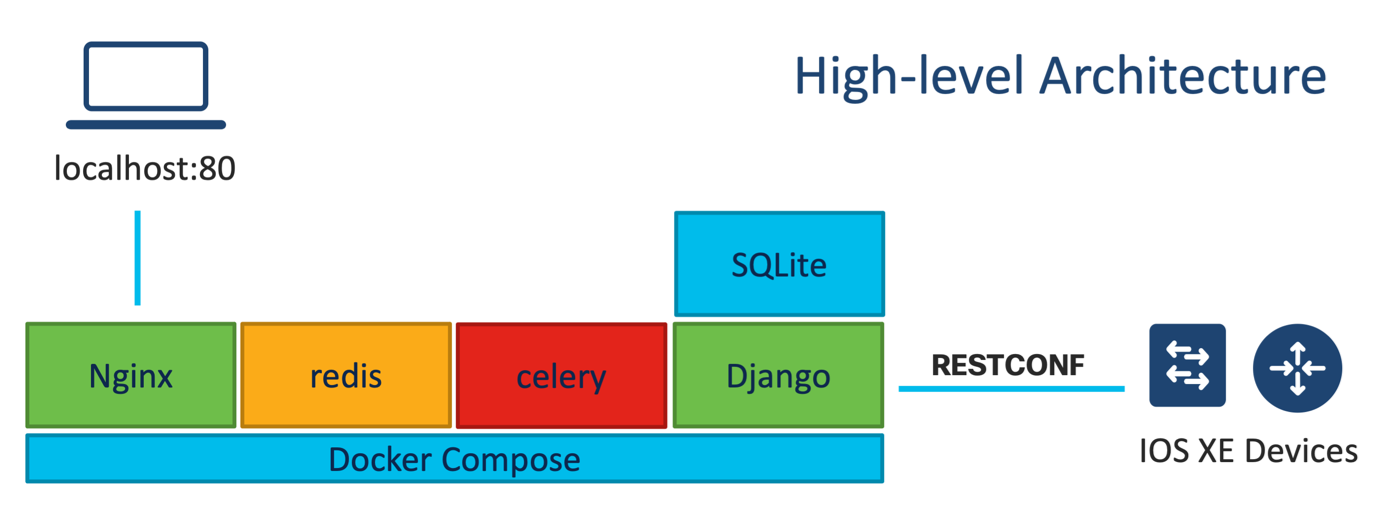
Celery is an asynchronous task queue written in Python, easy to use and very powerful for creating such background tasks. Celery requires a message transport to send and receive messages for its task queue. This can be done either with the message broker RabbitMQ, but in the case of johann the in-memory data structure store redis ( https://redis.io/ ), which also supports a message broker, is totally sufficient.
Therefore, when the user is sending the POST request to add a single device, a new celery task will be started (docker/johann/main/views.py) and the page will be sent back immediately to the user with the celery task id (this will be important for later!):
task = task_add_devices_single.delay(form.cleaned_data["device_ip"],form.cleaned_data["device_username"],form.cleaned_data["device_password"])
Now, the user can still send other requests to the webserver and doesn’t need to wait for the RESTCONF calls to be finished. This task will be done by the celery worker. If there are more tasks, they will line up in the queue and if the hardware resources allow it, they can run also in parallel. The task function is defined in docker/johann/main/tasks.py. You can see below in the code that you can also send updates of the current task status to give the user more information on what operation is currently in progress.

To make it more tangible for you, I have created a sequence diagram on the device adding process from the front-end to the back-end. As you can see below, we are sending the device credentials and a new celery task will start (process above the red line). But how do we update the user if the task was successful or not? This is where WebSockets come into play (starting from the process below the red line).

Using WebSockets with Django Channels
WebSockets are a very popular and powerful tool to send and receive data from the client to the server without reloading the page. A WebSocket is providing full-duplex communication channels over a single TCP connection which means it supports bi-directional communication. Its protocol got standardized in 2011 as RFC6455 and is widely used.
When using Django, you can implement WebSockets with Django Channels. At first, it may seem complex, but after doing the tutorial (sample chat application), you will get to know the architecture and how to integrate it with Django. After switching our Python application from WSGI to its de-facto successor ASGI, our Django application gains the support of handling multiple protocols such as WebSockets.
On the back-end, we at first create a routing configuration (docker/johann/main/routing.py) which will redirect to our WebSocket consumer “StatusConsumer” (docker/johann/main/consumers.py) when the server accepts the Websocket connection. You can see in the WebSocket consumer all the functions which will be executed when a new Websocket connection will be established and messages from the client will be sent and received.
On the frontend, we need to initiate the WebSocket connection which will be done with Javascript. Let’s take a look again on the sequence diagram below the red line: When the user is adding the device, the server is starting the celery task, but also sending back the task id. In the background, a WebSocket connection will be established and every 2 seconds the task status (via the respective task id) is queried from the WebSocket consumer in the back-end (docker/johann/main/static/main/js/dashboard_helper.js).
And that’s it! The task status will be updated every 2 seconds to the front-end and if the task is finished, the successful results or error messages will be displayed.
Do you have a question or comment?
Please leave me a comment in the section below. I hope this blog was helpful to you in your NetDevOps / Device API journey! Stay tuned for Part 4 where we will take a closer look at packaging and deploying johann!
Resources
- Flexing the Network Device API Muscles with johann – Part 1: Introduction
- Getting Data via RESTCONF – Flexing the Network Device APIs Muscles with “johann” Part 2
- Deploying Your Django App to Production – Flexing the Network Device APIs Muscles with johann, Part 4
- Download, test,and view the source code of johann from DevNet Code Exchange
- Learn more about model-driven-programmability
- Django
We’d love to hear what you think. Ask a question or leave a comment below.
And stay connected with Cisco DevNet on social!
Twitter @CiscoDevNet | Facebook | LinkedIn
Visit the new Developer Video Channel


Hi Flo,
Can it be added to CI/CD?
Hey Alan, for now johann itself is an independent application without any APIs and only reading data from the devices. But there can be a possible extension which can include a sort of CI/CD pipeline.