
If you haven’t already seen Part 1 of this blog series, please have a read through. This section will cover ACI + Terraform, and we’ll include a couple of new topics – Terraform importing and data resources.
- Introduction to Terraform
- Terraform and ACI
- Explanation of the Terraform configuration files
- Terraform Remote State and Team Collaboration
- Terraform Providers – How are they built?
Code Example
https://github.com/conmurphy/intro-to-terraform-and-aci
Lab Infrastructure
You may already have your own ACI lab to follow along with however if you don’t you might want to use the ACI Simulator in the DevNet Sandbox.
Terraform ACI Provider and Resources
As explained in the previous post, a Terraform provider is responsible for understanding API interactions and exposing resources.
A Terraform resource describes one or more infrastructure objects, for example in an ACI Tenant, EPG, Contract, BD.
This post will cover the ACI Terraform Provider which includes a large number of resources.
The full list of available resources can be found from the following link.
https://www.terraform.io/docs/providers/aci/index.html

Terraform Resource vs Data Sources
Until now we’ve only looked at the provider resource, for example “aci_tenant”.
resource "aci_tenant" "my_terraform_tenant" {

  name        = "tenant_for_terraform"
  description = "This tenant is created by the Terraform ACI provider"

}
Terraform also includes a concept known as data sources.
Data sources allow a Terraform configuration to make use of information defined outside of Terraform, or defined by another separate Terraform configuration.
https://www.terraform.io/docs/configuration/data-sources.html
It’s important to note that while resources are read/write, data sources are read only. This means we can include information in our configuration file for objects that we may not manage.
For example in the case of ACI, perhaps we want to manage our own app profiles and EPGs in a shared tenant however don’t want Terraform to have any control of the tenant itself.
We can define the shared elements (tenant, BD, VRF, contracts etc) as data sources (read only), and the ANP/EPGs as resources which will be created and deleted by Terraform.
provider "aci" {
  # cisco-aci user name
  username = "${var.username}"
  # cisco-aci password
  password = "${var.password}"
  # cisco-aci url
  url      =  "${var.apic_url}"
  insecure = true
}

data "aci_tenant" "my_shared_tenant" {
  name = "my_shared_tenant"
}

data "aci_bridge_domain" "my_shared_bd" {
  tenant_dn   = "${data.aci_tenant. my_shared_tenant.id}"
  name        = "my_shared_bd"
}

resource "aci_application_profile" "terraform_app" {
  tenant_dn = "${data.aci_tenant. my_shared_tenant.id}"
  name       = "demo_app_profile"
}

resource "aci_application_epg" "my_web_epg" {
    application_profile_dn  = "${aci_application_profile.terraform_app.id}"
    name                            = "db_epg"
    description                   = "%s"
    annotation                    = "tag_epg"
    exception_tag               = "0"
    flood_on_encap            = "disabled"
    fwd_ctrl                    = "none"
    has_mcast_source            = "no"
    is_attr_based_e_pg      = "no"
    match_t                         = "AtleastOne"
    name_alias                  = "alias_epg"
    pc_enf_pref                 = "unenforced"
    pref_gr_memb                = "exclude"
    prio                            = "unspecified"
    shutdown                    = "no"
  }
As you can see above we have defined two data sources (my_shared_tenant and my_shared_bd). These are then referenced in the aci_application_profile resource using the format, “${data.aci_tenant. my_shared_tenant.id}“.
Remember from the previous post that some properties such as IDs are computed behind the scenes without the need to hard code values.
NOTE: You’ll need to ensure that any data sources you’re referencing already exist in the ACI fabric. For example the bridge domain, “my_shared_bd”, already exists in the tenant, “my_shared_tenant” in our lab. If these data sources don’t already exists you will receive an error.
So using these two concepts we can build the desired configuration for our ACI fabric. Some Terraform ACI configuration has already been provided above and in the previous post. To help you get started the ACI Business Unit have created a large number of example configuration files which you can find from the following link.
https://github.com/terraform-providers/terraform-provider-aci/tree/master/examples
Additionally, for any customer configuration you may want to create, the following document includes the entire list of available resources for the ACI provider.
https://www.terraform.io/docs/providers/aci/index.html
These resources should give you a good start on your journey to managing ACI with Terraform.
But wait, there’s more! There are a couple of questions that are often asked in relation to the ACI provider.
- Is this only for greenfield deployments?
- Can I configure everything through Terraform?
- What happens if I manually configure ACI?
Importing With Terraform
ACI may already exist in many customer environments when they start to use Terraform. Alternatively, a customer new to ACI and Terraform may not want to learn both at the same time, choosing to first learn ACI and then migrate configuration to Terraform.
Luckily Terraform supports (for some providers) the importing of existing configuration to address these common scenarios.
terraform import
Remember there are two main files we’re working with, the configuration (.tf) and the state (terraform.tfstate) files.
Currently the “Terraform Import” command will only import what it learns about the existing infrastructure into the state (terraform.tfstate) file. It will not automatically append this into the configuration file.
This is a manual process you must complete.
https://www.terraform.io/docs/import/index.html
Step 1 – Add the new resources to the configuration (.tf) file.
resource "aci_tenant" "myTenant" {
}
You only need to define the resource.
If you configure a property such as a name and then import from an existing resource, the values will be overwritten.
resource "aci_tenant" "myTenant" {
  name = “myTenant1”
}
In this example if the ACI tenant is named “myTenant”, when first importing Terraform will use “myTenant” in the state file. The configuration file is not updated on an import and therefore “myTenant1” will not be changed. Later when you run the apply command, Terraform will update the ACI fabric with the new name, “myTenant1”
Step 2 – Run the import command
Terraform identifies ACI objects with their Distinguished Name (Dn) and the Terraform resource ID is the absolute path of ACI object in the DMIT.
For example, the ID of an ACI tenant, myTenant, is uni/tn-myTenant. The ID of an ACI VRF, vrf1, in myTenant is uni/tn-myTenant/ctx-vrf1
The import command is used as follows:
terraform import <resource name> <resource id>
e.g terraform import aci_tenant.myTenant uni/tn-myTenant
We added the aci_tenant.myTenant resource to the configuration file in Step 1. This command is now assigning an ID, the ACI Tenant Dn (uni/tn-myTenant), to the resource and will also import existing configuration.
Step 3 – Repeat for all required resources
This used the ACI tenant as an example however you may also need to import other resources such as bridge domains, VRFs, EPGs, contract. You would repeat the steps above for each of these resources. First add them all as resources and then run the import command referencing the name of the resource and the ACI Dn as ID.
ACI REST Resource
There are many properties of ACI that can be configured, however not all exist as Terraform resources in the ACI provider. For this reason the aci_rest resource was created and allows you to configure ACI Objects through the REST API. Any Model Object that is not supported by the provider can be created/managed using this resource.
As a result, anything that can be configured through the ACI REST API can be configured and managed by Terraform. Either through a native resource (e.g. aci_tenant), or using the API (aci_rest resource).
Here’s an example of creating an L3Out.
resource "aci_rest" "rest_l3_ext_out" {
path = "/api/node/mo/${aci_tenant.tenant_for_rest_example.id}/out-test_ext.json"
class_name = "l3extOut"
content = {
"name" = "test_ext"
}
}These is the same configuration you would find in a Python script making raw calls to the ACI API, only this is wrapped in a Terraform resource.
Note as well that you can still reference existing variables or properties such as the aci_tenant id.
https://www.terraform.io/docs/providers/aci/r/rest.html
Config Drift
“What happens if someone manually configures a resource Terraform is managing?”
This is a common question not only for Terraform but anytime we are using external tools to manage infrastructure.
In the case of ACI we can test it out and see what happens.
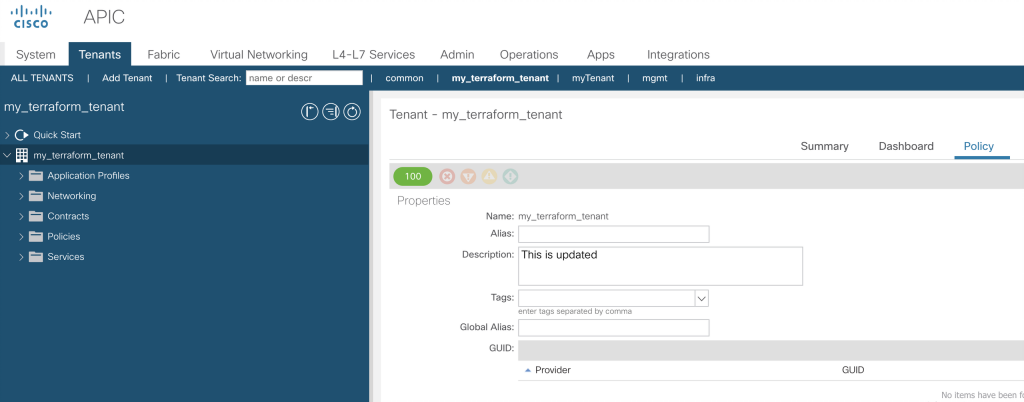
Step 1 – First create a tenant, my_terraform_tenant, with the following description.
resource "aci_tenant" "my_terraform_tenant" {
  name        = "tenant_for_terraform"
  description = "This tenant is created by the Terraform ACI provider"
}
Step 2 – Login to the GUI and under the Tenant -> Policy, update the description.
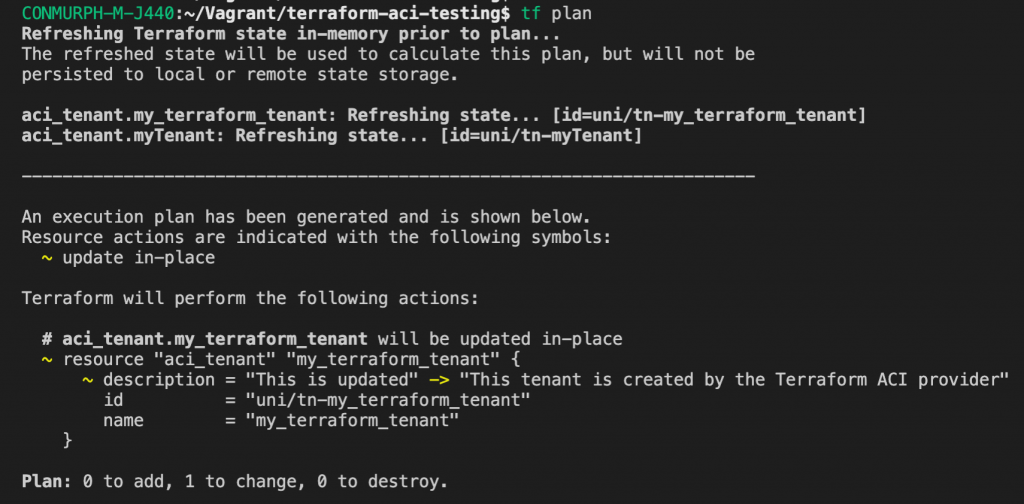
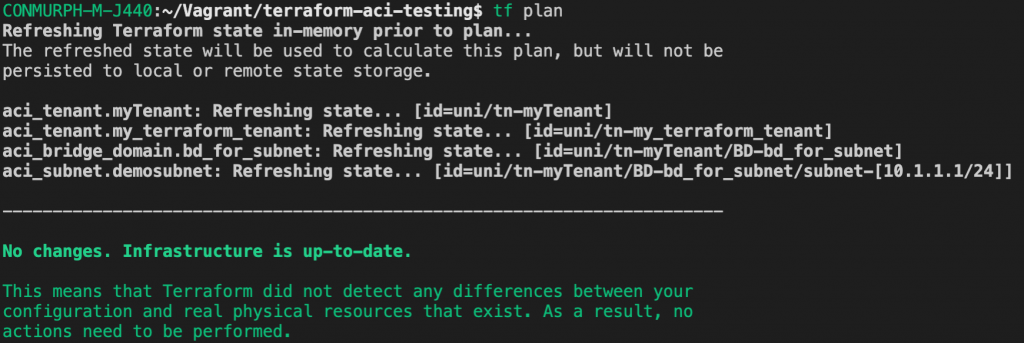
Step 3 – Run the terraform plan command and see what will happen
You should see that one change will be made to reconfigure the tenant description.
This validates what we have previously learnt. Terraform will attempt to maintain consistency between the desired configuration (.tf files) and the current state (terraform.tfstate file) of the infrastructure. If it notices that the state has been changed (manually in our case), it will reconfigure the infrastructure.
Modifying Attributes vs Resources
Be aware that the outcome above may not always be the same when working with Terraform and ACI. Let’s run another test and see what happens.
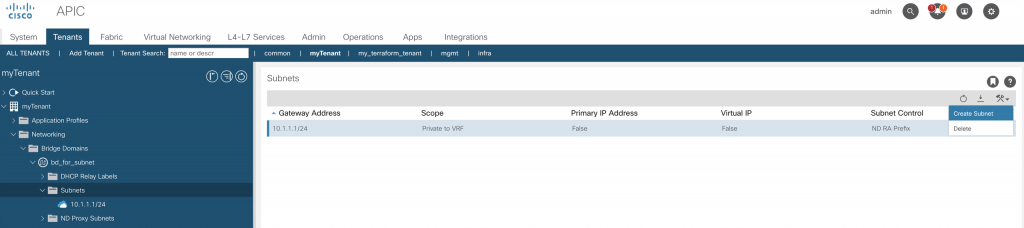
Step 1 – Create a tenant, BD, and subnet with the following configuration.
resource "aci_tenant" "myTenant" {
name = "myTenant"
}
resource "aci_bridge_domain" "bd_for_subnet" {
tenant_dn = "${aci_tenant.myTenant.id}"
name = "bd_for_subnet"
description = "This bridge domain is created by the Terraform ACI provider"
}
resource "aci_subnet" "demosubnet" {
bridge_domain_dn = "${aci_bridge_domain.bd_for_subnet.id}"
ip = "10.1.1.1/24"
scope = "private"
description = "This subject is created by Terraform"
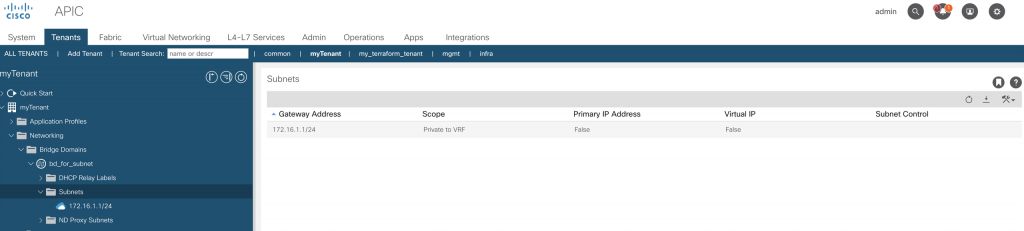
}Step 2 – Through the ACI GUI, create a new subnet in the same bridge domain. I’ve used 172.16.1.1/24 as an example.
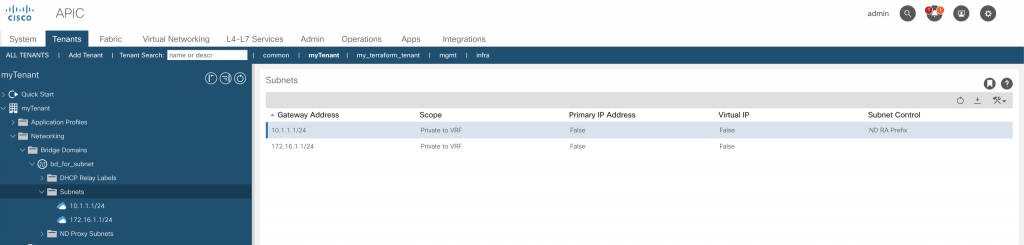
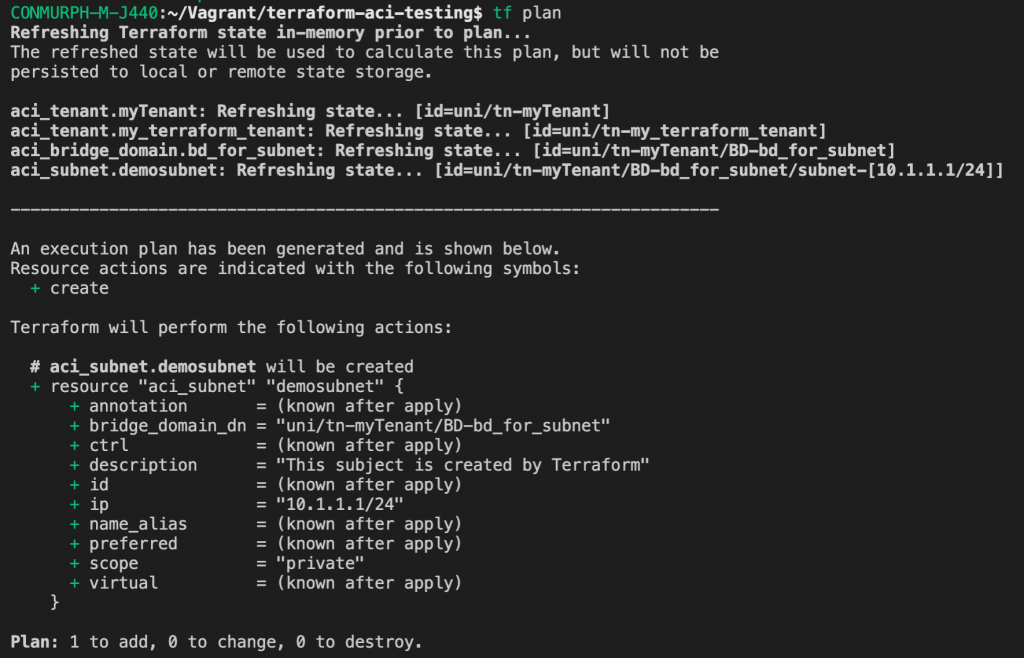
Step 3 – Run the terraform plan again and have a look at the output. You shouldn’t see any changes.
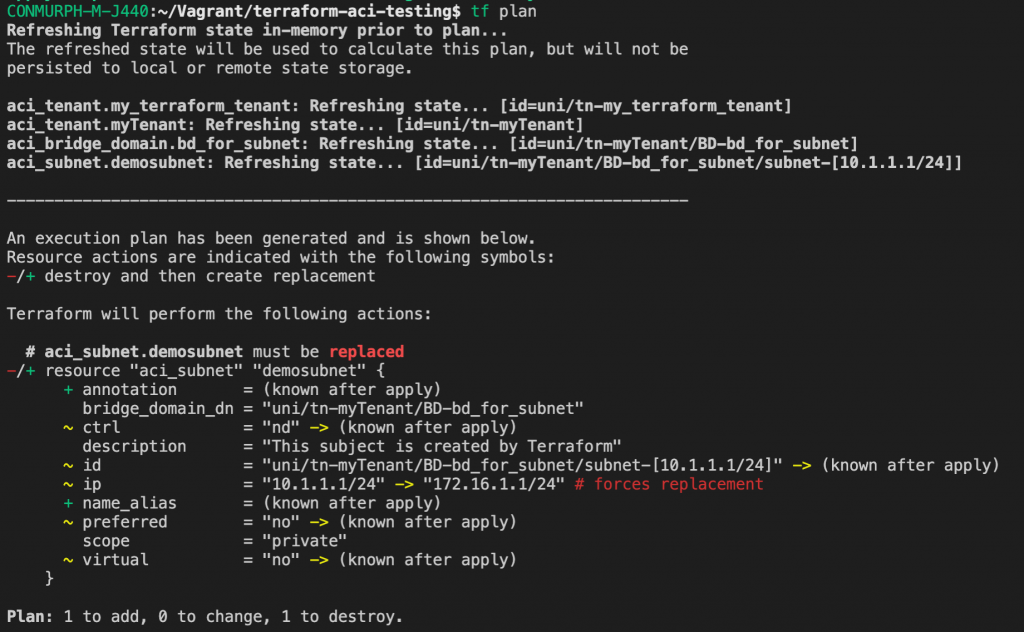
Step 4 – Delete the 10.1.1.1/24 subnet from the bridge domain, keeping the new subnet.
Step 5 – Run another plan and see the output. You should see that Terraform will add back the 10.1.1.1/24 subnet when applied. However it doesn’t know about the new subnet ,172.16.1.1/24, so this is left untouched.
This means we again have two subnets on the bridge domain.
Why is this happening?
Terraform tracks resources by an ID and a name. When it notices that a property (e.g. description) in a resource (e.g. aci_tenant) has changed, it updates the infrastructure to match what is in the configuration file. This is what happened with the description. Note that the ID and name of the resource didn’t change, it was still the same ACI tenant.
If you’ve worked with ACI you’ll know that you can’t rename objects. This is inherent to how ACI stores information. All objects have a unique distinguished name and this name is used when connecting various objects together. You can see this in the configuration above where a subnet points to the distinguished name of the bridge domain in which it resides.
As also previously mentioned, the Terraform ACI provider uses the Dn as the ID for the resource.
In the case of ACI a subnet is an object with a distinguished name. Since we can’t edit the name (10.1.1.1/24) we need to delete it and recreate it with a different name (172.16.1.1/24). This results in a new object and Dn and therefore a new Terraform resource and ID.
However the old subnet resource (10.1.1.1/24) still exists in the Terraform state file, while the new one hasn’t been imported. As a result, Terraform re-implements the 10.1.1.1/24 subnet and nothing happens to the 172.16.1.1/24 subnet.
If you update the subnet in the Terraform configuration file you’ll see that Terraform takes care of the “renaming”. It will first delete the old subnet and then recreate a new one, making it appear as though it has been renamed.
Final Thoughts
Terraform is an extremely powerful and flexible tool however as you’ve seen so far, there are cases that may result in unexpected behaviour. Like any deployment, it’s always best to understand how you will use Terraform in your environment. The ACI simulator is a great way to learn, test, and plan any changes you wish to make before pushing to production.
References
https://www.terraform.io/docs/import/usage.html
https://www.terraform.io/docs/providers/aci/r/rest.html
https://developer.cisco.com/site/aci/
We’d love to hear what you think. Ask a question or leave a comment below. And stay connected with Cisco DevNet on social!
Twitter @CiscoDevNet | Facebook | LinkedIn
Visit the new Developer Video Channel


