In this blog about the design, deployment and automation of the Black Hat Asia network, we have the following sections:
- Designing the Black Hat Network
- AP (Access Point) Placement Planning, by Uros Mihajlovic
- Security Center Investigations, by Uros Mihajlovic
- Meraki and ThousandEyes, by Uros Mihajlovic
- Meraki Dashboards, by Steven Fan
- Meraki Alerting, by Connor Loughlin
- Meraki Systems Manager, by Paul Fidler
- Building Tools for Black Hat Staff, by Ryan MacLennan
- A Better Way to Design Training SSIDs/VLANs, by Paul Fidler
Cisco is honored to be a Partner of the Black Hat NOC (Network Operations Center), and was the Official Network Equipment, Mobile Device Management, Malware Analysis, and DNS (Domain Name Service) Provider of Black Hat Asia 2023.
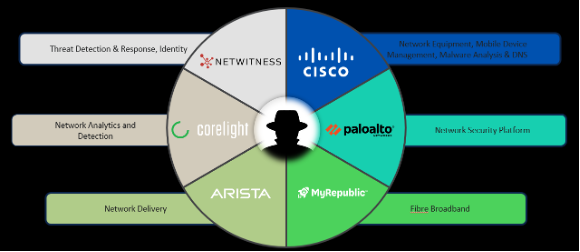
This was Cisco’s seventh year as a NOC partner for Black Hat Asia and the second time building the network. Below are our fellow NOC partners providing hardware, contributing to build and secure the network for our joint customer: Black Hat.
Designing the Black Hat Network
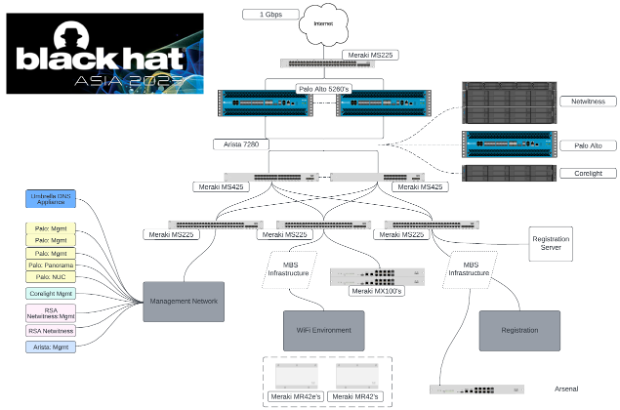
We used the experiences of Black Hat Asia 2022, Black Hat USA 2022 and Black Hat Europe 2022 to plan the network topology design and equipment, with Black Hat, and the NOC partners.
It was a team effort to build an enterprise level network in 2 ½ days. We appreciate the hard work of the 12 Cisco Meraki and Cisco Secure engineers on site (plus four virtually supporting engineers) to build, operate and secure the network; and great NOC leadership and collaborative Partners.
Building this network is a challenge. On one hand, we must allow real malware on the Black Hat network for training, demonstrations, and briefing sessions. On the other, we need to protect the attendees from attack within the network from their fellow attendees and prevent bad actors from using the network to attack the Internet.
It is a critical balance to ensure everyone has a safe experience, while still being able to learn from real world malware, vulnerabilities and malicious websites.

In addition to the weekly meetings with Black Hat and the other partners, the Cisco Meraki engineering team also discussed the challenges in a Webex space, with other engineers who worked on past Black Hat events.
The mission:
- Deploy 63 (11 spares) Meraki access points to provide Wi-Fi to 10 training courses, dozens of briefings, keynotes, and the Business Hall
- Deploy 63 ten-foot (three meter) tripods and brackets provided to Black Hat by Cisco Meraki global events
- Deploy seven Meraki cloud managed switches (one spare) and three Meraki MX security appliances to connect with the partner appliances and provide host isolation to the conference network attendees
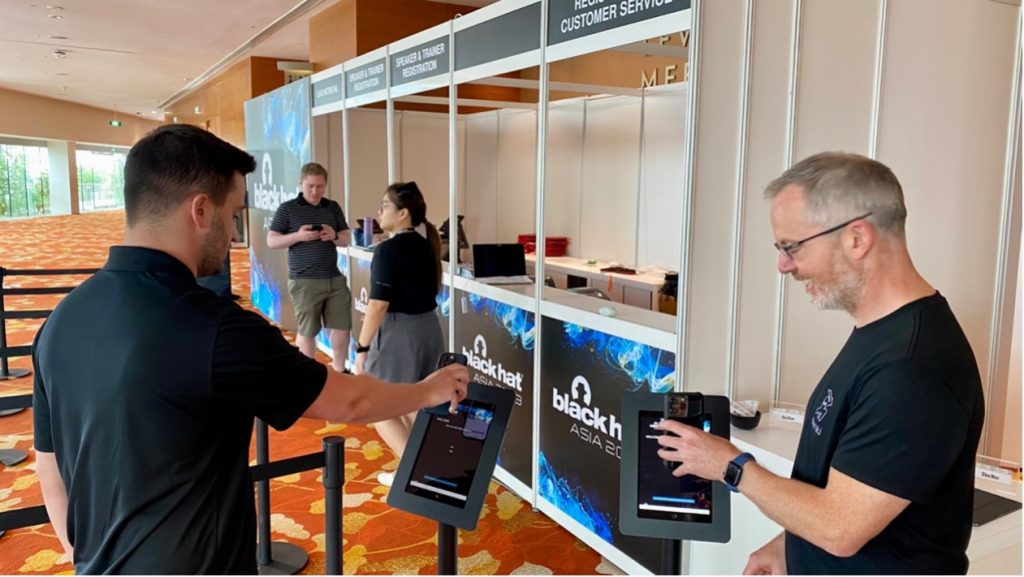
- Manage dozens of iOS registration and lead management devices, secured by Meraki Systems Manager, Umbrella and by the Cisco Security Connector for iOS
Division of labor is essential to reduce mistakes and stay laser focused on security scope. Uros ensured every AP and Switch was tracked, and the MAC addresses were provided to Palo Alto Networks for DCHP assignments. Stephen and Connor spent two days in the server room with the NOC partners, ensuring every switch was operating and configured correctly.
AP Placement Planning, by Uros Mihajlovic
In the weeks before deployment, Jeffry Handal focused on planning and creating a virtual Wi-Fi site survey. Multiple requirements and restrictions had to be taken into consideration. The report was based on the Marina Bay Sands floor plan and the space allocation requirements from Black Hat. Fortunately, we had more APs available to us than required.
Below is the Signal Strength plan for the 4th floor of the conference centre on the 5 GHz band.
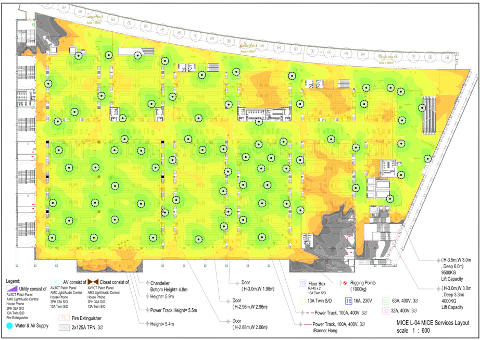
Using the experience of Black Hat Asia 2022, discussing the requirements of Black Hat and working with the Marina Bay Sands IT, we finalized the AP deployment plan prior to arrival. We also grouped access points per room, so we could correctly deploy them in relevant spaces. This also allowed Marina Bay Sands IT team to accurately lay out necessary cabling for the access points.
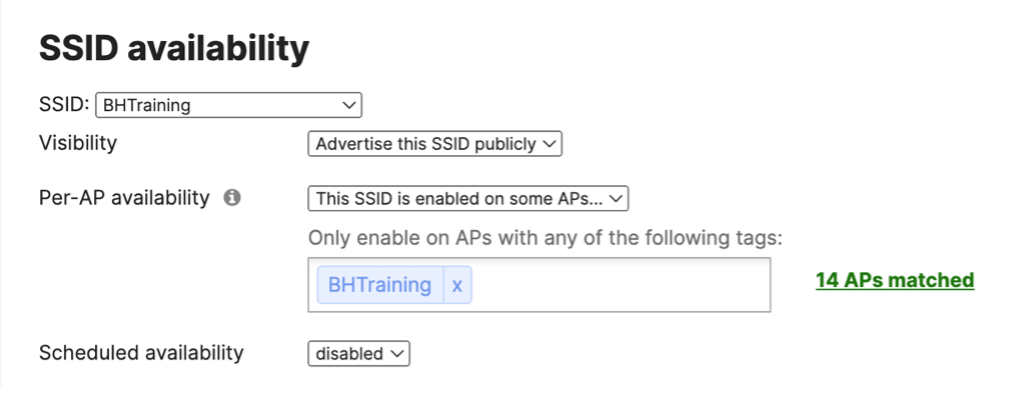
Before the APs were even online, we configured any necessary settings in the Meraki dashboard. This involved wireless radio profiles, SSID configuration, traffic shaping rules, etc. In addition to general Black Hat SSID for all attendees, we also had special SSIDs that should broadcast only in specific areas. Using Cisco Meraki’s SSID availability feature, we could tag access points accordingly to their location, which allowed us to broadcast appropriate SSIDs.
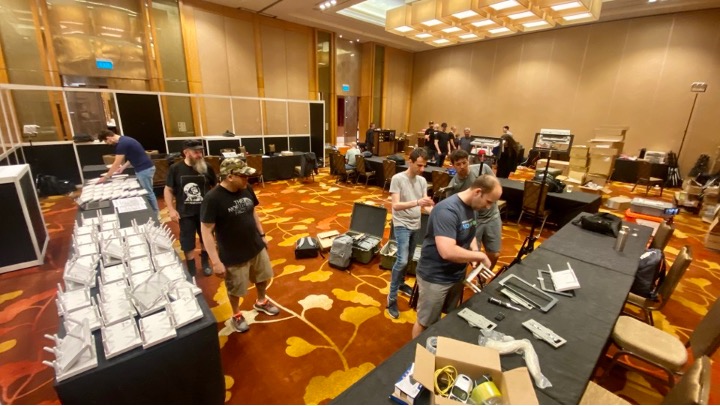
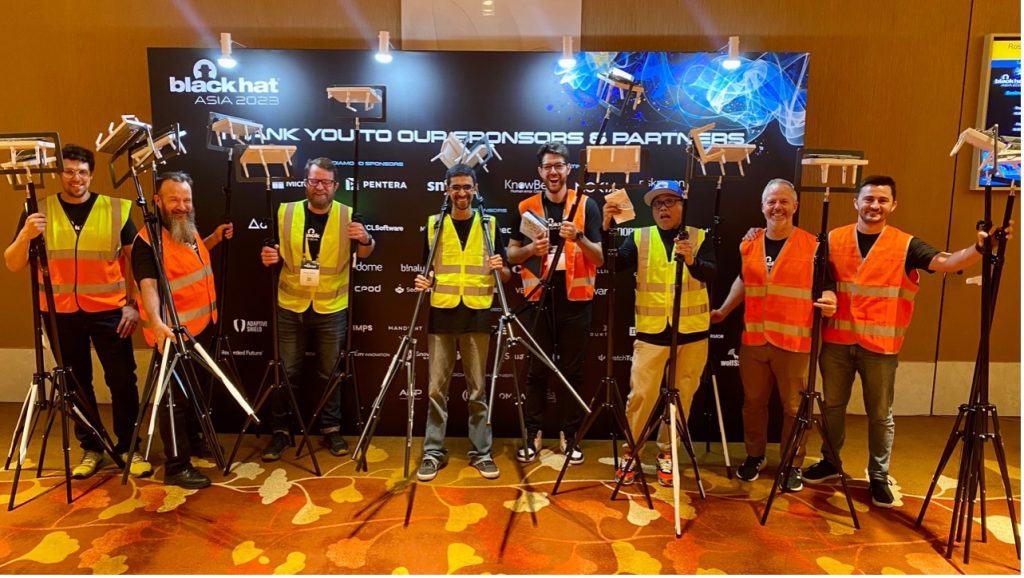
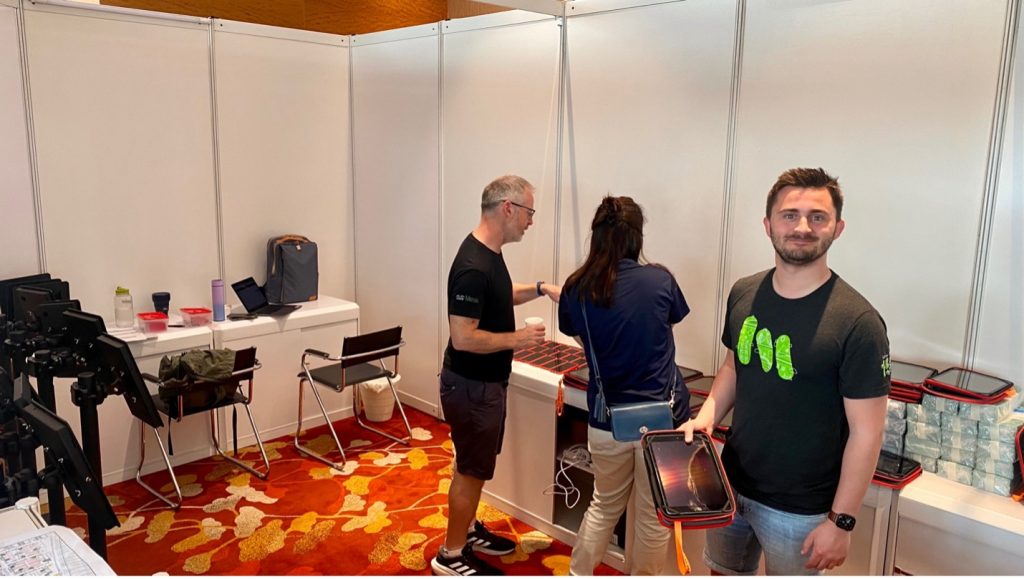
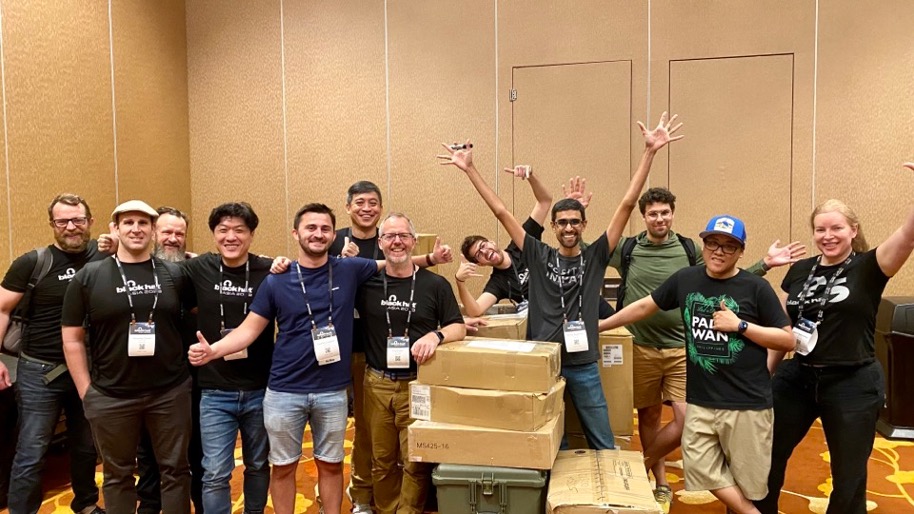
As the APs had been pre-staged and added to the Meraki dashboard, including their location on the floor maps, the main work was placing and cabling them physically. Thanks to good planning, we could start deploying the 63 APs as soon as the conference space was available, with only a small number of changes to optimize the deployment on-site. With a helping hand from our Cisco Security colleagues, we swiftly deployed tripods around the venue. As you can see from the image below, this was also a great team bonding experience.
During operations, the floor plans in the Meraki Dashboard were a visual help to easily spot a problem and navigate the team on the ground to the right spot, if something had to be adjusted.
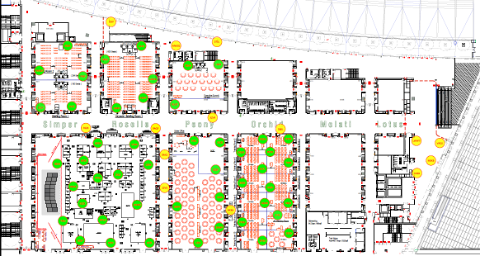
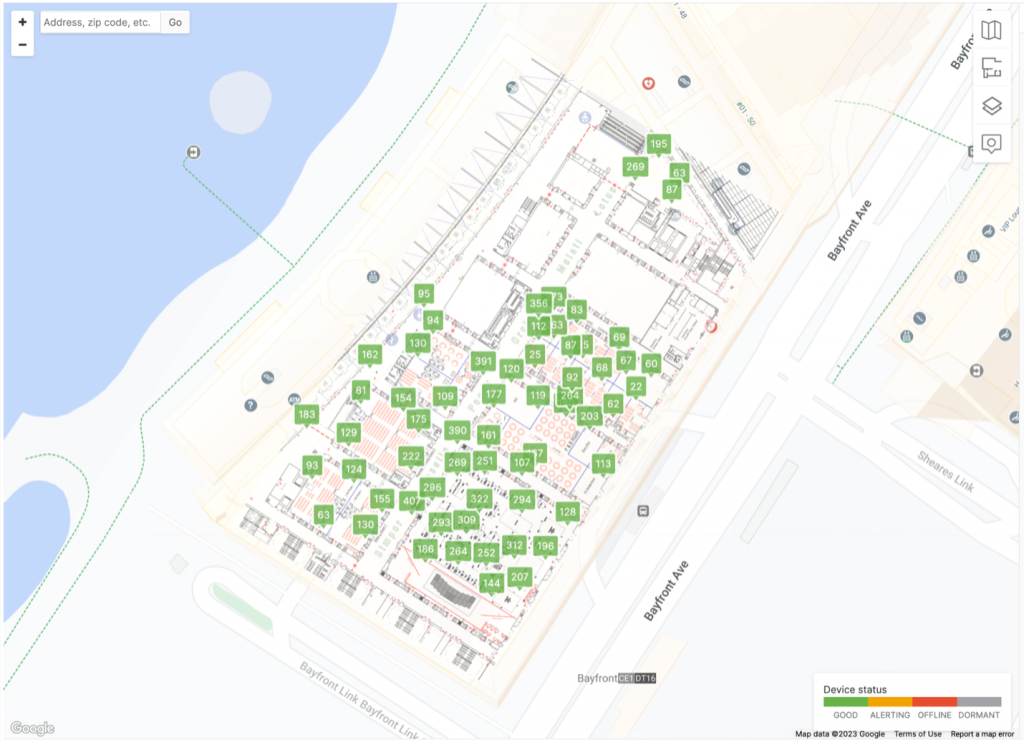
As the sponsors and attendees filled each space, in the Meraki dashboard, we were able to see in real-time the number of clients connected to each AP, currently and over the time of the conference. This enabled quick reaction if challenges were identified, or APs could be redeployed to other zones. Below is the Marina Bay Sands Level 4. We could drill into any AP, as needed.
Meraki’s built-in Location Analytics helped us visualize physical space utilization. We could see the number of attendees who passed through the covered area of the conference, without them even connecting to the network. This gave us insights into visitor footfall trends, such as areas of interest, most visited booths, classrooms, or sessions. For example, below you can see the 2nd day of training, with busy classrooms, while Business Hall in setup. You might also notice long dwell times closer to the area overlooking the bay.
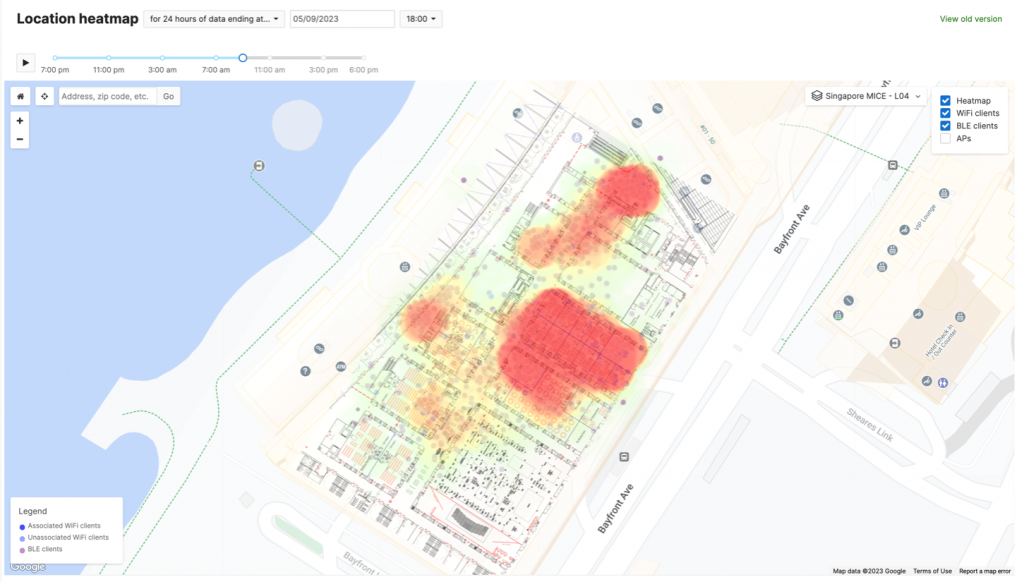
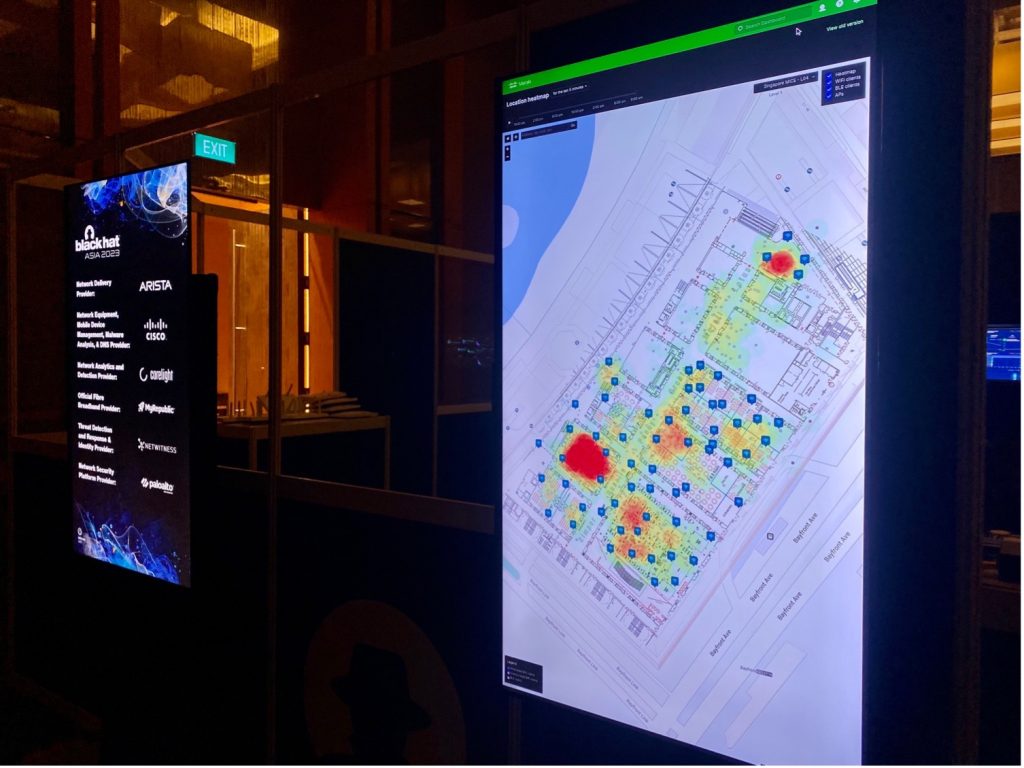
The Location Heatmap was displayed live outside the NOC. Below you can see the 9am Opening Keynote on 11 May, before the Business Hall opened.
Physical security is also an important aspect of cybersecurity. We need to know how devices move in space, know where valuable assets are located, and monitor their safety. Christian Clasen takes this available data to a new level in Part 2 of the blog: Correlating Meraki Scanning Data with Umbrella DNS Security Events.
Meraki wireless network allowed us to provide a consistent and exceptional experience to event visitors and staff. Each day, on average more than 500 clients connected to the wireless network.
Security Center Investigations, by Uros Mihajlovic
During our time in the NOC, we had the chance to work with other vendor engineers and some use cases that came up led to interesting collaborations. We actively looked for violations of the Black Hat Code of Conduct. Examples are using the network as a platform to attack the Internet, attacking others on the network and/or disrupting the network.
These alerts were viewed in the Security & SD-WAN -> Security Center -> MX Events. Look for Part 2 of this blog to learn about this investigation and response: Script Kiddie gets a Timeout, by Ben Greenbaum and Shawn Coulter

We were able to easily identify the client’s approximate location based on the access point they were connected to. Client location allowed us to identify where the client was in a physical location.
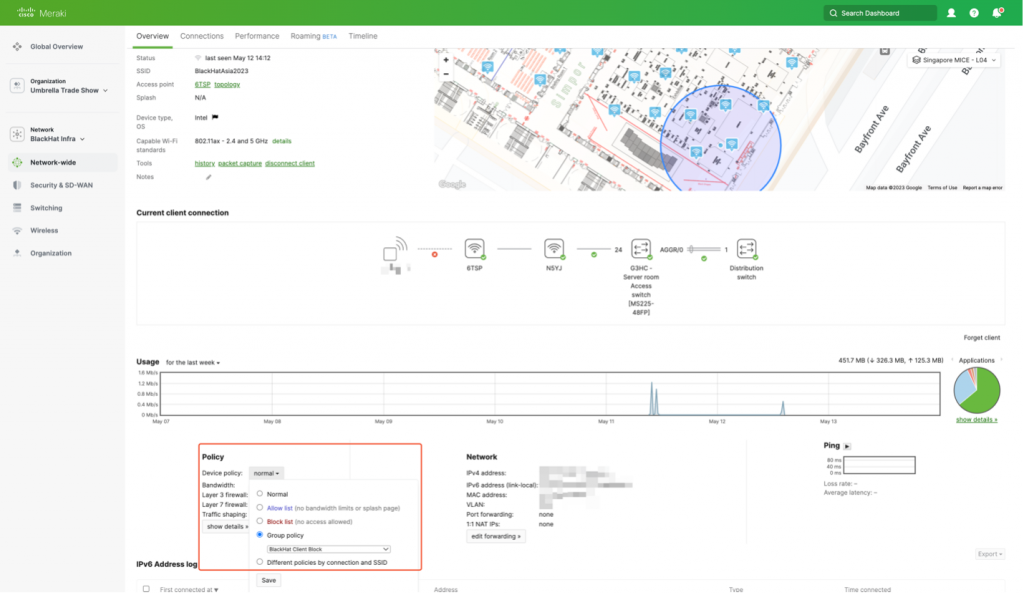
If the behavior continued and we needed to block wireless clients, we could easily do so by attaching a group policy through the Meraki Dashboard, including a quarantine VLAN and a splash page. In addition, we could use a script that can be triggered through the interfaces of the other security products to apply the same group policy via the Meraki APIs (Application Programming Interfaces). This integration was just one of the many collaboration bits that we worked on.
Meraki and ThousandEyes, by Uros Mihajlovic
At the conference, an important sales application, used for engaging with event prospects, was having issues connecting to the server. The sales team reached out to the NOC leaders to report the application slowness, which they suspected might be due to our network.
Using Meraki Wireless Health, we could easily inspect client performance and wireless experience. Observing the full stack map from the client perspective also showed that upstream switching infrastructure is not reporting any performance or latency issues.
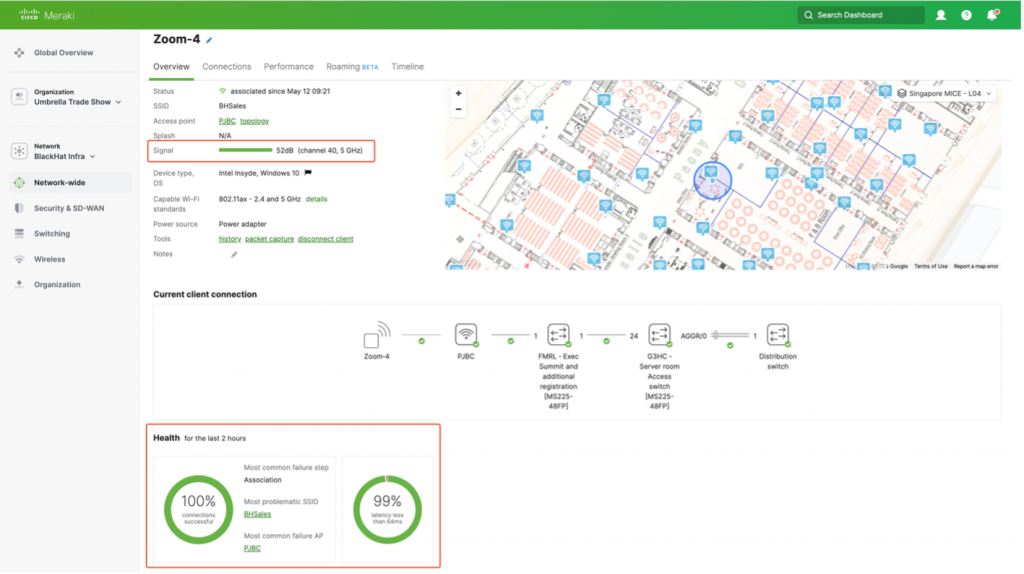
This allowed us to better understand the status of our network. If any of these devices in the client path were reporting an issue, we could have easily isolated the issue to that device and troubleshoot. Considering everything was reporting excellent network health, the next step was to check performance data in more detail. After examining the performance data, we could quicky and effectively determine that issue in not due to our network.
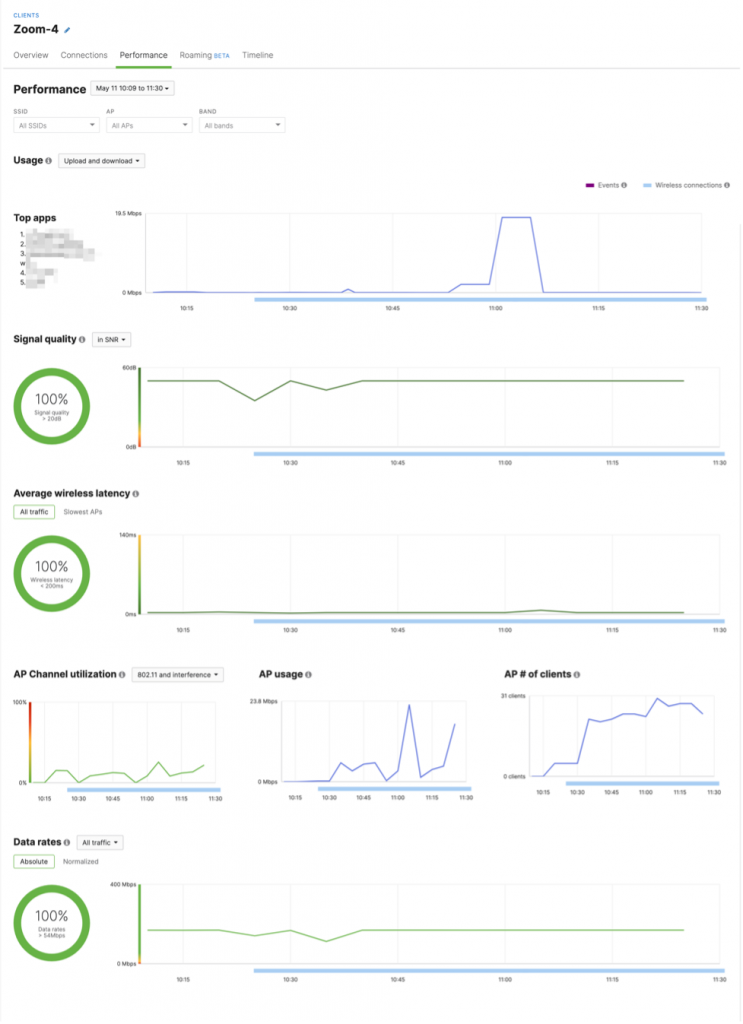
Ruling out the network, now we could focus on the next step of the troubleshooting process: to demonstrate the issue is not due to our network. The best way to do this is by having evidence to show where the issue is happening. First, we had to identify the server destination where the application was being hosted. Looking at the Meraki application analytics, we could see that application is reaching out to a specific domain. Next, using Cisco ThousandEyes cloud agents, together with endpoint agent installed on our laptops, we configured scheduled synthetic tests that will probe the application domain. This immediately showed that consistent latency from our host device to the server was around 200ms, with frequent spikes up to 600ms (about half a second). Furthermore, ThousandEyes helped us visualize the traffic path for the app domain. Using this, we noticed that domain is hosted in AWS (Amazon Web Services) in Dublin, with traffic path going through Paris. Each hop added latency, which was causing the reported issues.

This is a notable example of how Cisco tools come together to reduce Mean-Time-To-Resolution (MTTR). Meraki network health provided us with visibility of assets we own (e.g., wireless and switching network), while ThousandEyes provided insights into assets, we do not have control over (e.g., service and application providers). Subsequently, this provided us with a holistic view of dependencies, allowing us to pinpoint the exact source of the issue.
Meraki Dashboard, by Steven Fan
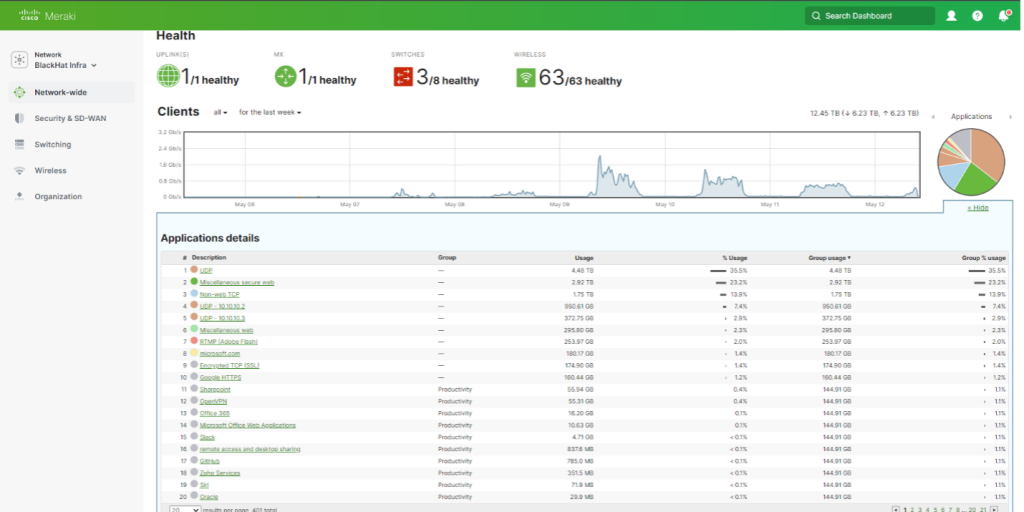
The Meraki dashboard offer a comprehensive and user-friendly interface for observing the health of the network. This includes the entire suite of solutions provided by Meraki, among which the Access Points (APs) and Switches are integral components. These dashboards offered excellent data visualization capabilities, allowing users to quickly comprehend and interact with the system’s status. The ability to aggregate data meant that we could gather and display information from multiple sources, giving us a holistic view of the network’s performance. Furthermore, the dashboards enabled us to delve into the details of any switch, AP, or client swiftly, making troubleshooting and performance analysis faster and more efficient.
Throughout the distinct stages of the conference, the Meraki dashboards were invaluable. In the three days leading up to the conference, during the setup phase, we could monitor the network’s status in real-time, ensuring that all elements were functioning correctly and that any issues could be addressed promptly. This was crucial in ensuring a smooth and reliable network setup.
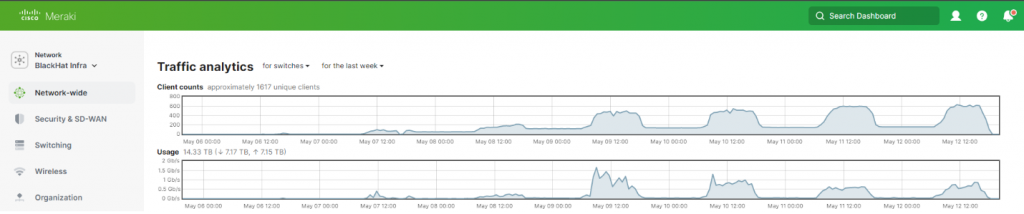
During the first two days of the conference, which were dedicated to focused and intense training, the Meraki dashboards allowed us to keep a close eye on network usage and performance. We could see how the network was handling the increased demand and made any necessary adjustments to ensure a stable and robust service.
Finally, as we transitioned to the briefings and Business Hall stages of the conference, we could visualize the network traffic. This visualization was crucial in understanding how the network was being used, identifying any potential bottlenecks or issues, and ensuring that all attendees could access and use the network services effectively.
The new Summary Report function in the Meraki system served as a valuable tool for providing high-level statistics relevant to the network’s operation. This report contained an overview of the most important metrics and data, enabling us to quickly understand the network’s performance.
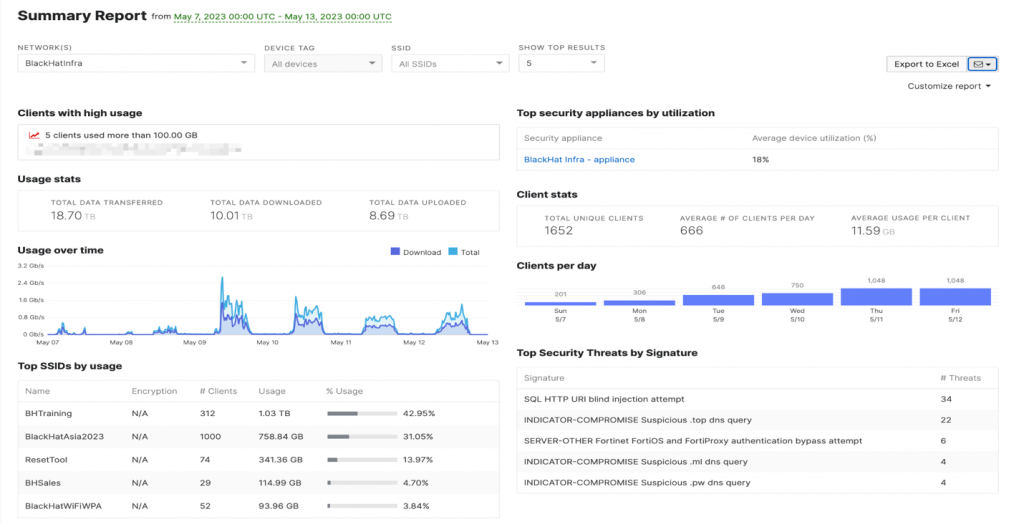
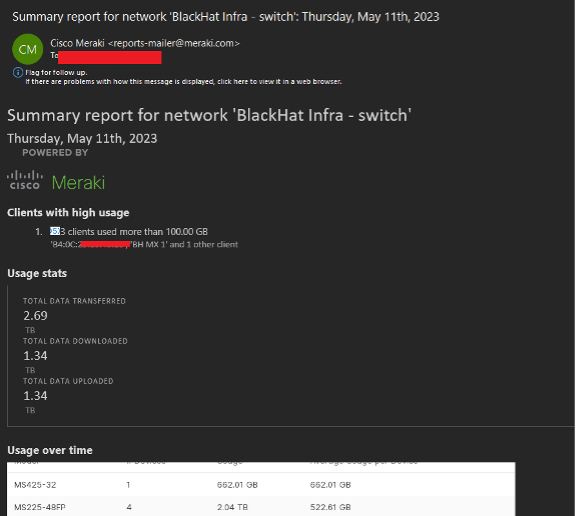
One of the noteworthy features of this report was its automatic emailing function. Every morning, the system would send this report directly to our team’s inbox. This meant that we could start each day with an immediate understanding of the network’s status, without needing to manually gather and analyze the data ourselves.
In addition to saving time, this automated report also helped us stay proactive. If there were any significant changes in the network’s performance, we would be alerted immediately through the report, allowing us to swiftly respond and address any potential issues. This was particularly beneficial for executive-level staff who needed a quick, comprehensive overview of the network’s health without getting too involved in the technical details.
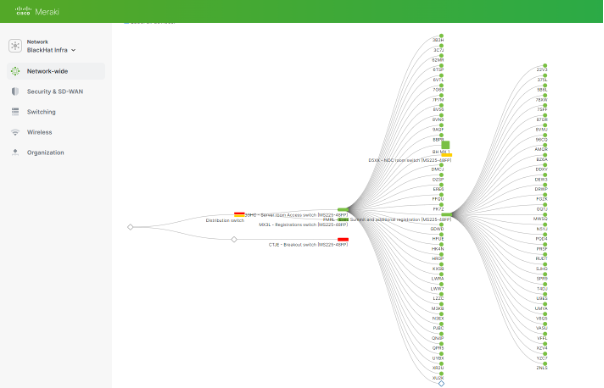
As the person with core responsibilities for the switch configuration and uptime, the Meraki dashboard made it quite simple to quickly change the network topology, according to the needs of the Black Hat customer. In summary, the Meraki dashboards were a powerful tool in managing and optimizing our network throughout the conference.
Meraki Alerting, by Connor Loughlin
Meraki Dashboard allows for alerting via Syslog, SNMP and Webhooks. For Black Hat, we utilized Webhooks to post a variety of alerts to back Slack and Cisco Webex; this means we can jump to action should there be a change in network connectivity or if certain thresholds (such as client bad roaming) without having to watch Dashboard all day.
Configuration for this is easy; taking only two steps to get this set up. Firstly, configure the incoming webhook on your chosen platform and then paste the Webhook URL into Dashboard.
- Slack Webhook Documentation
- Cisco Webex Webhook Documentation
- Cisco Meraki Dashboard Alert Documentation

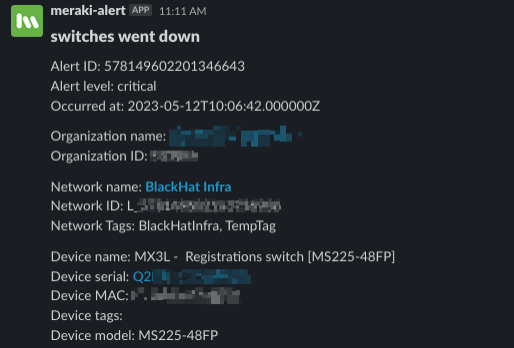
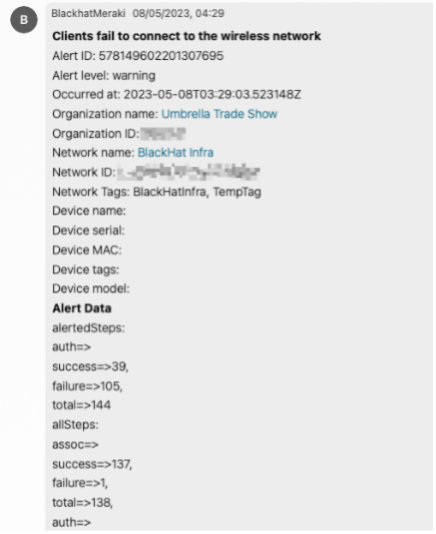
We enabled alerts for switch & APs going offline, switch port event changes, Dashboard configuration changes, and wireless client connectivity events.
Wi-Fi Roaming Timeline
A new addition to Dashboard is Client Roaming Timeline and Analytics. It provides network administrators a great troubleshooting tool for when users complain about dropped calls or reduced throughput typically caused poor roaming experience. The new timeline shows how a device roams between APs and whether they experienced a successful, suboptimal roam, bad roam, ping-pong (when a device constantly bounces between APs), or the dreaded disconnect.
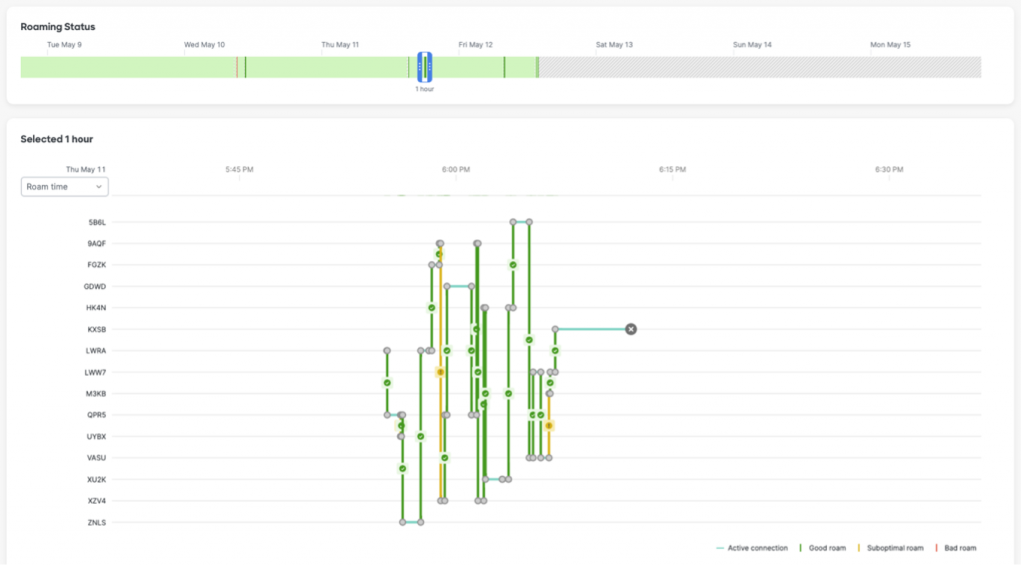
In this example, I was walking around the Business Hall with my iPhone in my pocket. You can see most of the roams were optimal and thankfully my connectivity was not impacted. This level of visibility helps network administrators gain valuable insight about clients roam around their network, potentially highlighting AP placement or density issues. (This also shows that proper planning and using predictive site surveys paid off.)
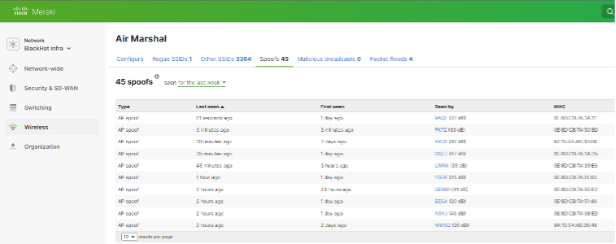
Wi-Fi Air Marshal
During the first day of training, in the Meraki dashboard Air Marshal, we observed packet flood attacks against we were able to adapt and remain resilient.
We also observed an AP spoofing. We quickly identified the location of the attack at the Lobby outside the Business Hall. Should the attacks continue, physical security had the information to intervene. We also had the ability to track the MAC addresses throughout the venue, as discussed in Christian Clasen’s section in part two.
Meraki Systems Manager, by Paul Fidler
Provisioning of devices
As we did in Las Vegas and London in 2022, some of the iOS devices had to be restored again. Using the blueprint helped with regards to time taken, but, again, the limiting factor was the sheer amount of time taken to download the 6GB file (which, when using Apple Configurator, does not like network interruptions). Learning point: ensure all images are downloaded ahead of time.
To download the iOS and restore, add the mobile config and prepare the 28 devices, between two of us, took 2.5 hours. Obviously, there was some disruption due to the network still being built, which contributed to this time, but, even so, this was still a considerable number of hours of toil. We have fed back to the Black Hat management team how leveraging Apple’s Automated Device Enrollment could certainly simplify this task. There is a security benefit with using this as well: If someone wipes a device either on purpose or by accident, when the device next connects to the internet, it will automatically re-enroll into Meraki Systems Manager, preventing the user from setting up the device without management. Supervision (A process that Apple requires to prove that you physically have the device) is also applied, which results in more MDM profiles being available to be sent down to the device, such as Secure Endpoint / Clarity, the ability to install applications silently, and things like Home Screen layout and Lock Screen messages, all of which are used at Black Hat.
Search logic
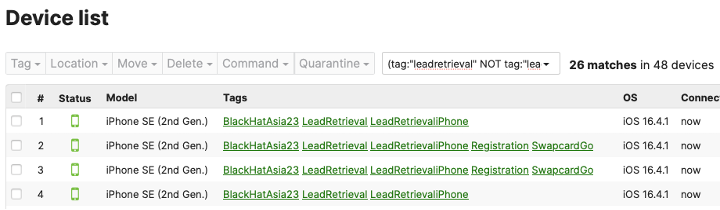
We have historically left alone once enrolled devices in the dashboard, to save time for future sessions, by not having to rename / re-tag devices. However, over time, this has resulted in the growth of stale devices in dashboard. It may have been wise to have purged stale devices before we got here, but that did not happen. So, as devices were briefly turned on then off, the data in dashboard was not easily used to determine stale vs non stale. So, the enrollment date was used to tag devices with a new tag (Black HatAsias2023). However, dashboard does not allow you to show devices which are NOT tagged with something. Luckily, there are some rudimentary logic search capabilities to leverage.
For example:
Give me devices that have the leadretrieval tag but NOT the leadretrievalspecial tag
(tag:”leadretrieval” NOT tag:”leadretrievalspecial”))
Device Identification
Renaming of devices: iOS devices for session scanning, lead retrieval and registration have an asset barcode on the back of them which is how they tend to be referenced by Swapcard. As the devices are in cases, it is painful for the registration staff to find the asset number in the event of an issue, of role reassignment for that device (from session scanning to lead retrieval, for example). So, what we do is twofold:
- The first thing that we do is take the packing list of asset number, serial number and run a script that uses the Meraki API to rename each device in the Systems Manager Dashboard
- The next thing we have is a policy in Systems Manager that sets the text at the bottom of the Home Screen whilst locked, so users can see instantly which device it is, without having to take the case off / log in to the device, and open Settings > General > About
Obviously, using the serial number to identify devices on the Lock Screen has security implications.
The perils of third-party libraries and tracking
Towards the start of registration, Umbrella picked up a few events pointing to TikTok.com and a few other blocked domains. An investigation was launched. Initial thinking was that the application used to check attendees in had used some third-party libraries (this is probably true to the devices reaching out to a legitimate app development website). However, after talking to the SwapCard staff, it was determined that, at the time of device setup, the devices go to an authentication page, which is just a web page. This web page contains a few tracking capabilities, such as Google Tag Manager which includes TikTok.com. We blocked those tracking domains in Umbrella, to better secure Black Hat.
Client Vs MDM Management
Most of the information we get back from a device is by leveraging Apple MDM commands. This includes installed apps, certs and profiles, for example, but also information such as general device information. However, there is some information that is not available via MDM. This includes:
- Location
- Jailbreak detection
- SSID
The reason that the last is relevant is that the Registration app on the iPads has its own VLAN that runs across the Black Hat network to a handful of servers that process that information, keeping things safe and secure. However, these servers are NOT accessible outside of this VLAN. I was looking through the status of the managed devices and noticed a couple of iPads were NOT connected to the proper SSIDs. A quick chat to the registration staff highlights that when they were handed out to Expo Hall staff, the SSIDs for the iPads and iPhones were not up and running, so they were joined to the attendee Wi-Fi!
Visibility is King!
But it does highlight a problem with Apple Management, especially on mobile: If that app is NOT running, then we do not get that information. It becomes stale. So, I’m researching ways to ensure that, should a user / admin kill the SM app, it can be remotely spawned by sending a user a push notification.
Building Tools for Black Hat Staff, by Ryan MacLennan
After deploying all the iOS devices for the Black Hat staff to use during the conference, we decided there needed to be a way for them to see the battery level of the devices while they are in Kiosk mode. Kiosk mode makes the selected application use full screen mode and cannot be exited. This mode happens to hide the battery level and other status symbols that are at the top of the device. This has caused issues in the past where the worker will have their device die in the middle of lead generation or checking in an attendee.
We can see the battery levels of the devices in the Meraki Dashboard; however, allowing access to the Meraki Dashboard to anyone not managing the network is not something we want to do. This is why we created a web application using NodeJs, Express, Meraki APIs and ReactJs to allow the workers to view the battery levels of the devices. The application is containerized and deployed so the workers can easily get to the application and immediately see the lowest battery level devices.
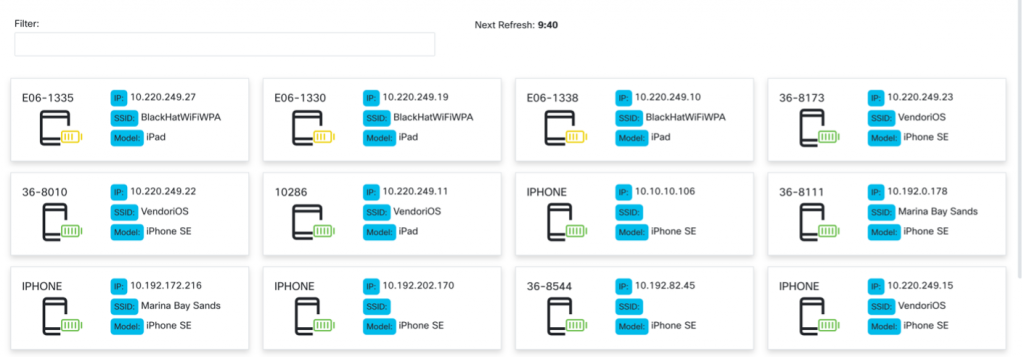
The above image shows the interface of what the workers see and when the application will perform its next update to refresh the device list. If they need to find a specific device, they easily search by the fields shown or by the meta data stored, but not shown for each device.
A Better Way to Design Training SSIDs/VLANs, by Paul Fidler
Deploying a network like Black Hat takes a lot of work, and repetitive configuration. Much of this has been covered in previous blogs. However, to make things easier for this event, instead of the 60+ training SSIDs we had in Black Hat USA 2022, the Meraki team discussed the benefits of moving to iPSKs with Black Hat NOC Leadership, which accepted the plan for Black Hat Europe 2022 and again for Asia 2023.
For context, instead of having a single pre shared key for an SSID, iPSK functionality allows you to have 1000+. Each of these iPSKs can be assigned its own group policy / VLAN. So, we created a script:
- That consumed networkID, SSID, Training name, iPSK and VLAN from a CSV
- Created a group policy for that VLAN with the name of the training
- Created an iPSK for the given SSID that referred to the training name
This only involves five API calls:
- For a given network name, get the network ID
- Get Group Policies
- If the group policy exists, use that, else create a group policy, retaining the group policy ID
- Get the SSIDs (to get the ID of the SSID)
- Create an iPSK for the given SSID ID
The bulk of the script is error handling (The SSID or network does not exist, for example) and logic!
The result was one SSID for all of training: BHTraining, and each classroom had their own password. This reduced the training SSIDs from over a dozen and helped clear the airwaves.
Check out Part 2:
Black Hat Asia 2023 NOC: XDR (eXtended Detection and Response) in Action
Acknowledgments
Thank you to the Cisco NOC team:
- Meraki Network: Steven Fan, Connor Loughlin, Uros Mihajlovic and Jeffrey Chua; with virtual support by Evan Basta and Jeffry Handal
- Meraki Systems Manager: Paul Fidler and Connor Loughlin
- Cisco Secure: Christian Clasen, Alex Calaoagan, Ben Greenbaum, Ryan Maclennan, Shaun Coulter and Aditya Raghavan; with virtual support by Ian Redden and Adi Sankar
Also, to our NOC partners: NetWitness (especially David Glover, Iain Davidson and Alessandro Zatti), PNOCalo Alto Networks (especially James Holland), Corelight (especially Dustin Lee), Arista, MyRepublic and the entire Black Hat / Informa Tech staff (especially Grifter ‘Neil Wyler,’ Bart Stump, Steve Fink, James Pope, Mike Spicer, Jess Stafford and Steve Oldenbourg).
About Black Hat
For 25 years, Black Hat has provided attendees with the very latest in information security research, development, and trends. These high-profile global events and trainings are driven by the needs of the security community, striving to bring together the best minds in the industry. Black Hat inspires professionals at all career levels, encouraging growth and collaboration among academia, world-class researchers, and leaders in the public and private sectors. Black Hat Briefings and Trainings are held annually in the United States, Europe and USA. More information is available at: Black Hat.com. Black Hat is brought to you by Informa Tech.
We’d love to hear what you think. Ask a Question, Comment Below, and Stay Connected with Cisco Secure on social!
Cisco Secure Social Channels