
This is the second of a series of blogs where we will illustrate how to leverage Cisco ACI to implement Micro Segmentation. In the first blog we described how to use ACI micro segmentation to implement a web application that uses a tier of apache Web servers and a MySQL database.
We saw how all Virtual Machines involved could be on the same subnet and on the same dvPortGroup in a vSphere environment, and use Micro EPGs to group Virtual Machines according to the function they provide in order to get the right policies applied. The ACI white-list policy model ensures that only the required protocols and ports are allowed between the involved Virtual Machines, and Service Graphs can be used to insert advanced security provided by NGFW and Load Balancing functions.
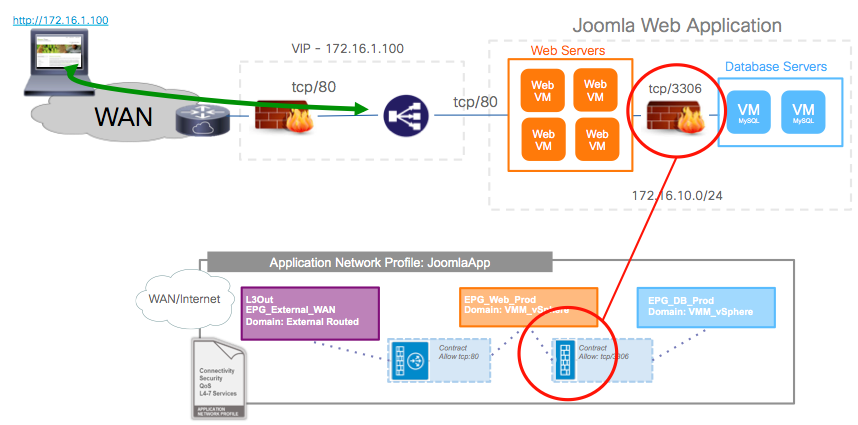
In this blog, we will focus on how to dynamically implement a sandboxed development environment to modify that application. Before I get on with that, I want to explain that in order to make the demo a bit more fun, I also decided to add an L2 NGFW between the Web and DB tiers of our application. I did that to illustrate how the APIC can automate the NGFW configuration there. But in any case we can imagine that doing this is interesting anyways, because while the contracts on the fabric effectively act like a firewall in the sense that only TCP/3306 is allowed between Web and DB tiers, the fabric can’t really ensure that it is SQL traffic going over that protocol. You need to inspect at the application layer for that. An NGFW can do that, and also protect against SQL-related attacks, etc. So the “production” environment is represented like in the picture below, where I am just highlighting the change from the demo of the first blog:
You can check this video to see how we added that L2 Firewall using the ACI vCenter Plugin to insert an existing Service Graph Template.
Implementing a Dev/Test Environment
So now let’s imagine that Acme Co. wants to give their developers an environment to make changes to the application. If we remember, our Joomla-based Application Profile looks like this:

One of the advantages of SDN is that we can create and delete network configurations programatically, just like we create Virtual Machines. So we can build the development and testing environments on demand, and destroy them when they are no longer required. With ACI, this does not requiring anyone going box-by-box configuring network constructs. Instead, a program or script can talk to the APIC API and create, modify or delete complex network configurations, regardless of physical topology. You can also snapshot existing configurations … like you can snapshot a VM (… a promise long made by other SDN vendors, and long overdue … 😉 ).
In the demo of the video at the end of this article we do exactly that. We create a dev/test environment when we need it. For our demo, let’s assume that the developer will only change static web content, so we will create clones of the DB VM and leave them in the same dvPortGroup where we will place them on uEPGs when we run a script that queries the APIC, gets the production Application Profile details, and modifies it creating a sandboxed development environment and a corresponding testing environment.
Developers can then create additional Virtual Machines and connect them to the dvPortGroup corresponding to the JoomlaAppServers EPG. When a VM is placed there, by default it only has access to provisioning tools. Our development environment will look like this:
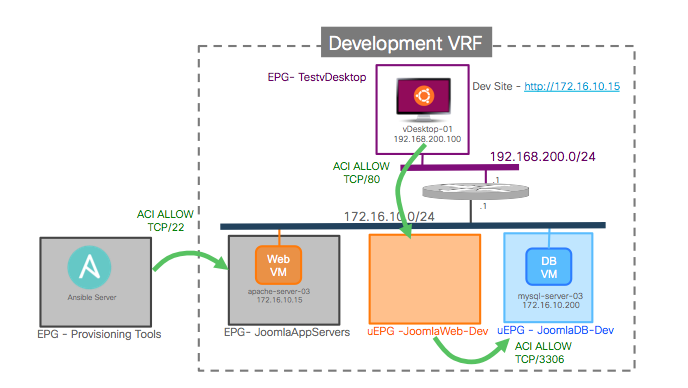
We create a new VRF on the fly that has the exact same subnet as the production environment. This allows us to keep an exact clone of the DB, including using the same IP address of the production DB, in the example it is 172.16.20.200 – notice this is done like this for the point of illustrating ACI capabilities, I am not suggesting that you should hardcode the IP address of the VM in the application like I did!
The script copies the contracts from production without the service graphs because we don’t need them on the development environment: it is sandboxed, it has access to nothing outside of it. And you don’t need to create any firewall rules anywhere to isolate the environment … it’s in its own VRF, and without contracts, the EPG/uEPGs can’t access anything.
In the dev environment, the JoomlaWeb-Dev and JoomlaDB-Dev are Micro EPGs. We configure them so that Virtual Machines are placed in those uEPG depending on VM-attributes. In the demo, I use the VM name so that if a VM has a name that contains WebDev it will be on the JoomlaWeb-Dev uEPG. But in a real deployment I recommend using something like Custom Attributes for the same “tagging”, since that gives you a lot more flexibility.
The VM apache-server-03 runs CentOS and we use Ansible to install Apache and Joomla on it, along with the base files, etc. Once that is done, a simple VM-attribute change suffices to change the VM into the JoomlaWeb-Dev uEPG: the VM vNIC does not need to change dvPortGroup. In the demo, I show how the contracts in place enforce that only the required traffic is allowed, and also I show how a vSphere administrator can easily change those contracts from vCenter if the developer wants more freedom of connectivity in that environment.
There, our developer can make whatever changes they require. In our case, we are changing the image of one of the banners of the site. Once that is done, the changed application is ready for testing. Changing again VM-attributes will “move” (notice, not vMotion) the VM to the JoomlaWeb-Test Micro EGP. Again, this does not represent a dvPortGroup change, even if the VM also changed to a different VRF. 🙂 This is represented in this picture:
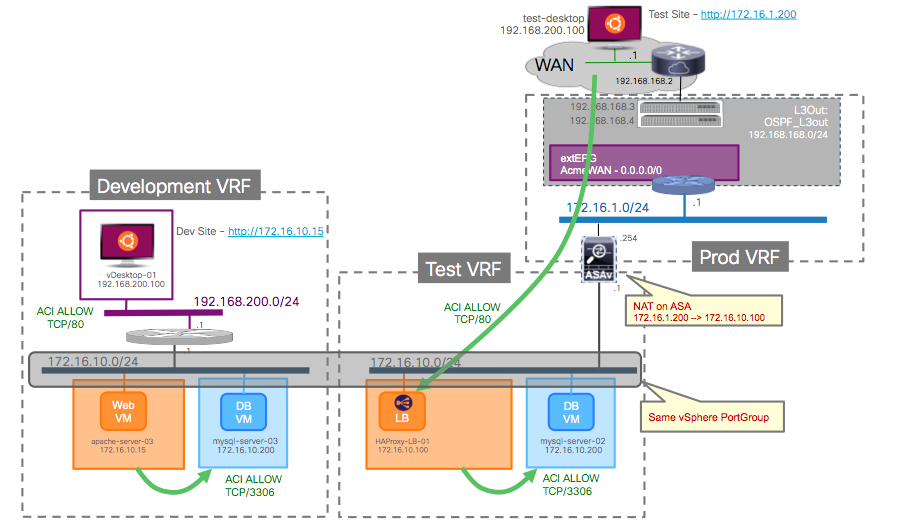
The test environment was also created by our script “copying” from the production environment. Here I actually “cheated” a bit because I hard coded a new Service Graph on my script – I don’t create that one on demand, although I could, I was just lazy. This Service Graph essentially connects our test VRF to the L3Out of the production VRF. Why? Because we want to be able to test the application from real desktops external to the fabric. So we need to connect the Test environment to a DMZ, and we do that with a Service Graph. Of course, we re-use the L3Out from production that already connects to the WAN. We also need the NGFW to NAT traffic towards our application, since we are assuming that we use overlapping address spaces (we can’t really announce the same subnet from two VRFs). That NAT is configured on the NGFW (Cisco vASA) directly from the APIC Service Graph. Also in the test environment I decided to use a different Load Balancer: open source HAProxy. Again this is done strictly with the intention of showing possibilities, not to indicate any vendor preference in this area.
Once the apache-server-03 VM changes to the JoomlaWeb-Test uEPG it has access to a copy of the production DB again, the one of the test environment. It is not available directly for external connectivity, because we programmed the ASAv to only allow access to a VIP on the HAProxy. The HAProxy however can access the new test VM. We can test that the application is working well and we are ready to move it into production. See below the complete picture of the process:
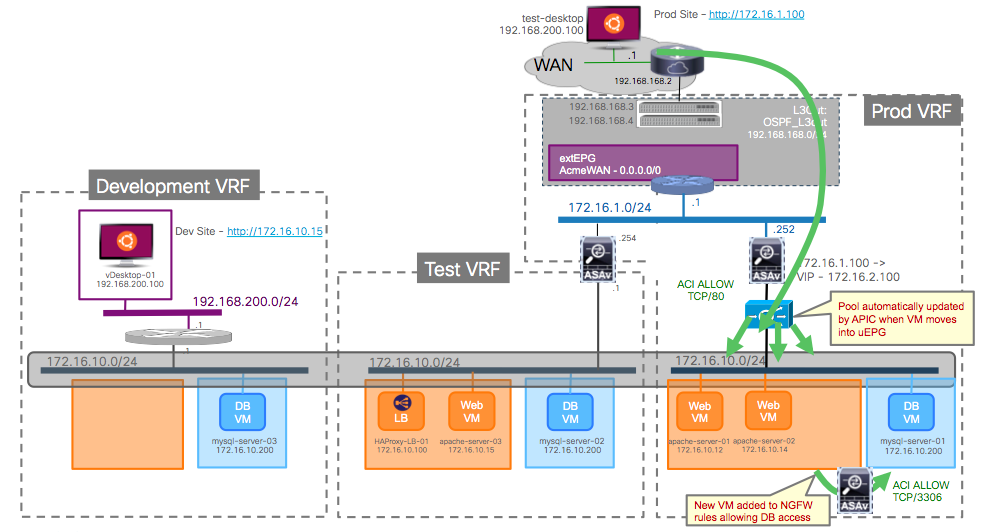
That is indeed the final step, where we once again modify the apache-server-03 VM attributes to indicate that it is now good for production environment. The VM changes to the JoomlaWeb-Prod uEPG. When this happens, the APIC detects the new IP (172.16.10.15) it will automatically add it to the F5 BigIP load balancer pool, and to the network-object in the vASA that we used to define security features to be applied when accessing the DB.
The final step is to modify the VM attributes of apache-server-01 and apache-server-02 to indicate that those two are no longer in production. When this is done, the following happens:
- the F5 BigIP configuration is automatically changed by the APIC to delete the IP addresses of the decommissioned VMs from the pool
- the ASAv configuration is also modified to remove the IP addresses of those VMs from the network-object
- the decommissioned VMs are put back into the JoomlaAppServers EPG where they only have access to the provisioning tools
At this stage, we could instrument the same application changes on apache-server-01/02 and move them back into production, again changing the VM attributes, or simply delete those VMs if they are no longer required.
Once that is done, the development and testing configurations on APIC can be completely deleted as well. Until the next time we need to make changes.
And now the link to the demo … 🙂 If you read the blog, you can fast forward to minute 3:25 where the real demo begins:
In the next couple of blogs we will look at how Micro Segmentation can be used to implement a Zero Trust zone also at the infrastructure level: securing the vSphere and server management environment.
We will also look back at this specific example of the JoomlaApp dev/test/prod, and how the APIC provides Day-2 operational tools built-in, at no extra cost, that greatly simplify the work of IT teams.
If that interests you, stay tuned in the next couple of weeks … 🙂


Juan, I have seen a number of ACI demos since it’s inception over two years ago, and this demo, by far, is one of the most powerful, useful and informative demos I’ve seen. Simply awesome. The video especially is just amazing. Keep it up! 🙂
Thank you very much! 🙂 Appreciate your kind words 🙂
I guess I should have logged in before posting 🙂 … thanks again!