
Welcome to the Launchpad, our new blog series! This is your one-stop shop for everything you need to get started with a certain technology or certification path. It’s also the perfect place to be if you just want to learn something cool.
As I use my time to pick up a new skill or study for a certification, I realized that I don’t always know where to start. I always feel conflicted because I have limited time to study during my work week. That said, I decided to start a blog series to share my learning path with you, our learning community, in hopes that I can help you learn something new, while also giving you some direction and resources to get you over the finish line! All while making it fun!
The next couple of Launchpad blog series will focus on the Cisco Certified DevNet Expert certification exam topics.

The Direction
If you haven’t done so yet:
- Go through the exam topics and familiarize yourself with the blueprint.
- Watch the DevNet Expert Certification Event for an expert-led overview.
- Make a study schedule (and stick to it)!
“Decoding the New DevNet Expert Lab Exam”
Watch #CiscoChat on-demand now.
The Learning
Now that we have an idea of what will be covered in the certification exam, let’s start with the most heavily weighted topic.
Coming in at 30 percent: Infrastructure as Code.
- Build, manage, and operate a Python-based REST API with a web application framework (endpoints, HTTP request, and response).
Flask web framework comes to mind here. Let’s build a simple web application together.
The Application
- Written in python leveraging Flask framework
- Will receive HTTP requests via Postman
- Handle GET/POST/PUT/DELETE methods
- Return data based on API requests to endpoints
Simple enough, right? Let’s get started:
1. First, as with anything Python, let’s import the required libraries.
import json
from flask import Flask, request, jsonify
from tinyDB import TinyDB, Query, where
import random
Json – library used for Json data manipulation
Flask – web application framework
Tinydb – exactly what it reads, a tiny database
2. We are going to build a poor man’s IPAM, save IP address and its corresponding information (mask, vrf, status… etc.) to a database and allow Flask to expose an API endpoint into the data. To do so, let’s create an instance of Flask and TinyDB.
app = Flask(__name__)
db = TinyDB ('db/data.json')
3. Next use the route decorator to tell Flask what URL should trigger our function.
In this case, we accommodate for five different URLs:
- / – Default route
- /query GET – to retrieve records
- /create POST – to insert records
- /update PUT to – update existing records
- /delete DELETE – to remove a record
I could have used the default route with 4 different http methods, but I wanted to demonstrate routes. ¯\_(ツ)_/¯
4. Default route, the return msg, will display in your browser once you navigate to the server’s URL.
@app.route('/')
def index():
return ("Welcome to Launchpad ? - Flask APP is up and running on {}".format(request.host_url))
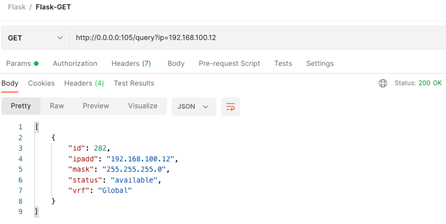
5. The /query route will accept GET method. The function will check for parameters coming in part of the request call, in this case the ‘ip’ address and will do a lookup for the record in the db. If found, it will return it. Otherwise, it will return all records. I leveraged TinyDB’s Query() method to search.
@app.route('/query', methods=['GET'])
def query_records():
ip = request.args.get('ip')
for item in db:
result = db.search(Query().ipadd == ip)
if result:
return jsonify(result)
else:
return jsonify(db.all())
Here’s what the API call looks like with the returned data. It’s always good news when you see 200 OK:
6. Let’s go over one more route together before I send you over to have a peek at the completed code.
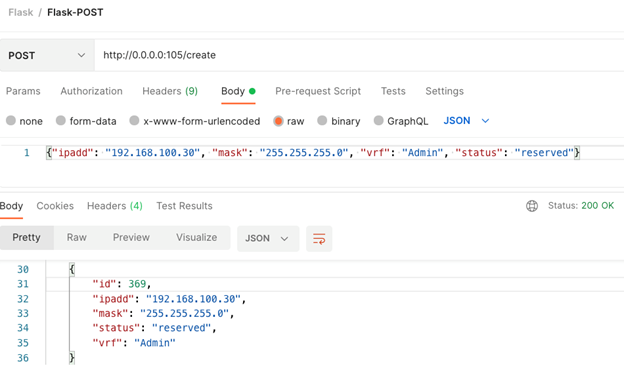
/create route is used to insert a new record in your makeshift IPAM application. It accepts POST method, captures the request body and inserts data into the TinyDB
@app.route('/create', methods=['POST'])
def create_record():
record = json.loads(request.data)
result = db.insert({"id": random.randint(1,500), "ipadd":
record['ipadd'], "mask": record['mask'], "vrf": record['vrf'], "status":
record['status']})
return jsonify(db.all())
Here’s what the API call looks like:
7. Finally, the important part of all of this is to actually tell your application to run the Flask server by defining the Host IP and port. Debug mode is optional, but recommended.
if __name__ == '__main__':
 app.run(host='0.0.0.0', port=105, debug=True)
The Resources
Hey, look! You made it all the way through! And for that, I reward you with this Spotify playlist to help you focus as you play around with the code. I will also leave you with some useful resources to continue your journey toward becoming a DevNet Expert:
- GitHub Repo includes working code + Postman collection
- Flask Mega Tutorial
- TinyDB Docs
- Cisco DevNet Expert certification exam topics
Sign up for Cisco U. | Join the Cisco Learning Network.
Follow Cisco Learning & Certifications
Twitter | Facebook | LinkedIn | Instagram
Use #CiscoU and #CiscoCert to join the conversation.


Excellent oportunity
Nice!!
Nice!!!
Good.
I need to learn more about automation, so thanks for that.
Great opportunity
Excellent, super excited.