
Yeah, yeah, yeah … sure we’re a few days past the holiday, but Kareem and I were busy regaling with our friends and family, editing video takes time! Here is episode 2 of Kareem and Matt’s Code Party! For those of you new to the Code Party, the idea is to capture Kareem and I talking about code. This is a series so keep your eyes open for new episodes, sample code, and blog entries. In each episode, we will have a casual discussion on a particular topic that provides you, the audience, a little interesting information to get started with your code projects.
Quick intros for those that are new
My name is Matt DeNapoli and I’m a Developer Evangelist for Cisco DevNet. I’m super lucky because I get to travel around the world and tell people about all the cool technologies that Cisco has and how to write software to integrate with them.
My counterpart is Kareem Iskander and he’s much smarter than me. He works on the DevNet Events team, making sure all of the technical bits work for our workshops, demos, learning labs, etc. etc. etc.. So if you’ve attended a Cisco DevNet event, there’s a chance that you had some interaction with Kareem’s work in some way, shape or form.
Ok, on to the new bits
In this captivating episode, Kareem and I talk about a solution I extended that implements Meraki’s Location Scanning API. Specifically, we look at building and deploying a Python Flask based web application that leverages the HTTP POST location data served up by the Meraki cloud service. The code for the example that we work through can be grabbed in the repository here.
First things first. As is our custom with all Code Parties, let’s take a quick look at what Kareem and I were drinking for this episode. Kareem was consuming an advanced IPA from Russian River brewing called Pliny the Elder. I say advanced because it is a very complex and well regarded beer that is appreciated by far more experienced beer aficionados. I made myself the classic Italian cocktail known as the Negroni. Gin, Campari, and sweet vermouth round out a sweet then bitter flavor good for both summer afternoons and cold nights.
On to the technical stuff
No solution is worth its salt if we don’t have a diagram to describe it:
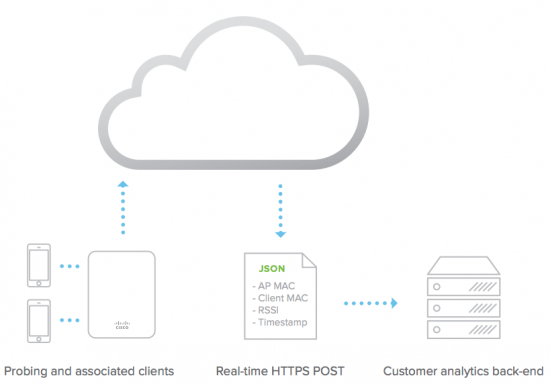
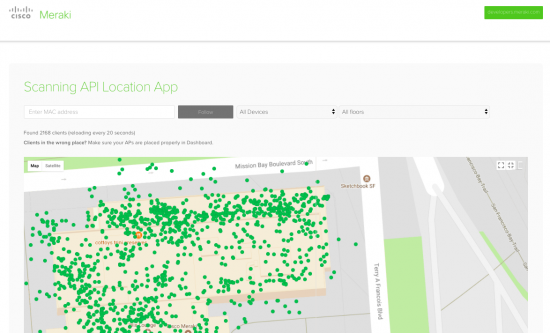
Our focus is mainly on the part labeled “Customer analytics back-end.” This location scanning application is a Listener Service as it sits and waits for messages to be sent via HTTP POST to a URL:Port that needs to be configured on the Meraki Dashboard. For the sake of demo/testing, I used ngrok to create a tunnel to my local machine running the application. In a production environment, you’d want to deploy to a proper web server. The ultimate result of this effort is to take that POST information and plot it on a map, as shown below.
As I mentioned before, this application requires that you configure a listener service for Meraki to send POST messages to with the location JSON. Those with access to the Meraki Dashboard (e.g. you own Meraki equipment or you’ve checked out our learning labs) should be able to head to Network Wide > Configure > General, scroll down to Location and Scanning section. Set the POST URL to the server’s URL and set a Secret (whatever you want!). Note that only 4 listener services can be configured at one time so if there are 4 already setup, delete the first one in the list. Also take note of the Validator value.
There are two main pieces of code in question here. The first is the python flask “server”. Flask is a web framework for python which allows you to define “routes” (essentially a method+url combination) and take action on those “routes” using python when they are accessed via a web browser. Our server has 5 routes that it handles. The first is a GET method to the root (“/”).
@app.route('/', methods=['GET'])
def get_validator():
    print("validator sent to: ",request.environ['REMOTE_ADDR'])
    return validator
This simply returns the validator we set when launching our listener service and is required as validation in the Meraki cloud service.
Our second route collects the POST data when Meraki sends it.
@app.route('/', methods=['POST'])
def get_locationJSON():
You’ll notice that the url is the same (“/”), but the method is different, hence the Flask framework knows which function to execute.
The third route serves up the actual web page where we’ll see our locations plotted.
@app.route('/go', methods=['GET'])
def get_go():
    return render_template('index.html',**locals())
It’s a simple function that uses a native Flask function called render_template. This looks in the /templates folder of the service and pulls out the referenced file (in this instance index.html).
Our fourth route is the interesting one, as it actually provides the JSON data to the front end javascript that will plot the points on the map!
@app.route('/clients/', methods=['GET'])
def get_clients():
    global locationdata
    if locationdata != 'Location Data Holder':
        pprint(locationdata["data"]["observations"], indent=1)
        return json.dumps(locationdata["data"]["observations"])
    return ''
This code loops through a global variable called locationdata that holds the raw JSON of the location data POST. Now, you may be wondering “where is that data being sent?”. That’s where the front-end javascript comes in (and the second part of code).
Within the /static directory of our service we have a file called sample.js. In it we have the following function:
function lookupAll() {
    $('#last-mac').text("Looking up all clients...");
    $.getJSON('/clients/', function (response) {
      trackAll(response);
    });
  }
Note that there is a jQuery function call to getJSON, which passes in our route /clients/! This retrieves the return data and makes it available to the scope of the javascript. Now there are several functions within this javascript that do some interesting things (e.g. the javascript runs on a 20 second timer that does the /clients/ lookup), but mainly it uses dot notation on the location data JSON object to access and plot the values on a map using the Google Maps API.
var m = new google.maps.Marker({
        position: new google.maps.LatLng(client.location.lat, client.location.lng),
        map: map,
        mac: client.clientMac,
        icon: markerImage
      });
That is the meat of this application, but I did mention that there were 5 routes. The last one allows us to pinpoint a specific client and dig into details on that one:
@app.route('/clients/', methods=['GET'])
def get_individualclients(clientMac):
    global locationdata
    for client in locationdata["data"]["observations"]:
        if client["clientMac"] == clientMac:
            return json.dumps(client)
    return ''
And that, my friends is that! We hope that this will kick start your own cool location services applications and help you take advantage of all the Meraki infrastructure has to offer! Happy Holidays (belated) and good luck in the new year!
As usual (well, twice now), thanks, stay tuned, and (Code) Party On!

We’d love to hear what you think. Ask a question or leave a comment below.
And stay connected with Cisco DevNet on social!
Twitter @CiscoDevNet | Facebook | LinkedIn
Visit the new Developer Video Channel


