
Welcome, welcome, welcome! Here is the first episode of Kareem and Matt’s Code Party where the idea is to video what we usually do, which is sit around, have a beverage, and talk tech (I know…super nerdy right?). This will be a series so keep your eyes open for new episodes, sample code, and blog entries. In each episode, we will have a casual discussion on a particular topic that provides you, the audience, a little interesting information to get started with your code projects.
My name is Matt DeNapoli and I’m a Developer Evangelist for Cisco DevNet. I’m super lucky because I get to travel around the world and tell people about all the cool technologies that Cisco has and how to write software to integrate with them.
My counterpart is Kareem Iskander and he’s much smarter than me. He works on the DevNet Events team, making sure all of the technical bits work for our workshops, demos, learning labs, etc. etc. etc.. So if you’ve attended a Cisco DevNet event, there’s a chance that you had some interaction with Kareem’s work in some way, shape or form.
In this first action-packed episode, Kareem and I hit quite a lot of topics that combine into one solution. We hit Python, REST API usage, chat-bots in Cisco Spark, Meraki, and simple web servers. Specifically, we look at building and deploying a simple bot that allows an administrator to see and manage their Meraki network through Cisco Spark. The code for the example that we work through can be grabbed in the KM-CodeParty github repo.
First things first, let’s take a quick look at what Kareem and I were drinking for this episode. Kareem was having a lovely 2012 pinot noir called Cherry Pie from the Stanly Ranch winery. I’ve had it and it is a nice, easy to drink red that doesn’t fall off at the end in flavor. I was consuming Great Lakes Edmund Fitzgerald Porter which proves to be classic in porter taste but lighter in feel. It’s a great fall beer.
Ok, that’s out of the way…onto the architecture and the code! First off, this is what we’re working with from an architectural standpoint:
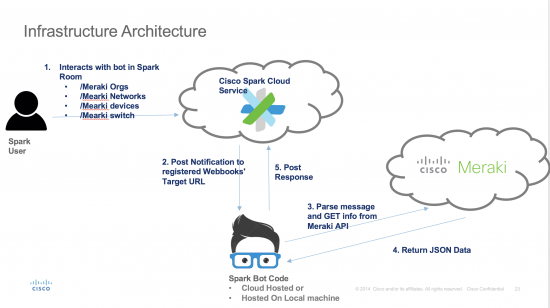
Our focus is mainly on the part labeled “Spark Bot Code”. The python file in the link above (botmeraki.py) should be accessible through a public web server of your choosing (for this I used the native python webserver) because Cisco Spark will have to send a webhook to it on the /message event (e.g. someone types a message into the room in which the bot is included). But first, we have to register the bot!
You can setup a bot for spark in the My Apps section of Spark for Developers. Choose a bot, give it a name and an icon and Spark does the rest! Note the token generated because this is the bot’s authorization to interact with the Spark platform and is needed for a few upcoming steps. Onto the webhook!
We setup the webhook through the Cisco Spark documentation (quickest path in my opinion). Now, MAKE SURE to change the authorization token to the bot’s access token, otherwise the webhook will be created under you and the /message event will kick off when you type things into a room. Ok…now we have the Spark bits set, let’s take a look at what’s going on in the code.
First off, we need to make sure our python path is set properly (I have 2 instances of python installed so I have to call out python3 specifically, so please be aware of which version and where python is installed). Secondly we need to make sure we pull in our Cisco Spark python wrapper so we don’t have to do all the heavy lifting in making the API calls. Our first two lines code are setting the table…
#!/usr/bin/python3

import pyCiscoSpark as Spark
Next, we need to make sure we put our Meraki API key in. If you have a Meraki account, you can use the one accessible in your profile. If you want to kick the tires, check out our sandbox by heading to https://meraki.cisco.com and logging in with devnetmeraki@cisco.com/ilovemeraki and heading to the profile for that user and grabbing the API key there.
meraki_key = ""
In the following code, we are accepting the webhook. Since we’re using a bot framework, the first “thing” sent to the webhook is that an event happened. Since this is well-formed JSON (hint: we loaded the json in __main__), it’s easy to parse out the message’s ID so the bot knows what message to go get! It is then the responsibility of the bot code to go out and get the message.
def parse_data(data):
    dataDict = data
    log.info(data)
    decode_msg(dataDict['data']['id'])
And now we can get the message. Note that you have to put the bot’s PERSON ID in the code so that the bot messaging the room doesn’t cause an infinite loop of messages (wheeeeeeeee!). Also, please note that references to accessToken. This the accessToken of the bot that we used to create the webhook. If you do not use the bot access token, there is no way for Spark to know where to put the messages and who sent them!
def decode_msg(msgId):
    uri = 'https://api.ciscospark.com/v1/messages/' + msgId
    resp = Spark.get_message(accessToken, msgId)
    log.info(resp)
    if resp['personId'] != '':  # Bot ID prevents infinit loop
        log.info("doing something")
        do_something(resp)
The next bit of code is our do_something based on what was entered in the message in the room. This is simple prompt-based bot, so we only take action on very specific keywords. This functionality can be expanded to include a natural language processor (NLP) like API.ai (protip: we’ll be doing an episode on that…it’s nuts).
def do_something(resp):
    trig = resp['text'].split()
    log.info(trig[0])
    if trig[0].lower() in ['webhook', 'webhooks', 'hook', 'hooks']:
        do_spark(resp)
    elif trig[0].lower() == 'meraki':
        do_meraki(resp)
    else:
        Spark.post_message(accessToken, resp['roomId'], resp['text'])  # echo
I’ll leave most of the intricacies of the do_spark and do_meraki functions to your code perusal. But let’s take a look at the following in the do_meraki function. Below is just part of the function, but it gives a clue into what we need to interact with Meraki’s Dashboard API. First, we need to set header X-Cisco-Meraki_API-Key” for authorization. Second, we need to set our baseURL. Finally you’ll note the keywords listing and check against the trig array. The trig array are the actual words typed into the Spark room directing the bot, so the message “meraki organization” results in trig[0] being set to “meraki” and trig[1] is “organization”, which “triggers” (see what we did there) there first if in the code below, which kicks off the Meraki API calls.
def do_meraki(resp):
     # Create a list of incoming text
     trig = resp['text'].split()

     # Content type and Authorization information must be included in the header

     header = {"content-type": "application/json", "X-Cisco-Meraki-API-Key": meraki_key}
     endpoint = ''
     keyword = '' # Meraki API resources
     baseURL = 'https://n149.meraki.com/api/v0'
     if trig[1].lower() in ['organization', 'organizations', 'org', 'orgs']:
          keyword = 'org'
          endpoint = '/organizations'
     elif trig[1].lower() in ['networks', 'network', 'net']:
          if len(trig) > 2:
               keyword = 'net'
               endpoint = '/organizations/' + trig[2] + '/networks' ...
Now, this is a grassroots experiment (that we hope works) and the production quality isn’t the best, but since we like to hear our own voices we think it’s ok. We’ll definitely work out the technical kinks as we move on. If you like to hear our voices too, then I’ll think you’ll find this informative, potentially entertaining, but definitely nerdy. Bear with us as we work out our growing pains and please give us constructive feedback (what you want to see, learn about, kinds of drinks we should have, etc.) and we’ll try to work in all the feedback to make this the best for you
Thanks, stay tuned, and (Code) Party On!
We’d love to hear what you think. Ask a question or leave a comment below.
And stay connected with Cisco DevNet on social!
Twitter @CiscoDevNet | Facebook | LinkedIn
Visit the new Developer Video Channel


Nicely done Kareem and Matt. Since it was a Code Party I totally immersed myself in party mode while I read the blog. End result I coded and partied.
Looking forward to the next Code Party, at which I’ll be drinking Jack and Drambuie on Ice.
FYI, video link is incorrect. Should be: https://youtu.be/Z2p1cGzH6b4
Great coding tutorial on how a Meraki admin can use Cisco Spark to manage the Meraki dashboard. Also loved the beer and wine choice. I have had the Cherry Pie Pinot (tastes as labeled). Great Lakes brewery is an awesome brewery although I do not think I have had the porter.
Thanks for the putting in the personId tip, I too have endless looped my bots.
I definitely need to learn how to code!