
Cisco, in its quest to embrace programmability, has created what is called the ACI Toolkit, which is basically a combination of an NX-OS like CLI and some custom python scripts. Although this toolkit doesn’t allow you to do all configurations within ACI, it can be used to create and show the common configuration and administrative actions that may be used daily. It’s also great for someone who is just starting to migrate to a more programmatic way of doing things, as it’s easily understandable to folks used to common networking commands.
If you’re not familiar with ACI, check out this short video to get a brief understanding of some of the basic constructs used and for a deeper dive go to www.cisco.com/go/aci. These concepts will help you to understand some of the configuration options available with the ACI Toolkit.
The toolkit’s python libraries are all available on GitHub.com and it’s fairly simple to access. All you need to do is open a terminal window on your computer and enter the following command:
git clone https://github.com/datacenter/Simple-ACI-Toolkit
This command will download the necessary libraries to use the ACI Toolkit syntax. Then to run CLI commands from your APIC type:
python acitoolkitcli.py -l admin -p password -u https://APIC_IP
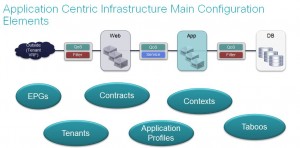
This will connect you to your APIC so you may run commands that will help you build your application network profiles as shown in the three tier application in the picture above. We can do things such as switching tenants, creating contexts, creating bridge domains, and creating end point groups (EPGs).
Here are some examples of the common commands we might use to create these logical objects.
Switch to a tenant configuration mode:
- fabric# switchto tenant <tenant-name>
- fabric-tenant# switchback
Create a Context and don’t enforce contracts on it:
- fabric-tenant(config)# [no] context <context-name>
- fabric-tenant(config-ctx)# [no] allow-all
Create a bridge domain and assign it to a context:
- fabric-tenant(config)# [no] bridgedomain <bd-name>
- fabric-tenant(config-bd)# [no] context <context-name>
Create a subnet under the bridge domain:
- fabric-tenant(config-bd)# [no] ip address <ip-address>/<masklength> [name <subnet-name>]
As you can see from these examples the syntax will be very familiar to network engineers. We can also use the ACI Toolkit combined with the Python SDK to actually script these things. It makes scripting a little easier because we’re again using simpler syntax. Below is an example of configuring a tenant using Python in conjunction with the toolkit:
from acitoolkit import *
from credentials import *
tenant = Tenant (‘Customer1’)
context = Context (‘customer1-router’, tenant)
bd = BridgeDomain(‘BD1’, tenant)
bd.add_context(context)
bd.add_subnet(‘10.0.0.1/24’)
app = AppProfile(‘web-and-ordering’, tenant)
vlan10 = EPG(‘VLAN10’, app )
vlan10.add_bd(bd)
vlan20 = EPG(‘VLAN20’, app )
vlan20.add_bd(bd)
Currently the ACI Toolkit may not be used to create service graphs, VMM Domains, SPAN, Atomic Counters, and or to see most telemetry and health score information. However, the toolkit still gives us a lot to work with and automate as far as basic configurations go. For more information please see the guide found here (http://datacenter.github.io/acitoolkit/).


This looks very promising. Will it be developed further to include functionality not currently available (create service graphs, VMM Domains, SPAN, Atomic Counters etc)? Also, does this have a future? i.e. will it be supported or is it just a ‘Sold As Seen’ tool with no guarantees of further investment?
Thanks for the questions, Paul. We are absolutely planning on having further integration with the functionality you mentioned. This is a 1.0 release, but we will continue working on new releases. Also keep in mind that the Nexus 9000 series switches also have a fully open API which is programmable using Python. The ACI Toolkit just makes it a little easier. Thanks.
Further development of ACI toolkit will be great, but the ACIP driven policy deployment and ACI fabric concept already rocks. I watched a webcast few months back about ACI driven WAN optimization performance in collaboration with Akamai and that also seemed like a great product leveraging MATE.
santanu
Thanks Santunu!