
Malware is one of the most prevalent and most insidious forms of cyber attack. Identifying and eliminating them are critical in minimizing the impact of a breach. As a cybersecurity incident responder, I always end up performing some level of malicious file analysis. In this blog, I’ll share some recommended approaches that have worked for our Incident Response team.
Time is rarely on our side to perform deep analysis of the potentially malicious file. Reverse engineering a file can take weeks or months to complete and takes a level of skill which few individuals maintain. We need to develop indicators of compromise to complete the identification phase of the incident response process with some degree of haste. With an understanding of how to develop those indicators ourselves, we can quickly execute a response plan without needing to wait on full analysis.
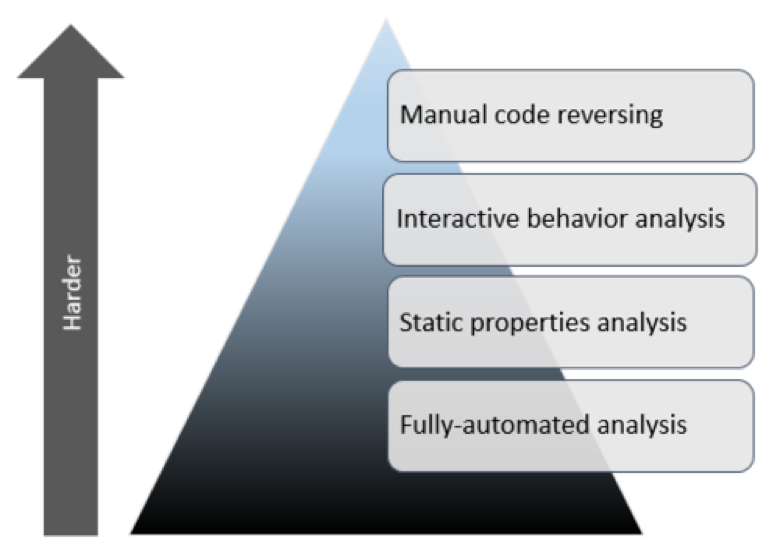
Lenny Zeltser groups malware analysis into four stages. Starting from the easiest to use, fully-automated analysis, we move up into static property analysis, then to interactive behavior analysis, and finally into full manual code reversing. Many of you likely have experience using fully-automated analysis provided by tools such as ThreatGrid. These types of tools provide quick answers, but little in the way of interaction by the analyst. They are easy to use and certainly should be part of the incident responder’s tool kit. Sometimes though we need to do a little more analysis on a suspicious file.
While performing an incident response engagement, we really have to focus on efficiency and effectiveness. The goal of the incident response process is determining root cause and impact to ultimately succeed in recovery. The goal is not one of research trying to fully understand the intricacies of a new vulnerability in the moment. However, further research can and should be performed after the engagement has been completed. During incident response malware analysis, I channel the Pareto principle, which Vilfredo Pareto developed for application in economics. For our incident response purposes, we are stating that by performing 20% of the malware analysis work we can generate 80% of the results necessary for successful incident scoping. We do not need to always perform full manual code reversing to understand what the malicious file is doing and to write good signatures for that sample.
To help us out with this incident response malware analysis, we need a set of tools. The following is a list of the tools I use regularly and will demonstrate in this blog post and the corresponding video.
Tools:
Static Property Analysis:
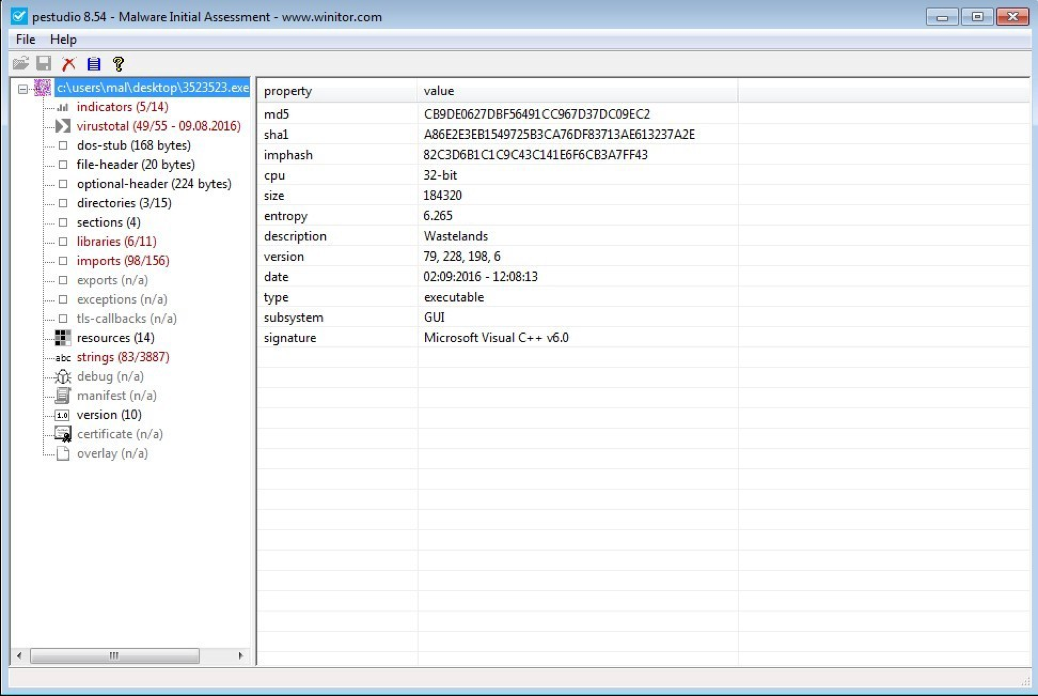
My favorite tool for performing property analysis is pestudio developed by Marc Ochsenmeier. I wrote a personal blog post on this tool a few months ago if you would like a full break down of its capabilities. During static property analysis, we will do some tasks such as searching for the hash on our favorite search engine or malware repository. Beyond simply doing searches for the hash, we will also dump a list of all readable strings in the file, as strings can give us a wealth of information about what the file is likely to do. Files which have little in the way of obfuscation might tell us what domain names it is attempting to call out to and IP address could be stored in plain-text or directory locations where data will be written to.
Identifying the function imports can allow us to predict what we should expect out of the file when we move into interactive behavior analysis. For applications to execute inside a Windows environment, or any operating system for that matter, they must import functions from the application programming interface, or API. These function imports tell us a lot about what the file wants to do. If a program has in its import table a function to write out to the Windows registry, we can assume that it will be making registry modifications. We may even be able to see what registry key is being modified in the strings we dumped earlier. While looking at function imports, pestudio will highlight those functions which are ‘blacklisted’, as in those which are most often used in malicious software.
We can also write signatures based on the static properties of a file. Signatures, whether in the form of anti-virus or intrusion detection and prevention rules, are written on the static properties of a file. Sometimes it is simply the hash, though not often as hashes are not a reliable method for detection due to modern malware samples performing self-modifications to avoid hash detection. More often signatures are written base on byte strings and readable strings.
Interactive Behavior Analysis:
Most files have some method of obfuscation making static property analysis difficult, as some are heavily obfuscated using custom routines making it impossible to analyze without a deeper form of analysis. During behavior analysis, we let the file execute in a contained environment and collect detailed information about its execution, similar to automated analysis. The difference is that with this method we can interact with the malware while it executes. Additionally, we can provide the malware with an environment that it should thrive in. For example, if the malware exploits a Java vulnerability, then we make sure our laboratory machines have that vulnerable version installed.
While the malware is executing on the vulnerable host, we measure changes to the system. Malware must make modifications to a host to remain persistent; it often must communicate for it to complete its objectives. We can measure these changes and communication to identify other hosts which have been impacted by the malware.
Before we execute the malware, we need to setup of laboratory environment to allow for the execution of malicious files in a controlled manner. Windows 7 Service Pack 0 compiled for 32-bit Intel x86 architecture will likely be able to execute most malicious Windows binaries. We want the system unpatched so that the malware can execute to its fullest extent. If the sample is compiled for a different version of Windows or processor, then change your laboratory to suit the needs for the sample. You will find this information out during property analysis.
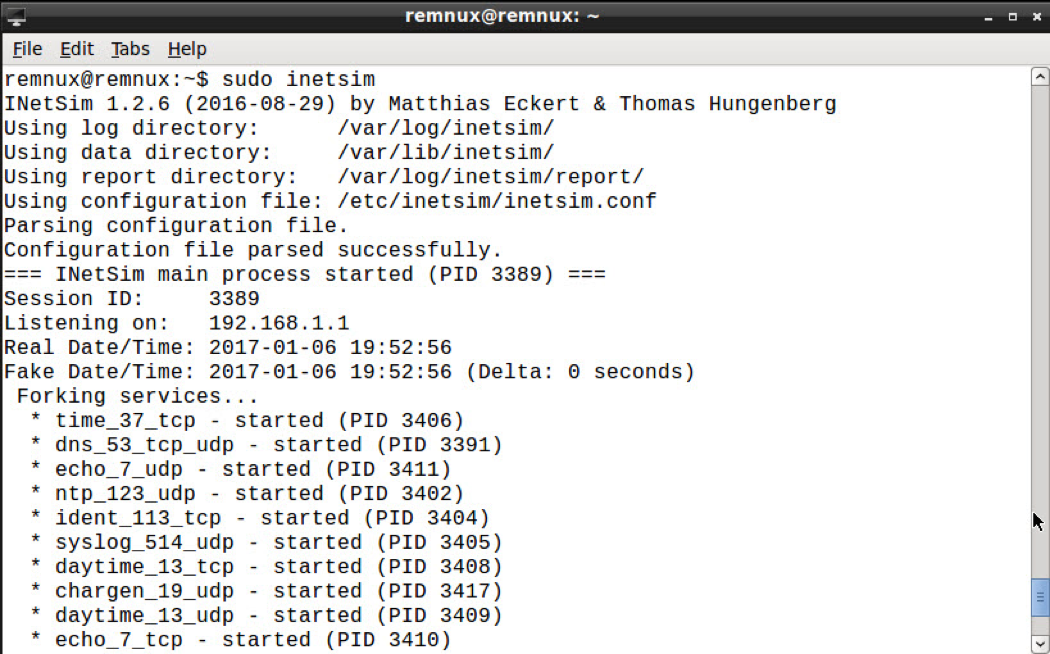
To mimic services that the malicious sample might communicate with, we will use INetSim. This is a Linux application which comes installed on the REMnux distribution developed by the SANS Institute. But you can install the application on any Linux distribution of your choice.
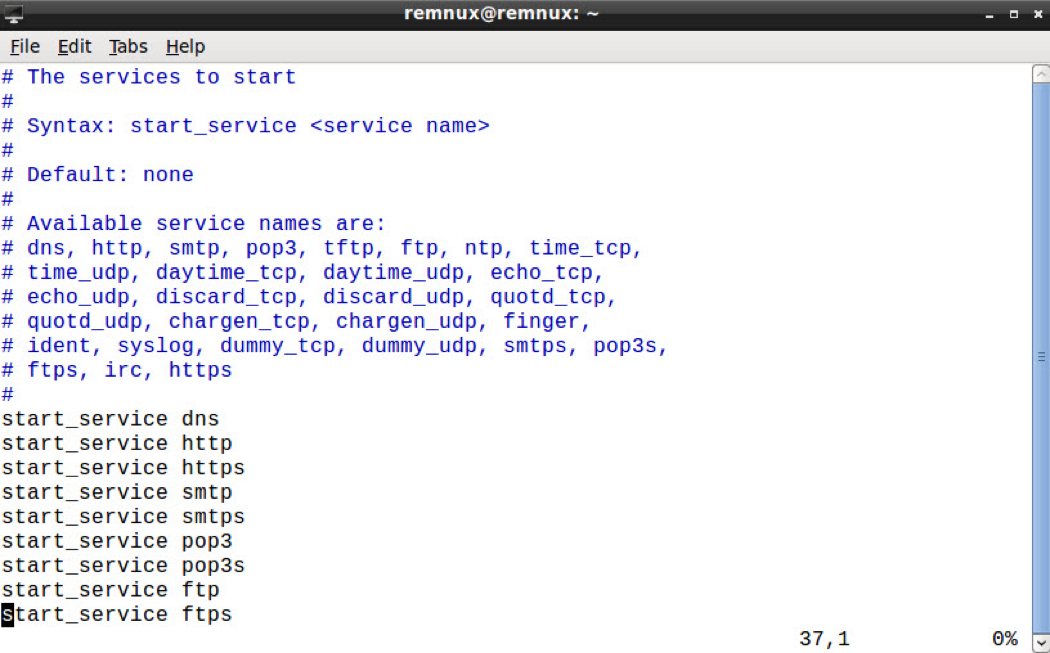
Changes are necessary to the configuration of INetSim to enable all of the services required for analysis. By default, most of the available services are disabled, but you can enable them by uncommenting the appropriate line. I recommend reviewing the configuration and making those changes as necessary.
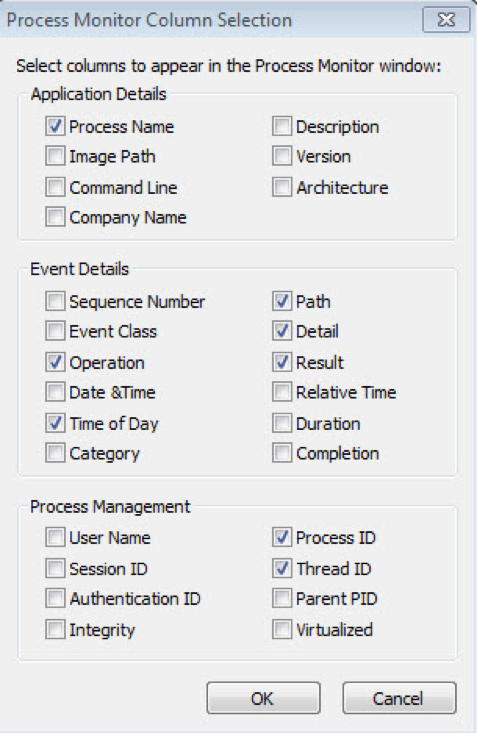
Prior to executing the malicious sample, we need to start our tools to watch for changes. There are two tools which I use for this. SysInternal’s Process Monitor is a tool which monitors the entire system for changes, to include changes to the registry and to the file system via hooks in the Windows API. When a process wants to write the file system, it must make calls to the appropriate Windows API to do so- process monitor identifies these calls and tracks what arguments are made during the call. Details about the processes and their threads are laid out in a table which updates continuously. We can, and ultimately will, output this data into a comma separated value, or CSV, format for ingestion into another product or review in its CSV form. To prepare us for the later use in a tool called ProcDOT, we need to make some minor configuration changes, as seen in Figure 6.

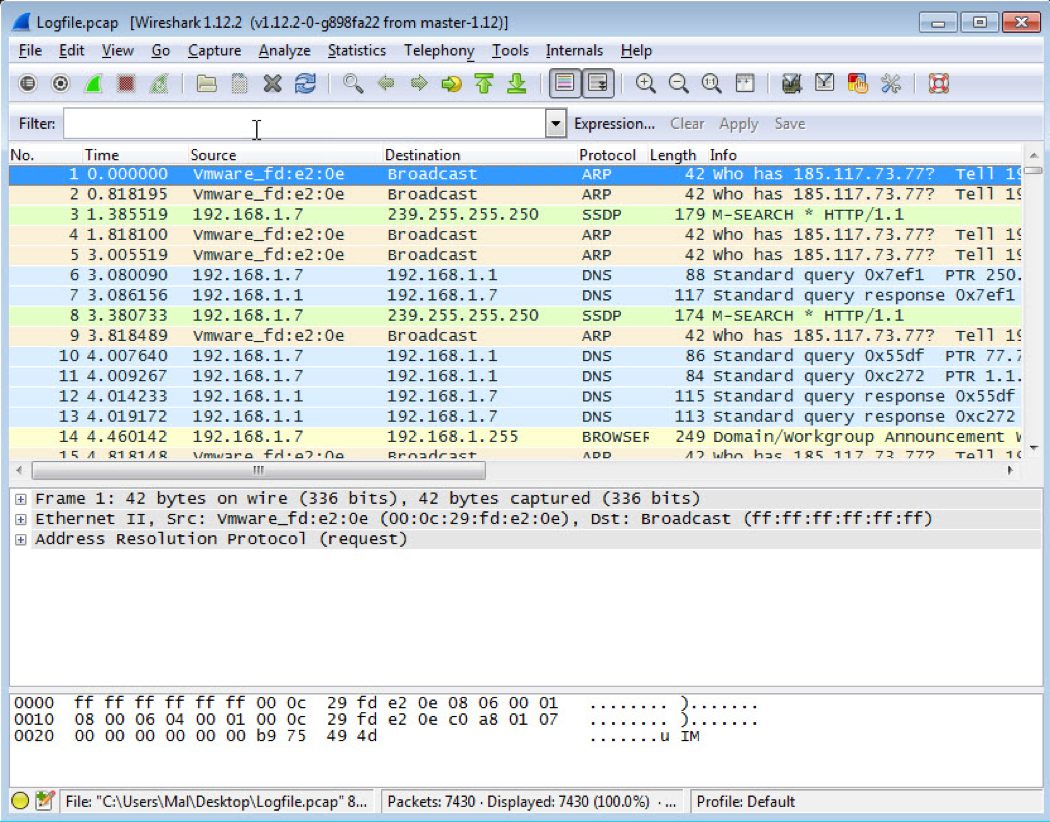
Samples will likely make some form of network communication. To capture this communication, we use the ever-popular Wireshark running on the Windows 7 machine. INetSim needs to be running and communication between the Linux and Windows host must be available for this to work.
We do not want the malware sample to speak to its actual command and control, as doing so would tip our hand to the adversary. Our goal is to find other hosts which made this similar communication. We may also use this information to prepare for second rounds of analysis. Wireshark is our go-to tool to capture this data.
Now that Wireshark and Process Monitor are running we can execute our sample. Running the sample with Administrative privileges will give us the greatest impact to the host. Realistically we will want to run this sample multiple times with a couple different levels of privilege to see what happens. Once we have executed the sample, we may monitor its progress using the Task Manger or Process Explorer. When we believe that the process has completed is primary objective, we can pause the data capture and export our data.
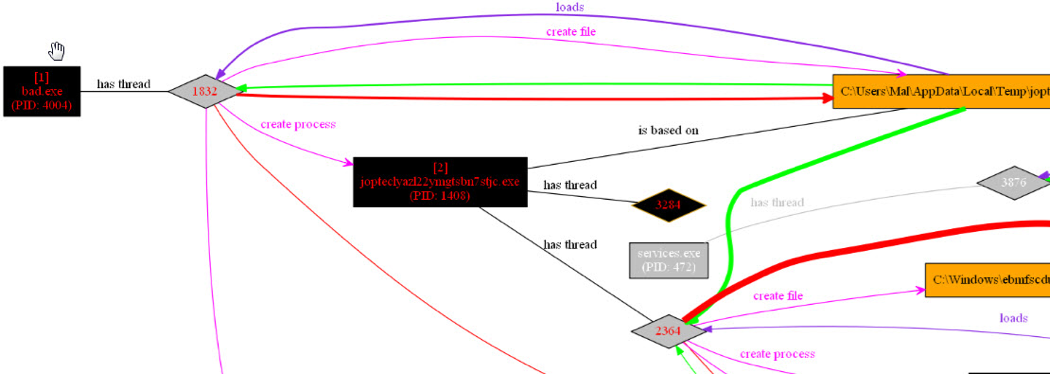
The exported data will now be imported into a graphing tool called ProcDOT. We must make sure that our output is formatted properly from Process Monitor and from Wireshark for use in ProcDOT. ProcDOT produces an interactive graph of the malicious process executing. In the graph, we can see changes made to the registry, files written to the volume, and attempts at resolving domain names for network communication.
Wrapping Up:
The whole purpose of analyzing the file is to determine artifacts, called indicators, which can be used to determine if the file successfully executed in the production environment. We can search for these indicators using the enterprise security information and event management (SIEM) system. Or we can package the indicators into rules such as Yara, OpenIOC, and Snort.
Limitations exist in this process of analysis. Malware can identify it is running inside of a virtual machine. We can avoid this problem by identifying malware capabilities during property analysis of the file then making changes to our procedures or to the sample itself such as removing the offending detection mechanisms. If we cannot get the file to execute at all inside a virtualized environment, we may be able to execute the file on a hardware system instead or perform manual code reversing to NOP out the offending subroutines.
These simple methods for analyzing malicious files can be a force multiplier for the incident responder on the ground during an investigation. Rather than waiting for a full reverse engineering of the sample, we can quickly determine indicators of compromise and properly complete the identification phase of the incident response process. Cisco Security’s Incident Response Service can also help support analysis of malicious files for our customers on retainer, and when those files require deeper analysis, we can leverage our relationship with Talos Intelligence.
For a demonstration on how these tools work together to help us analyze a file, watch my YouTube video.


Analysis is key to understand and stopping.
very great article. thank you very much!
Great list of tools and interesting use of Pareto principle.
When I was coding we used it to identify which coding issues to tackle first.