
Abstract
Building applications to automate management of your Webex organization is easy – keeping admin user OAuth access tokens refreshed is harder. HashiCorp Vault can help!
Introduction
While Webex – with all its collaboration and productivity enhancement features – is a powerful and delightful platform in-and-of itself, two key value propositions stand out for enterprise developers: meticulous focus on security, and expansive API capabilities. The promise of making IT’s life easier by automating administrative Webex tasks using scripts and applications is where security and APIs truly meet…
To make sure applications are authorized to perform particular operations, Webex APIs require that a Bearer access token be presented as part of each API request, for example:
GET /v1/people/me HTTP/1.1
Authorization: Bearer ZGU5MDc2NjctZredacted17f-9974-ad72cae0e10f
Host: webexapis.com
The process for obtaining an API access token varies a bit depending on which of two main credential types the app operates under: as a Bot, or as an Integration (the less commonly used Guest Issuer credential is also available, but wouldn’t typically be used for admin apps.)
Some of the key differences between Bots and Integrations include:
Bots: Statically configured ‘Machine’ accounts that can perform API operations acting as their own unique bot user.
- Use-cases: ‘chat ops’ messaging notification, interactive chat bots/assistants
- Pros: easy to create; easy to use; access token never expires (99 years)
- Cons: limited capabilities (message visibility, Widget/SDKs, admin APIs)
Integrations: Implement OAuth2 authentication flows to obtain credentials for acting on end-users’ behalf.
- Use-cases: Productivity apps; Widget/SDK apps; operations that should occur ‘as’ an end user.
- Pros: Impersonates a real end user; no limitations on API operations; can use admin APIs (if the user is an admin)
- Cons: Requires implementation of the OAuth2 authorization code grant flow; requires an end-user to authenticate via a web browser; access token expires relatively quickly (e.g. 14 days, though they can be refreshed).
Glancing at the above, you might be tempted to select a Bot application type for an an admin app since the access token is statically generated and lasts indefinitely; however, note that Bots can not perform admin operations!
The correct choice is to use an Integration application type, since an access token generated via OAuth2 can be used to perform any operation the authenticating user is allowed to perform. One of the challenges in building Integration apps is implementing the OAuth2 flow, which requres a real, live human to authenticate via a web browser. The other challenge is that OAuth2 generated tokens last only 14 days:

Imagine you are tasked with building an application that compiles a monthly report of Webex meeting activity using the Webex REST API /v1/analytics/meetingsMetrics/aggregates resource. You’ve been able to successfully implement an OAuth2 grant flow allowing an admin user to login and generate an access token, then use the token to retrieve the data. However, if the application stores this access token and attempts to use it a month later, the access token will have expired, requiring the admin to manually authorize the app again.
This is where Vault (plus Puppet Labs’ vault-plugin-secrets-oauthapp) comes into the picture!
Vault and vault-plugin-secrets-oauthapp
Any Webex application – whether Bot, Integration, or Guest Issuer – has a key responsibility to protect access tokens and other secrets that could be used by potential attackers to invade privacy, steal/destroy data, or disrupt communications. Using a centralized, ultra-secure secret management solution like Vault is a great best-practice for keeping enterprise secrets organized, controlled, and safe. We’ll also see how Vault can transparently generate and auto-refresh Webex OAuth2 access tokens, making the access token generation/refresh process automatic and highly secure.
Vault can be used to statically store all kinds of secrets, but the OAuth2 access token generation and auto-refresh functionality we’re looking for doesn’t come with Vault out of the box – for that we will be using a Vault plugin developed by Puppet Labs: vault-plugin-secrets-oauthapp.
Step-by-Step Guide
Note: This tutorial was created using the following software versions installed. Please see the respective projects’ web sites for installation details:
- Ubuntu 22.04
- Docker 20.10
- Python 3.10
Caveat: For simplicity, the tutorial below demonstrates Vault config/access via the official Vault container, in development mode. For production, you will absolutely not want to use this Vault implementation, but rather a fully hardened and professionally managed Vault instance.
Starting the Vault Server
- Download the vault-plugin-secrets-oauthapp plugin from the Releases area of the GitHub repo. In this case we’re using: vault-plugin-secrets-oauthapp-v3.0.0-linux-amd64.tar.xz
- Open a terminal window and navigate to the plugin download directory.
- Decompress the archive:
tar -xvf vault-plugin-secrets-oauthapp-v3.0.0-linux-amd64.tar.xz
- Rename the plugin binary to something a bit less unwieldy:
mv vault-plugin-secrets-oauthapp* oauthapp
- Pull the Vault container (latest, 1.10.3 as of this writing):
docker pull vault
- Start the Vault container:
docker run -it \
--name vault \
-p 8200:8200 \
-v ${PWD}/oauthapp:/etc/vault/plugins/oauthapp \
vault:latest server -dev -dev-plugin-dir /etc/vault/plugins
A brief explanation of the parameters:
| Parameter | Value |
| -it | Run the container in an interactive terminal |
| -name vault | Name the container ‘vault’ for ease of access later |
| -p 8200:8200 | Expose the Vault API port for client application access |
| -v ${PWD}/oauthapp:/etc/vault/plugins/oauthapp | Mounts the oauthapp plugin binary (from the current working directory) into the container |
| server | Start the Vault server |
| -dev | Start Vault in development mode |
| -dev-plugin-dir /etc/vault/plugins/ | Location for Vault plugins |
You should see output similar to the below:
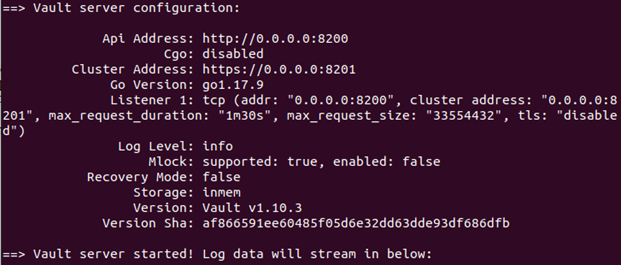 Note the generated Root Token shown at the bottom of the log output, e.g:
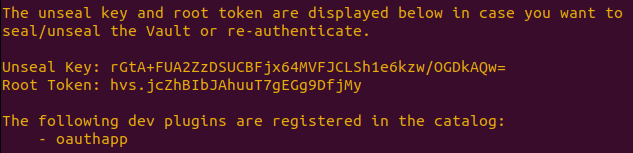
This will be the Vault access token we’ll use when performing Vault client and API operations – copy it to a safe place.
Note also that the oauthapp plugin was successfully registered.
Caveat: While we’ll use this root Vault token in the steps below, in production you will absolutely want to use a proper, generated identity token unique to your application.
Vault Server Configuration
- Open a second terminal window and attach to the running Vault container:
docker exec -it vault sh
- Set the VAULT_ADDR environment variable for the (non-HTTPS) Vault URL:
export VAULT_ADDR='http://0.0.0.0:8200'
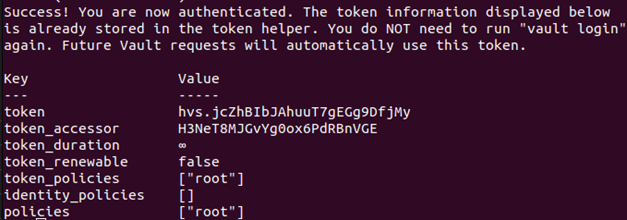
- Login to Vault from the CLI:
vault login <vault_token>
- Enable the oauthapp plugin:
vault secrets enable oauthapp
![]()
Configuring the Webex OAuth Server
At this point we are ready to create an oauthapp server that will manage Webex OAuth2 credentials for our application; however, before we can do that we need to register a new Webex Integration:
- Browse and login to https://developer.webex.com/my-apps and create a new integration.
Note: it’s possible that your Webex organization’s admin has disabled the ability for users to create/use their own Integration apps – if so you may want to request a Webex Developer Sandbox organization using a non-org-associated email address. - Enter the Redirect URI as: http://localhost:5000
- For this Integration, select just the scope: spark:people_read
- Upon creation of the Integration, you will be shown the Client ID and Client Secret – keep this page open for bit (or copy them into a safe place) as we will need these values later. The Client Secret will be displayed just this one time!
- We’re now ready to define our first oauthapp server: back in your 2nd terminal window, run the following command (substituting your app’s Client ID and Client Secret):
vault write oauthapp/servers/webex-myapp provider=custom
client_id=<client_id> client_secret=<client_secret>
provider_options=auth_code_url="https://webexapis.com/v1/authorize"
provider_options=token_url="https://webexapis.com/v1/access_token"
A brief explanation of the parameters:
| Parameter | Value |
| write | We’re storing information in Vault |
| oauthapp/servers/webex-myapp | We’re defining a new oauthapp server (equiv. to a specific Webex Integration), named webex-myapp |
| client_id | Copied from the Integration page |
| client_secret | Copied from the Integration creation page |
| provider=custom | Webex is not one oauthapp’s built-in providers – we’ll need to create a custom provider here |
| provider_options=auth_code_url | This is the URL where the Webex OAuth2 authorization code grant flow should initate |
| provider_options=token_url | This is the URL where authorization codes can be exchanged for access tokens |
You should see output similar to:
![]()
Generating a Webex Access Token via Vault CLI
Now that the Vault server is fully configured, let’s see how to use Vault/oauthapp to perform the Webex OAuth2 authorization code grant flow ‘manually’ via the Vault CLI:
- Request an authorization code grant flow kickoff URL:
vault write oauthapp/auth-code-url server=webex-myapp redirect_url="http://localhost:5000" scopes="spark:people_read" state="12345"
A brief explanation of the parameters:
| Parameter | Value |
| write | Since the state parameter (which should be unique for each OAuth2 attempt) needs to be persisted across commands, this is a Vault write operation |
| oauthapp/auth-code-url | We’re creating a new auth-code-url definition |
| server=webex-myapp | We want to authenticate using the ‘webex-myapp’ server associated with our specific Webex Integration |
| redirect_url=”http://localhost:5000″ | The redirect URL to be used for this OAuth2 grant flow (note, there is nothing here at the moment) |
| scopes=”spark:people_read” | The requested scopes (can be a comma-separate list) |
| state=”12345″ | A unique value provided by the app for each OAuth2 request |
You should receive a response similar to:

- Copy the authorization code URL from the response and browse to it in a new tab – complete the login sequence.
You will see that your browser shows ‘Unable to connect’ (or a similar error) since we haven’t started any web servers at that URL. However, if you look at the browser address bar, you should see that the URL includes query parameters code (with the returned authorization code), and state (which should match the state value provided in the previous step):
![]()
Copy just the actual value of the code (be sure not to grab the ‘&state=12345’ at the end) for use in the next step.
- Exchange the authorization code and store the actual access token:
vault write oauthapp/creds/testauth server=webex-myapp
code=NGFhMjJmMjYtNGY1MCredactedad72cae0e10f
redirect_url="http://localhost:5000"
A brief explanation of the parameters:
| Parameter | Value |
| write | We’re storing the Webex OAuth credentials (including the initial access token as well as a refresh token)We’re creating a new credential called testauth |
| oauthapp/creds/testauth | We’re creating a new credential called ‘testauth’ |
| server=webex-myapp | We want to use the previously defined server webex-myapp |
| code= | This is the authorization code copied during the previous step |
| redirect_url=”http://localhost:5000“ | The Redirect URL associated with this server/Integration; must be the same as in the Vault write oauthapp/auth-code-url step above |
You should see output similar to:
![]()
- Let’s test that we can get a fresh access token for this authorization any time, via:
vault read oauthapp/creds/testauth
You should see output similar to:
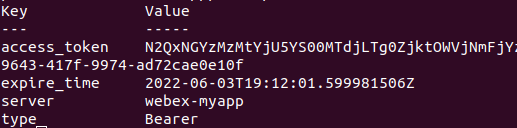
- We can test making a Webex REST API call using the retrieved access token:
wget -qO - --header='Authorization: Bearer N2QxNGYzMzMredacted9974-ad72cae0e10f' https://webexapis.com/v1/people/me
which should output the JSON response data for the access token’s user.
- Finally, we can delete the credential from Vault via:
vault delete oauthapp/creds/testauth
However note that this doesn’t revoke the Webex access code itself, which will continue to work until it expires or is revoked by the Webex user or an admin.
Using Vault from a Python Application
The CLI steps above could be all you need for a basic working scenario: Vault/oauthapp will refresh this credential indefinitely as long as the Vault server is running (or if the production mode Vault server restarts before the refresh token expires, e.g. 90 days). All we need is to configure the app with the necessary Vault API URL and token to get a guaranteed fresh access token at any time using the Vault hvac library:
However, you may have noted that performing the OAuth2 flow via CLI requires a fair number of steps, with a lot of error-prone (and insecure) data-entry, copy/pasting, etc. It also needs to be done for each set of credentials required (e.g. for separate app instances or different apps) or if the credentials are revoked or expire.
The hvac library can be used to accomplish all of the above at run-time! For a working sample of a basic Python+Flask based solution, you can check out this CiscoDevNet GitHub repository: https://github.com/CiscoDevNet/webex-vault-samples
See the REAME.md for details on how to configure and run the sample.
Key code sections:
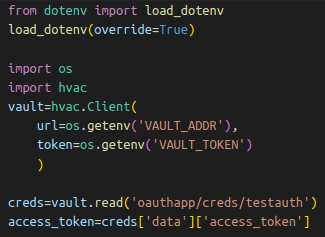
- Retrieving an access token from the Vault/oauthapp credential:

- Requesting an authorization code kickoff URL:
- Creating a Vault/oauthapp credential using the received authorization code:


Conclusion
A platform is only as secure as it’s most-insecure component – take special care to ensure that your Webex application is not the weak link! Deploying Vault to your enterprise is a great way to get a secure handle on managing all kinds of application secrets, not just those associated with Webex apps.
Hopefully, using the hints and code samples provided here you can create powerful tools to manage and monitor your Webex organization without requiring a lot of manual admin logins or intervention.
Resources
- More Cisco DevNet blogs about Hashicorp Vault
- Webex for Developers
- Request a Webex Developer Sandbox
- Hashicorp Vault
- vault-plugin-secrets-oauthapp
We’d love to hear what you think. Ask a question or leave a comment below.
And stay connected with Cisco DevNet on social!
LinkedIn | Twitter @CiscoDevNet | Facebook | YouTube Channel


Excellent writeup and very interesting! You did an awful lot of work to produce this.