
Get your free DevNet account for access to our developer resources, learning labs & sandbox
Just before I left for Cisco Live US, I was given the chance to work with the APIs on Cisco DNA Center. Having never used Cisco DNA Center this was a quick learning curve, but once I started I could see some great possibilities and some more coding fun to be had! Once back from Cisco Live US, where I learned even more about DNA Center (an awesome experience), I was excited to expand my knowledge and leverage some fun python code using the APIs that DNA Center has to offer.
Dude, where is my DNA Center sandbox?
All the Python code you are about to see and learn about can be used on the DNA Center Always-On Sandbox. I used this for the creation of the code and documentation for this blog post and testing/building this code. This DevNet Sandbox lets you:
- Access at any time without making a reservation or using VPN connection
- Learn the DNA Center GUI or experiment with the REST API
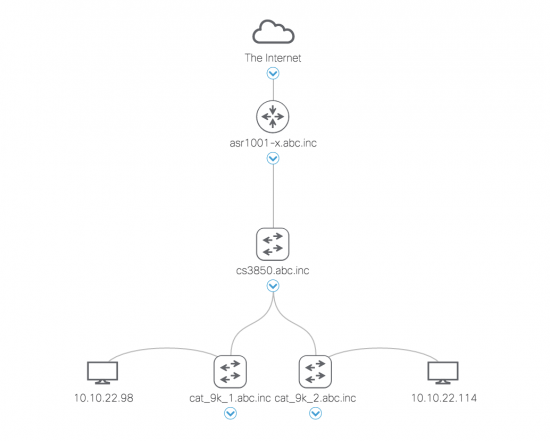
- Access a pre-configured network topology running on genuine Cisco hardware
Because this sandbox is always available to all users, any other user may potentially overwrite your work at any time. The other caveats to an always-on DNA Center sandbox are… you cannot configure the network or devices and you cannot activate and enforce policy on network devices. I should also note there is other DNA Center sandbox’s that are reservable which provides your own private lab environment for the duration of the reservation.
Network device’s script, simple and easy to create
By the end of this blog post, you will learn:
- How to use the DNA Center APIs
- How to use the DNA Center APIs in a Python script
I have started with a simple Python script. The Python script uses the DNA Center APIs to get device information. The APIs provide a list of all of the network devices the DNCA controller knows about and all of their attributes. For example, hostname, serial platform type, software version, uptime, etc. You can either get all of the devices or a subset. The script print to console using PrettyTable is a simple Python library designed to make it quick and easy to represent tabular data in visually appealing ASCII tables.
Using DNA Center APIs
By looking at the API Catalog within DNA Center you can see this contains documentation about each API call, including the request method and URL, query parameters, request header parameters, responses, and schema, along with ways to preview or test the request.
Pre-Requisites
In order to run the code featured here, you must have Python 3.6 installed. We will use the following Python packages listed below.
requestsWe will use this to make HTTP requestsprettytableThis will be used to generate ASCII tables in Python
We must also import HTTPBasicAuth from requests.auth. This can be all installed by using the requirements.txt file on the GitHub repo (link below). Use pip to install the requests libraries as shown below:
pip install -r requirements
Authentication
The DNA Center APIs use token-based authentication. Token-based authentication works by ensuring that each request is accompanied by a signed token which is verified for authenticity and only then responds to the request. This POST function logs in retrieves a token the request and returns the response body.
def dnac_login(host, username, password):
    url = "https://{}/api/system/v1/auth/token".format(host)
    response = requests.request("POST", url, auth=HTTPBasicAuth(username, password),
                                headers=headers, verify=False)
    return response.json()["Token"]
The next Python function uses the network-devices API. As mentioned above the APIs provide a list of all of the network devices the DNCA controller knows about and all of their attributes. Here we are using the GET Method. GET is used to request data from a specified resource, GET is one of the most common HTTP methods.
def network_device_list(dnac, token):
    url = "https://{}/api/v1/network-device".format(dnac['host'])
    headers["x-auth-token"] = token
    response = requests.get(url, headers=headers, verify=False)
    data = response.json()
Printing with prettytable module
Now we have all our information, you can make this presentable and readable using the python module prettytable to create one table with headers. This holds the ‘Hostname’, ‘Platform Id’, ‘Software Type’, ‘Software Version’, ‘Up Time’ (you can also add serial number, MAC address, management IP address….etc)
dnac_devices = PrettyTable(['Hostname','Platform Id','Software Type','Software Version','Up Time' ])
dnac_devices.padding_width = 1()
As part of the network-device API, the Python script is connecting to DNA Center and using a loop for iterating over a sequence querying for the information, selecting the data required from the returned output, and then populating the table.
    for item in data['response']:
        dnac_devices.add_row([item["hostname"],item["platformId"],item["softwareType"],item["softwareVersion"],item["upTime"]])
Running the code
Testing this out against the DNA Center in the DevNet Sandbox, we can see the following output we requested printed a clear table format.
python get_dnac_devices.py
+-------------------+----------------+---------------+------------------+-----------------------+
|      Hostname     |  Platform Id   | Software Type | Software Version |        Up Time        |
+-------------------+----------------+---------------+------------------+-----------------------+
| asr1001-x.abc.inc |   ASR1001-X    |     IOS-XE    |      16.6.1      | 180 days, 19:21:43.97 |
|  cat_9k_1.abc.inc |   C9300-24UX   |     IOS-XE    |      16.6.1      | 180 days, 20:20:17.26 |
|  cat_9k_2.abc.inc |   C9300-24UX   |     IOS-XE    |      16.6.1      | 180 days, 20:14:43.95 |
|   cs3850.abc.inc  | WS-C3850-48U-E |     IOS-XE    |     16.6.2s      |  177 days, 7:33:46.98 |
+-------------------+----------------+---------------+------------------+-----------------------+
Adding additional attributes required?
No problem! Let now say for example we wanted to expand on this and added some additional (or we could replace/remove) attributes to our information. This is really simple to do. In our code we only need to update two places, the header and the additional attribute we want to parse from DNA Center from the script. Let’s add the devices serial number and management IP address.
dnac_devices = PrettyTable(['Hostname','Platform Id','Software Type','Software Version','Up Time', 'Serial Nu', 'MGMT IP' ])
dnac_devices.padding_width = 1
for item in data['response']:
        dnac_devices.add_row([item["hostname"],item["platformId"],item["softwareType"],item["softwareVersion"],item["upTime"], item["serialNumber"], item["managementIpAddress"]])
Now, let’s run the Python script once more and see the additional attributes we added.
python get_dnac_devices.py
+-------------------+----------------+---------------+------------------+-----------------------+-------------+-------------+
|      Hostname     |  Platform Id   | Software Type | Software Version |        Up Time        |  Serial Nu  |   MGMT IP   |
+-------------------+----------------+---------------+------------------+-----------------------+-------------+-------------+
| asr1001-x.abc.inc |   ASR1001-X    |     IOS-XE    |      16.6.1      | 180 days, 19:21:43.97 | FXS1932Q1SE | 10.10.22.74 |
|  cat_9k_1.abc.inc |   C9300-24UX   |     IOS-XE    |      16.6.1      | 180 days, 20:45:36.37 | FCW2136L0AK | 10.10.22.66 |
|  cat_9k_2.abc.inc |   C9300-24UX   |     IOS-XE    |      16.6.1      | 180 days, 20:40:03.91 | FCW2140L039 | 10.10.22.70 |
|   cs3850.abc.inc  | WS-C3850-48U-E |     IOS-XE    |     16.6.2s      |  177 days, 7:33:46.98 | FOC1833X0AR | 10.10.22.69 |
+-------------------+----------------+---------------+------------------+-----------------------+-------------+-------------+
Conclusion, automate all the things
We can all acknowledge that manual processes are the adversary of quick value delivery, high productivity, and security. Automation isn’t only about making tasks quicker though. It also allows the creation of repeatable environments and processes as we have seen above with this Python script. Anyone on your team could run this script, no more logging support tickets for information about network devices and their current images or device types or logging into every device and running the same CLI commands, just run the automated script.
Getting the code
Try this for yourself – all of the code for this example and installation instructions can be found on my GitHub via Cisco DevNet CodeExchange
Cisco DevNet helps you get started and learn more!
Congratulations! Now you have learned how to build Python scripts that leverage DNA Center APIs to automate a task with an assurance solution that provides comprehensive visibility into the network devices and state. Want to learn more? Cisco DevNet is a great place to go. Wherever you are on the network automation journey, you’ll find all kinds of helpful information – including learning labs, sandboxes, and API documentation – in the Networking Dev Center.
Get your free DevNet account for access to our developer resources, learning labs & sandbox.
We’d love to hear what you think. Ask a question or leave a comment below.
And stay connected with Cisco DevNet on social!
Twitter @CiscoDevNet | Facebook | LinkedIn
Visit the new Developer Video Channel


Great post; thanks Stuart!
Thanks, Julio. 🙂
Stuart / bigevilbeard,
I enjoyed your talk in the DevNet Zone at CLUS2018, and I look forward to digging into the information you've provided here.
Thanks!
Hey Vincent! Thank you, this was fun to write I hope you enjoy it.
This doc helped to resolve a ticket. Great blog my friend