
The Rubber Hits the Road..
The first and second blog posts in this series gave an overview of network Plug and Play (PnP) and how it has evolved in Cisco DNA Center. They showed a very simple workflow to provision a device with a configuration template with a variable called “hostname.” This was done by the UI and programmatically via the API.
This blog post looks at creating PnP configuration templates using template editor in Cisco DNA Center. Here, we will cover the User Interface and basic concepts, and subsequent blog posts will cover advanced topics, Day-N provisioning and the associated API.
Template Editor
The template editor is a standalone application at the bottom of the Cisco DNA Center home page. It can be used for Day-0 (PnP) or Day-N configurations.

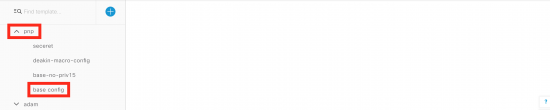
When the editor is opened for the first time, a project needs to be created along with a template. Projects are like folders to contain and structure the templates you build. The example below, shows the “base config” template used in the earlier blogs. “pnp” and “adam” are just project names.
Creating a new Template
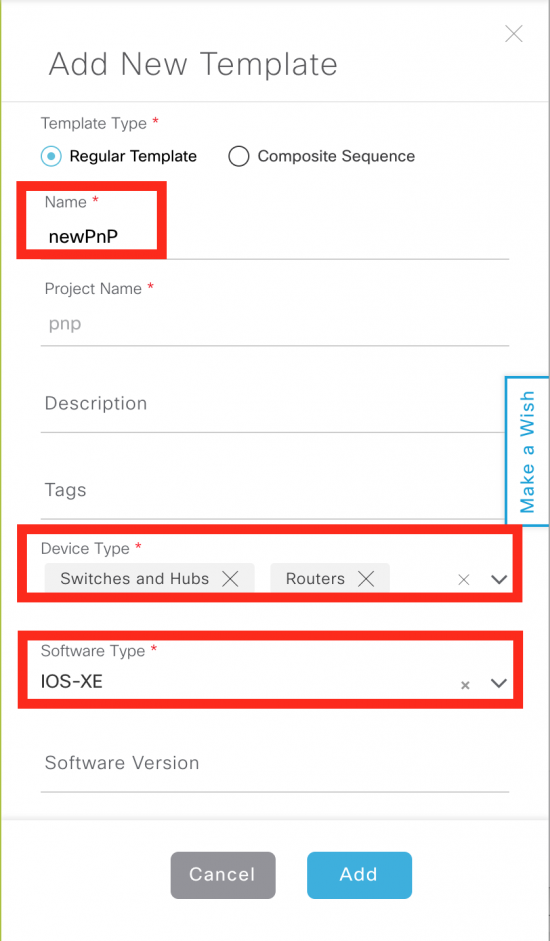
Click the “+” at the top of the template page or the gear beside a project to add a new template. The “+” allows you to create a project or a template, while the gear creates a template with the project.

The “add new template” slide out will appear. This contains metadata about the template, such as the device types it applies to and the flavor of IOS. The example below applies to routers and switches (all models) which run IOS-XE. It is possible to restrict the template to a specific version of code or model of device.
NOTE: It is possible to have a single template or a composite sequence of templates. Currently composite sequences are not supported in PnP.
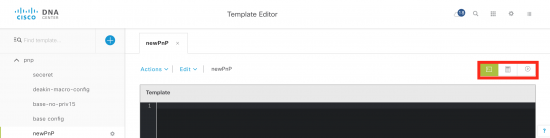
Click on the template to edit it. The three boxes on the top right are used to navigate between the following views:
- Edit – to edit/commit the template.
- Variable – provide metadata about the variables used in the template. “$” is used to signify a variable.
- Simulation mode – View the rendered template by providing a set of test values for the variables.
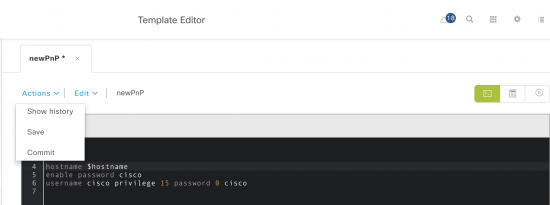
It is important to realize that templates have a 2-phase commit. A template can be saved, but it needs to be “committed” before it can be used. Templates have version control based on the “commit process”.
First Version
After entering some commands, the template needs to be saved and committed. Any string that starts with “$” will be treated as a variable. In this example, “$hostname” is a variable. Multiple variables are supported.
Variable Types
After committing an initial template version, the variables view can be used to change the type of the variable if required. Variables can also be marked as “not a variable”, which is useful for configuration strings that contain “$”. I will discuss this more in the advanced blog post.

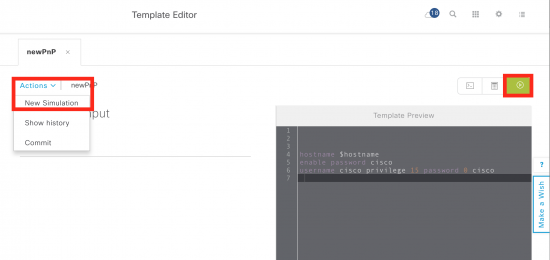
Simulation
Simulations can be used to test the template with dummy variables. This is particularly useful later on when using loops and other control structures in a template.
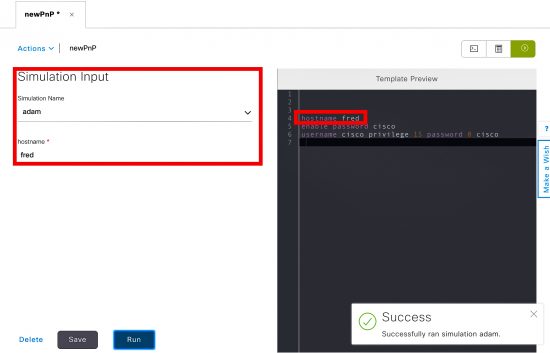
Select the simulation tab, and then the “New Simulation” action.
You then need to provide a value for the variables, and run the simulation to see the result. Notice how the hostname variable has been replaced by its value (“fred”).
The simulation feature is particularly relevant with more sophisticated templates.
What next?
This blog post shows how to create templates for PnP. The next blog post will go into more detail on the template language: velocity.
In the meantime, if you would like to learn more about this, you could visit Cisco DevNet. In addition, we have a Github repository where you can get examples related to PnP.
Thanks for reading
We’d love to hear what you think. Ask a question or leave a comment below.
And stay connected with Cisco DevNet on social!
Twitter @CiscoDevNet | Facebook | LinkedIn
Visit the new Developer Video Channel


Hi! Thanks for this one. I have tried simulation on a template with if/elseif/else block and provided the output which I didn't expect. So… let's say my template is
if ($var1 == 'value1')
ip ssh version 2
else
ip ssh version 1
end
I used simulation to render it, defined $var1's value as 'value2' and got the following
if (value2 == 'value1')
ip ssh version 2
else
ip ssh version 1
end
However, I expected proper rendering and the following output
ip ssh version 1
Am I doing something wrong, or is it how it works?
Please ignore my DUMB question 😀
I forgot to add # before my if/else/end! It works as expected now!