
Continuing the PnP story…
The first blog in this series gave an overview of network Plug and Play (PnP) and how it has evolved in DNA Center. It showed a very simple workflow to provision a device with a configuration template with a variable called “hostname”.
One of my customers had a requirement to automate the PnP process for deploying 1600 new switches. Assigning a workflow and template variables to each device through the user interface would be a very time consuming and (potentially) error prone process.
This blog has an example script to automate this, then breaks down each of the API calls in case you would like to further customize.
The following API steps will be shown in detail:
- Automated discovery of configuration template and variables from an onboarding workflow.
- Automated addition of a new device to PnP.
- Automated claiming of a device, assignment of the workflow and population of template variables.
The example scripts used here are all available from this Github repository.
Bulk Device Provisioning – Template Example
In order to bulk configure devices, I need a configuration file (csv in this case). This file contains
- name of the PnP rule
- serial number of the device to be onboarded
- product ID of the device
- workflow name – which contains a configuration template
- hostname – a variable used in the configuration template defined in the workflow.
name,serial,pid,workflow,hostname
auto_python0,12345678910,WS-C3850,simpleTemplate,adam0
auto_python1,12345678911,WS-C3850,simpleTemplate,adam1
auto_python2,12345678912,WS-C3850,simpleTemplate,adam2
auto_python3,12345678913,WS-C3850,simpleTemplate,adam3
auto_python4,12345678914,WS-C3850,simpleTemplate,adam4
auto_python5,12345678915,WS-C3850,simpleTemplate,adam5
auto_python6,12345678916,WS-C3850,simpleTemplate,adam6
auto_python7,12345678917,WS-C3850,simpleTemplate,adam7
auto_python8,12345678918,WS-C3850,simpleTemplate,adam8
auto_python9,12345678919,WS-C3850,simpleTemplate,adam9
The csv file is used as input to the script. In this case it is only 10 devices, but it would be the same process for 1600.
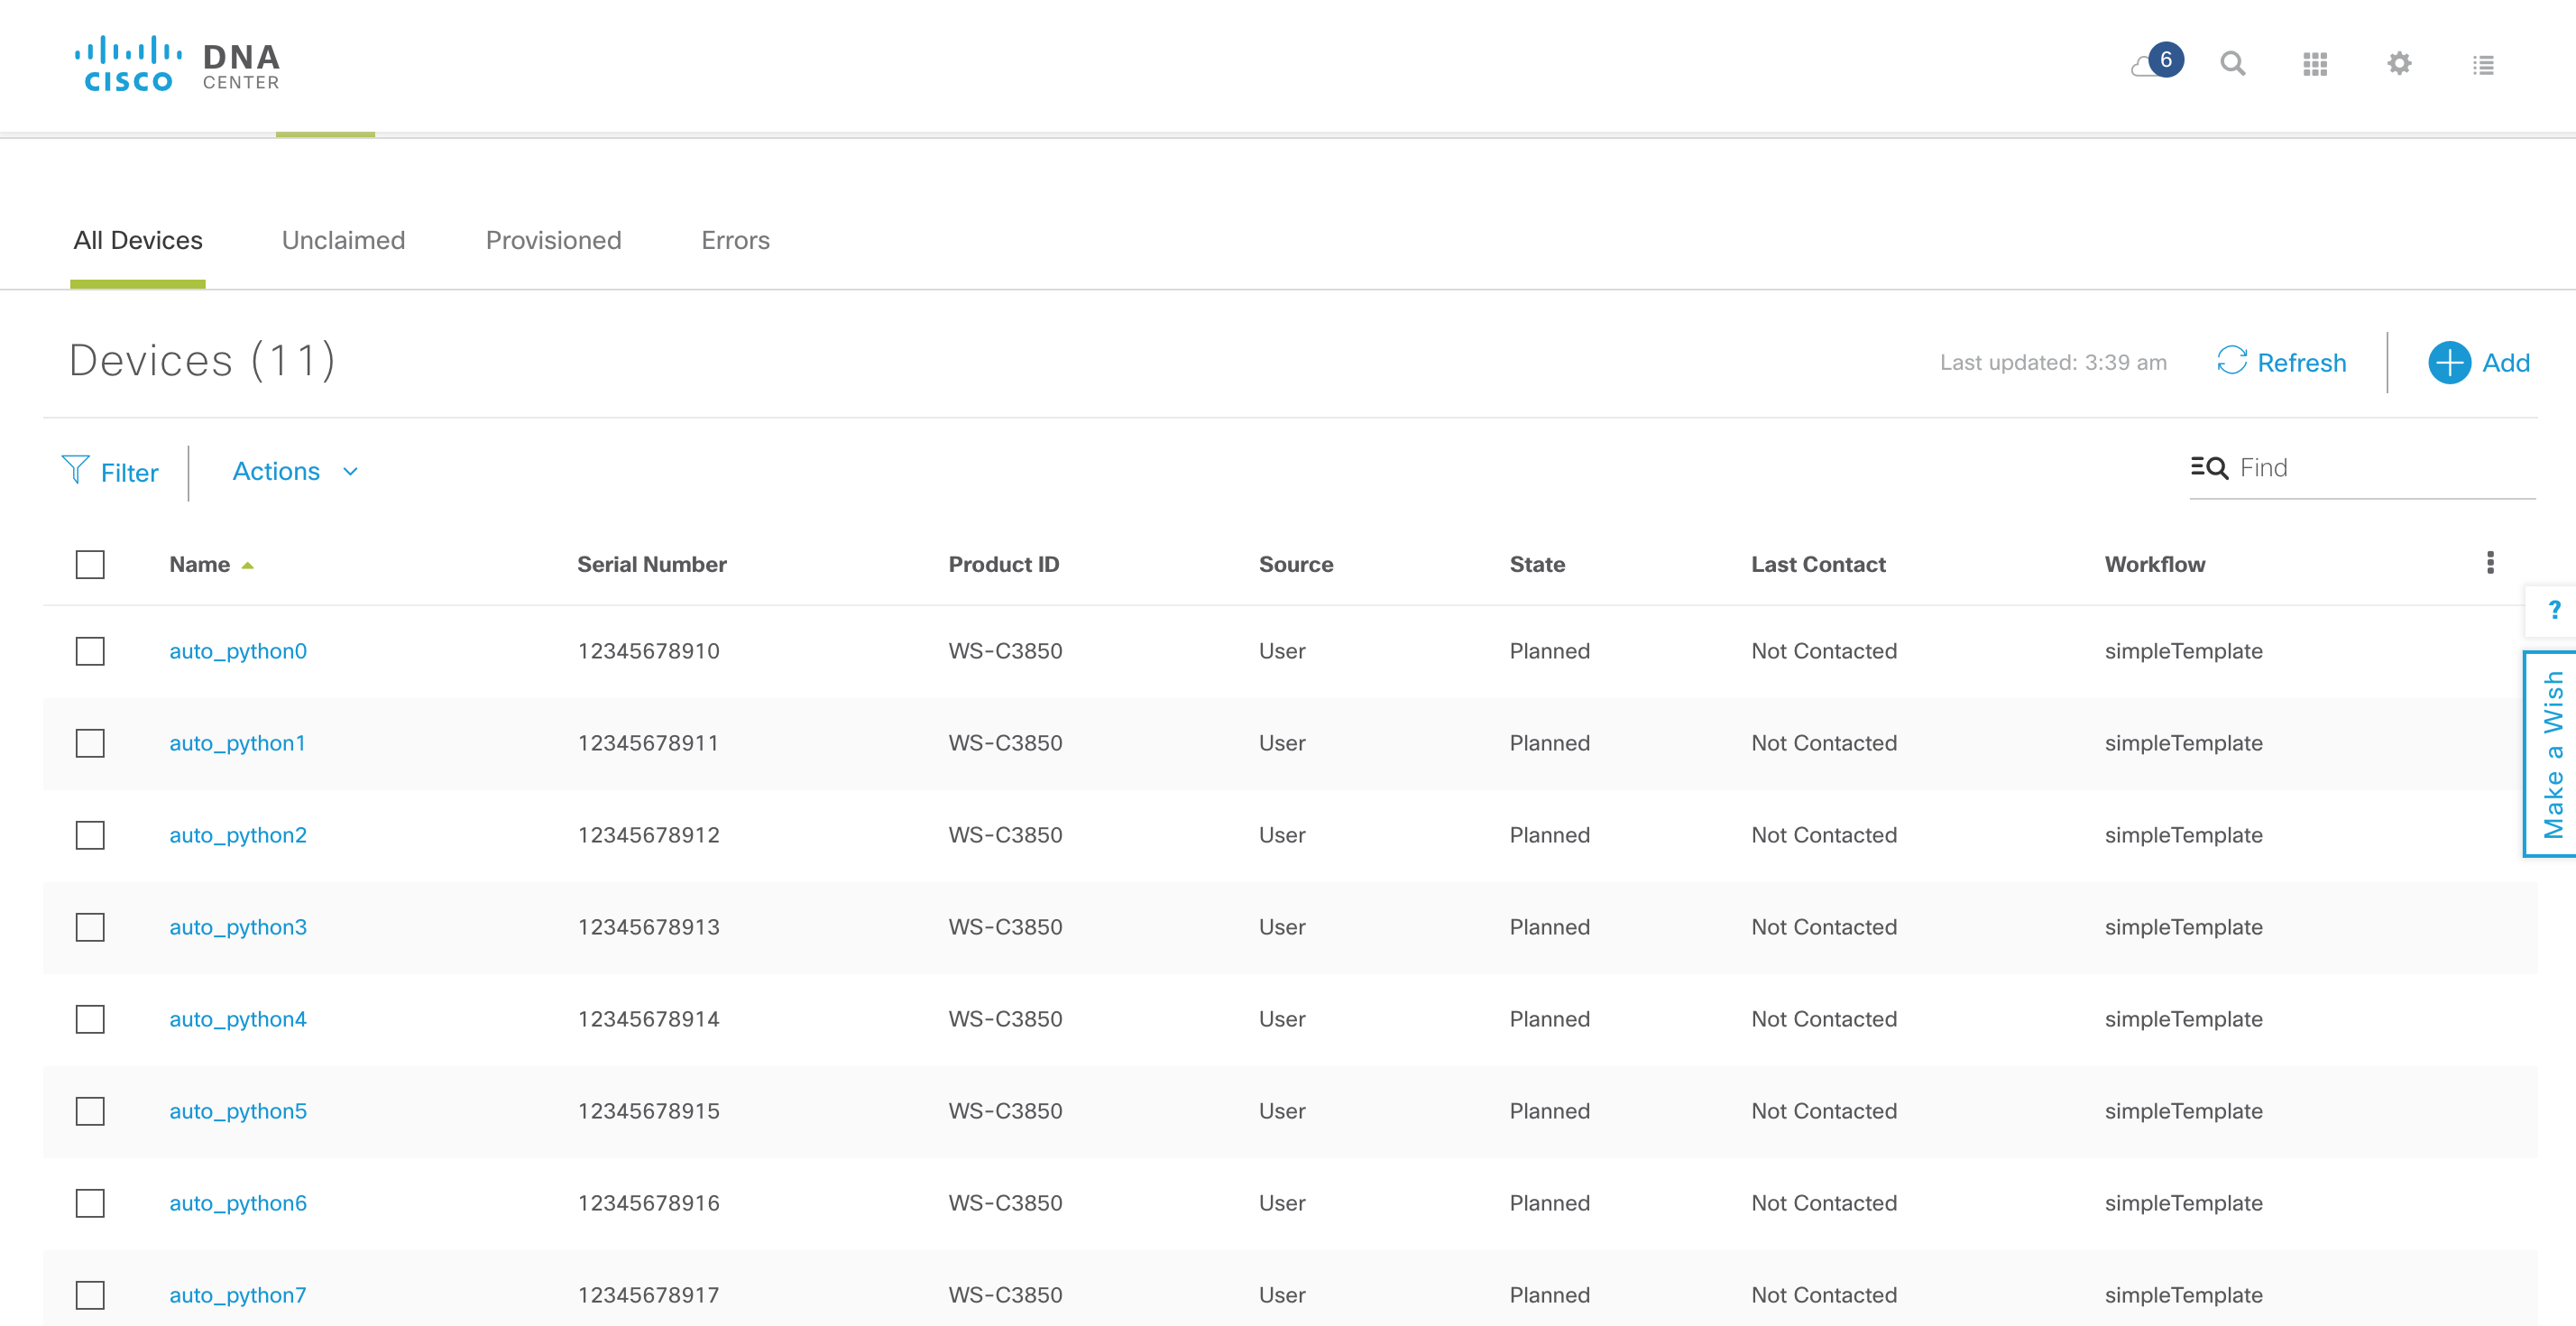
python ./10_add_and_claim.py work_files/bigtest.csv
Using device file: work_files/bigtest.csv
##########################
Device:12345678910 name:auto_python0 workflow:simpleTemplate Status:PLANNED
Device:12345678911 name:auto_python1 workflow:simpleTemplate Status:PLANNED
Device:12345678912 name:auto_python2 workflow:simpleTemplate Status:PLANNED
Device:12345678913 name:auto_python3 workflow:simpleTemplate Status:PLANNED
Device:12345678914 name:auto_python4 workflow:simpleTemplate Status:PLANNED
Device:12345678915 name:auto_python5 workflow:simpleTemplate Status:PLANNED
Device:12345678916 name:auto_python6 workflow:simpleTemplate Status:PLANNED
Device:12345678917 name:auto_python7 workflow:simpleTemplate Status:PLANNED
Device:12345678918 name:auto_python8 workflow:simpleTemplate Status:PLANNED
Device:12345678919 name:auto_python9 workflow:simpleTemplate Status:PLANNED
The DNA Center GUI shows 10 new devices have been added to PnP service, waiting to be onboarded. Once the devices connect to the network, they will contact DNA Center and be onboarded with the intended configuration.
The other python scripts in the repository will show the complete configuration template for the device (before it is provisioned) and do a bulk delete of the devices.
Looking at the API details – Workflow
I am going to keep the same steps as the first blog. The first step it to examine the workflow to find the template and extract the variables from it.
A GET request looks up the workflow “simpleTemplate” by name. The workflow has a single step, called “Config Download” and the template has a UUID of “d0259219-3433-4a52-a933-7096ac0854c3”, which is required for the next step. The workflow id is 5b16465b7a5c2900077b664e . This is required to claim the device.
GET https://dnac/api/v1/onboarding/pnp-workflow?name=simpleTemplate
[
    {
        "version": 1,
        "name": "simpleTemplate",
        "description": "",
        "useState": "Available",
        "type": "Standard",
        "addedOn": 1528186459377,
        "lastupdateOn": 1528186459377,
        "startTime": 0,
        "endTime": 0,
        "execTime": 0,
        "currTaskIdx": 0,
        "tasks": [
            {
                "taskSeqNo": 0,
                "name": "Config Download",
                "type": "Config",
                "startTime": 0,
                "endTime": 0,
                "timeTaken": 0,
                "currWorkItemIdx": 0,
                "configInfo": {
                    "configId": "d0259219-3433-4a52-a933-7096ac0854c3" ,
                    "configFileUrl": null,
                    "fileServiceId": null,
                    "saveToStartUp": true,
                    "connLossRollBack": true,
                    "configParameters": null
                }
            }
	  ],
        "addToInventory": true,
        "tenantId": "5afe871e2e1c86008e4692c5",
        "id": "5b16465b7a5c2900077b664e"
    }
]
A GET API call using the template id d0259219-3433-4a52-a933-7096ac0854c3 retrieves the template. Notice there is a single variable with the name “hostname”, which will be used in the claim process.
Some of the response has been removed for brevity. Templates will be covered in more detail in future blogs.
GET https://dnac/api/v1/template-programmer/template/d0259219-3433-4a52-a933-7096ac0854c3

{
    "name": "base config",
    "description": "",
    "tags": [],
    "deviceTypes": [
        {
            "productFamily": "Switches and Hubs"
        }
    ],
    "softwareType": "IOS-XE",
    "softwareVariant": "XE",
    "templateParams": [
        {
            "parameterName": "hostname",
            "dataType": null,
            "defaultValue": null,
            "description": null,
            "required": true,
            "notParam": false,
            "displayName": null,
            "instructionText": null,
            "group": null,
            "order": 1,
            "selection": null,
            "range": [],
            "key": null,
            "provider": null,
            "binding": "",
            "id": "4481c1a4-fcb1-4ee8-ba2f-f24f2d39035b"
        }
    ],
<snip>
Adding a PnP device
The next step is to add the device to PnP database. The three mandatory attributes are “name”, “serialNumber” and “pid”. The “pid” (productid) is used to determine if the device is capable of stacking, as some workflows have specific steps for stacks. A POST request sends the attributes in a JSON payload.
The payload takes a list of “deviceInfo”, so multiple devices could be added in a single API call.
POST https://dnac/api/v1/onboarding/pnp-device/import
[{
	"deviceInfo": {
		"name": "pnp-test",
		"serialNumber": "FDO1732Q00B",
		"pid":"ws-c3650",
		"sudiRequired": false,
		"userSudiSerialNos": [],
		"stack": false,
		"aaaCredentials": {
			"username": "",
			"password": ""
		}
	}
}]
The result has been shortened for brevity. It was a synchronous API call (no task was returned in contrast to APIC-EM).
The “id” “5b463bde2cc0f40007b126ee” will be required for the claim process. The id uniquely identifies this PnP device rule.
{
    "successList": [
        {
            "version": 1,
            "deviceInfo": {
                "serialNumber": "FDO1732Q00B",
                "name": "pnp-test",
                "pid": "ws-c3650",
                "lastSyncTime": 0,
                "addedOn": 1531329502838,
                "lastUpdateOn": 1531329502838,
                "firstContact": 0,
                "lastContact": 0,
                "state": "Unclaimed",
                "onbState": "Not Contacted",
                "cmState": "Not Contacted",
                "userSudiSerialNos": [],
                "source": "User",
		"id": "5b463bde2cc0f40007b126ee"
Claiming PnP device
The final step is to “claim” the device. This step associates the workflow (including the configuration template and variables) with the device. The values of “workflowId”,“configId”(template) and “deviceId” were discovered in earlier steps.
A value for the hostname variable of is required in this case “pnp-test1” is provided.
Again, a list is provided for a given workflow, so multiple devices could be claimed by the same workflow. Each device can have a unique set of config parameters.
POST https://dnac/api/v1/onboarding/pnp-device/import
{
  "workflowId": "5b16465b7a5c2900077b664e",
  "deviceClaimList": [
    {
      "configList": [
        {
          "configId": "d0259219-3433-4a52-a933-7096ac0854c3",
          "configParameters": [
            {
              "value": "pnp-test1",
              "key": "hostname"
            }
          ]
        }
      ],
      "deviceId": "5b463bde2cc0f40007b126ee"
    }
  ],
  "populateInventory": true,
  "imageId": null,
  "projectId": null,
  "configId": null
}
The response is synchronous and gives a simple indication of success.
{
    "message": "Device(s) Claimed",
    "statusCode": 200
}
Summary
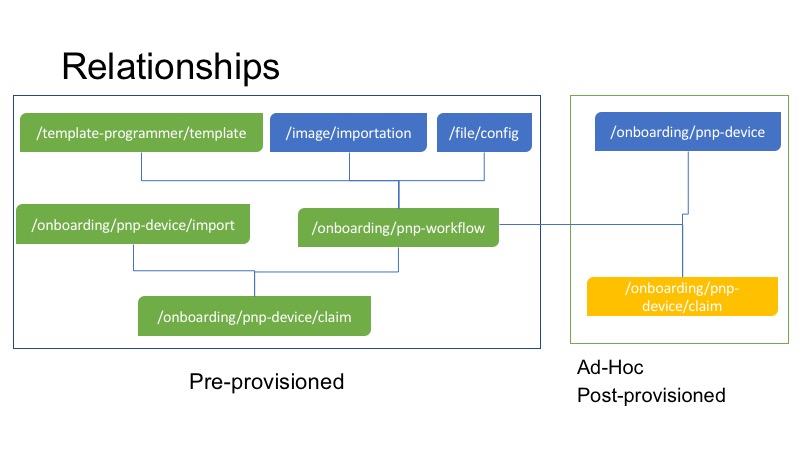
This blog covered the green API calls below. Although “un-claimed” workflow was not officially covered, the claim API is the same as pre-provisioned. The source of the network device differs as the device contacts DNA center before a rule is in place. This means the /api/v1/onboarding/pnp-device/import API call is not required.
Using these API you can automate the onboading of tens, hundreds, or even thousands of devices.
What Next?
This blog shows how the PnP steps can be automated for greater efficiency. The next blog will take a look at configuration templates.
In the meantime, if you would like to learn more about this, you could visit Cisco Devnet. DevNet has further explanations about this. In addition, we have a Github repositorywhere you can get examples related to PnP.
Thanks for reading
We’d love to hear what you think. Ask a question or leave a comment below.
And stay connected with Cisco DevNet on social!
Twitter @CiscoDevNet | Facebook | LinkedIn
Visit the new Developer Video Channel


