
I suspect most people are aware of the Windows Subsystem for Linux (WSL). And how you can use it to install a distribution like Ubuntu on Windows. That will get you all the command-line features of Linux, which are many. Most people I know use vi as their console-based editor. I prefer Joe’s Own Editor (joe), which I have customized to use my favorite keystroke commands. And then there’s Midnight Commander (mc), which is a favorite for file and directory navigation.
But what about the powerful GUI applications? This blog entry shows you how to get them working on Windows 10 and Windows 11.
I’ve been a Linux guy for decades now. But when I began my career at Cisco with Developer Support, I chose Windows 10 as my operating system. At that time, David Staudt had Linux covered and David Nguyen had a Mac, so I filled in the gap. I like Windows 10. I like Windows 11 even more. It puts the virtual desktop chooser at the bottom of the screen, like Windows 10 originally did it.
But I’m still a Linux guy at heart
So, when it comes time to get a laptop refresh, I will be getting a Mac. No, it’s not Linux, but OS X has a lot of BSD (Berkely Software Distribution) in it (and/or FreeBSD, depending on who you ask), so it is a familiar platform for Linux users like me.
Why does the Mac build on FreeBSD and not Linux? My friend Brett Glass made very strong arguments for FreeBSD over Linux back in the day. He pointed out that you can build proprietary code on top of FreeBSD and make money doing it. Steve Jobs, when forced out of Apple, started up NeXT, a computer that ran on a BSD-based OS. So, the foundation for making money on BSD was already laid. Apple simply continued the evolution.
That’s hard to do with Linux. The GNU Public License (GPL) constrains Linux proprietary use, because (for the most part) you must share your Linux code free of charge. The way to make money is to charge for support. Of course, that’s an over-simplified comparison of BSD vs Linux, but that’s the gist.
While I can clearly see the advantages of an open-source operating system like Linux, I’m beyond caring about the philosophical differences, these days. I just prefer a UNIX-like operating system for my personal use over Windows. So, the Mac is a great choice for me.
In the meantime, while I wait for a laptop refresh, there’s a way to run Linux on Windows, and that’s what this blog entry is about.
Here’s how to start:
First, you must make sure your computer BIOS settings allow your CPU to support virtualization. If you can’t do that, then I can’t predict how the rest of these instructions will work out.
Then you need to install some optional Windows features, if they aren’t already installed. There are different ways to get to the Windows optional feature installation dialog, so I’ll just jump right to it and assume you know how.
Install Hyper-V, Virtual Machine Platform and Windows Hypervisor Platform shown in these two sample screen shots:
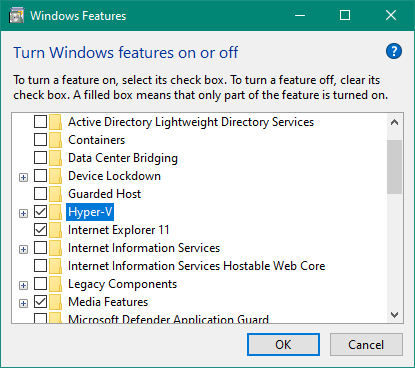
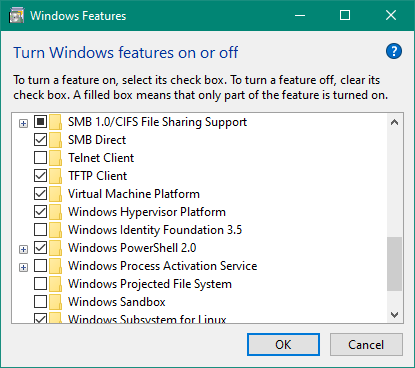
Some may say, like chicken soup, one or more of these wouldn’t help, but it wouldn’t hurt. Click OK and do whatever Windows tells you to do if anything.
Now, make sure you have the latest graphics drivers installed. I have a Radeon 5700 XT on my personal computer running Windows 11. My company laptop has an Nvidia Quadro display adapter.
Open the Microsoft Store and “get” a copy of Ubuntu. I recommend Ubuntu 22.04.1 LTS, unless a later version is available by the time you read this. Run it, and the installation will ask you for your language, a username and password, and not much else.
Open a Windows PowerShell console with administrator privileges. Perform these operations:
C:>wsl –list
C:> wsl --set-version Ubuntu-22.04 2
C:> wsl --set-default-version 2
It is possible those are already the default settings (and that last command is probably redundant), but it’s worth making sure.
Now launch Ubuntu from the Windows menu, and enter these commands:
$ sudo apt update
$ sudo apt dist-upgrade
You can use “upgrade” instead of “dist-upgrade”, but “dist-upgrade” is more comprehensive. It removes unnecessary files and adds newly needed files. The “upgrade” option only upgrades what you already have on your system.
Let’s install some sample apps. If you’re like me and prefer the KDE Plasma desktop on Linux, install the KDE editor, kate.
$ sudo apt install kate
If you’re a fan of GNOME, install gedit instead.
$ sudo apt install gedit
And just for fun, install some basic X11 GUI apps.
$ sudo apt install x11-apps
You can install whatever other Linux GUI apps you like, but the above will get you started. The one thing you cannot do is install a graphical desktop, like Xfce, KDE Plasma, GNOME, Cinnamon, or any of the many other desktops. But you can run almost any graphical application.
You need to set an environment variable for the X11 display. So back in the Ubuntu terminal type:
$ export DISPLAY=:0.0
That’s only good for this one Ubuntu terminal session, so edit your .bashrc file and add this line somewhere at the top of the file:
DISPLAY=:0.0
STOP, do not turn the page until told to do so
If you are running Windows 11 or some super-secret double probation version of Windows 10, you can stop installing, open an Ubuntu terminal window and happily run your Linux GUI applications. For example, start kate or gedit (the ampersand launches the app and returns you to the prompt):
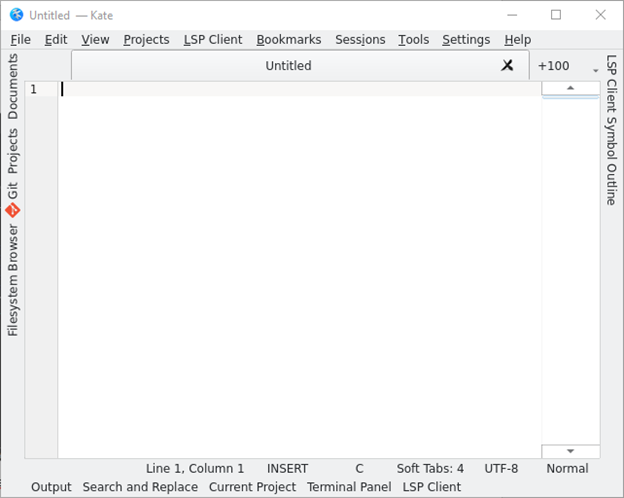
$ kate &
$ gedit &
If, on the other hand, you’re on Windows 10, there’s more for you to do. There are several different ways you can get Linux GUI apps working on Windows 10, but here’s what I have found to be the easiest. Download and install MobaXTerm. You can install the free home version or the paid version if it is for business purposes.
Once you have it installed, launch MobaXTerm. You should see something like this:
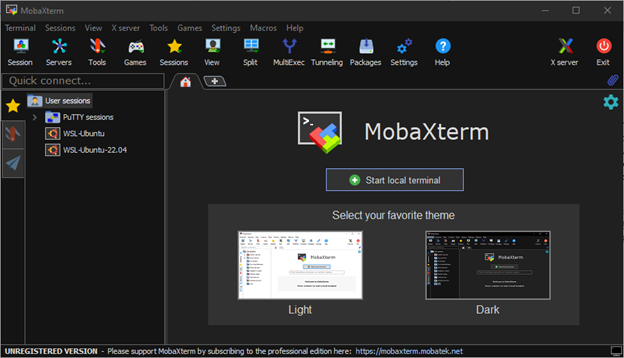
You see that X server icon in the upper right? If it’s in color, you’re gold. If it’s black and white, click it to start the X server.
You can see that MobaXTerm is aware that you have Ubuntu-22.04 installed. Double-Click on that to bring up a terminal for Ubuntu-22.04. DO NOT use the “Start local terminal” button. That way lies madness.
You should see something like this:
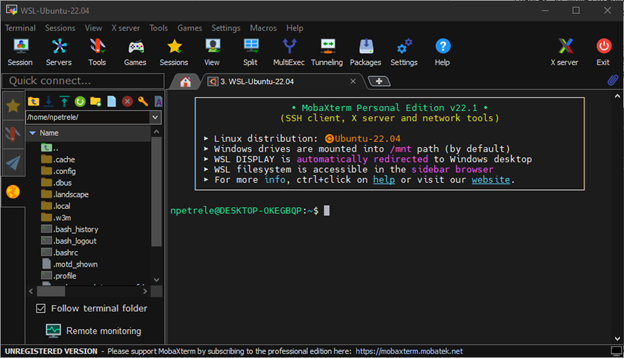
Now go ahead and start kate or gedit, or whichever app you like. I started xeyes and kate. Yes, kate complains about missing theme items, but I can install those later.
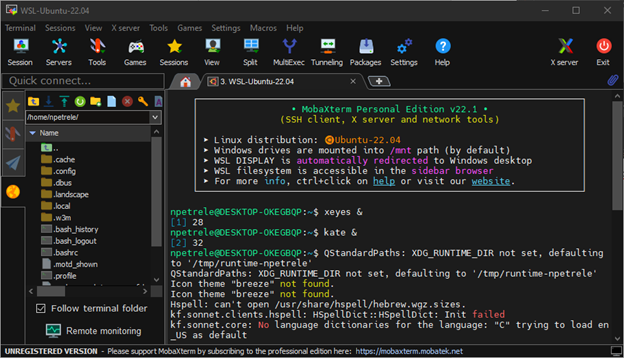
Voila, I now have access to graphical Linux apps:

And there you have it. All the pleasure of using Linux graphical applications on a Windows computer.
Related resources
- Learn more about Cisco network programmability tools and APIs
We’d love to hear what you think. Ask a question or leave a comment below.
And stay connected with Cisco DevNet on social!
LinkedIn | Twitter @CiscoDevNet | Facebook | YouTube Channel


