
Creating an integration between two software platforms sounds complex, right? Well, it can be much easier than it looks. In this blog, you can have Salesforce Cloud CRM tightly integrated with Cisco Webex to digitize customer and sales workflows, bringing together experts, customers, data and workflows into a seamless, powerful real-time collaboration experience.
Note that Cisco Spark and Cisco WebEx are now Cisco Webex Teams and Cisco Webex Meetings, both part of Cisco Webex for Salesforce. The new Cisco Webex experience in Salesforce will be rolled out to customers in late 2018. Until then, set up screens, help articles and the user interface will have references to Cisco Spark and Cisco Webex.
What is Webex Teams?
Webex Teams and Webex Meetings are now part of the Cisco Webex for Salesforce experience.
Webex Teams is a collaboration tool to manage people, spaces, messages, teams, roles, admin, and more. You can chat with people, video call with an individual or your entire team, or connect via voice/VoIP. Developers can easily integrate solutions with Webex Teams via the Webex Teams REST API – for example to add Webex Teams messaging features to an app user interface, or to automate sending Webex Teams messages to rooms based on business system or real-world events.
Webex Meetings is Cisco’s industry-leading meetings solution that brings the power of conferencing to Salesforce. Now, you can invite people related to a Salesforce Event to meet at a time that works for everyone. Webex meetings run on Cisco’s global Webex network, providing a simple, easy to use, video-first, and mobile-centric experience, without the need for downloads or plugins. Cisco Webex rich API allows developers to insert Webex Meetings into their application environments such as the integration we are showing here with Salesforce.
So what exactly is Cisco Webex for Salesforce?
Cisco Webex for Salesforce (formerly known as Cisco Spark for Salesforce) is a joint development effort that is now available. Watch the video here, or check out the blog by Jason Goecke. This solution puts essential collaboration tools in the hands of users directly within Salesforce. It’s turnkey and intuitive, allowing you to gain user value from day one. If you’re in Salesforce, then you now have a free and ready-to-use solution that provides
- High-quality video calling
- Group messaging with advanced features including file sharing, read receipts, and message deletion
- Visibility of user status
- Reliable, high quality Webex meetings at your Webex Personal Room or standard Webex meeting address
- Other tools designed to improve your effectiveness
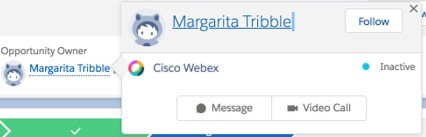
These capabilities integrate smartly into the Salesforce interface. Simply hover over another user’s name to send a message or start a video call. Link group messages right inside relevant Salesforce records to keep things streamlined. Have multiple ongoing discussions to multitask as you move between different records.
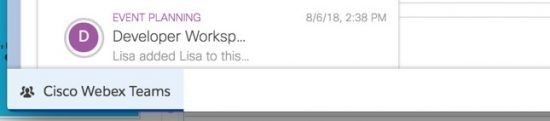
Let’s say a sales person is talking to customer support and needs to document it. You can save records of your conversation. The Webex Teams Widget is easily accessed on the utility bar.
Need to meet later? Just add a Webex meeting to your Salesforce Event and choose where to meet. All the available ways to join the meeting (your Webex Personal Room or Webex standard meeting invitation, phone numbers) will be automatically added and available to the people related to the Salesforce Event.
The integration is designed to be very easy for a Salesforce admin to set up. No APIs or development work is needed. Just follow these steps to get started quickly.
Enabling Webex Teams
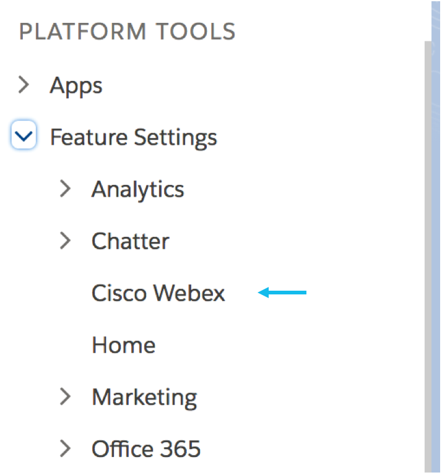
Step 1: Enable Cisco Webex Widget
Go to Setup -> Platform Tools -> Feature Settings -> Cisco Webex
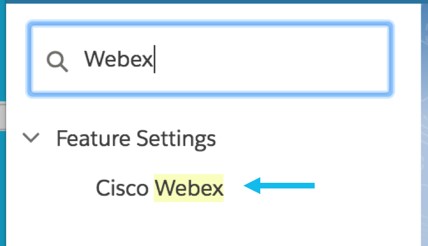
You can also use the Search function to find Cisco Webex.
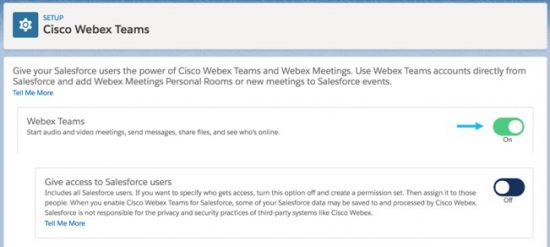
Click on the button and Enable Cisco Webex Teams Messages and Meetings.
You can find more helpful tips on the help page for Salesforce.
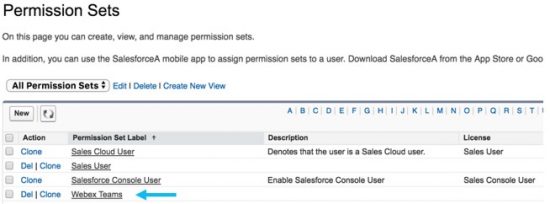
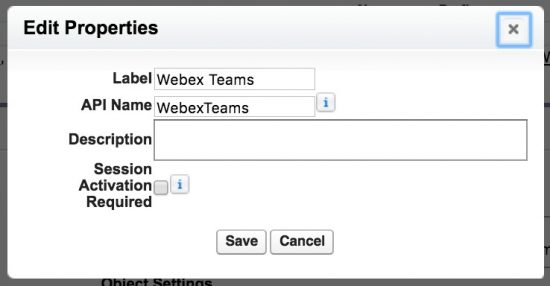
Step 2: Create a new permission or edit an existing one, and add the Webex Teams Conversation permission
Create a new permission or edit an existing one and add the Cisco Webex Teams Conversation permission. You can find this on Setup -> Administration -> Users -> Permission Sets.
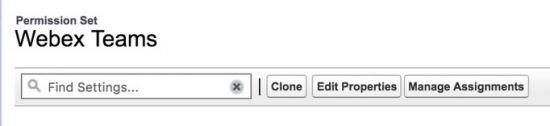
Step 3: Add System Permissions
In the Permission set, navigate to System Permissions towards the bottom of the page. After enabling Cisco Webex on Step 1, you’ll now see “Cisco Webex Teams Conversation” on the list of system permissions.
Edit the page, checkmark and enable Cisco Webex Teams Conversation, and save the permissions.
![]()
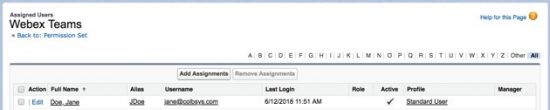
Step 4: Add User Permission
Now, we will enable the permission set for one or multiple users. Still in the Permission Set, click on Manage Assignments.
Go to Manage Assignments under the specific permission and select the users for which you want to enable the permission for Cisco Webex Teams. Check the Active checkbox to enable specific users.
At this point in time, the hover to message or video call with a colleague feature is enabled automatically; no additional set up required.
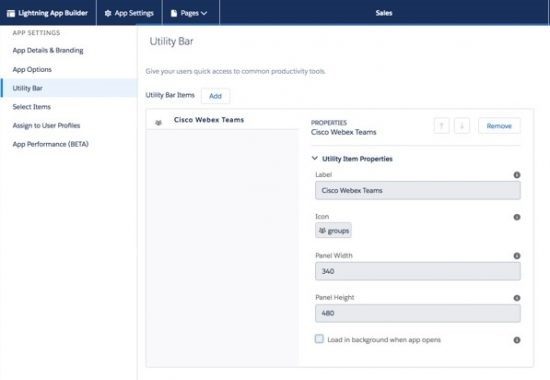
Step 5: Add Webex Teams to Your Utility Bar
Go to Set Up -> Apps -> App Manager -> Sales (Lightning Sales type) -> Edit -> Utility Bar (3rd tab).
Click on Add and search for Cisco Webex Teams. When you click on Save, you will be able to view the Cisco Webex Teams button in your utility bar.
Not only can you have Webex Teams integrated with your Salesforce instance, you can use the SDK to integrate it in any web app you are using. Check out our learning lab about how to integrate Webex Teams video into your web app.
Step 6: Adding Webex Teams Components to the User Interface
To add Webex Teams components to your UI, follow these steps:
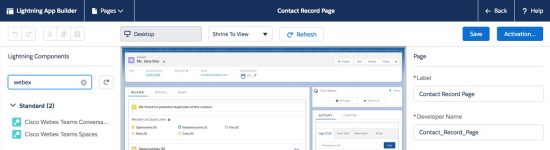
Go to the Sales view -> Contacts -> Open a Contact -> Click on Setup Icon -> Edit Page
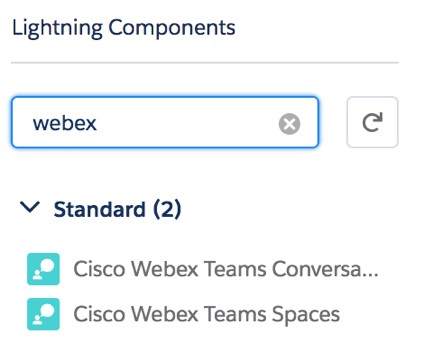
- Adding the Conversation component:
Enable 1:1 video call and messaging feature for Salesforce record pages. Go to Lightning App Builder and drag/drop the Cisco Webex Teams Conversation component anywhere you want in the UI.
Tip: The component is best used for leads, contacts, or anywhere that 1:1 communication is desired.
- Enabling Webex Teams spaces in Salesforce record pages.
Enable Cisco Webex Teams spaces in Salesforce record pages. Go to Lightning App Builder and drag/drop the Cisco Webex Teams Group Conversation component anywhere you want in the UI.
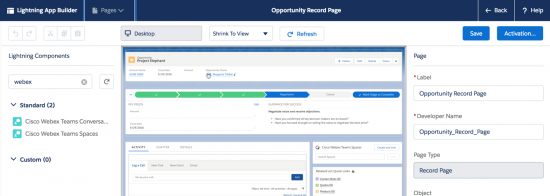
Tip: Best utilized in places where group spaces are needed such as Opportunities or Accounts.
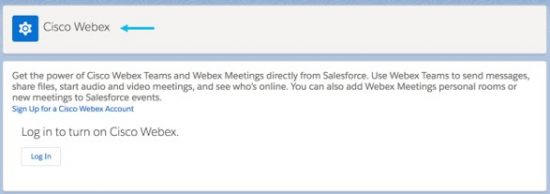
Step 7: Connect Webex Teams
For all Salesforce users, by clicking on “Connect Your Cisco Webex Account” at the top of the page you will be prompted to login to your Webex Teams account.

If you do not have an account, you’ll be able to create an account on that page.
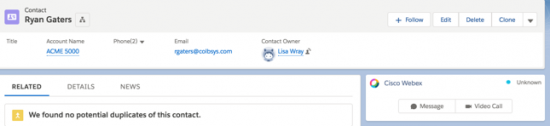
Go to your “Contact” page and open up a contact. You can now open up a Webex Teams Chat Message or Initiate a Video Call with the user. If they do not have a Webex Teams account, it will send them an invite to create an account. The contact will be able to use the Webex Teams desktop, mobile, or web application.
Note: You can also enable Webex Teams via User settings and searching for Cisco Webex.

Enabling Webex Meetings
Step 1: Enable Webex Meetings
You enable Webex Meetings in the same settings area you used to enable Webex Teams. Either browse to Home > Settings > Feature Settings, or type “Webex” in the ‘Search Setup’ bar on the home screen.
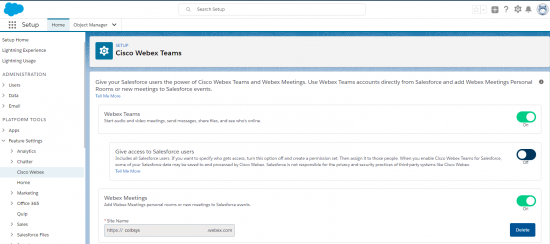
Enter your Webex sitename URL <sitename.webex.com>, and slide the toggle to ‘On’ for Webex Meetings.
At this point your Salesforce users will be able to add Webex meetings to their events, and Salesforce’s association capabilities will propagate these events into the various Salesforce workflows making these meetings easy to find for your colleagues and followers. Hosts of Webex meetings require Webex Host licenses. Continue reading below for more information about license requirements.
Step 2: Onboard Webex Users
Behind every Webex meeting is a Webex Host, and depending on your Webex license agreement you may be assigning everyone or a subset of users in your organization as Webex Hosts. Everyone in your organization regardless of whether or not they have a Webex Host license will at least be a user with a user level account. These are the different ways to assign a Webex license:
- Manually Assign Licenses
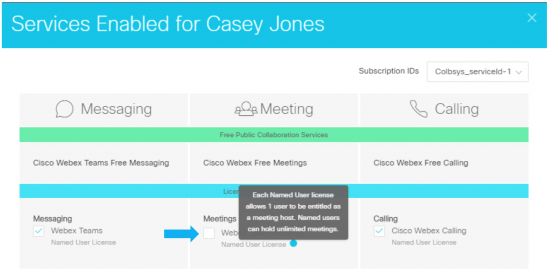
Login to admin.webex.com as a Webex administrator and go to the Users screen.
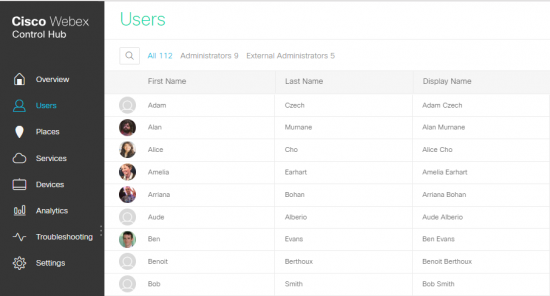
Select the user(s) in question to assign a host license by clicking on the Edit tab, in the Services area.
2. Bulk Assign Licenses
Can be done for hundreds or thousands of users at a time via CSV import, by flagging the Webex Host field for that user. Flag that variable to true for all the users you want to do this for and upload the new file. For more detailed instructions see: https://collaborationhelp.cisco.com/article/en-us/nh17y2u
3. Automatic License Assignment for New Users
Ease the admin’s overhead by automatically providing new users with Webex Host licenses when those are created in Webex Control Hub. Read more about this option here:
For further assistance you can go to Salesforce Help
Want to get involved with Cisco DevNet? Start Developing Today!
- Join DevNet / Get a Webex Teams account
- DevNet Webex Community
- DevNet Learning Tracks and Labs virtual, DevNet Express and Cisco Live irl
- Webex 4 Devs
- 24×7 developer support via Webex Teams or email
- DevNet Creations / Webex Team App Hub
We’d love to hear what you think. Ask a question or leave a comment below.
And stay connected with Cisco DevNet on social!
Twitter @CiscoDevNet | Facebook | LinkedIn
Visit the new Developer Video Channel


