

The author of this blog is Matyáš Prokop, Principal Architect at Natilik, a Cisco Champion, and member of the DevNet 500.
Before we start…
Before I start talking about TensorFlow and Deep Learning, let me first give you a disclaimer: I’m not a programming genius…I’m no expert in Deep Learning or Tensorflow. However, I do love exploring new areas where I have zero knowledge, and TensorFlow gave me a great opportunity to do just that. Now this is can be a very complex topic, so I feel a little bit bad that I’ve had to compress so much information into such a short post. Maybe I will write more posts about ML/AI and TensorFlow in the future. For now, let me tell you about this project.
What do we want to build?
In the Czech Republic highways are financed by motorists having to buy a vignette (sticker) to put in the car windshield. You can buy the vignette at any patrol station. But wouldn’t it be better to eliminate stickers and have an e-shop where people could buy a virtual sticker and link it with their car license plate. A system that could do:
- Car license plate detection
- Car license plate reading
- Car license plate recognition
- Send data to a database
Why would we want to build this?
I’m a member of the community called ‘Cesko.Digital’. It’s a group of IT experts who not only voluntarily build tools for Czech government organizations. but also keep a watchful eye on the government for how transparent they are, and how much they are spending on IT.
In January 2020 one of the teams discovered that the cost for creating the highway vignettes e-shop would be 401M CZK. And that there was no public tender for it! The community decided to try something that had not been done before. Cesko.Digital organized a hackathon where the community would build the portal over the weekend. For free! And they did!
I wondered if it would be possible to build, for minimal cost, a camera system which would read the car plates and send the plate details to a backend database to check whether the driver had paid or not? Let’s find out.
What do we need?
We will want to run this on something small and relatively cheap. So we will use a Raspberry Pi with the camera. To be able to build the car plate data set, we will need A LOT of pictures (which I will explain later). In this case we will use a data set with only around 300 pictures of cars with UK plates. Obviously, I didn’t go and start taking pictures of cars and car plates on the streets in London. Luckily I have some smart colleagues who were able to script downloading car pictures from the Internet. (You know who you are, thanks!)
Once we have the data set we will need to build the data model from it. For this purpose we will need compute power and, in case of AI/ML, we will need a lot of performance. My MacBook can’t provide enough compute power so I went to the Internet and did some research. AWS and GCP both have some pretty decent offerings, however GCP looked to be the most flexible. To make a long story short (and trust me, finding the right GPU and the best price/performance can be a really long story) I recommend to use Tesla T4 GPU in GCP. More on this in other sections.
Introduction into TensorFlow
TensorFlow has been developed by Google and you can ‘see’ TensorFlow being used in products like Search, Gmail, and Translate. It is being used widely by companies like Uber, Spotify, and Tesla. TensorFlow can be used in many different scenarios: object detection (if we want to detect cars), text classification (reviewing sentiments of the comments) or face recognition. TensorFlow allows you to run data models on different devices. So you can run them in the cloud, on your VM, or RaspberryPi. That’s one of the big strengths of TensorFlow.
I will go into more details of TensorFlow in other posts. For now, in case you want to study TensorFlow, I would recommend Safari Books, YouTube, or Coursera materials.
TensorFlow vs TensorFlow Lite
TensorFlow has been around for many years, but only recently (2 years) has Google announced TensorFlow Lite (TL). TL is optimized for mobile/edge devices. Therefore, it’s ideal for our purposes and requirements. But would there be any important limitations?
Through the process of building models and testing I found there are a few limitations. First is the object detectors you can use. At this point, TensorFlow Lite does NOT support RCNN models such as Faster-RCNN! It only supports SSD models. The second limitation (which was a bit annoying) is that TensorFlow Lite is not optimized for running on laptops. It runs great on a device like RasperryPi with ARP chipset, but it will be really slow on your high-spec MacBook. TL libraries are just not optimised for x86 or x86_64 architecture. So when you will be testing your scripts locally be aware of that.
What is the dataset?
A wise person once said: “Your neural network is only as good as the data you feed it.” Our dataset is critical for this project. Therefore, we will need a solid dataset. As I have mentioned before, I’m lucky to have smart colleagues. So, I have managed to download around 300 pictures of cars with UK car plates from the Internet with their scripts. It is necessary to have pictures of different cars from different angles with different plates which should be enough for now.
We will need the dataset to learn the machine (computer, RaspberryPi) to recognize two objects – the car and the plate. With the large sample of pictures we will be able to teach the computer what the car and car plate look like. We will be able to teach the computer certain patterns, based on which it will be recognizing the car and car plate objects.
There are multiple techniques for how to improve your dataset. You can use various angles, scales, noise levels, picture quality, and object sizes to make it a bit harder for the computer to learn and train. In the end, however, this will make your object recognition much more reliable. In this project I will not be using any of these techniques. I’ll try to write more on this is a separate post.
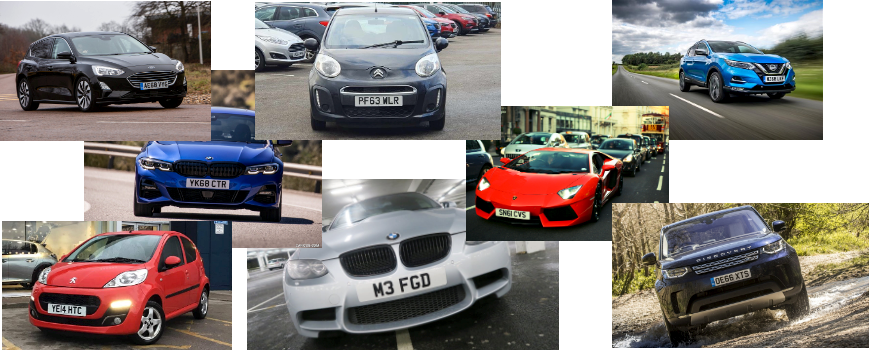
Anyway, back to our dataset. How does it look? These are some of the pictures I will be using:
We have a set of pictures and we will need to split them into two categories – train and test. After studying some of the articles I have split the pictures to an 80:20 ratio. When we start the training, 80% of pictures will be used for training and 20% of pictures will be used for testing the dataset. We will create two directories in the folder with the dataset and move the pictures into particular folders – test and train.
TensorFlow is very sensitive about size and format of the pictures. I have found out the hard way that if TensorFlow doesn’t have the right inputs it will be unstable, or it will just hang and do nothing. For this reason I have built the script which will go through the test or train folder (change the variable folder) and check if the pictures are in the right format.
import imghdr
import cv2
import os
import glob

for folder in ['test']:
    image_path = os.path.join(os.getcwd(), (folder))
print(image_path)
for file in glob.glob(image_path + '/*.jpg'):
    image = cv2.imread(file)
    file_type = imghdr.what(file)
if file_type != 'jpeg':
    print(file + " - invalid - " + str(file_type))
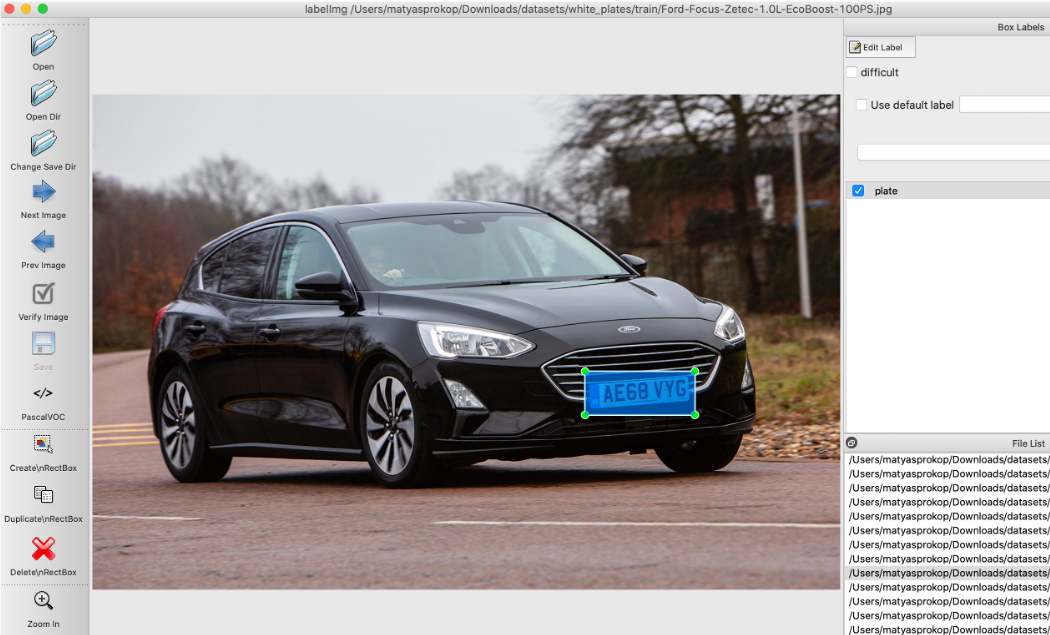
Picture annotation
Now the funny part! When we split pictures into two folders, we will need to annotate all of them. Annotating pictures means that we will frame the objects which we are interested in EVERY picture. Yes, this will take a while.
For these purposes I would recommend using labelImg. I’m using MacOS so here are a few simple steps to run it:
brew install python3
pip3 install pipenv
pipenv run pip install pyqt5==5.13.2 lxml
pipenv run make qt5py3
python3 labelImg.py
Now when you have it opened, you need to open the whole folder with pictures and start annotating file by file.
Choosing an object detector
OK. We have pictures which will be inputs. We have objects defined which we want to detect. But we don’t have the detector which will help to teach our data model those defined objects. Finding the right object detector (at least for me) was not that easy. You have to take into consideration multiple factors – like what objects you will be detecting, where you will be running it, how fast the objects will need to be detected, etc. This is another huge topic and perhaps I will talk more about it in a separate post. But, to keep a very long story short, I will borrow the info from this great post on Medium:
- SSD with MobileNet provides the best accuracy trade-off within the fastest detectors.
- SSD is fast but performs worse for small objects when compared to others.
- For large objects, SSD can outperform Faster R-CNN and R-FCN in accuracy with lighter and faster extractors.
Based on this I have decided for SSD Mobilenet V2.
How to build a data model
Alright, good stuff. We are finished with preparation and we can finally start to build the data model. In my case I have decided on a virtual machine running in GCP. So, we will need to get that machine ready. First let’s create the VM.
Provisioning VM
In GCP you can go into Marketplace and launch Deep Learning VM, which has a pre-defined template with pre-installed TensorFlow. Specs are below:
Machine type: n1-highmem-2 (2 vCPUs, 13 GB memory)
GPUs: 1 x NVIDIA Tesla T4
Zone: us-east1-d
framework: TensorFlow:1.15
As you can see, I have chosen TensorFlow 1.15 and not 2.0. I didn’t figure out why but TensorFlow 2.0 was very unstable for me, so I downgraded to 1.15 which was much more stable. So now we have the VM ready and we will upload the dataset either via SCP or SFTP onto the new VM.
Downloading TensorFlow models and object detectors
After you SSH to your VM (either via a webbrowser or gcloud CLI) you will start with cloning TensorFlow Models repo:
git clone https://github.com/tensorflow/models
Open the folder, download and un-tar SSD TAR file:
cd research/object_detection/
wget http://download.tensorflow.org/models/object_detection/ssd_mobilenet_v2_quantized_300x300_coco_2019_01_03.tar.gz
tar xzvf ssd_mobilenet_v2_quantized_300x300_coco_2019_01_03.tar.gz
In the research/object_detection/ folder we will create a folder training into which we will copy the SSD object detection config file:
mkdir training
cp samples/configs/ssd_mobilenet_v2_quantized_300x300_coco.config training/
Before going to the next step we will need to modify /models/research/object_detection/training/ssd_mobilenet_v2_quantized_300x300_coco.config:
Change num_classes accordingly based on how many objects we will need to detect. In our case it will be car plate only therefore 1:
model {
  ssd {
    num_classes: 1
    .....
      }
    }
I have changed batch_size to 6 as with larger batches TensorFlow can be a bit unstable:
train_config: {
  batch_size: 6
  optimizer {
Set the directory for checkpoint files:
fine_tune_checkpoint: "/home/matyasprokop/models/research/object_detection/ssd_mobilenet_v2_quantized_300x300_coco_2019_01_03/model.ckpt"
fine_tune_checkpoint_type: "detection"
And the record inputs:
train_input_reader: {
  tf_record_input_reader {
    input_path: "/home/matyasprokop/models/research/object_detection/train.record"
  }
  label_map_path: "/home/matyasprokop/models/research/object_detection/training/labelmap.pbtxt"
}
eval_input_reader: {
  tf_record_input_reader {
    input_path: "/home/matyasprokop/models/research/object_detection/test.record"
  }
  label_map_path: "/home/matyasprokop/models/research/object_detection/training/labelmap.pbtxt"
  shuffle: false
  num_readers: 1
}
Building the data model will need Python libraries from the TensorFlow models folder. Therefore, we have to add them to PYTHONPATH:
export PYTHONPATH=/home/matyasprokop/models:/home/matyasprokop/models/research:/home/matyasprokop/models/research/slim
Compiling TensorFlow source
Even though we have TensorFlow installed we will need TensorFlow source. Download TensorFlow source from GitHub.
git clone https://github.com/tensorflow/tensorflow.git
cd tensorflow
Switch to the right branch. Please make sure you switch to the same branch version as your TensorFlow installed.
git checkout r1.15
Now you just need to compile it. This will take a while. Go and have a tea.
python ./configure.py
Generating records for the training
Now we need to translate the information we have about the pictures from XML to CSV. For these purposes we will use the script xml_to_csv.py from our repo.
python3 xml_to_csv.py
Before we convert CSV into TensorFlow training records, we will need to modify file generate_tfrecord.py. You will need to define all the labels which have been used for the object annotation. In my case I have annotated car plates with the label plate:
# TO-DO replace this with label map
def class_text_to_int(row_label):
    if row_label == 'plate':
        return 1
    else:
        None
We are ready now and we can convert CSVs into TensorFlow training records:
python3 generate_tfrecord.py --csv_input=images/train_labels.csv --image_dir=images/train --output_path=train.record
python3 generate_tfrecord.py --csv_input=images/test_labels.csv --image_dir=images/test --output_path=test.record
Awesome. Almost there! The last thing we have to do before we start the training of our brand new data model is to label the map. You will need to define it in /models/research/object_detection/training/labelmap.pbtxt and it will look in our case like this:
item {
  id: 1
  name: 'plate'
}
Building the data model
Finally you are all set and ready. Now the last step before we start the training of our model. We will run protoc to compile .proto files from TensorFlow Object Detection APIs to Python:
protoc --python_out=. ./object_detection/protos/anchor_generator.proto ./object_detection/protos/argmax_matcher.proto ./object_detection/protos/bipartite_matcher.proto ./object_detection/protos/box_coder.proto ./object_detection/protos/box_predictor.proto ./object_detection/protos/eval.proto ./object_detection/protos/faster_rcnn.proto ./object_detection/protos/faster_rcnn_box_coder.proto ./object_detection/protos/grid_anchor_generator.proto ./object_detection/protos/hyperparams.proto ./object_detection/protos/image_resizer.proto ./object_detection/protos/input_reader.proto ./object_detection/protos/losses.proto ./object_detection/protos/matcher.proto ./object_detection/protos/mean_stddev_box_coder.proto ./object_detection/protos/model.proto ./object_detection/protos/optimizer.proto ./object_detection/protos/pipeline.proto ./object_detection/protos/post_processing.proto ./object_detection/protos/preprocessor.proto ./object_detection/protos/region_similarity_calculator.proto ./object_detection/protos/square_box_coder.proto ./object_detection/protos/ssd.proto ./object_detection/protos/ssd_anchor_generator.proto ./object_detection/protos/string_int_label_map.proto ./object_detection/protos/train.proto ./object_detection/protos/keypoint_box_coder.proto ./object_detection/protos/multiscale_anchor_generator.proto ./object_detection/protos/graph_rewriter.proto ./object_detection/protos/calibration.proto ./object_detection/protos/flexible_grid_anchor_generator.proto
Before we start training the model, please set env variables which we will use in the next few scripts:
export CONFIG_FILE=/home/matyasprokop/models/research/object_detection/training/ssd_mobilenet_v2_quantized_300x300_coco.config
export CHECKPOINT_PATH=/home/matyasprokop/models/research/object_detection/training/model.ckpt-28171
export OUTPUT_DIR=/home/matyasprokop/models/research/object_detection/TFLite_model
When this is done, we will run the command to start training of our model:
python3 train.py --logtostderr --train_dir=training/ --pipeline_config_path=$CONFIG_FILE
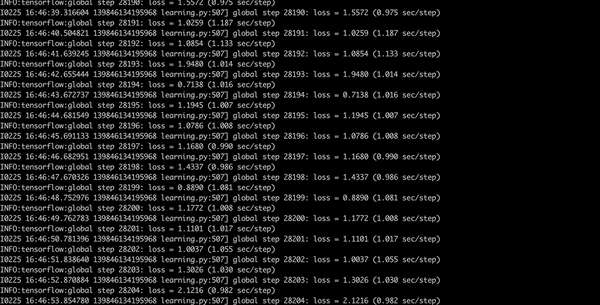
Now have a coffee, dinner, shower, go to bed, and when you wake up in the morning your model should be finished. You want to get the loss consistently below 2, which will take a while. This will take approximately 8 hours.
Converting TensorFlow data model to TensorFlow Lite data model
Did you have a good sleep? Almost there! Now when we have the TensorFlow model done we need to convert it to a TensorFlow Lite model. This is pretty easy. We will use a script from models/research/object_detection
python3 export_tflite_ssd_graph.py --pipeline_config_path=$CONFIG_FILE --trained_checkpoint_prefix=$CHECKPOINT_PATH --output_directory=$OUTPUT_DIR --add_postprocessing_op=true
Wrapping it all up
Now we need to wrap everything together and we will use Bazel for it. Make sure you use the right version of Bazel. TensorFlow 1.15 only support bazel version 0.21.0 or lower so please be aware of that.
cd ~/tensorflow
bazel run -c opt tensorflow/lite/toco:toco -- --input_file=$OUTPUT_DIR/tflite_graph.pb --output_file=$OUTPUT_DIR/detect.tflite --input_shapes=1,300,300,3 --input_arrays=normalized_input_image_tensor --output_arrays=TFLite_Detection_PostProcess,TFLite_Detection_PostProcess:1,TFLite_Detection_PostProcess:2,TFLite_Detection_PostProcess:3 --inference_type=QUANTIZED_UINT8 --mean_values=128 --std_values=128 --change_concat_input_ranges=false --allow_custom_ops
Finished? Looks like we are there 🙂 Now if you go to TFLite_model folder you will see detect.tflite file. This is what we will need to download and upload to our RaspberryPi. In the same folder, create a new file called labelmap.txt and list all the labels we have used. In this case it will “plate”. Download labelmap.txt as well.
plate
Running our TensorFlow Lite model
Our data model is now finished and we can use it for detecting car plates. We will use RaspberryPi with the video camera. For testing purposes, I was using script to detect objects in the video. It is a generic script which will run the video (in my case it is video recorded on my iPhone) and using the data model on top of it which we have just created.
Car plate detection
Let’s start by cloning my repo on your RaspberryPi.
git clone https://git.matyasprokop.com/mprokop/plate-recognition
cd plate-recognition
For testing the data model with the video, use the script TFLite_detection_video.py. Create a new folder called tflite_graphs/plates and copy detect.tflite and labelmap.txt to the folder. Run the script with parameter —modeldir=tflite_graphs/plates which will apply our model from the directory tflite_graphs/plates.
python3 TFLite_detection_video.py --modeldir=tflite_graphs/plates
When we run the script, we should see something like this:
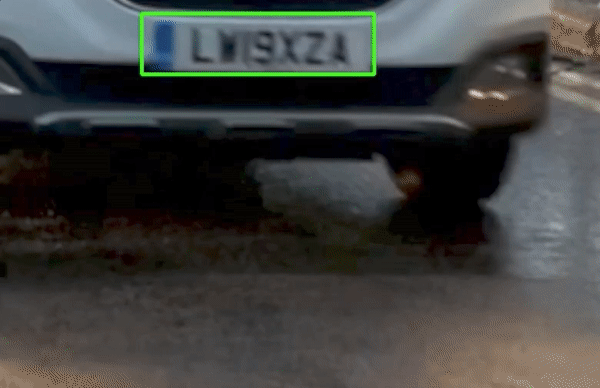
Car plate recognition
This was fun and we can now recognize car plates. This is a great start and proves that our data model works! Our next step will be to crop recognized car plates and run OCR on top of it. For this purpose we will use OpenCV and pytesseract libraries.
We will use another script called TFLite_reco_video.py.
OpenCV will allow to crop the car plate from the frame and pytesseract will do the OCR recognition. We will crop the image from the frame:
crop_img = frame[ymin-10:ymax-10, xmin-10:xmax-10]
Now when we have the car plate cropped and ready for OCR, we want to make the letters readable as much as we can. And this showed as the biggest challenge in my project. Car plates are usually taken from different angles and they have different sizes. It’s not really challenging for TensorFlow to detect car plates, however it is very challenging for OCR to read the car plates. The best combination I have found (and I’m sure there is still a huge opportunity for improvement) is to make grey picture and reduce the noise.
gray = cv2.cvtColor(crop_img, cv2.COLOR_BGR2GRAY)
thresh = cv2.GaussianBlur(gray, (3,3), 0)
When we have car plate picture thresh we will OCR the car plate and read the meta data.
meta = pytesseract.image_to_data(Image.open(filename), lang='gb', output_type=pytesseract.Output.DICT)
Next will be OCR of car plate. To make OCR as accurate as we can we will use pre-trained data for UK car plate font which will be stored in the tessdata folder:
text_string = pytesseract.image_to_string(Image.open(filename),lang='gb')
To minimize any ‘false alarms’ we will need to get from pytesseract the confidence level:
confidence = int(meta['conf'][len(text)-1])
Now when we have a reasonable confidence level, we can start detecting car plates and playing with the level of confidence. I have found that best level is about 73. So, if the car plate text is not empty, and the confidence level is above 73, the car plate string is shown in the terminal and the picture of the car plate, with the car plate string, in the title.
if (text_string != "") and confidence > 73 and len(text_string)>6:
print("ID:" + str(text_string) + " Confidence:" + str(confidence))
label = '%s: %d%%' % (str(text_string), confidence) # Example: 'person: 72%'
labelSize, baseLine = cv2.getTextSize(label, cv2.FONT_HERSHEY_SIMPLEX, 0.7, 2) # Get font size
label_ymin = max(ymin, labelSize[1] + 10) # Make sure not to draw label too close to top of window
cv2.rectangle(frame, (xmin, label_ymin-labelSize[1]-10), (xmin+labelSize[0], label_ymin+baseLine-10), (255, 255, 255), cv2.FILLED) # Draw white box to put label text in
cv2.putText(frame, "ID:" + str(text_string), (xmin, label_ymin-7), cv2.FONT_HERSHEY_SIMPLEX, 0.7, (0, 0, 0), 2) # Draw label text
cv2.imshow(str(text_string), thresh)
We will use the same data model in the same folder. However, we will use a different script.
python3 TFLite_reco_video.py --modeldir=tflite_graphs/plates
On the video it looks something like this:

Real time recognition
In case you want to do this real-time, and run the car plate recognition on your RaspberryPi or any other device with the camera, use the script TFLite_detection_webcam.py.
python3 TFLite_detection_webcam.py --modeldir=tflite_graphs/plates
What can be improved in the future?
Will this be able to replace expensive solutions which are already used on Czech highways? Almost certainly not. I think the biggest weakness appeared to be camera resolution which, in the case of RasppberyPi, is not great. Even though I was recording video on an iPhone, it still wasn’t very good mainly because of the optics and zoom ability. I can imagine statically mounted, proper high-resolution cameras, pointing to the same area all the time, will be much better.
Performance wise I think TensorFlow Lite showed that this is doable on RaspberryPi. It was able to detect car plates in real time. The weakest point of this was the performance of OCR. OCR is super sensitive to light, quality, angels, and noise. One significant improvement would be to use TensorFlow for OCR. which I will look in the future.
Overall this was a really fun project and for me personally a great introduction into AI/ML. I’m already thinking how to use this in networking! If you’re interested in this, DevNet’s AI/ML site is a great place to start.
Sources
https://git.matyasprokop.com/mprokop/car-plate-recognition
https://learning.oreilly.com/library/view/learning-tensorflow/9781491978504/
https://learning.oreilly.com/library/view/tensorflow-for-deep/9781491980446/
https://github.com/mahavird/my_deep_anpr
https://github.com/GuiltyNeuron/ANPR
https://github.com/EdjeElectronics/TensorFlow-Lite-Object-Detection-on-Android-and-Raspberry-Pi/blob/master/Raspberry_Pi_Guide.md
https://circuitdigest.com/microcontroller-projects/license-plate-recognition-using-raspberry-pi-and-opencv
https://www.youtube.com/watch?v=TiOKvOrYNII
https://egallen.com/red-hat-codeready-containers-gpu/
https://www.youtube.com/watch?time_continue=5&v=V4P_ptn2FF4&feature=emb_title
http://matthewearl.github.io/2016/05/06/cnn-anpr/
We’d love to hear what you think. Ask a question or leave a comment below.
And stay connected with Cisco DevNet on social!
Twitter @CiscoDevNet | Facebook | LinkedIn
Visit the new Developer Video Channel


WOW!!!
That sounds like a great deal of work for “someone” when the model is put together!
However, it also seems to be something that is relatively easy to use once the model is available.
Thanks for the great write-up Matyáš, and thanks for getting this posted @bigevilbeard!!!
fjm