Cisco Modeling Labs (CML) 2.5 arrives with annotations, a new feature for all CML license levels. When learning and designing, annotations let you get the most out of your labs. Annotations allow you to include all the documentation on how parts of the network work, details about your learning objectives and next steps, or ways the network elements fit together. In short, the annotations feature in CML 2.5 lets you make your network yours. Here’s how it works.
Add context with annotations in CML
Annotations allow you to provide additional context to your lab topology and organize the elements in a helpful, meaningful way. For example, you can use annotations to show routing, IP addressing, and VLAN information, as shown below: 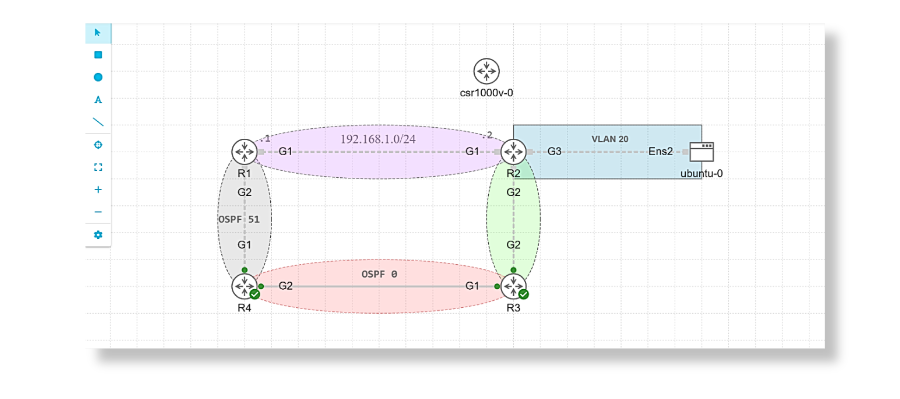 Annotations in CML are persistent. This means annotations will be included in the lab definition if exported, allowing you to share your annotated labs with others.
A grid background and node/annotation grid snapping are enabled by default. Snapping will automatically snap nodes and annotations to ensure they are properly aligned when drawing or moving them. You can turn off snapping for a lab by unchecking the snap to grid option in the toolbar settings. You can also temporarily disable snapping by holding the Alt key when you add or move a node/annotation.
Additionally, annotations support transparency and layering, allowing you to stack annotations.
How to add annotations to labs in CML 2.5
You can add annotations to labs in the workbench via one of the four annotation tools in the toolbar.
There is one tool for each type of annotation:
- Rectangle
- Ellipsis
- Text
- Line
For all annotation types except text, you can add the annotations by first selecting the tool. Then click and hold the mouse where you want the annotation to start, and drag it to where you want it to end. Releasing the mouse will create the annotation, and you will see a sidebar with other properties you can change for the annotation.
The process of adding a text annotation is similar, starting with selecting the tool. Next, click and release where you want the text. Finally, the sidebar will open, allowing you to enter the text you wish to use.
New options in toolbar settings
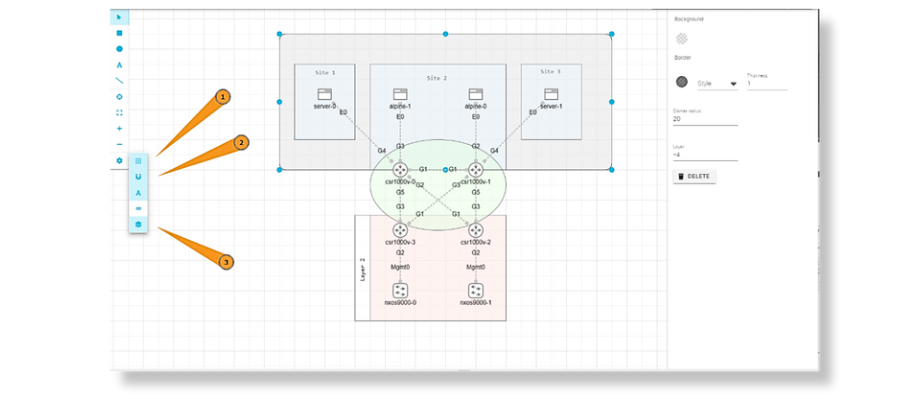
Click the gear icon in the toolbar to open the canvas settings menu, which provides these new options for CML 2.5:
- Toggles the grid on/off
- Turns node/annotation snapping on/off
- Turns annotations off, hiding the drawn annotations and annotation tools
NOTE: You can temporarily disable the snap-to-grid option by holding the Alt key (or Option key on a Mac) when moving or resizing an annotation/node. This lets you keep snapping enabled while precisely placing an annotation/node.
 Edit annotations
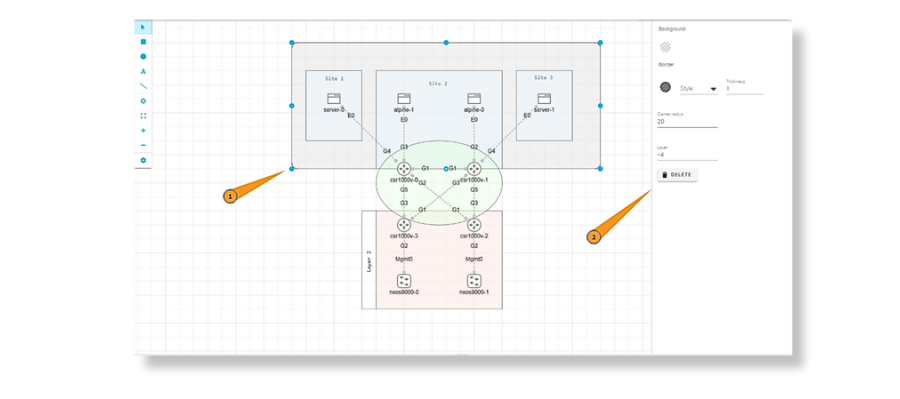
Selecting an annotation will toggle the visibility of the resize handles for the currently selected annotation. Additionally, a sidebar will be opened, allowing you to edit the annotation properties further
- Resize Handles
- Sidebar
Future annotations in CML
The CML development team is currently exploring adding an image annotation type in a future release to allow the addition of images inside a topology.
What do you think of annotations? How can we improve?
Share your thoughts in the Cisco Modeling Labs Community on the Cisco Learning Network now.
Read next: Cisco Modeling Labs 2.5 offers resource limiting for Enterprise and Higher Education licenses. Learn more.
Join the Cisco Learning Network today for free.
Follow Cisco Learning & Certifications
Twitter | Facebook | LinkedIn | Instagram
Use #CiscoCert to join the conversation.