
This is the first of a multi-part series intended to share practical knowledge about Git for network engineers, as well as some tips and tricks that I have learned over the years that will hopefully make your journey easier!
Why Should I Know Git as a Network Engineer?
Version control systems, primarily Git, are becoming more and more prevalent outside of the realm of software development. The increase in DevOps, network automation, and infrastructure as code practices over the last decade has made it even more important to not only be familiar with Git, but proficient with it.
As teams move into the realm of infrastructure as code, understanding and using Git is a key skill.
What is Git?
Git is a Version Control System (VCS). Version Control Systems record file changes over time, giving you the ability to recall previous revisions and see the history of changes. On the surface, it seems simple. However, things get more complicated when you start working with others on the same set of files.
Git is known as a distributed VCS. This is primarily how the Linux kernel development team utilizes Git. For most the use of a centralized location like GitHub, GitLab, or an internal Git server is typical, especially because there is even more functionality associated with these centralized Git systems like GitHub and GitLab.
Short History of Git
Linus Torvalds created Git in 2005 to replace a commercial VCS used by Linux kernel developers. Linus Torvalds, who was also the creator of the Linux kernel, designed Git to be:
- Speedy
- Simple design
- Support parallel development
- Distributed
- Handle large projects efficiently
Nowadays, Git is maintained by a team of Open-Source developers who are continuing to improve Git as we know it.
How Git Works
Unlike other Version Control Systems, Git uses a snapshot method to track changes instead of a delta-based method.
Every time you commit in Git, it basically takes a snapshot of those files that have been changed while simply linking unchanged files to a previous snapshot, efficiently storing the history of the files. Think of it as a series of snapshots where only the changed files are referenced in the snapshot, and unchanged files are referenced in previous snapshots.
Git operations are local, for the most part, meaning it does not need to interact with a remote or central repository. (There are specific commands which do interact with remote repositories, but we will be covering that in the next article.)
Everything in Git is checksummed. This not only maintains the integrity of the repository by allowing Git to detect corruption but it is used as the reference to most objects in Git, such as commits, tags, etc. Git uses the SHA-1 hash, represented as a 40-character string of hex (digits and a-f characters) as the checksum. You’ll see these types of hashes a lot when working with Git.
I feel it is important to note (and this will become clearer as you use Git) that Git has three main states for a file:
- Modified: File has changed, but not committed to yet
- Staged: File has been marked to appear in the following commit snapshot
- Committed: File has been safely snapshotted
This will make more sense later once you see it in action.
Getting Started with Git Locally
I think it’s important to understand the basic operations in Git. One of the best ways to learn is to create your own local repository. Now, a local repository is just that: local. It has no remote repository locations configured, and we will not be interacting with a remote repository.
Don’t worry. We’ll be covering remote repositories in the next article in this series.
Basic Git Commands
We will be working with the command line version of Git. For the most part, a majority, if not all graphical user interface Git have the same concepts or even refer to the operations the same way as the command line operations. Understanding the command line will be helpful for later when using graphical Git tools.
Configuration :: git config
The git config command allows the setting and getting of configuration options either system-wide, global for the user, or at the repository level.
Before we can really do anything in Git we need to set our user.name and user.email. These are used when we commit and will become much more important when working with remote repositories. Typically, these are set globally, but they can be set at the repository level as well. When a configuration option is set at the repository level that value overrides the set global configuration values.
Let’s set up your user.name and user.email for yourself:

In the above example, I’m setting the user.name value to Tony Roman and the user.email value to tonyroman@example.com. You should set your settings to the name and email address that you use.
Another configuration option worth setting to align with some community changes around naming conventions is setting the default branch to main instead of master.
Let’s set the init.defaultBranch to main so when we create a Git repository the default branch is correctly named main:

Create a New Repository :: git init
The git init command is used to create a Git repository in either the current directory or a directory name passed as the first argument to the command.
Let’s create a Git repository named git-series:

Seeing Status of the Files :: git status
The git status command is probably the Git command I use the most. This command gives you the status of the repository and file for every possible state. Because I believe that doing is the best way to learn, we’ll be using git status in conjunction with the rest of the Git commands we will be working with.
Let’s change to the git-series directory and run git status:

Notice how git status command told us we are On branch main, with No commits yet. To keep this simple we will cover branches when we talk about working with others.
By default, git status has pretty helpful output. It typically outputs helpful hints and the associated commands to guide you along. An example of something helpful is the nothing to commit (create/copy files and use git add to track) output at the end. It even tells you that you have not made any commits to the repository yet.
Adding Files to Commit :: git add
Okay, so now that we have this empty Git repository we want to start tracking our files. It is pretty common in Open-Source software to have a README.md text file written in markdown, so let’s create one.

Now let’s check the status of the new file.

Notice how the new file shows up in the Untracked files:. Basically, we created the new file, but we didn’t add it to Git for tracking, hence it being an untracked file.
Now let’s add the new file, so it is being tracked.
![]()
Committing Files :: git commit
Now the file is added and being tracked by Git, but we still need to commit it or record our changes. Let’s do that and see how the status changes.

When invoking the git commit command it will typically open your default editor, in my case vim, to create the commit message. As you can see, Git populates the commit message with helpful text, but notice how the helpful text lines start with the # character. This is important to note technically the help text is commented out so that when you save the commit message the commented-out lines are ignored.
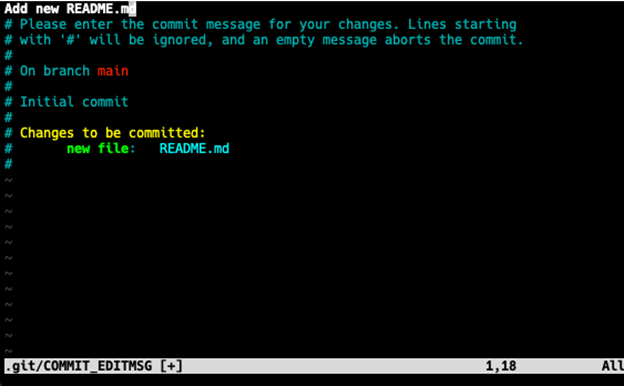
I always advise people to think of commit messages as a short description of the changes that are being committed to the repository.
I also like to consider this a message to my future self. What do I mean? Well, in the moment you might understand the context of your commit message, but later, even years later, you might not remember the context or what you were thinking when you wrote that commit message. Be concise and descriptive without being overly wordy. By writing a good commit message you also help others you may be collaborating with now or in the future.
Modifying Existing Files and Reviewing Changes :: git diff
By now we have added a file and committed it to the repository, which is just a first step. Now let’s add a few more lines to the README.md, modify it, and then check the status.

Once again, the git status command tells us the typical actions that are taken. In this case, we can stage the modified file by using the git add, or, because the file is already being tracked, we can use the git commit -a command to add any modified tracked files to staging before committing. Think of -a as a shortcut: you would otherwise have to use the git add then the git commit commands to do the same work that git commit -a will do.
We have changed the README.md, and we know this by the modified status of the file. We know what we changed — we added a new line and a welcome message. Now let’s review the changes with the git diff command.

The git diff output is like most difference utilities outputs. First, we have the header information about the file in question, but Git adds additional information like the index line. The rest is pretty standard: the file name in question, the line number of the change, and then the change represented with + meaning an addition and – meaning a removal. In our case, we added two lines. We can confirm that by finding the + sign in front of the two lines we added.
When dealing with multiple changed, added, and/or removed files the output of the git diff command can get long. If you want to just review a single file or files within a directory using git diff then simply add the file or directory to the end of the command.
TIP: The git diff command shows the difference between the file Git knows to the changes currently not staged. Once the files have been staged, the git diff command will not show the differences between the file Git has snapshotted and the staged file unless you use the git diff –cached command.
Now let’s commit our changes to the README.md file. We will use one command with options to git add and git commit without opening an editor for the commit message using the git commit -a -m “<message>” command.

Moving and Renaming Files :: git mv
From time to time, you may need to move or rename files in your repository. For that, we use the git mv command. First let’s set up a scenario with some new, incorrectly named files. We will commit the files then realize we named them incorrectly and have to fix them.
Let’s create our files, then add and commit them to the repository.

As you can see, we created the files and then checked the Git status. Now we cannot use the shortcut to add modified files because these are new. We use the git add command to change their status from Untracked to Staged so we can commit. Finally, we commit using the command line option for the commit message.
Now, after some review, we realize that we do not want to use the plural for the switching and routing device files. Let’s move them around to fix it.

You can see that when we use the git mv command, it stages the move immediately. With the move already staged, we just commit the update.
Removing Files :: git rm
And finally, we need to remove a file from the repository. For that, we use the git rm command.
Let’s go ahead and remove the devices/router file and commit that change.

Once again, like the git mv command, the git rm command automatically stages the removal. Because it is already staged, we can then commit the changes to the repository with git commit.
View Commit Log :: git log
Now that we have commits in the repository, let’s review the work we have done.

The git log command lets you view a list of the commits or snapshots made to the repository.
Let’s focus on the first block the git log command output.
commit 46125202f573989ee8d2024c49f879132ccc7c05 (HEAD -> main)
Author: Tony Roman <tonyroman@example.com>
Date:   Tue Jul 12 11:43:51 2022 -0400

    Remove router devices file
The first line starts with commit and following on the same line after commit is the SHA1 checksum for the commit. Almost everything in Git is referenced by the SHA1 or a shorted version of it. The trailing text denotes the HEAD, or the most up-to-date commit in the main branch. We have been working in the default branch of main within this repository. Branches and how they work will be covered in the next article. The Author and Date are pretty self-explanatory.
Then finally, the commit message is shown.
Show Things :: git show
The git show command along with git log command are useful in reviewing what has been done in the repository. The git show command shows various types of objects as the documentation summarizes. Here we will use it to look at the git diff of a particular commit made on the repository.
First lets git log and copy the SHA1 commit checksum from the 3rd commit from the top.

Now, if you’re following along at home, the SHA1 checksum will probably not be the same. So, you will need to copy it from the git log output. Let’s copy the SHA1 checksum for the last commit displayed.

As you can see from the output of the git show command, it looks like git log and git diff outputs together for one commit. In the case of this commit, we added two files. The git diff output as part of git show tells us the new files and then proceeds to show the content of the file proceeded with + denoting the addition of those lines in a new file. The new file is denoted by the git diff output of — /dev/null which basically says, in computer geek speak, the file did not previously exist or was null.
The git show command can be very helpful for viewing many things in a Git repository, but the primary usage case is typically to inspect what was done in a commit.
Git Status Lifecycle
Because we did not really talk about the difference statuses a file can potentially have, I think it is important to cover it now.
There are basically four statuses:
- Untracked
- Modified
- Staged
- Unmodified

When you add new files, they are initially Untracked. We use the git add command for the new files status to be changed to Staged.
Editing files already existing in the repository will change their status to Modified. Modified files need to be staged using the git add command to change the status to Staged.
Staged is the status that git add, git rm, and git mv commands immediately change said files to Staged because there is no Modified status for those operations. Files must be Staged before they can be committed to the repository, so Modified files need to be added to staging using the git add command.
As you can see on the diagram, there is a Remove arrow from Unmodified to Untracked. By default, when you use the git rm command it removes the file. In the background, the file is moved from Unmodified to Untracked, then deleted by the git rm command. It is ultimately removed after following this status path.
Finally, Unmodified is the status once the Staged files have been committed to the repository.
Reference: https://git-scm.com/book/en/v2/Git-Basics-Recording-Changes-to-the-Repository
Summary
After all that we have covered, you should now be able to create your own local Git repository to track not just coding projects, but configuration files, your notes — almost anything! Think of Git as a tool to track and record changes over time for any file-based project you are working on.
More Learning
- Developing Applications and Automating Workflows using Cisco Platforms (DEVASC)
- 350-901 DEVCOR Developing Applications Using Cisco Core Platforms and APIs
- Introduction to Version Control — Git and GitHub
What’s next?
Now that we have covered the basics of Git for network engineers, we’ll move into the real world of working effectively in a team. Not only will I be covering the technical aspects of using a remote repository including branching, merging, and rebasing, but we will also be covering strategies to avoid common issues and pitfalls.
Stay tuned for the next part in this Git for Network Engineers series coming soon!
Follow Cisco Learning & Certifications
Twitter | Facebook | LinkedIn | Instagram


I’m working at City Hall and we will get hundreds switches for schools across the town. I think this serie will help me to get organized with those switches and config filés.
🙌💯
Absolutely can! With what I covered here you can at least get started locally. Eventually you can create a central Git server or internal GitLab service to push your local repository to.
When to expect next article?
Thanks for this one, very useful !
nice!
Thanks for covering the basics. Looking forward for the next article in this series.