
Hello friends and fellow curious engineers! As part of my new video series on Cisco U., I’m revisiting the topic of container networking. If you want to check out the new video, head on over to @CiscoUtube for Container Networking at Layer 1 or watch it below:
Following up on my last blog post where I explored the basics of the Linux ‘ip’ command, I’m back with a topic that I’ve found both interesting and a source of confusion for many people: container networking. Specifically, Docker container networking. I knew as soon as I decided on container networking for my next topic that there is far too much material to cover in a single blog post. I’d need to scope the content down to make it blog-sized. As I considered possible choices for where to spend time, I figured that exploring the default Docker networking behavior and setup was a great place to start. If there is interest in learning more about the topic, I’d be happy to continue and explore other aspects of Docker networking in future posts.
What does “default Docker networking” mean, exactly?
Before I jump right into the technical bits, I wanted to define exactly what I mean by “default Docker networking.” Docker offers engineers many options for setting up networking. These options are available in the form of different network drivers that are included with Docker itself or added as a networking plugin. There are three options I would recommend every network engineer to be familiar with: host, bridge, and none.
Containers attached to a network using the host driver run without any network isolation from the underlying host that is running the container. That means that applications running within the container have full access to all network interfaces and traffic on the hosting server itself. This option isn’t often used, because typical container use cases involve a desire to keep workloads running in containers isolated from each other. However, for use cases when a container is used to simplify the installation/maintenance of an application, and there is a single container running on each host, a Docker host network provides a solution that offers the best network performance and least complexity in the network configuration.
Containers attached to a network using the null driver (i.e., none) have no networking created by Docker when starting up. This option is most often used while working on custom networking for an application or service.
Containers attached to a network using the bridge driver are placed onto an isolated layer 2 network created on the host. Each container on this isolated network is assigned a network interface and an IP address. Communication between containers on the same bridge network on the host is allowed, the same way two hosts connected to the same switch would be allowed. In fact, a great way to think about a bridge network is like it is a single VLAN switch.
With those basics covered, let’s circle back to the question of “what does default Docker networking mean?” Whenever you start a container with “docker run” and do NOT specify a network to attach the container, it will be placed on a Docker network called “bridge” that uses the bridge driver. This bridge network is created by default when the Docker daemon is installed. And so, the concept of “default Docker networking” in this blog post refers to the network activities that occur within that default “bridge” Docker network.
But Hank, how can I try this out myself?
I hope that you will want to experiment and play along “at home” with me after you read this blog. While Docker can be installed on just about any operating system today, there are significant differences in the low-level implementation details on networking. I recommend you start experimenting and learning about Docker networking with a standard Linux system, rather than Docker installed on Windows or macOS. Once you understand how Docker networking works natively in Linux, moving to other options is much easier.
If you don’t have a Linux system to work with, I recommend looking at the DevNet Expert Candidate Workstation (CWS) image as a resource for candidates working toward the Cisco Certified DevNet Expert lab exam. Even if you aren’t preparing for the DevNet Expert certification, it can still be a useful resource. The DevNet Expert CWS comes installed with many standard network automation tools you may want to learn and use — including Docker. You can download the DevNet Expert CWS from the Cisco Learning Network (which is what I’m using for this blog), but a standard installation of Docker Engine (or Docker Desktop) on your Linux system is all you need to get started.
Exploring the default Docker bridge network
Before we start up any containers on the host, let’s explore what networking setup is done on the host just by installing Docker. For this exploration, we’ll leverage some of the commands we learned in my blog post on the “ip” command, as well as a few new ones.
First up, let’s look at the Docker networks that are set up on my host system.
docker network ls

NETWORK ID   NAME   DRIVER SCOPE
d6a4ce6ed0fa bridge bridge local
5f12db536980 host   host   local
d35eb80d4a39 none   null   local
docker network inspect bridge

[
    {
        "Name": "bridge",
        "Id": "d6a4ce6ed0fadde2ade3b9ff6f561c5189e9a3be01df959e7c04f514f88241a2",
        "Created": "2022-07-22T19:04:58.026025475Z",
        "Scope": "local",
        "Driver": "bridge",
        "EnableIPv6": false,
        "IPAM": {
            "Driver": "default",
            "Options": null,
            "Config": [
                {
                    "Subnet": "172.17.0.0/16",
                    "Gateway": "172.17.0.1"
                }
            ]
        },
        "Internal": false,
        "Attachable": false,
        "Ingress": false,
        "ConfigFrom": {
            "Network": ""
        },
        "ConfigOnly": false,
        "Containers": {},
        "Options": {
            "com.docker.network.bridge.default_bridge": "true",
            "com.docker.network.bridge.enable_icc": "true",
            "com.docker.network.bridge.enable_ip_masquerade": "true",
            "com.docker.network.bridge.host_binding_ipv4": "0.0.0.0",
            "com.docker.network.bridge.name": "docker0",
            "com.docker.network.driver.mtu": "1500"
        },
        "Labels": {}
    }
]
There’s a lot in this output. To make things easier, I’ve color-coded a few parts that I want to call out and explain specifically.
First up, take a look at “com.docker.network.bridge.default_bridge”: “true” in blue. This configuration option dictates that when containers are created without an assigned network, they will be automatically placed on this bridge network. (If you “inspect” the other networks you’ll find they lack this option.)
Next, locate the option “com.docker.network.bridge.name”: “docker0” in red. Much of what Docker does when starting and running containers takes advantage of other features of Linux that have existed for years. Docker’s networking parts are no different. This option indicates which “Linux bridge” is doing the actual networking for the containers. In just a moment, we’ll look at the “docker0” Linux bridge from outside of Docker — where we can connect some of the dots and expose the “magic.”
When a container is started, it must have an IP address assigned on the bridge network, just like any host connected to a switch would. In green, you can see the subnet that will be used to assign IPs and the gateway address that will be configured on each container. You might be wondering where this “gateway” address is used. We’ll get to that in a minute. ?
Looking at the Docker “bridge” from the Linux host’s view
Now, let’s look at what Docker added to the host system to set up this bridge network.
In order to explore the Linux bridge configuration, we’ll be using the “brctl” command on Linux. (The CWS doesn’t have this command by default, so I installed it.)
root@expert-cws:~# apt-get install bridge-utils

Reading package lists... Done
Building dependency tree
Reading state information... Done
bridge-utils is already the newest version (1.6-2ubuntu1).
0 upgraded, 0 newly installed, 0 to remove and 121 not upgraded.
It requires root privileges to use the “brctl” command, so be sure to use “sudo” or login as root.
Once installed, we can take a look at the bridges that are currently created on our host.
root@expert-cws:~# brctl show docker0

bridge name bridge id         STP enabled interfaces
docker0     8000.02429a0c8aee no
And look at that: there is a bridge named”docker0″.
Just to prove that Docker created this bridge, let’s create a new Docker network using the “bridge” driver to see what happens.
# Create a new docker network named blog0
# Use 'linuxblog0' as the name for the Linux bridge
root@expert-cws:~# docker network create -o com.docker.network.bridge.name=linuxblog0 blog0
e987bee657f4c48b1d76f11b532672f1f23b826e8e17a48f64c6a2b5e862aa32

# Look at the Linux bridges on the host
root@expert-cws:~# brctl show
bridge name bridge id        STP enabled interfaces
linuxblog0 8000.024278fef30f no
docker0    8000.02429a0c8aee no

# Delete the blog0 docker network
root@expert-cws:~# docker network remove blog0
blog0

# Check that the Linux bridge is gone
root@expert-cws:~# brctl show
bridge name bridge id         STP enabled interfaces
docker0     8000.02429a0c8aee no
Okay, it looks like Hank wasn’t lying. Docker actually does create and use these Linux bridges.
Next on our exploration, we’ll have a bit of a callback to my last post and the “ip link” command.
root@expert-cws:~# ip link show
1: lo: <LOOPBACK,UP,LOWER_UP> mtu 65536 qdisc noqueue state UNKNOWN mode DEFAULT group default qlen 1000
link/loopback 00:00:00:00:00:00 brd 00:00:00:00:00:00
2: ens160: <BROADCAST,MULTICAST,UP,LOWER_UP> mtu 9000 qdisc mq state UP mode DEFAULT group default qlen 1000
link/ether 00:0c:29:75:99:27 brd ff:ff:ff:ff:ff:ff
3: docker0: <NO-CARRIER,BROADCAST,MULTICAST,UP> mtu 1500 qdisc noqueue state DOWN mode DEFAULT group default
link/ether 02:42:9a:0c:8a:ee brd ff:ff:ff:ff:ff:ff
Take a look at the “docker0” link in the list — specifically, the MAC address assigned to it. Now, compare it to the bridge id for the “docker0” bridge. Every Linux bridge created on a host will also have an associated link created. In fact, using “ip link show type bridge” will only display the “docker0” link.
And lastly, on this part of our exploration, let’s check out the IP address configured on the “docker0” link.
root@expert-cws:~# ip address show dev docker0

3: docker0: <NO-CARRIER,BROADCAST,MULTICAST,UP> mtu 1500 qdisc noqueue state DOWN group default
  link/ether 02:42:9a:0c:8a:ee brd ff:ff:ff:ff:ff:ff
    inet 172.17.0.1/16 brd 172.17.255.255 scope global docker0
    valid_lft forever preferred_lft forever
  inet6 fe80::42:9aff:fe0c:8aee/64 scope link
    valid_lft forever preferred_lft forever
We’ve seen this IP address before. Look back at the details of the “docker network inspect bridge” command above. You’ll find that the “Gateway” address configured on the bridge is used when creating the IP address for the bridge link interface. This allows the Linux bridge to act as the default gateway for the containers that are added to this network.
Adding containers to a default Docker bridge network
Now that we’ve taken a good look at how the default Docker network is set up, let’s start some containers to test and see what happens. But what image should we use for the testing?
Since we’ll be exploring the networking configuration of Docker, I created a very simple Dockerfile that adds the “ip” command and “ping” to the based Ubuntu image.
# Install ip utilities and ping into
# Ubuntu container
FROM ubuntu:latest

RUN apt-get update \
    && apt-get install -y \
    iproute2 \
    iputils-ping \
    && rm -rf /var/lib/apt/lists/*
docker build -t nettest .

Sending build context to Docker daemon   5.12kB
Step 1/2 : FROM ubuntu:latest
 ---> df5de72bdb3b
Step 2/2 : RUN apt-get update     && apt-get install -y     iproute2     iputils-ping     && rm -rf /var/lib/apt/lists/*
 ---> Using cache
 ---> dffdfcc96c69
Successfully built dffdfcc96c69
Successfully tagged nettest:latest
Now I’ll start three containers using this customized Ubuntu image I created.
docker run -it -d --name c1 --hostname c1 nettest
docker run -it -d --name c2 --hostname c2 nettest
docker run -it -d --name c3 --hostname c3 nettest
- “-it” is actually two options, but they are often used together. These options will start the container in “interactive” (-i) mode and allocate a “pseudo-tty” (-t), so that we can connect to and use the shell within the container.
- “-d” will start the container as a “daemon” (or, in the background). Without this option, the container would start up and automatically attach to our terminal, allowing us to enter commands and see their output immediately. Starting the containers with this option enables us to start up 3 containers, then attach them for use if and when needed.
- “–name c1” and “–hostname c1” provide names for the container; the first one is used to determine how the container will be named and referenced in docker commands, and the second provides the hostname of the container itself.
- I like to think of the first one as putting a label on the outside of a switch. This way, when I am physically standing in the data center, I know which switch is which. Meanwhile, the second one is for actually running the command “hostname” on the switch.
root@expert-cws:~# docker ps

CONTAINER ID IMAGE   COMMAND CREATED       STATUS       PORTS NAMES
061e0e2ccc4f nettest "bash"  3 seconds ago Up 2 seconds       c3
20262fff1d05 nettest "bash"  3 seconds ago Up 2 seconds       c2
c8134a156169 nettest "bash"  4 seconds ago Up 3 seconds       c1
Okay, all the containers are running as expected. Let’s look at the Docker networks.
root@expert-cws:~# docker network inspect bridge | jq .[0].Containers
{
  "5d17955c0c7f2b77e40eb5f69ce4da544bf244138b530b5a461e9f38ce3671b9": {
    "Name": "c1",
    "EndpointID": "e1bddcaa35684079e79bc75bca84c758d58aa4c13ffc155f6427169d2ee0bcd1",
    "MacAddress": "02:42:ac:11:00:02",
    "IPv4Address": "172.17.0.2/16",
    "IPv6Address": ""
  },
  "635287284bf49acdba5fe7921ae9c3bd699a2b8b5abc2e19f984fa030f180a54": {
    "Name": "c2",
    "EndpointID": "b8ff9a89d4ebe5c3f349dec0fa050330d930a87b917673c836ae90c0e154b131",
    "MacAddress": "02:42:ac:11:00:03",
    "IPv4Address": "172.17.0.3/16",
    "IPv6Address": ""
  },
  "f3dd453379d76f240c03a5853bff62687f000ab1b81158a40d177471d9fef677": {
    "Name": "c3",
    "EndpointID": "7c7959415bcd1f001417aa0715cdf67e1123bca5eae6405547b39b51f5ca100b",
    "MacAddress": "02:42:ac:11:00:04",
    "IPv4Address": "172.17.0.4/16",
    "IPv6Address": ""
  }
}
A little extra bonus tip here: I’m using the jq (jquery) command to parse and process the returned data and just view the part of the output I want. Specifically the list of containers attached to this network.
In the output, you can see an entry for each of the three containers I started up, along with their network details. Each container is assigned an IP address on the 172.17.0.0/16 network that was listed as the subnet for the network.
Exploring the container network from IN the container
Before we dive into the more complicated view of the network interfaces and how they attach to the bridge from the host view, let’s check out the network from IN a container. To do that, we need to “attach” to one of the containers. Because we started the containers with the “-it” option, there is an interactive terminal shell available to connect to.
# Running the attach command from the host
root@expert-cws:~# docker attach c1

# Now connected to the c1 container
root@c1:/#
Note: Eventually, you’re likely going to want to “detach” from the container and return to the host. If you type “exit” at the shell, the container process will stop. You can “docker start” it again, but an easier way is to use the “detach-keys” option that is part of the “docker attach” command. The default keys to use are “ctrl-p ctrl-q” key sequence. Pressing these keys will “detach” the terminal from the container but leave the container running. You can change the keys used by including “–detach-keys=’ctrl-a'” in the command to attach.
Once inside the container, we can use the skills we learned in the “Exploring the Linux ‘ip’ Command” blog post.
# Note: This command is running in the "c1" container
root@c1:/# ip add

1: lo: <LOOPBACK,UP,LOWER_UP> mtu 65536 qdisc noqueue state UNKNOWN group default qlen 1000
  link/loopback 00:00:00:00:00:00 brd 00:00:00:00:00:00
  inet 127.0.0.1/8 scope host lo
    valid_lft forever preferred_lft forever
58: eth0@if59: <BROADCAST,MULTICAST,UP,LOWER_UP> mtu 1500 qdisc noqueue state UP group default
  link/ether 02:42:ac:11:00:02 brd ff:ff:ff:ff:ff:ff link-netnsid 0
  inet 172.17.0.2/16 brd 172.17.255.255 scope global eth0
    valid_lft forever preferred_lft forever
There are several things we want to notice in this output.
First, the name of the non-loopback interface shown is “eth0@if59.” The “eth0” part of this probably looks normal, but what is the “@if59” part all about? The answer lies in the type of link that is used in this container. Let’s get the “detailed” information about the “eth0” link. (Notice that the actual name of the link is just “eth0”.)
# Note: This command is running in the "c1" container
root@c1:/# ip -d address show dev eth0

58: eth0@if59: <BROADCAST,MULTICAST,UP,LOWER_UP> mtu 1500 qdisc noqueue state UP group default
  link/ether 02:42:ac:11:00:02 brd ff:ff:ff:ff:ff:ff link-netnsid 0 promiscuity 0 minmtu 68 maxmtu 65535
  veth numtxqueues 1 numrxqueues 1 gso_max_size 65536 gso_max_segs 65535
  inet 172.17.0.2/16 brd 172.17.255.255 scope global eth0
    valid_lft forever preferred_lft forever
The link type is “veth,” or, “virtual ethernet.” I like to think of a veth link in Linux like an ethernet cable. An ethernet cable has two ends and connects two interfaces together. Similarly, a veth link in Linux is actually a pair of veth links where anything that goes in one end of the link comes out the other. This means that “eth0@if59” is actually one end of a veth pair.
I know what you are thinking: “Where is the other end of the veth pair, Hank?” That is an excellent question and shows how much you are paying attention. We’ll answer that question in just a second. But first, what would a network test be without a couple pings?
I know that the other two containers I started have IP addresses of 172.17.0.3 and 172.17.0.4. Let’s see if they are reachable.
# Note: These commands are running in the "c1" container
root@c1:/# ping 172.17.0.3

PING 172.17.0.3 (172.17.0.3) 56(84) bytes of data.
64 bytes from 172.17.0.3: icmp_seq=1 ttl=64 time=0.177 ms
64 bytes from 172.17.0.3: icmp_seq=2 ttl=64 time=0.055 ms
ç64 bytes from 172.17.0.3: icmp_seq=3 ttl=64 time=0.055 ms
64 bytes from 172.17.0.3: icmp_seq=4 ttl=64 time=0.092 ms
64 bytes from 172.17.0.3: icmp_seq=5 ttl=64 time=0.053 ms
^C
--- 172.17.0.3 ping statistics ---
5 packets transmitted, 5 received, 0% packet loss, time 4096ms
rtt min/avg/max/mdev = 0.053/0.086/0.177/0.047 ms

root@c1:/# ping 172.17.0.4

PING 172.17.0.4 (172.17.0.4) 56(84) bytes of data.
64 bytes from 172.17.0.4: icmp_seq=1 ttl=64 time=0.144 ms
64 bytes from 172.17.0.4: icmp_seq=2 ttl=64 time=0.066 ms
64 bytes from 172.17.0.4: icmp_seq=3 ttl=64 time=0.086 ms
64 bytes from 172.17.0.4: icmp_seq=4 ttl=64 time=0.176 ms
^C
--- 172.17.0.4 ping statistics ---
4 packets transmitted, 4 received, 0% packet loss, time 3059ms
rtt min/avg/max/mdev = 0.066/0.118/0.176/0.044 ms
Also, the “docker0” bridge has an IP address of 172.17.0.1 and should be the default gateway for the host. Let’s check on it.
root@c1:/# ip route

default via 172.17.0.1 dev eth0
172.17.0.0/16 dev eth0 proto kernel scope link src 172.17.0.2

root@c1:/# ping 172.17.0.1

PING 172.17.0.1 (172.17.0.1) 56(84) bytes of data.
64 bytes from 172.17.0.1: icmp_seq=1 ttl=64 time=0.039 ms
64 bytes from 172.17.0.1: icmp_seq=2 ttl=64 time=0.066 ms
^C
--- 172.17.0.1 ping statistics ---
2 packets transmitted, 2 received, 0% packet loss, time 1011ms
rtt min/avg/max/mdev = 0.039/0.052/0.066/0.013 ms
And one last thing to check within the container before we head back to the host system, let’s look at the “neighbors” to our container (that is the ARP table).
root@c1:/# ip neigh
172.17.0.1 dev eth0 lladdr 02:42:9a:0c:8a:ee REACHABLE
172.17.0.3 dev eth0 lladdr 02:42:ac:11:00:03 STALE
172.17.0.4 dev eth0 lladdr 02:42:ac:11:00:04 STALE
Okay, entries for the gateway and two other containers. Those MAC addresses will be handy in a little bit so remember where we put them.
Okay, Hank. But didn’t you promise to tell us where the other end of the veth link is?
I don’t want to make you wait any longer. Let’s get back to the topic of the “veth” link and how it acts like a virtual ethernet cable connecting the container to the bridge network.
Our first step in answering that is to look at the veth links on the host system.
To run this command, I either need to “detach” from the “c1” container or open a new terminal connection to the host system. Notice how the hostname in the command changes back to “expert-cws” in the following examples?
# Note: This command is running on the Linux host outside the container
root@expert-cws:~# ip link show type veth

59: vetheb714e7@if58: <BROADCAST,MULTICAST,UP,LOWER_UP> mtu 1500 qdisc noqueue master docker0 state UP mode DEFAULT group default
  link/ether 3a:a4:33:c8:5e:be brd ff:ff:ff:ff:ff:ff link-netnsid 0
61: veth7ac8946@if60: <BROADCAST,MULTICAST,UP,LOWER_UP> mtu 1500 qdisc noqueue master docker0 state UP mode DEFAULT group default
  link/ether 7e:ca:5c:fa:ca:6c brd ff:ff:ff:ff:ff:ff link-netnsid 1
63: veth66bf00e@if62: <BROADCAST,MULTICAST,UP,LOWER_UP> mtu 1500 qdisc noqueue master docker0 state UP mode DEFAULT group default
  link/ether 86:74:65:35:ef:15 brd ff:ff:ff:ff:ff:ff link-netnsid 2
There are three “veth” links shown; one for each of the three containers that I started up.
The “veth” link that matches up with the interface from the “c1” container is “vetheb714e7@if58.” How do I know this? Well, this is where the “@if59” part from “eth0@if59” comes in. “if59″ refers to “interface 59” (link 59) on the host. Looking at the above output, we can see that link 59 has “@if58” attached to its name. If you look back at the output from within the container, you will see that the “eth0” link within the container is indeed numbered “58”.
Pretty cool, huh? It’s okay to feel your mind blow a little bit there. I know how it felt for me. Feel free to go back and reread the last part a couple times to make sure you’ve got it. And believe it or not, there is more cool stuff to come. ?
But how does this virtual ethernet cable connect to the bridge?
Now that we’ve seen how the network from “inside” the container gets to the network “outside” the container on the host (using the virtual ethernet cable or veth), it is time to go back to the Linux bridge that represents the “docker0” network.
root@expert-cws:~# brctl show
bridge name   bridge id          STP enabled   interfaces
docker0       8000.02429a0c8aee  no            veth66bf00e
                                               veth7ac8946
                                               vetheb714e7
In this output, we can see that there are three interfaces attached to the bridge. One of these interfaces is the veth interface at the other end of the virtual ethernet cable from the container we were looking at.
One more new command. Let’s use “brctl” to look at the MAC table for the docker0 bridge.
root@expert-cws:~# brctl showmacs docker0
port no   mac addr          is local? ageing timer
1         02:42:ac:11:00:02 no        3.20
2         02:42:ac:11:00:03 no        3.20
3         02:42:ac:11:00:04 no        7.27
1         3a:a4:33:c8:5e:be yes       0.00
1         3a:a4:33:c8:5e:be yes       0.00
2         7e:ca:5c:fa:ca:6c yes       0.00
2         7e:ca:5c:fa:ca:6c yes       0.00
3         86:74:65:35:ef:15 yes       0.00
3         86:74:65:35:ef:15 yes       0.00
You can either trust me that the first three entries listed are the MAC addresses for the eth0 interfaces for the three containers we started, or you can scroll up and verify for yourself.
Note: If you are following along in your own lab, you might need to go and send the pings from within C1 again if the MAC entries aren’t showing up on the bridge. They will age out fairly quickly, but sending a ping packet will have them be relearned by the bridge.
Let’s end on a network engineer’s double-feature dream!
As I end this post, I want to leave you with two things that I think will help solidify what we’ve covered in this long post. A network diagram, and a packet walk.
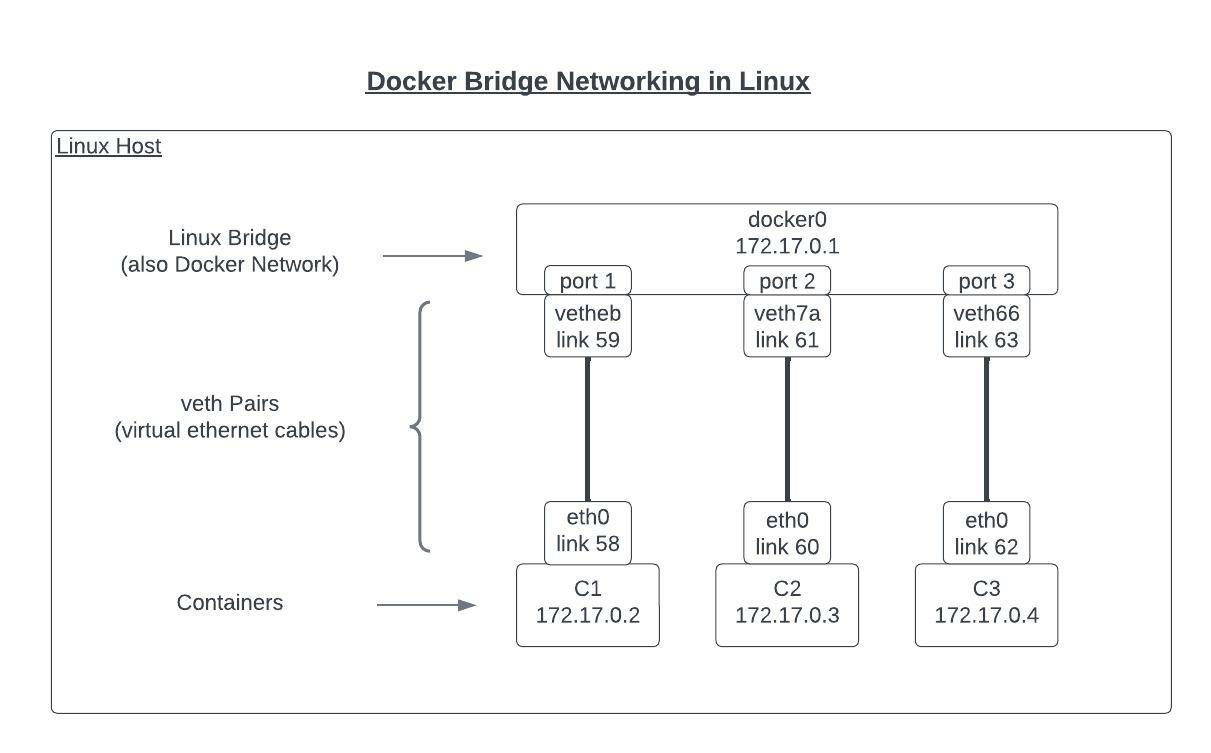
I put this drawing together to represent the small container network we built up in this blog post. It shows the three containers, their ethernet interfaces (which are actually one end of a veth pair), the Linux bridge, and the other end of the veth pairs that connect the containers to the bridge. With this in front of us, let’s talk through how a ping would flow from C1 to C2.
Note: I’m skipping over the ARP process for this example and just focusing on the ICMP traffic.
- The ICMP echo-request from the ping would be sent from “C1” out its “eth0” interface.
- The packet travels along the virtual ethernet cable to arrive at “vetheb” connected to the docker0 bridge.
- The packet arrives on port 1 on the docker0 bridge.
- The docker0 bridge consults its MAC table to find the port that the MAC address for the packet and finds it on port 2.
- The packet is sent out port2 and travels along the virtual ethernet cable starting at “veth7a” connected to the docker0 bridge.
- The packet arrives at the “eth0” interface for “C2” and is processed by the container.
- The echo-reply is sent out and follows a reverse path.
Conclusion (I know, finally…)
Now that we’ve finished diving into how the default docker bridge network works, I hope you found this blog post helpful. In fact, any Docker bridge network would use the same topics and concepts we covered in this post. And despite going on for over 4,000 words… I only really covered the layer 1 and layer 2 parts of how Docker networking works. If you’re interested, we can do a follow-up blog that looks at how traffic is sent from the isolated docker0 bridge out from the host to reach other services and how something like a web server can be hosted on a container. It would be an easy, natural next step in your Docker networking journey. So if you are interested, please let me know in the comments, and I’ll return for a “Part 2.”
I do want to leave you with a few links for places you can go for some more information:
- In Season 2 of NetDevOps Live, Matt Johnson joined me to do a deep dive into container networking. His session was fantastic, and I reviewed it when getting ready for this post. I highly recommend it as another great resource.
- The Docker documentation on networking is very good. I referenced it quite often when putting this post together.
- The “brctl” command we used to explore the Linux bridge created by Docker offers many more options.
- Note: You might see references that the “brctl” command is obsolete and that the “bridge” command and “ip link” commands are recommended. The fact that I used “brctl” in this post instead of “bridge” might seem odd after my last post talking about how important it was to move from “ifconfig” to “ip”; the reason I continue to leverage the older command is that the ability to quickly display bridges, connected interfaces, and the MAC addresses for a bridge aren’t currently available with the “recommended” commands. If anyone has suggestions that provide the same output as the “brctl show” and “brctl showmacs” commands, I would very much love to hear them.
- And of course, my recent blog post “Exploring the Linux ‘ip’ Command” that has already been referenced a few times in this post.
Let me know what you thought of this post, any follow-up questions you have, and what you might want me to “explore” next. Comments on this post or messages via Twitter are both excellent places to stay in touch. Thanks for reading!
Join the Cisco Learning Network today for free.
Follow Cisco Learning & Certifications
Twitter | Facebook | LinkedIn | Instagram | YouTube
Use #CiscoCert to join the conversation.


Thank you for explaining this!
Eagerly waiting for part 2.
You are welcome!
Great post once again. For Part 2 consider exploring the macvlan network type.
Tip for connecting to running containers (that support a shell), `docker exec -it {name} bash` – this lets you ctrl-d out of the container and leave it running (and not have to remember the key sequence for detaching).
Thanks Karl. I think I’ll move into the Layer 3 aspects of default networking to finish up the bridge type for Part 2. But looking at some of the other network types and how they work would certainly be worthy of a few posts of their own.
And great suggestion for another way to connect to a running container. I debated which to suggest in this post as I’ve used both. But since the Ubuntu container was starting with a bash already, I liked just connecting to it. I use the “docker exec -it {name} /bin/bash” method to connect to containers that are running an application to be able to explore without stopping it.
Looking forward to part 2
Me too 🙂
Great post!!! I would like to see the Part2
Excellent. I think you’ll get the chance in the next couple weeks.
Well written, easy to follow along.
Can’t wait for part 2
Thank you so much! I try to write how I think. And as long as I “think” in an easy to follow fashion the writing works out ok.
Eagerly waiting for part 2 as well, thank you for this!
You are welcome! I’ll get Part 2 out as soon as I can.
Nicely Explained!
Hope Part 2 will be published soon
Thank you so much! Explaining tech topics is one of the favorite parts of my job!
Thank you for the insightful topic on this! Eagerly waiting for the part .
You are welcome Prashanth, thanks for reading. Part 2 will be out soon.
Very nice post, look forward to part 2!! Thanks
Thanks for reading Phil, glad you enjoyed it!
Well explained Hank, I am struggling/working on a similar topic of POD networking. there are so many plugin’s(calico, funnel) and searching for good reference. Let me know if u have some references to share.
Moving from Docker networking to Kubernetes networking is definitely something that brings in its own complexity and confusion. I don’t have any pointers for specific places to go for info off the top of my head, but maybe I’ll continue into Kubernetes networking after Docker networking.
Awesome thanks for this, you explained very well.
You are welcome Sukhbir, thanks for reading. I’m glad my run through of the details were easy to follow.
Look forward to the part 2 of this great post!!
great stuff 🙂
Hi Hank,
Thanks for your great article. Could you please write article for the command iptable rules.
Great post! I meant to suggest this below as a reference for part2 but added as comment to your previous article by mistake.
So here it is again:
BRKCLD-3181 – Container Networking Deep Dive by Ivan Kovacevic – Cisco Live Barcelona 2020
https://www.ciscolive.com/on-demand/on-demand-library.html?search=container%20networking&search.event=1636046385176001FR5R&search=container+networking#/session/16360600075060017Q3J
Again, I really like what you are posting lately. Keep it up!
Super super blog… a usual Hank. Thanks !
I’m also interesting in part 2 of course and particulaty how design a secure network with containers (dmz, proxy, etc.)
Looks great!
Finally I came to read this one. Very cool how you drilled down default Docker networking. Like it.
Great topic!
Great topic!
This was a great write-up and hits on the low-level setup. Namespaces, a bridge, and a virtual ethernet device and boom you have a network’ed container. Good stuff Hank.