This is the third post in a series about writing ChatOps services on top of the Webex API. In the first post, we built a Webex Bot that received message events from a group room and printed the event JSON out to the console. In the second, we added security to that Bot, adding an encrypted authentication header to Webex events, and subsequently adding a simple list of authorized users to the event handler. We also added user feedback by posting messages back to the room where the event was raised.
In this post, we’ll build on what was done in the first two posts, and start to apply real-world use cases to our Bot. The goal here will be to manage Deployments in a Kubernetes cluster using commands entered into a Webex room. Not only is this a fun challenge to solve, but it also provides wider visibility into the goings-on of an ops team, as they can scale a Deployment or push out a new container version in the public view of a Webex room. You can find the completed code for this post on GitHub.
This post assumes that you’ve completed the steps listed in the first two blog posts. You can find the code from the second post here. Also, very important, be sure to read the first post to learn how to make your local development environment publicly accessible so that Webex Webhook events can reach your API. Make sure your tunnel is up and running and Webhook events can flow through to your API successfully before proceeding on to the next section. In this case, I’ve set up a new Bot called Kubernetes Deployment Manager, but you can use your existing Bot if you like. From here on out, this post assumes that you’ve taken those steps and have a successful end-to-end data flow.
Architecture
Let’s take a look at what we’re going to build:
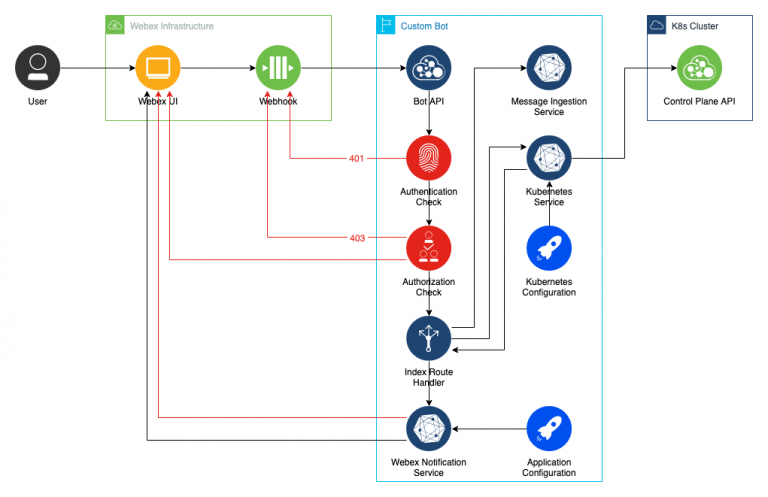
Building on top of our existing Bot, we’re going to create two new services: MessageIngestion, and Kubernetes. The latter will take a configuration object that gives it access to our Kubernetes cluster and will be responsible for sending requests to the K8s control plane. Our Index Router will continue to act as a controller, orchestrating data flows between services. And our WebexNotification service that we built in the second post will continue to be responsible for sending messages back to the user in Webex.
Our Kubernetes Resources
In this section, we’ll set up a simple Deployment in Kubernetes, as well as a Service Account that we can leverage to communicate with the Kubernetes API using the NodeJS SDK. Feel free to skip this part if you already have those resources created.
This section also assumes that you have a Kubernetes cluster up and running, and both you and your Bot have network access to interact with its API. There are plenty of resources online for getting a Kubernetes cluster set up, and getting kubetcl installed, both of which are beyond the scope of this blog post.
Our Test Deployment
To keep thing simple, I’m going to use Nginx as my deployment container – an easily-accessible image that doesn’t have any dependencies to get up and running. If you have a Deployment of your own that you’d like to use instead, feel free to replace what I’ve listed here with that.
# in resources/nginx-deployment.yaml
apiVersion: apps/v1
kind: Deployment
metadata:
    name: nginx-deployment
  labels:
      app: nginx
spec:
  replicas: 2
  selector:
    matchLabels:
      app: nginx
template:
  metadata:
    labels:
      app: nginx
  spec:
    containers:
    - name: nginx
      image: nginx:1.20
      ports:
      - containerPort: 80
Our Service Account and Role
The next step is to make sure our Bot code has a way of interacting with the Kubernetes API. We can do that by creating a Service Account (SA) that our Bot will assume as its identity when calling the Kubernetes API, and ensuring it has proper access with a Kubernetes Role.
First, let’s set up an SA that can interact with the Kubernetes API:
# in resources/sa.yaml
apiVersion: v1
kind: ServiceAccount
metadata:
  name: chatops-bot
Now we’ll create a Role in our Kubernetes cluster that will have access to pretty much everything in the default Namespace. In a real-world application, you’ll likely want to take a more restrictive approach, only providing the permissions that allow your Bot to do what you intend; but wide-open access will work for a simple demo:
# in resources/role.yaml
kind: Role
apiVersion: rbac.authorization.k8s.io/v1
metadata:
  namespace: default
  name: chatops-admin
rules:
- apiGroups: ["*"]
  resources: ["*"]
  verbs: ["*"]
Finally, we’ll bind the Role to our SA using a RoleBinding resource:
# in resources/rb.yaml
kind: RoleBinding
apiVersion: rbac.authorization.k8s.io/v1
metadata:
  name: chatops-admin-binding
  namespace: default
subjects:
- kind: ServiceAccount
  name: chatops-bot
  apiGroup: ""
roleRef:
  kind: Role
  name: chatops-admin
  apiGroup: ""
Apply these using kubectl:
$ kubectl apply -f resources/sa.yaml
$ kubectl apply -f resources/role.yaml
$ kubectl apply -f resources/rb.yaml
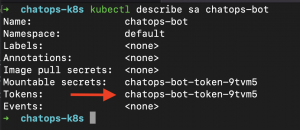
Once your SA is created, fetching its info will show you the name of the Secret in which its Token is stored.
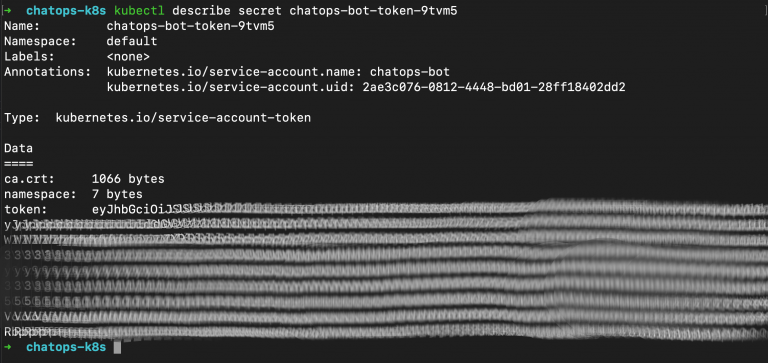
Fetching info about that Secret will print out the Token string in the console. Be careful with this Token, as it’s your SA’s secret, used to access the Kubernetes API!
Configuring the Kubernetes SDK
Since we’re writing a NodeJS Bot in this blog post, we’ll use the JavaScript Kubernetes SDK for calling our Kubernetes API. You’ll notice, if you look at the examples in the Readme, that the SDK expects to be able to pull from a local kubectl configuration file (which, for example, is stored on a Mac at ~/.kube/config). While that might work for local development, that’s not ideal for Twelve Factor development, where we typically pass in our configurations as environment variables. To get around this, we can pass in a pair of configuration objects that mimic the contents of our local Kubernetes config file and can use those configuration objects to assume the identity of our newly created service account.
Let’s add some environment variables to the AppConfig class that we created in the previous post:
// in config/AppConfig.js
// inside the constructor block
// after previous environment variables

// whatever you’d like to name this cluster, any string will do
this.clusterName = process.env['CLUSTER_NAME'];
// the base URL of your cluster, where the API can be reached
this.clusterUrl = process.env['CLUSTER_URL'];
// the CA cert set up for your cluster, if applicable
this.clusterCert = process.env['CLUSTER_CERT'];
// the SA name from above - chatops-bot
this.kubernetesUserame = process.env['KUBERNETES_USERNAME'];
// the token value referenced in the screenshot above
this.kubernetesToken = process.env['KUBERNETES_TOKEN'];

// the rest of the file is unchanged…
These five lines will allow us to pass configuration values into our Kubernetes SDK, and configure a local client. To do that, we’ll create a new service called KubernetesService, which we’ll use to communicate with our K8s cluster:
// in services/kubernetes.js

import {KubeConfig, AppsV1Api, PatchUtils} from '@kubernetes/client-node';

export class KubernetesService {
    constructor(appConfig) {
        this.appClient = this._initAppClient(appConfig);
        this.requestOptions = { "headers": { "Content-type":
PatchUtils.PATCH_FORMAT_JSON_PATCH}};
    }

    _initAppClient(appConfig) { /* we’ll fill this in soon */  }

    async takeAction(k8sCommand) { /* we’ll fill this in later */ }
}
This set of imports at the top gives us the objects and methods that we’ll need from the Kubernetes SDK to get up and running. The requestOptions property set on this constructor will be used when we send updates to the K8s API.
Now, let’s populate the contents of the _initAppClient method so that we can have an instance of the SDK ready to use in our class:
// inside the KubernetesService class
_initAppClient(appConfig) {
    // building objects from the env vars we pulled in
    const cluster = {
        name: appConfig.clusterName,
        server: appConfig.clusterUrl,
        caData: appConfig.clusterCert
    };
    const user = {
        name: appConfig.kubernetesUserame,
        token: appConfig.kubernetesToken,
    };
    // create a new config factory object
    const kc = new KubeConfig();
    // pass in our cluster and user objects
    kc.loadFromClusterAndUser(cluster, user);
    // return the client created by the factory object
    return kc.makeApiClient(AppsV1Api);
}
Simple enough. At this point, we have a Kubernetes API client ready to use, and stored in a class property so that public methods can leverage it in their internal logic. Let’s move on to wiring this into our route handler.
Message Ingestion and Validation
In a previous post, we took a look at the full payload of JSON that Webex sends to our Bot when a new message event is raised. It’s worth taking a look again, since this will indicate what we need to do in our next step:
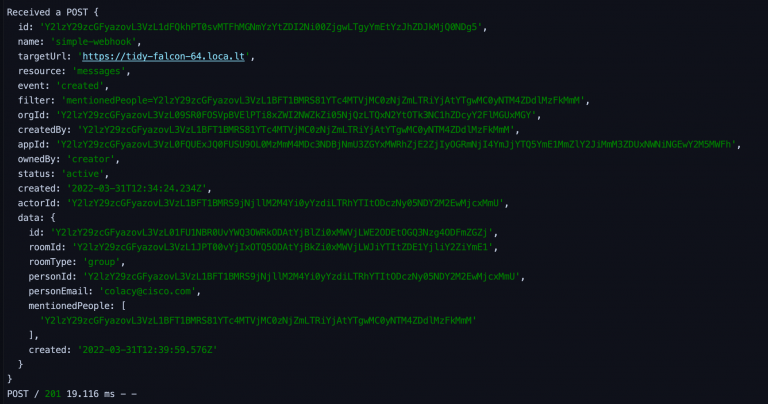
If you look through this JSON, you’ll notice that nowhere does it list the actual content of the message that was sent; it simply gives event data. However, we can use the data.id field to call the Webex API and fetch that content, so that we can take action on it. To do so, we’ll create a new service called MessageIngestion, which will be responsible for pulling in messages and validating their content.
Fetching Message Content
We’ll start with a very simple constructor that pulls in the AppConfig to build out its properties, one simple method that calls a couple of stubbed-out private methods:
// in services/MessageIngestion.js
export class MessageIngestion {
    constructor(appConfig) {
        this.botToken = appConfig.botToken;
    }

    async determineCommand(event) {
        const message = await this._fetchMessage(event);
        return this._interpret(message);
     }

    async _fetchMessage(event) { /* we’ll fill this in next */ }

    _interpret(rawMessageText) { /* we’ll talk about this */ }
}
We’ve got a good start, so now it’s time to write our code for fetching the raw message text. We’ll call the same /messages endpoint that we used to create messages in the previous blog post, but in this case, we’ll fetch a specific message by its ID:
// in services/MessageIngestion.js
// inside the MessageIngestion class

// notice we’re using fetch, which requires NodeJS 17.5 or higher, and a runtime flag
// see previous post for more info
async _fetchMessage(event) {
    const res = await fetch("https://webexapis.com/v1/messages/" +
event.data.id, {
        headers: {
            "Content-Type": "application/json",
            "Authorization": `Bearer ${this.botToken}`
        },
        method: "GET"
    });
    const messageData = await res.json();
    if(!messageData.text) {
        throw new Error("Could not fetch message content.");
    }
    return messageData.text;
}
If you console.log the messageData output from this fetch request, it will look something like this:
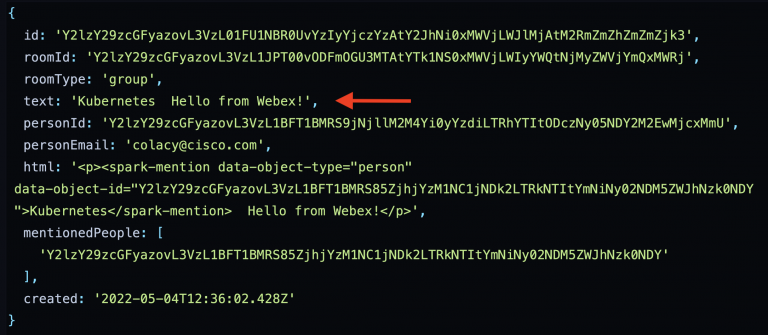
As you can see, the message content takes two forms – first in plain text (pointed out with a red arrow), and second in an HTML block. For our purposes, as you can see from the code block above, we’ll use the plain text content that doesn’t include any formatting.
Message Analysis and Validation
This is a complex topic to say the least, and the complexities are beyond the scope of this blog post. There are a lot of ways to analyze the content of the message to determine user intent. You could explore natural language processing (NLP), for which Cisco offers an open-source Python library called MindMeld. Or you could leverage OTS software like Amazon Lex.
In my code, I took the simple approach of static string analysis, with some rigid rules around the expected format of the message, e.g.:
<tagged-bot-name> scale <name-of-deployment> to <number-of-instances>
It’s not the most user-friendly approach, but it gets the job done for a blog post.
I have two intents available in my codebase – scaling a Deployment and updating a Deployment with a new image tag. A switch statement runs analysis on the message text to determine which of the actions is intended, and a default case throws an error that will be handled in the index route handler. Both have their own validation logic, which adds up to over sixty lines of string manipulation, so I won’t list all of it here. If you’re interested in reading through or leveraging my string manipulation code, it can be found on GitHub.
Analysis Output
The happy path output of the _interpret method is a new data transfer object (DTO) created in a new file:
// in dto/KubernetesCommand.js
export class KubernetesCommand {
    constructor(props = {}) {
        this.type = props.type;
        this.deploymentName = props.deploymentName;
        this.imageTag = props.imageTag;
        this.scaleTarget = props.scaleTarget;
    }
}
This standardizes the expected format of the analysis output, which can be anticipated by the various command handlers that we’ll add to our Kubernetes service.
Sending Commands to Kubernetes
For simplicity’s sake, we’ll focus on the scaling workflow instead of the two I’ve got coded. Suffice it to say, this is by no means scratching the surface of what’s possible with your Bot’s interactions with the Kubernetes API.
Creating a Webex Notification DTO
The first thing we’ll do is craft the shared DTO that will contain the output of our Kubernetes command methods. This will be passed into the WebexNotification service that we built in our last blog post and will standardize the expected fields for the methods in that service. It’s a very simple class:
// in dto/Notification.js
export class Notification {
    constructor(props = {}) {
        this.success = props.success;
        this.message = props.message;
    }
}
This is the object we’ll build when we return the results of our interactions with the Kubernetes SDK.
Handling Commands
Previously in this post, we stubbed out the public takeAction method in the Kubernetes Service. This is where we’ll determine what action is being requested, and then pass it to internal private methods. Since we’re only looking at the scale approach in this post, we’ll have two paths in this implementation. The code on GitHub has more.
// in services/Kuberetes.js
// inside the KubernetesService class
async takeAction(k8sCommand) {
    let result;
    switch (k8sCommand.type) {
        case "scale":
            result = await this._updateDeploymentScale(k8sCommand);
            break;
        default:
            throw new Error(`The action type ${k8sCommand.type} that was
determined by the system is not supported.`);
    }
    return result;
}
Very straightforward – if a recognized command type is identified (in this case, just “scale”) an internal method is called and the results are returned. If not, an error is thrown.
Implementing our internal _updateDeploymentScale method requires very little code. However it leverages the K8s SDK, which, to say the least, isn’t very intuitive. The data payload that we create includes an operation (op) that we’ll perform on a Deployment configuration property (path), with a new value (value). The SDK’s patchNamespacedDeployment method is documented in the Typedocs linked from the SDK repo. Here’s my implementation:
// in services/Kubernetes.js
// inside the KubernetesService class
async _updateDeploymentScale(k8sCommand) {
    // craft a PATCH body with an updated replica count
    const patch = [
        {
            "op": "replace",
            "path":"/spec/replicas",
            "value": k8sCommand.scaleTarget
        }
    ];
    // call the K8s API with a PATCH request
    const res = await
this.appClient.patchNamespacedDeployment(k8sCommand.deploymentName,
"default", patch, undefined, undefined, undefined, undefined,
this.requestOptions);
    // validate response and return an success object to the
    return this._validateScaleResponse(k8sCommand, res.body)
}
The method on the last line of that code block is responsible for crafting our response output.
// in services/Kubernetes.js
// inside the KubernetesService class
_validateScaleResponse(k8sCommand, template) {
    if (template.spec.replicas === k8sCommand.scaleTarget) {
        return new Notification({
            success: true,
            message: `Successfully scaled to ${k8sCommand.scaleTarget}
instances on the ${k8sCommand.deploymentName} deployment`
        });
    } else {
        return new Notification({
            success: false,
            message: `The Kubernetes API returned a replica count of
${template.spec.replicas}, which does not match the desired
${k8sCommand.scaleTarget}`
        });
    }
}
Updating the Webex Notification Service
We’re almost at the end! We still have one service that needs to be updated. In our last blog post, we created a very simple method that sent a message to the Webex room where the Bot was called, based on a simple success or failure flag. Now that we’ve built a more complex Bot, we need more complex user feedback.
There are only two methods that we need to cover here. They could easily be compacted into one, but I prefer to keep them separate for granularity.
The public method that our route handler will call is sendNotification, which we’ll refactor as follows here:
// in services/WebexNotifications
// inside the WebexNotifications class
// notice that we’re adding the original event
// and the Notification object
async sendNotification(event, notification) {
    let message = `<@personEmail:${event.data.personEmail}>`;
    if (!notification.success) {
        message += ` Oh no! Something went wrong!
${notification.message}`;
    } else {
        message += ` Nicely done! ${notification.message}`;
    }
    const req = this._buildRequest(event, message); // a new private
message, defined below
    const res = await fetch(req);
    return res.json();
}
Finally, we’ll build the private _buildRequest method, which returns a Request object that can be sent to the fetch call in the method above:
// in services/WebexNotifications
// inside the WebexNotifications class
_buildRequest(event, message) {
    return new Request("https://webexapis.com/v1/messages/", {
        headers: this._setHeaders(),
        method: "POST",
        body: JSON.stringify({
            roomId: event.data.roomId,
            markdown: message
        })
    })
}
Tying Everything Together in the Route Handler
In previous posts, we used simple route handler logic in routes/index.js that first logged out the event data, and then went on to respond to a Webex user depending on their access. We’ll now take a different approach, which is to wire in our services. We’ll start with pulling in the services we’ve created so far, keeping in mind that this will all take place after the auth/authz middleware checks are run. Here is the full code of the refactored route handler, with changes taking place in the import statements, initializations, and handler logic.
// revised routes/index.js
import express from 'express'
import {AppConfig} from '../config/AppConfig.js';
import {WebexNotifications} from '../services/WebexNotifications.js';
// ADD OUR NEW SERVICES AND TYPES
import {MessageIngestion} from "../services/MessageIngestion.js";
import {KubernetesService} from '../services/Kubernetes.js';
import {Notification} from "../dto/Notification.js";

const router = express.Router();
const config = new AppConfig();
const webex = new WebexNotifications(config);
// INSTANIATE THE NEW SERVICES
const ingestion = new MessageIngestion(config);
const k8s = new KubernetesService(config);

// Our refactored route handler
router.post('/', async function(req, res) {
  const event = req.body;
  try {
    // message ingestion and analysis
    const command = await ingestion.determineCommand(event);
    // taking action based on the command, currently stubbed-out
    const notification = await k8s.takeAction(command);
    // respond to the user
    const wbxOutput = await webex.sendNotification(event, notification);
    res.statusCode = 200;
    res.send(wbxOutput);
  } catch (e) {
    // respond to the user
    await webex.sendNotification(event, new Notification({success: false,
message: e}));
    res.statusCode = 500;
    res.end('Something went terribly wrong!');
  }
}
export default router;
Testing It Out!
If your service is publicly available, or if it’s running locally and your tunnel is exposing it to the internet, go ahead and send a message to your Bot to test it out. Remember that our test Deployment was called nginx-deployment, and we started with two instances. Let’s scale to three:

That takes care of the happy path. Now let’s see what happens if our command fails validation:

Success! From here, the possibilities are endless. Feel free to share all of your experiences leveraging ChatOps for managing your Kubernetes deployments in the comments section below.
Follow Cisco Learning & Certifications
Twitter, Facebook, LinkedIn and Instagram.
This whole series has been great! The bot is more interesting than some intro examples and tying the example to K8s is pretty cool!
Awesome!
Excellent piece