
Hello everyone, and welcome back to my little corner of the Internet. I always take inspiration from what I’m currently working on in my day job when putting together an idea for a post and/or video. Right now, we’re building a new data center to host the hands-on lab environments for learners, whether you’re training in Cisco U. or taking a course with your favorite Cisco instructor. As you may know, A LOT goes into building a new data center. But since I’m working on building the IPSEC VPN connections between this new data center and the others in our network, let’s narrow it down and take a technical look at IPSEC VPN tunnel creation.
In this blog post and the accompanying video, I’ll cover the IPSEC VPN tunnel creation process. We’ll explore “Phase 1” and “Phase 2” and take a look at how the ACLs that identify “interesting traffic” impact the security associations that are built. We’ll even look at the packets involved in the communications as tunnels are set up. If that sounds good to you, continue on, network adventurer!
A Technical Look at IPSEC VPN Tunnel Creation
“Technically Speaking… with Hank Preston” is a segment on The U. series.
Available on the Cisco U. by Learning and Certifications YouTube Channel. View Playlist
If you’re new here, I’m Hank Preston, Principal Engineer on the Labs and Systems team in Cisco Learning and Certifications. I’ve been building IPSEC VPNs for almost my entire career as a network engineer. In fact, one of my first jobs as a shiny new network engineer was building out IPSEC VPN connections using Cisco PIX firewalls for a Cisco Partner. For me, that meant taking the configuration templates built by the team’s more senior engineers and updating them with the details for a particular tunnel creation.
It wasn’t a problem… until there was one. You see, I didn’t really know what all the commands did back then. So when things didn’t work right away, finding the problem and knowing how to fix it was a bit of a mystery to me. Thankfully, there were some very good mentors and senior engineers to guide me.
I had to learn the commands to run to help me determine the problem and how to fix it. It was during these troubleshooting sessions I first learned terms like “Phase 1,” “Phase 2,” “Main Mode,” “Quick Mode,” and “Aggressive Mode,” as well as the protocols involved, like ISAKMP, IKE, IPSEC. It was a lot of fun, and it was only the beginning.
Over the years, my depth of understanding grew, transforming me into a senior engineer, not unlike those who nurtured my own curiosity. In addition to learning on the job, I had to dive deep into IPSEC VPNs to prepare for my Cisco certification exams. Even though I was preparing for now-retired certifications like CCNA Security, CCSP, and “VPN Specialist,” IPSEC knowledge is still important to this day.
So, should you learn IPSEC?
IPSEC knowledge is critical for real-world applications and current Cisco certification exams. In fact, it’s listed on the 200-301 CCNA exam topics, which is quite telling since the CCNA certification is the mark of someone who has the foundational knowledge to take their tech career in multiple directions. But that’s not all. IPSEC is on the CCNP Enterprise Core Exam, CCNP Security Core Exam, CCNP Security VPN Specialist, CCIE Enterprise Lab Exam, CCIE Security Lab Exam, and probably others. I didn’t check.
So when honing in on a topic for this month, my first choice was IPSEC VPNs. IPSEC VPNs is a huge topic, though. I knew I couldn’t cover everything in a single short “Technically Speaking…” installment. In fact, I hadn’t decided exactly where to focus until I was in the middle of standing up a new tunnel connection between two of our data centers.
There I was, monitoring the tunnel status to ensure everything was healthy, when I found myself on the CLI of one of the firewalls, running commands I’d run thousands of times: “show crypto isakmp sa” and “show crypto ipsec sa.” As I verified that each security association for the traffic types had come up and was healthy, I reflected on my early days of building VPNs on PIXs running these same commands and not knowing what I was looking at. And that’s when it hit me: this would make an excellent addition to the library.
And here were are. Feel free to use the video above to help you follow what I have outlined below. Alright, adventurers… let’s jump in.
Can’t have a VPN without a couple of sites to connect together…
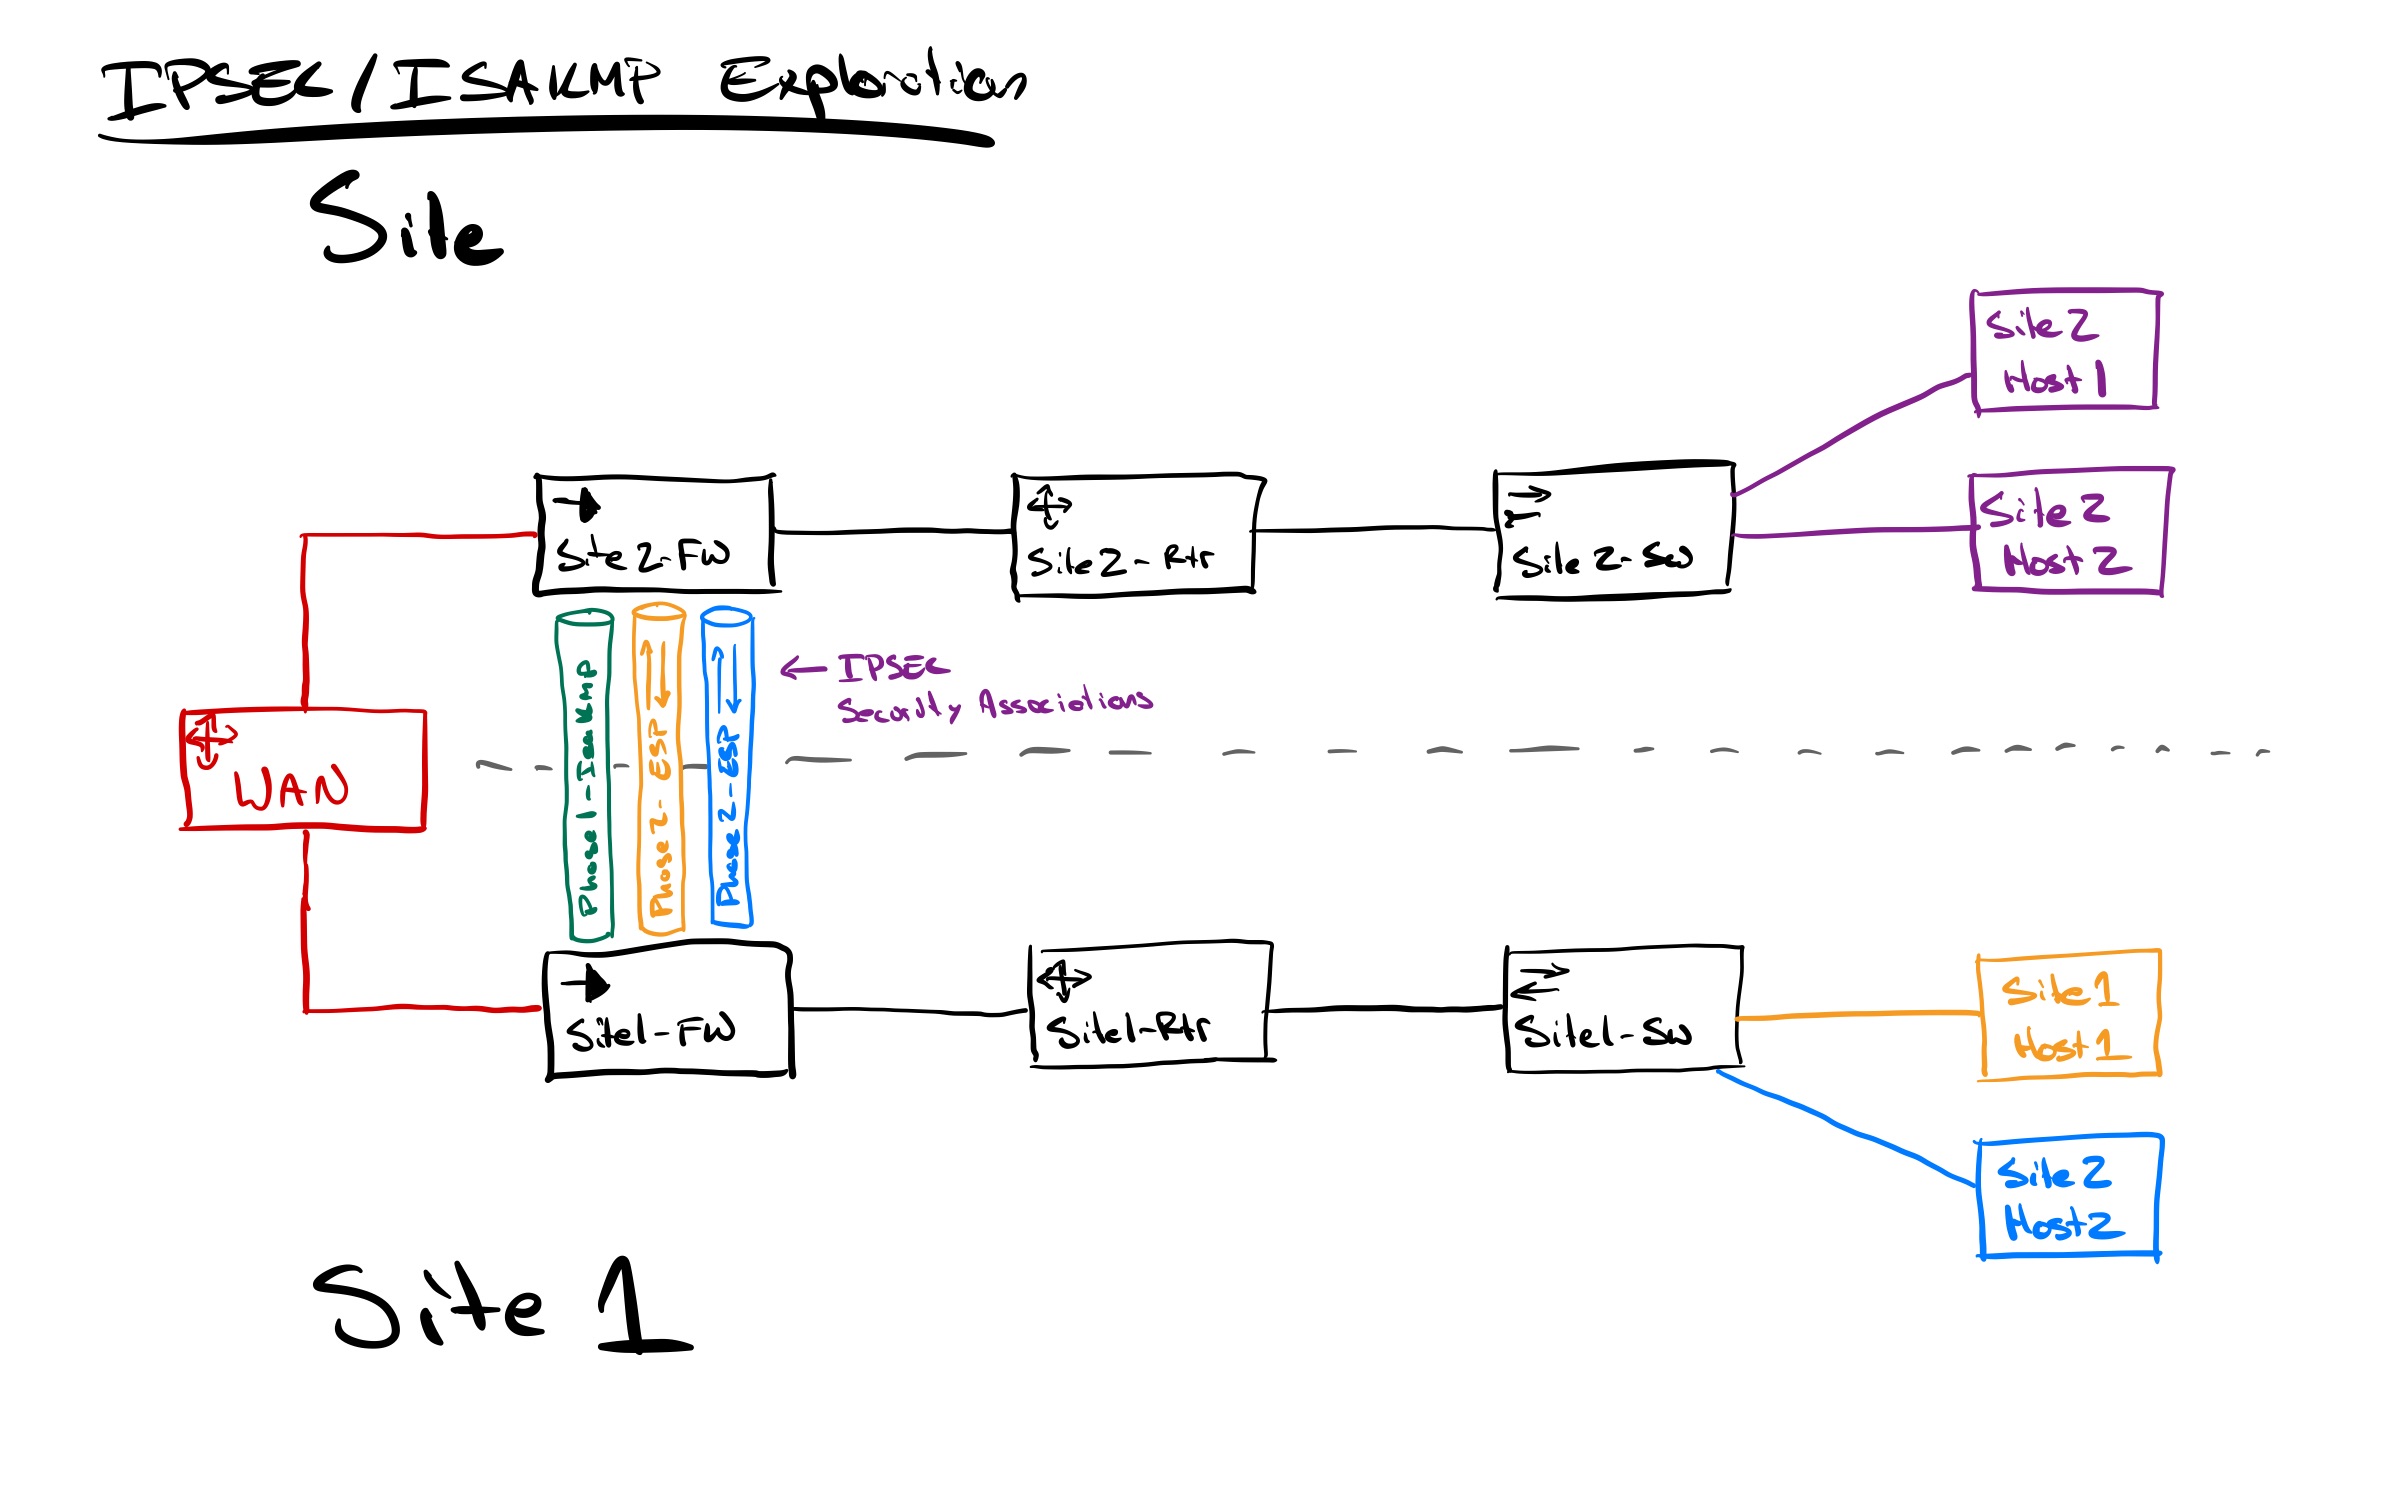
Before we start looking at the tunnel creation, we need a network to work with. So, I put together a fairly straightforward 2-site network:
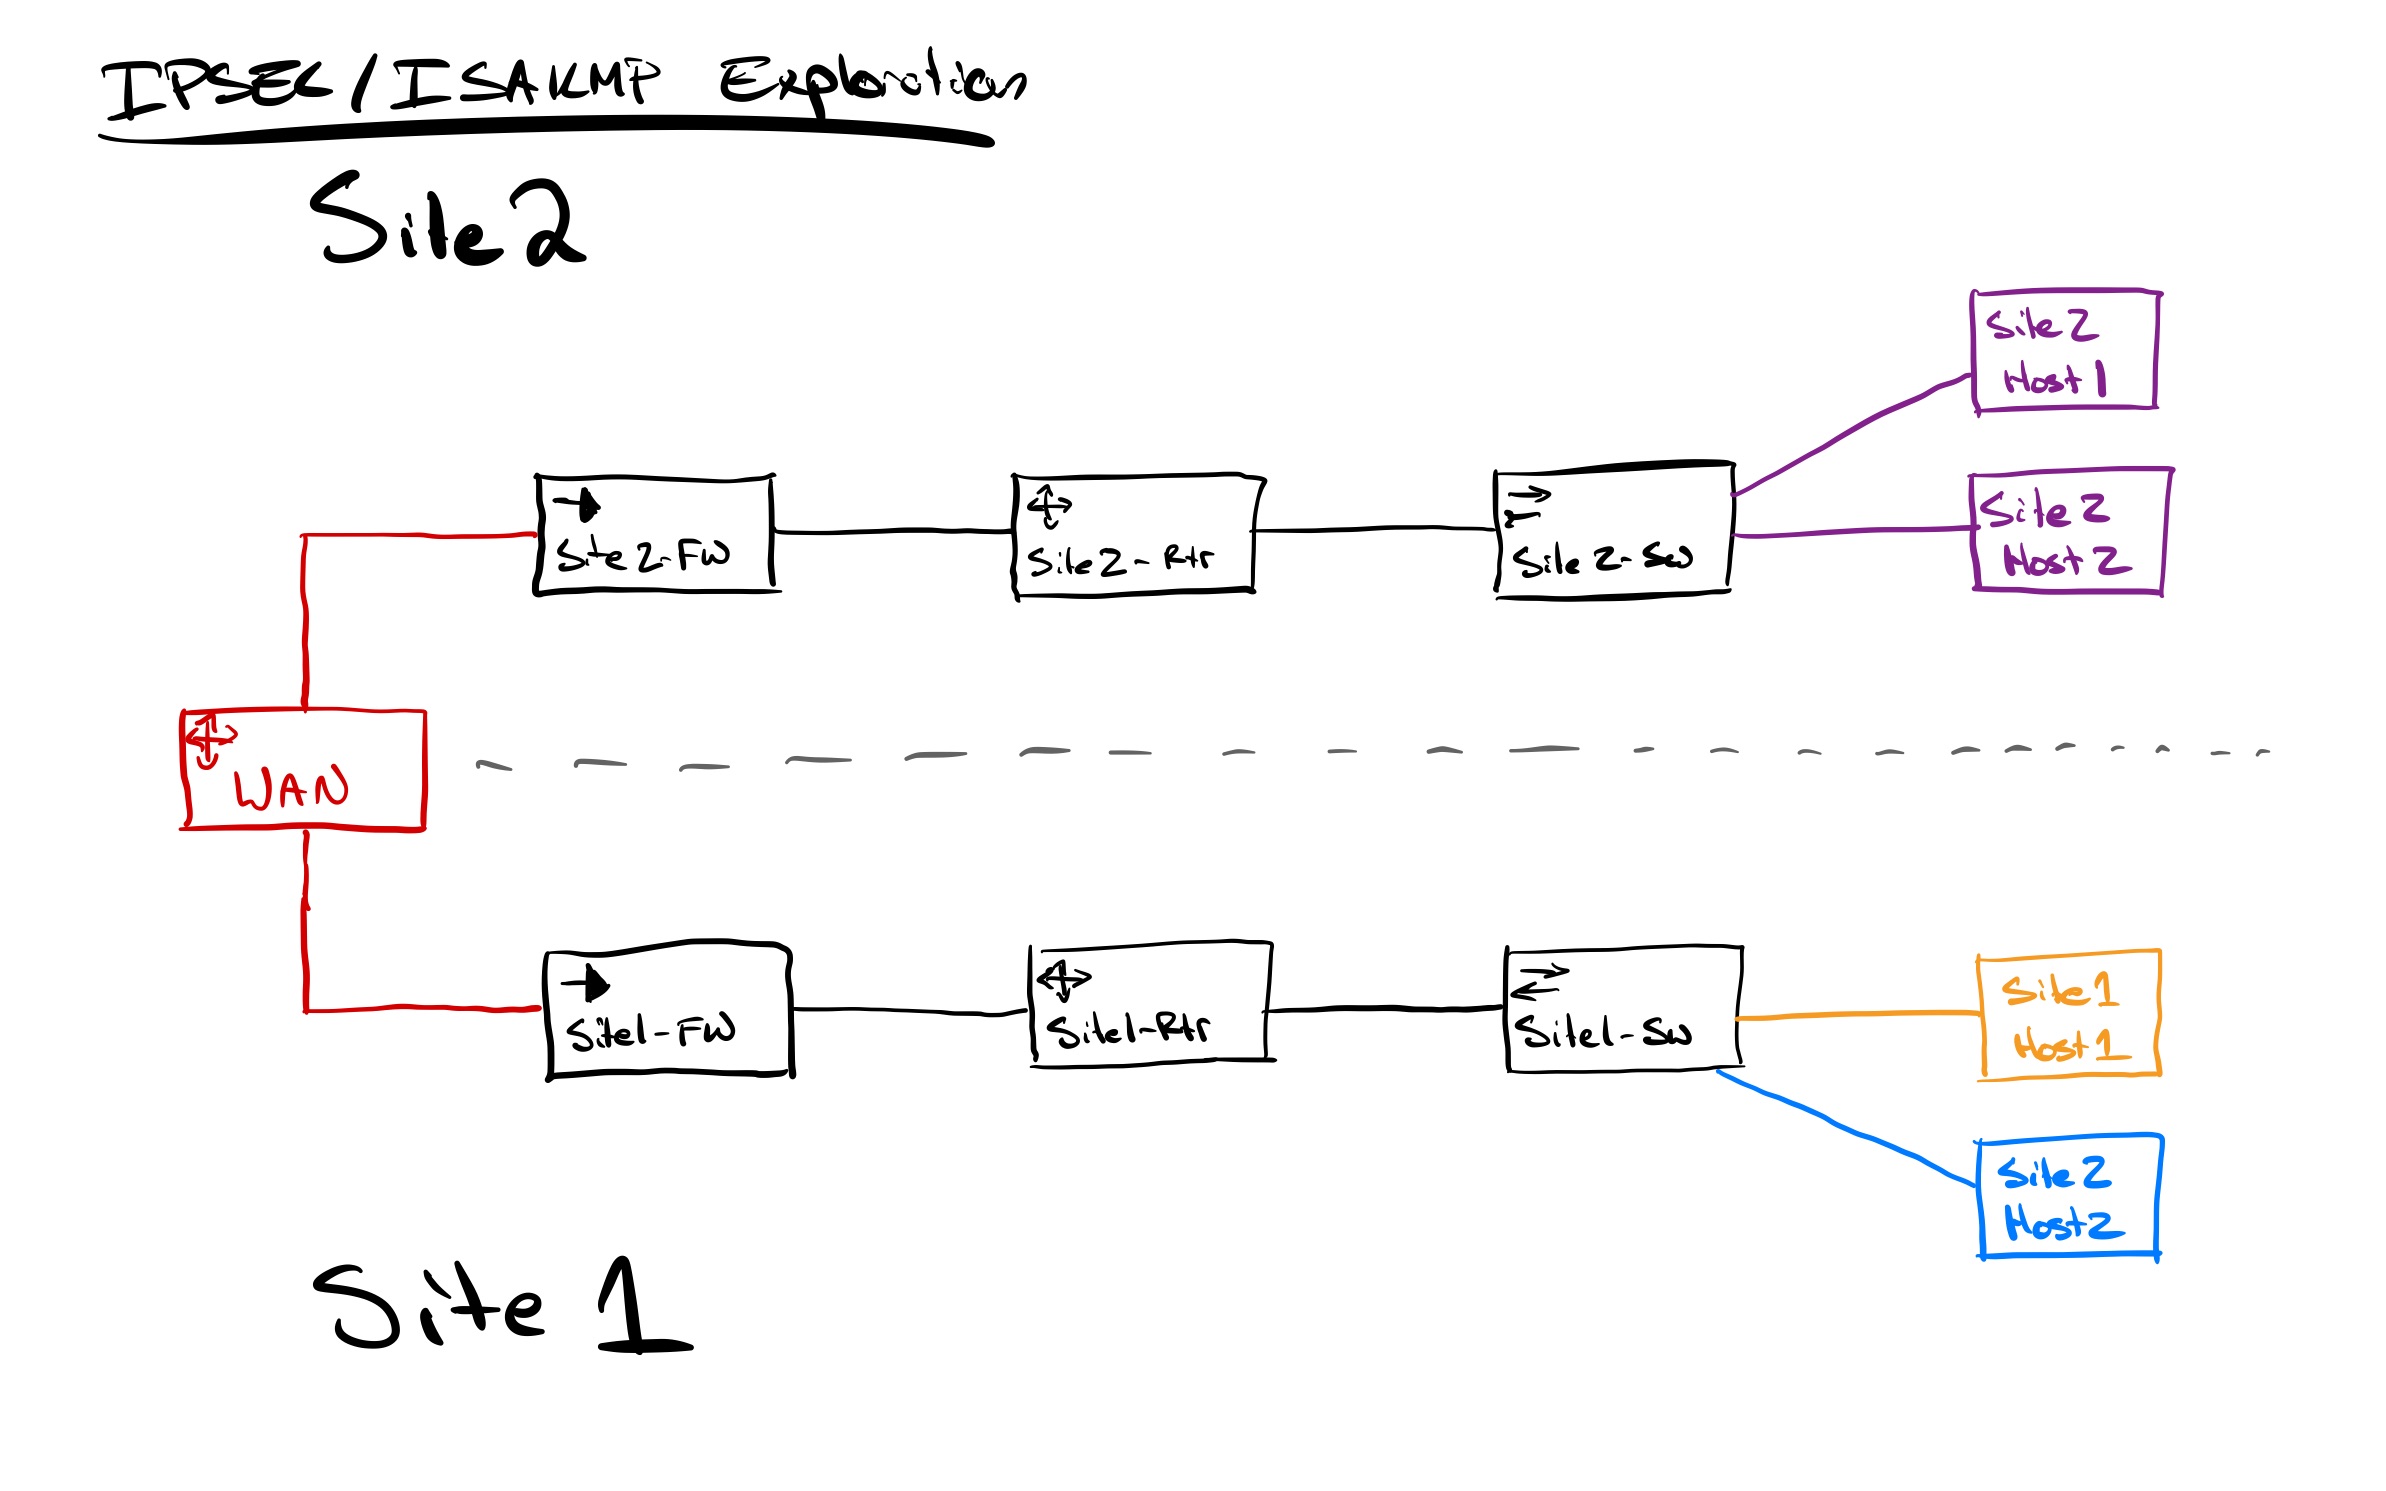
Site 1 (bottom in the diagram) has two local networks; a YELLOW network and a BLUE network.
Site 2 (top in the diagram) has a single local network, the PURPLE network.
Each site is connected to an untrusted WAN by a firewall. The firewall is configured like firewalls often are: to perform NAT/PAT on traffic passing from “inside” to “outside.”
Bringing the IPSEC VPN concept into this network, the goal is to create a tunnel between the two firewalls that will allow traffic between the sites to be securely tunneled across the WAN. This would then provide a network path for hosts on Site 1’s YELLOW and BLUE networks to reach the hosts on Site 2’s PURPLE network.
Just to let you know… the focus of this post is NOT on the configuration required to set up the network or the IPSEC tunnel itself. Instead, we will look at the process that happens to establish and build the connections when relevant traffic arrives at the firewall and initiates the IPSEC process.
If you’d like to see the configurations in this setup, I have posted a CML topology file for this network in the CML Community on GitHub. If you’d like to dive deeper and try some of this exploration yourself, download the file and run it on your CML server.
Saying something “interesting”
Just because a VPN is configured on a firewall doesn’t mean the tunnel will be established.
- Tunnels are established when they are needed and will eventually be torn down if left idle (without traffic passing through them) for long enough.
- A firewall determines what type of traffic should trigger the building of a VPN based on an access list that is associated with the IPSEC crypto map that defines the VPN.
Let’s take a look at the access list on Site1-FW that defines this “interesting traffic.”
Site1-FW# show access-list s2svpn_to_site2

access-list s2svpn_to_site2; 2 elements; name hash: 0xa681e779
access-list s2svpn_to_site2 line 1 extended permit ip object-group SITE1 object-group SITE2 log default (hitcnt=0) 0xb520aee6
access-list s2svpn_to_site2 line 1 extended permit ip 192.168.200.0 255.255.255.0 172.16.10.0 255.255.255.0 log default (hitcnt=0) 0xfab888fb
access-list s2svpn_to_site2 line 1 extended permit ip 192.168.100.0 255.255.255.0 172.16.10.0 255.255.255.0 log default (hitcnt=0) 0xb7b04209

Site1-FW# show run crypto map | inc match
crypto map outside_map 1 match address s2svpn_to_site2
In the ACL above, you’ll see there is a line that permits traffic from the BLUE network (192.168.200.0/24) to the PURPLE network (172.16.10.0) and a second line that permits traffic from the YELLOW network (192.168.100.0/24) also to the PURPLE network. This ACL is used to MATCH traffic in the crypto map configuration. So when traffic passes through the router that matches this ACL, it will initiate the tunnel bring-up process.
The ACL on Site2-FW looks very similar to this one. However, the source and destination networks are swapped, with PURPLE being the source and BLUE and YELLOW as the destinations in each line.
If we look at the current state of the VPN tunnel, we’ll see that there is no ISAKMP or IPSEC security association built yet.
Site1-FW# show crypto isakmp sa

There are no IKEv1 SAs

There are no IKEv2 SAs


Site1-FW# show crypto ipsec sa

There are no ipsec sas
…Everyone gets a Security Association!
Let’s take just a minute to talk about what a “security association” or “sa” is in the context of IPSEC VPNs.
A Security Association (SA) is an established relationship between devices that define the explicit mechanisms that will allow secure communications. An SA includes the encryption protocols (such as AES), hashing mechanisms (such as SHA), and Diffie-Hellman Group (such as group-14) used for communications. The two gateway devices building the tunnel negotiate these details during the security association establishment process. Phase 2 SAs, or IPSEC SAs, will also include the local and remote addresses allowed to communicate over the security association.
While we often think of IPSEC VPNs as being one tunnel, as in a single tunnel between two locations. However, it is more accurate to think of an IPSEC VPN as a collection of tunnels between two locations, with each security association as its own unique encrypted tunnel. We’ll explore this idea a bit more as we explore the establishment of the VPN between the two sites.
Let’s bring it up already…
And now, the time has come to bring up the VPN. We’ll start by sending some interesting traffic from Site1-Host1 in the form of five 100-byte ping packets.
Site1-Host1:~$ ping -s 100 -c 5 172.16.10.11
PING 172.16.10.11 (172.16.10.11): 100 data bytes
108 bytes from 172.16.10.11: seq=1 ttl=42 time=11.127 ms
108 bytes from 172.16.10.11: seq=2 ttl=42 time=11.032 ms
108 bytes from 172.16.10.11: seq=3 ttl=42 time=12.246 ms
108 bytes from 172.16.10.11: seq=4 ttl=42 time=11.046 ms

--- 172.16.10.11 ping statistics ---
5 packets transmitted, 4 packets received, 20% packet loss
round-trip min/avg/max = 11.032/11.362/12.246 ms
Notice in the output above that 5 packets were sent, but only 4 were received? This is because the first packet is lost while the tunnel is established.
Now let’s look at the state of the VPN tunnel on Site1-FW—but first, let’s begin with the ISAKMP Security Association.
Site1-FW# show crypto isakmp sa

There are no IKEv1 SAs

IKEv2 SAs:

Session-id:85, Status:UP-ACTIVE, IKE count:1, CHILD count:1

Tunnel-id Local                                               Remote                                                  Status         Role
188271715 10.255.1.2/500                                      10.255.2.2/500                                           READY    INITIATOR
      Encr: AES-CBC, keysize: 256, Hash: SHA256, DH Grp:14, Auth sign: PSK, Auth verify: PSK
      Life/Active Time: 86400/13 sec
Child sa: local selector  192.168.100.0/0 - 192.168.100.255/65535
          remote selector 172.16.10.0/0 - 172.16.10.255/65535
          ESP spi in/out: 0xed866a3c/0xb89f38c9
Let’s take a moment to understand what this output is telling us:
- In RED and BLUE above, you see the local and remote endpoints of the tunnel. These are the outside IP addresses of each of the firewalls making up the two sides of this tunnel.
- In ORANGE, we can see the specific services that provide encryption (AES-256), hashing (SHA256), secure key generation (DH Group 14), and authentication (preshared key). The lifetime and active time for the tunnel are also displayed.
- In GREEN, we see the “Child SAs” of the initial ISAKMP SA. This refers to the IPSEC Security Associations. We’ll talk more about them in just a moment, but if you look at this output, you can already see the references to the “interesting” traffic allowed through the tunnel.
An aside about Phase 1 and Phase 2
Now is an excellent time to discuss the Phase 1 and Phase 2 parts of IPSEC VPN tunnels.
Phase 1 refers to the ISAKMP Security Association establishment, while Phase 2 is often considered the IPSEC Security Association. In fact, the command we run to explore the Phase 2 SAs is “show crypto ipsec sa.” To be a bit more accurate, Phase 2 is actually the establishment of either the Encapsulating Security Payload (ESP) or Authentication Header (AH) Security Associations. Both Phase 1 and Phase 2 must complete and negotiate their relevant SAs before traffic can flow over the VPN connection.
I know what you are likely thinking… 2 phases? Why not just 1? It’s a good question, and the details of the “why” are a bit out of scope for this blog post. But I will explain what happens in each Phase and how they are related.
In Phase 1, the IKE (Identity Key Exchange) protocol and ISAKMP are used to set up a control channel between the two VPN endpoints. That control channel is used to create the encryption keys and negotiate details necessary to securely transport data between them. In our example, a preshared key (PSK) is used on both devices for initial identification and authentication of each other. Then, Diffie-Hellman is used to create the actual encryption keys used to secure the communications. With the Phase 1, or ISAKMP, Security Association established, the devices move onto Phase 2.
In Phase 2, the two devices build either ESP or AH Security Associations using keys created and communicated between the devices using the Phase 1 Security Association. Once established, data can now be sent over the Phase 2 SAs between devices.
The ESP and AH protocols have no methods of their own to perform the control steps and negotiations necessary to set up a Security Association; they rely on ISAKMP and IKE to provide that service. And ISAKMP and IKE can’t transport data payloads over their SAs. Each “phase” provides essential parts of the complete IPSEC VPN tunnel creation.
Getting back to Phase 2
The output of “show crypto isakmp sa” listed the “Child SA” and some details of Phase 2, but let’s look at all the details of this phase now.
Site1-FW# show crypto ipsec sa
interface: outside
Crypto map tag: outside_map, seq num: 1, local addr: 10.255.1.2

access-list s2svpn_to_site2 extended permit ip 192.168.100.0 255.255.255.0 172.16.10.0 255.255.255.0 log default
local ident (addr/mask/prot/port): (192.168.100.0/255.255.255.0/0/0)
remote ident (addr/mask/prot/port): (172.16.10.0/255.255.255.0/0/0)
current_peer: 10.255.2.2

#pkts encaps: 4, #pkts encrypt: 4, #pkts digest: 4
#pkts decaps: 4, #pkts decrypt: 4, #pkts verify: 4
#pkts compressed: 0, #pkts decompressed: 0
#pkts not compressed: 4, #pkts comp failed: 0, #pkts decomp failed: 0
#pre-frag successes: 0, #pre-frag failures: 0, #fragments created: 0
#PMTUs sent: 0, #PMTUs rcvd: 0, #decapsulated frgs needing reassembly: 0
#TFC rcvd: 0, #TFC sent: 0
#Valid ICMP Errors rcvd: 0, #Invalid ICMP Errors rcvd: 0
#send errors: 0, #recv errors: 0

local crypto endpt.: 10.255.1.2/500, remote crypto endpt.: 10.255.2.2/500
path mtu 1500, ipsec overhead 74(44), media mtu 1500
PMTU time remaining (sec): 0, DF policy: copy-df
ICMP error validation: disabled, TFC packets: disabled
current outbound spi: B89F38C9
current inbound spi : ED866A3C

inbound esp sas:
spi: 0xED866A3C (3985009212)
SA State: active
transform: esp-aes-256 esp-sha-hmac no compression
in use settings ={L2L, Tunnel, PFS Group 14, IKEv2, }
slot: 0, conn_id: 165, crypto-map: outside_map
sa timing: remaining key lifetime (kB/sec): (3962879/28775)
IV size: 16 bytes
replay detection support: Y
Anti replay bitmap:
0x00000000 0x0000001F
outbound esp sas:
spi: 0xB89F38C9 (3097442505)
SA State: active
transform: esp-aes-256 esp-sha-hmac no compression
in use settings ={L2L, Tunnel, PFS Group 14, IKEv2, }
slot: 0, conn_id: 165, crypto-map: outside_map
sa timing: remaining key lifetime (kB/sec): (3916799/28775)
IV size: 16 bytes
replay detection support: Y
Anti replay bitmap:
0x00000000 0x00000001
This output has a lot of detail, which can make it a bit overwhelming. Let’s break it down:
- In RED, we can see the specific line from the ACL that this SA (technically pair of SAs) matched. And right below the ACL line, the YELLOW network is listed as “local,” and the PURPLE network is listed as “remote.”
- If this makes you think that traffic from BLUE to PURPLE would require new SAs to be negotiated and built, give yourself a high five from Hank. We’ll see that exact thing in a little bit.
- In GREEN, we can see some really useful counters and statistics about traffic through this SA. So far, we can see the 4 ICMP echo and echo-reply’s listed as “encaps” and “decaps.”
- In BLUE and BROWN, we see the two actual SAs that make up this pairing. A Security Association is a one-way connection, so to have bidirectional communications through a VPN, two SAs must be negotiated; one for inbound and one for outbound.
- Find the “spi” lines for each of the inbound and outbound SAs. SPI is the Security Parameter Index. It is used within the actual ESP packets to uniquely identify the Security Association a packet belongs to. (We’ll see this in just a moment.)
- Two lines below the SPI, you’ll see the “transform” used in each SA. The transform lists the encryption and hashing algorithms used to secure these communications. The negotiation of the transform set is also done during Phase 1.
Pretty cool, but… SHOW ME THE PACKETS!
Seeing the output of the tunnel establishment on the firewall CLI is nice, but I find I understand the process even better by looking at the packets involved in the communications. And this is one of the reasons I like using Cisco Modeling Labs (CML) when labbing and learning. With CML, you can easily set up a packet capture on any interface in the topology. And it even supports filters to limit and target the traffic I’m interested in seeing.
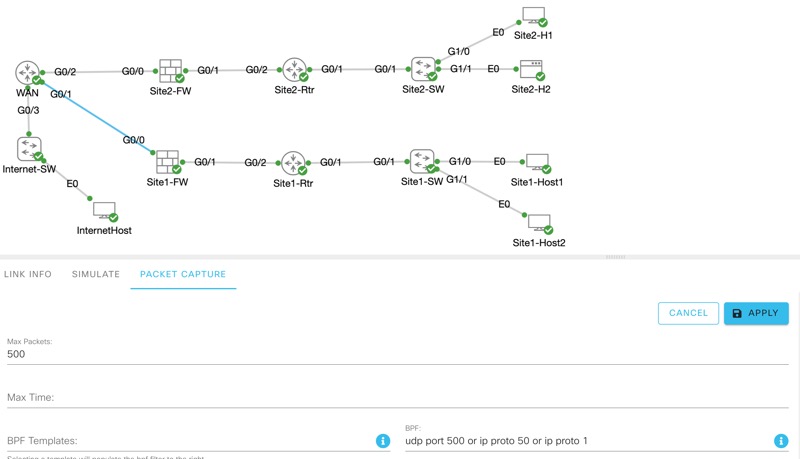
I set up a packet capture on the interface between Site1-FW and the WAN router, filtered to just ISAKMP (udp/500), ESP (ip/50), and ICMP (ip/1) and started capturing packets before sending the traffic to bring up the tunnel. Then once completed, I downloaded the PCAP file to explore in detail with Wireshark.
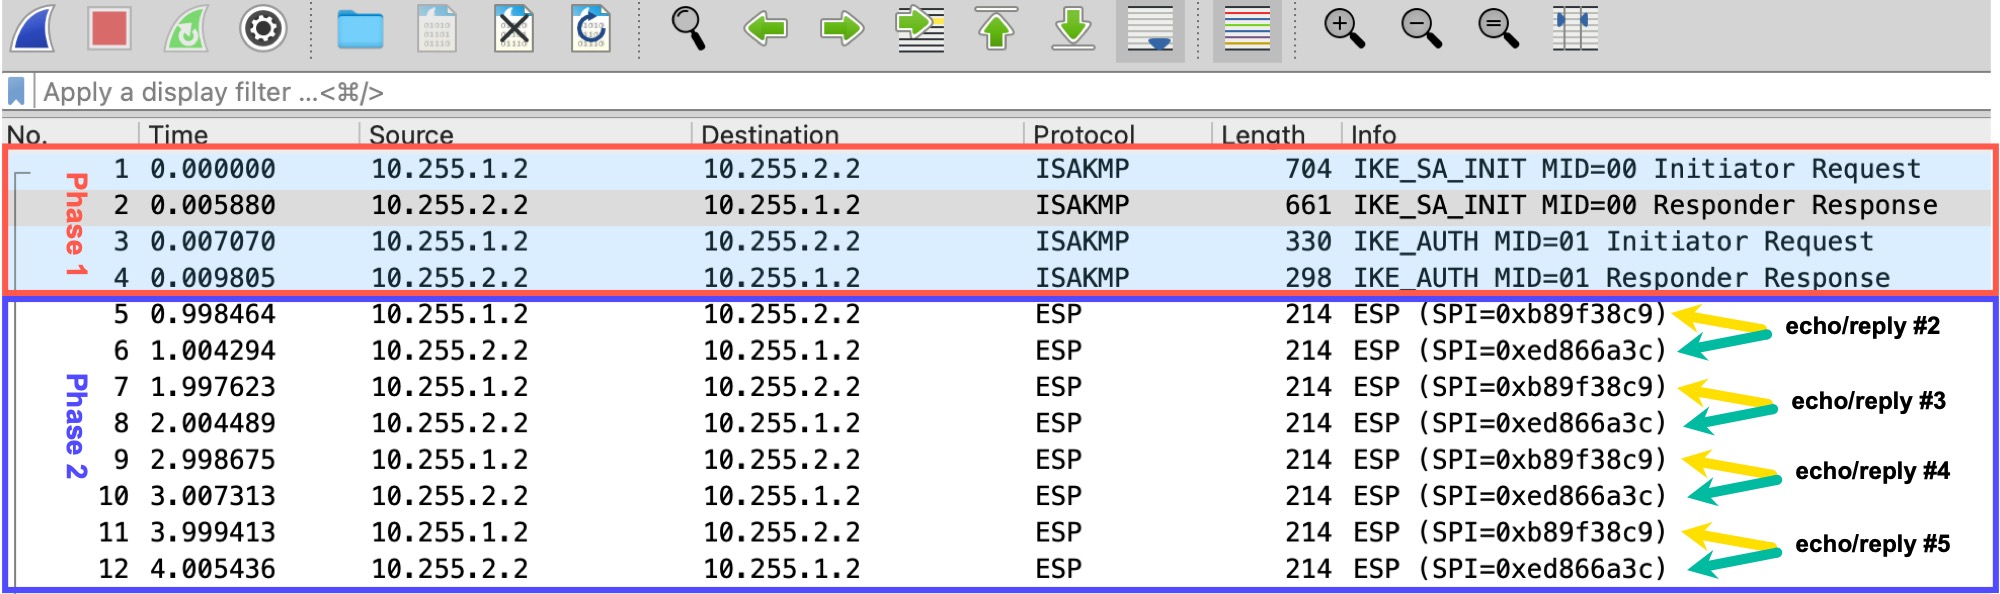
The image above shows the packets sent when the 5 pings were sent across the network. You can see the two separate phases quite clearly here just by looking at the Protocol of the communications. My tunnel is configured to use IKEv2, the latest version of IKE, which requires fewer packets to bring up a tunnel than IKEv1. So here we can see that only 4 packets are transmitted between the firewalls before the ESP Security Associations are built and able to send the ICMP traffic. We can’t tell that the data in the packets is ICMP because it is encrypted (we built a VPN, after all).
Also, take a look at the SPI values shown in the output for the ESP packets. These match the SPI values we saw in the output from “show crypto ipsec sa.”
inbound esp sas:
spi: 0xED866A3C (3985009212)
.
.
outbound esp sas:
spi: 0xB89F38C9 (3097442505)
.
.
We can even see the details of the negotiation between peers by looking at the Initiator Request packet.
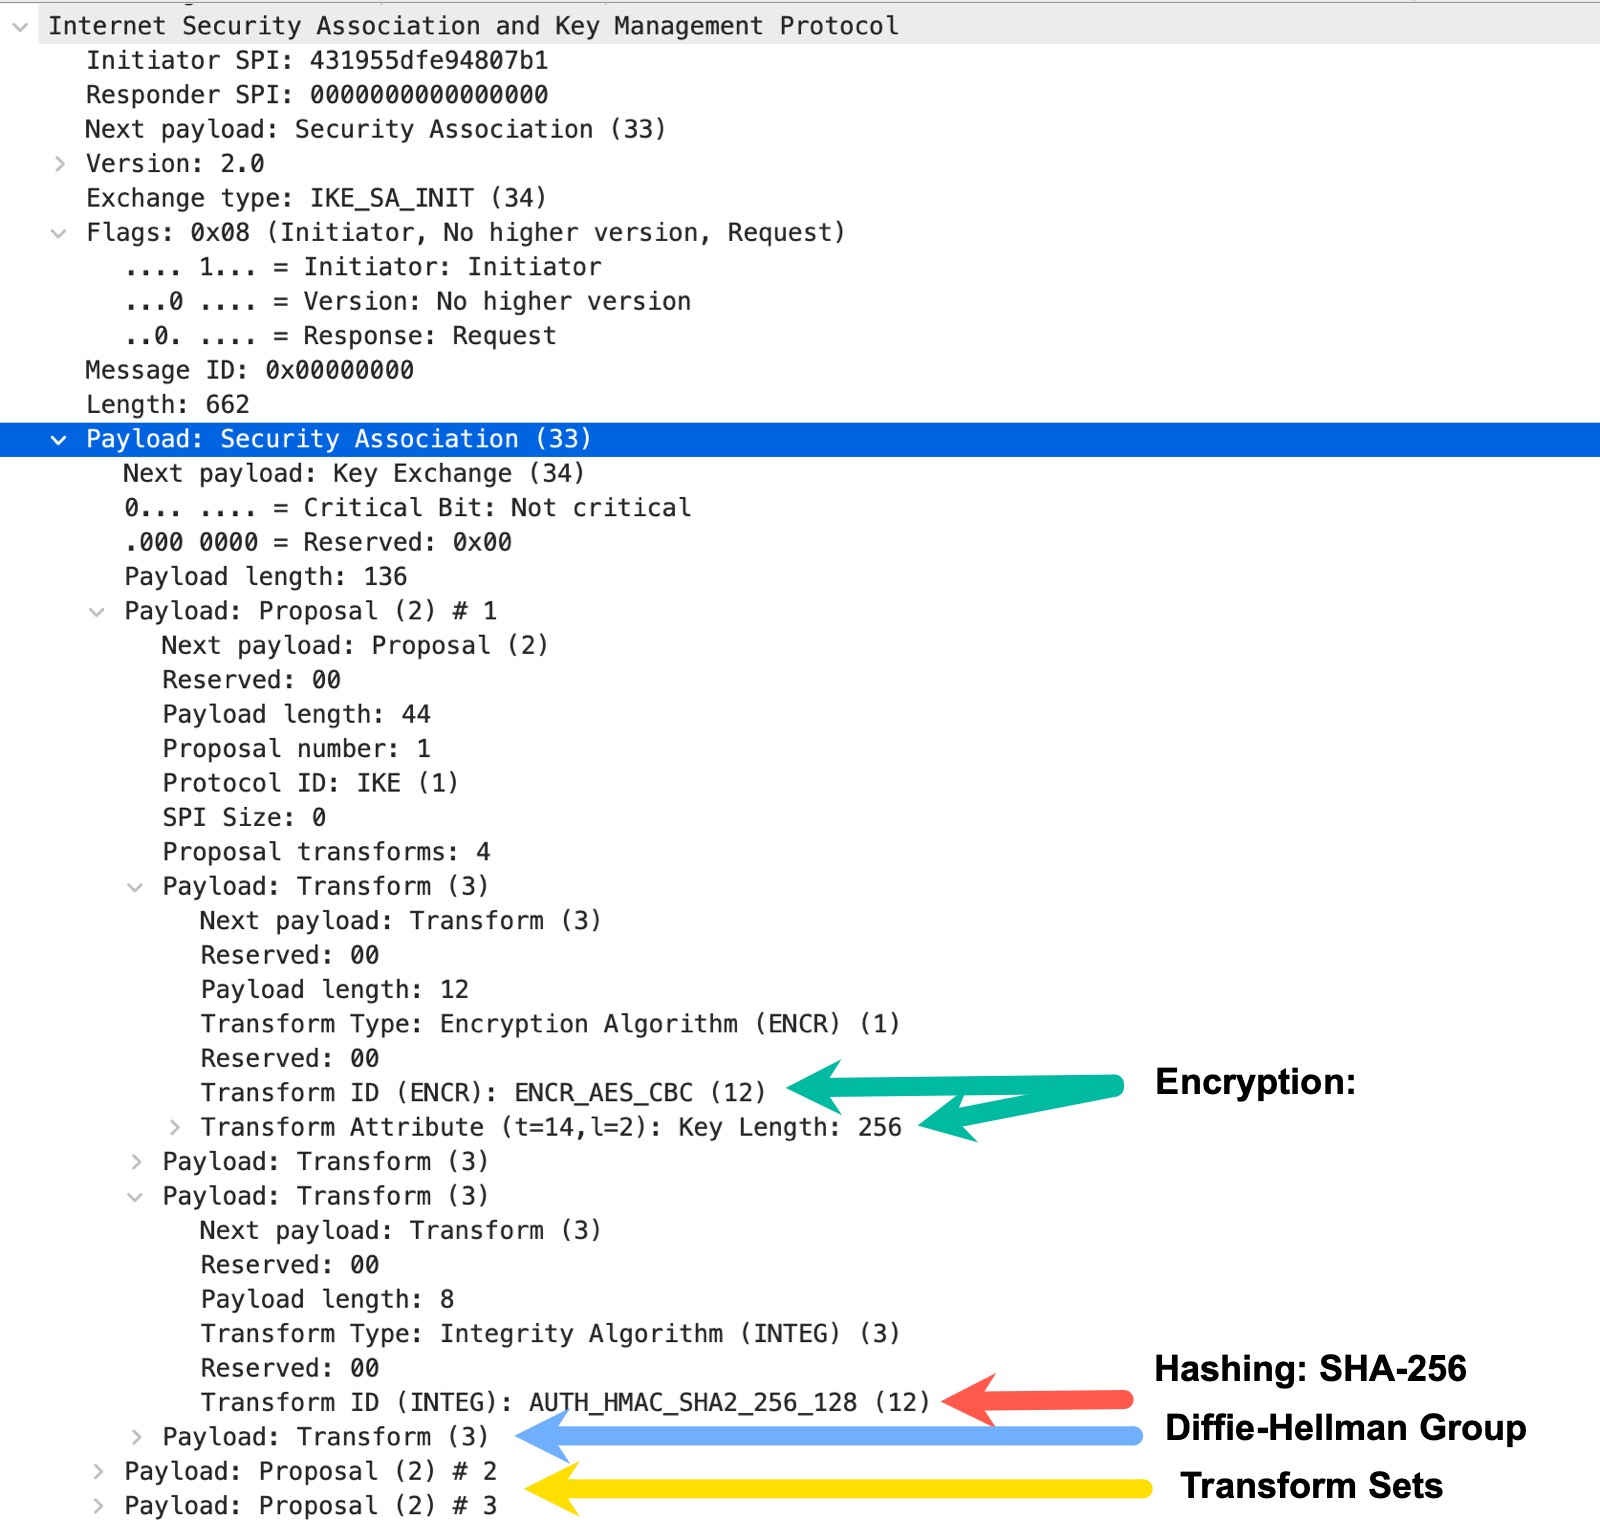
With the Security Association Payload of the packet, you can look at the Phase 1 proposal details for the encryption, hashing, and DH group, as well as the Transform Sets available for use in the Phase 2 SAs.
Am I the only one who is always amazed when I see packets match what I configured or expect? (Networking really is pretty awesome.)
But what about the BLUE to PURPLE traffic?
At this point, the VPN is up, but only one set of “interesting” traffic has been sent so far. So what happens when a host on the BLUE network tries to communicate with the PURPLE network?
To see this in action, we’ll send 5 two hundred byte packets from Site1-Host2 to Site2-Host2.
Site1-Host2:~$ ping -c 5 -s 200 172.16.10.21
PING 172.16.10.21 (172.16.10.21): 200 data bytes
208 bytes from 172.16.10.21: seq=1 ttl=42 time=12.105 ms
208 bytes from 172.16.10.21: seq=2 ttl=42 time=10.356 ms
208 bytes from 172.16.10.21: seq=3 ttl=42 time=11.046 ms
208 bytes from 172.16.10.21: seq=4 ttl=42 time=11.158 ms

--- 172.16.10.21 ping statistics ---
5 packets transmitted, 4 packets received, 20% packet loss
round-trip min/avg/max = 10.356/11.166/12.105 ms
Just like the last time, only 4 of the 5 packets were received. You might be thinking… But Hank, the tunnel is already up… why was a packet lost?”
The tunnel, or Security Association, that is “up” is the one that allows traffic from YELLOW to PURPLE. Traffic from BLUE is different “interesting” traffic, which requires its own Security Association to be created. We can see this new SA by exploring the output of the commands on the firewall.
First up, the “show crypto isakmp sa” command.
Site1-FW# show crypto isakmp sa

There are no IKEv1 SAs

IKEv2 SAs:

Session-id:85, Status:UP-ACTIVE, IKE count:1, CHILD count:2

Tunnel-id Local                                               Remote                                                  Status         Role
188271715 10.255.1.2/500                                      10.255.2.2/500                                           READY    INITIATOR
      Encr: AES-CBC, keysize: 256, Hash: SHA256, DH Grp:14, Auth sign: PSK, Auth verify: PSK
      Life/Active Time: 86400/66 sec
Child sa: local selector  192.168.200.0/0 - 192.168.200.255/65535
          remote selector 172.16.10.0/0 - 172.16.10.255/65535
          ESP spi in/out: 0xc8fce690/0xf34ce0e2
Child sa: local selector  192.168.100.0/0 - 192.168.100.255/65535
          remote selector 172.16.10.0/0 - 172.16.10.255/65535
          ESP spi in/out: 0xed866a3c/0xb89f38c9
If you scroll up, you can verify that the Tunnel-id is the same as the last time we ran the command, showing that the same Phase 1 Security Association is still active and being used. And now we see a second “Child SA” listed. The YELLOW SA is still listed, and the SPI values are also the same as before. Only now, we have a new BLUE Security Association with unique SPI values and “local selector” values.
We can also look at the details of the BLUE ESP SA by checking the “show crypto ipsec sa” command. (The command will also show the latest details about the YELLOW SA, but I’ve deleted that from the output to focus on the new one.)
Site1-FW# show crypto ipsec sa
interface: outside
.
.
    Crypto map tag: outside_map, seq num: 1, local addr: 10.255.1.2

      access-list s2svpn_to_site2 extended permit ip 192.168.200.0 255.255.255.0 172.16.10.0 255.255.255.0 log default
      local ident (addr/mask/prot/port): (192.168.200.0/255.255.255.0/0/0)
      remote ident (addr/mask/prot/port): (172.16.10.0/255.255.255.0/0/0)
      current_peer: 10.255.2.2


      #pkts encaps: 4, #pkts encrypt: 4, #pkts digest: 4
      #pkts decaps: 4, #pkts decrypt: 4, #pkts verify: 4
      #pkts compressed: 0, #pkts decompressed: 0
      #pkts not compressed: 4, #pkts comp failed: 0, #pkts decomp failed: 0
      #pre-frag successes: 0, #pre-frag failures: 0, #fragments created: 0
      #PMTUs sent: 0, #PMTUs rcvd: 0, #decapsulated frgs needing reassembly: 0
      #TFC rcvd: 0, #TFC sent: 0
      #Valid ICMP Errors rcvd: 0, #Invalid ICMP Errors rcvd: 0
      #send errors: 0, #recv errors: 0

      local crypto endpt.: 10.255.1.2/500, remote crypto endpt.: 10.255.2.2/500
      path mtu 1500, ipsec overhead 74(44), media mtu 1500
      PMTU time remaining (sec): 0, DF policy: copy-df
      ICMP error validation: disabled, TFC packets: disabled
      current outbound spi: F34CE0E2
      current inbound spi : C8FCE690

    inbound esp sas:
      spi: 0xC8FCE690 (3372017296)
         SA State: active
         transform: esp-aes-256 esp-sha-hmac no compression
         in use settings ={L2L, Tunnel, PFS Group 14, IKEv2, }
         slot: 0, conn_id: 165, crypto-map: outside_map
         sa timing: remaining key lifetime (kB/sec): (4239359/28783)
         IV size: 16 bytes
         replay detection support: Y
         Anti replay bitmap:
          0x00000000 0x0000001F
    outbound esp sas:
      spi: 0xF34CE0E2 (4081901794)
         SA State: active
         transform: esp-aes-256 esp-sha-hmac no compression
         in use settings ={L2L, Tunnel, PFS Group 14, IKEv2, }
         slot: 0, conn_id: 165, crypto-map: outside_map
         sa timing: remaining key lifetime (kB/sec): (4008959/28782)
         IV size: 16 bytes
         replay detection support: Y
         Anti replay bitmap:
          0x00000000 0x00000001
Please, Hank… can we have some more packets?
We’ll end this look at IPSEC tunnel creation with one more look at how the packets behave when an additional set of “interesting traffic” triggers the creation of a new Security Association between devices that already have a relationship built.
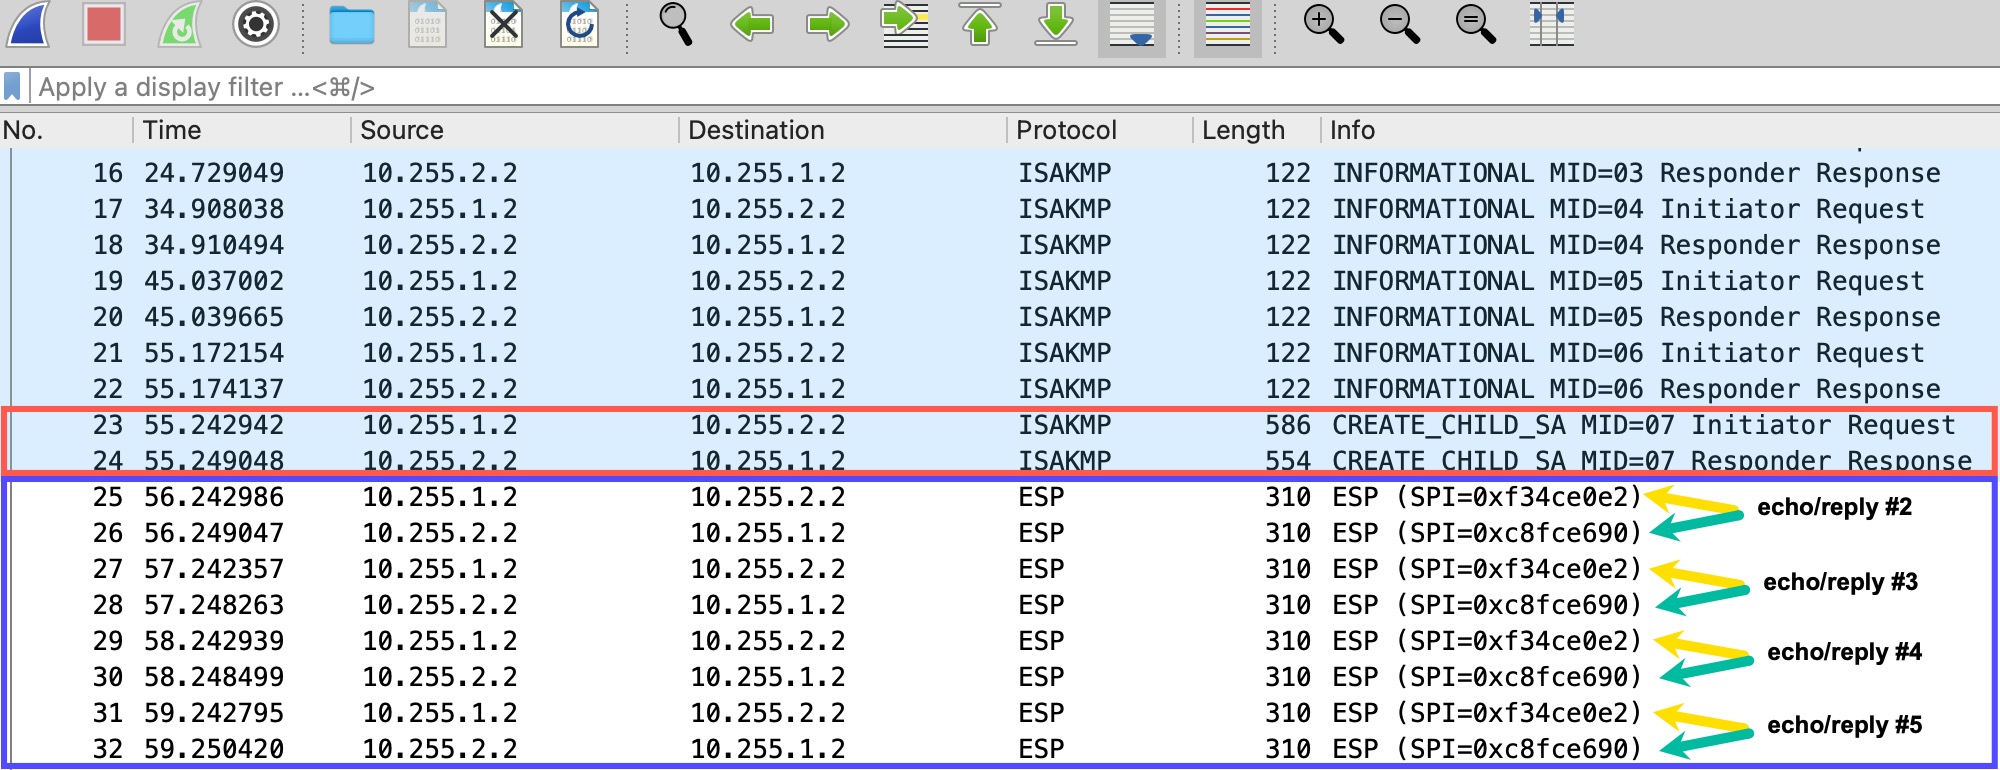
This packet capture shows that the Phase 1 process differs when adding an additional “child security association.” The ISAKMP message “CREATE_CHILD_SA” is used to use to negotiate the details for the new ESP Security Association. That happens with a single pair of packets, and then the Phase 2 ESP Security Association is available to transmit the ICMP traffic.
Buttoning it all up
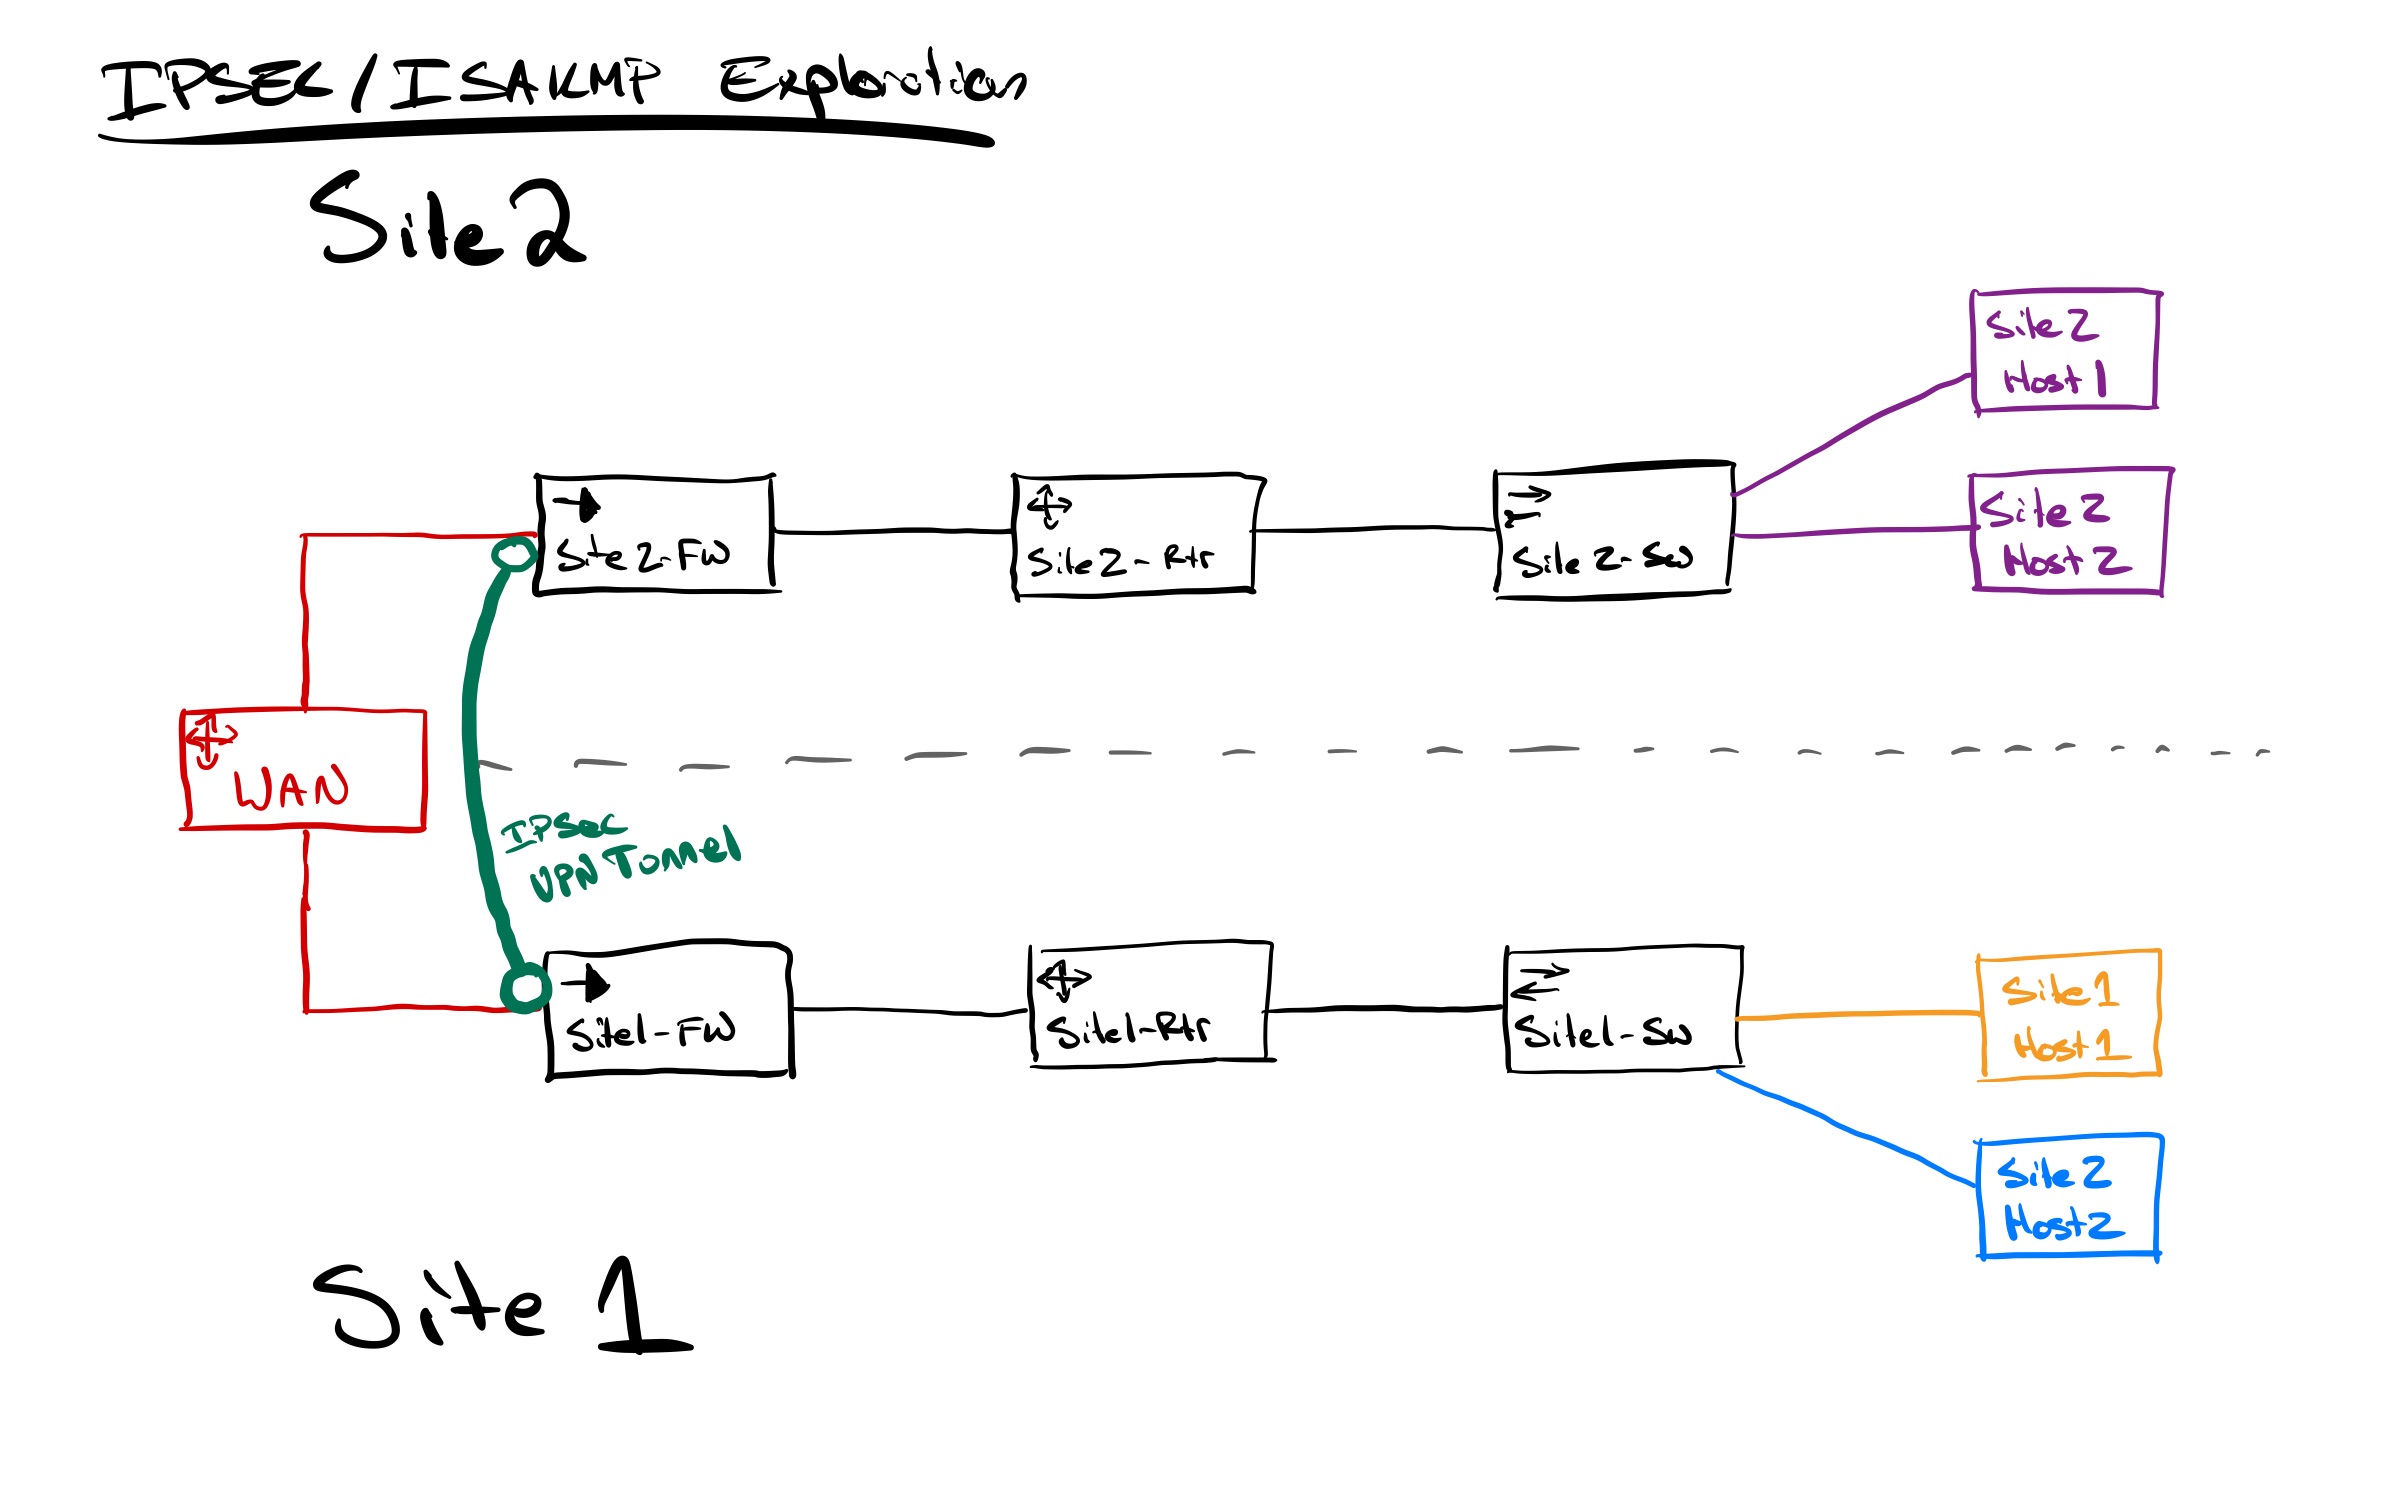
That brings us to the end of this look at IPSEC VPN tunnel creation. So let’s update the network diagram we started with to be a little more “accurate” with what we’ve learned.
I hope this look at IPSEC has helped you understand this core network technology a little better. Whether you are actively studying for a certification or working with IPSEC VPNs as part of your “day job,” a deeper understanding of what happens when a tunnel is being built is often vital. (Particularly when a tunnel isn’t coming up when you expect it to.)
If you’d like to dive deeper into IPSEC VPNs, here are a few handy links that can be useful:
- The accompanying Technically Speaking… with Hank Preston video on this same topic!
- The CML topology used here is a great way to explore and learn more
- Implementing Secure Solutions with Virtual Private Networks (SVPN) v1.0 eLearning Course
- Learning Resources about IPSEC VPNs on The Learning Network
Got a question on something from this post? Or an idea for another “Technically Speaking…” installment? Let me know in the comments!
Read next: Exploring Default Docker Networking [Part 1] by Hank Preston
Sign up for Cisco U. | Join the Cisco Learning Network.
Follow Cisco Learning & Certifications
Twitter | Facebook | LinkedIn | Instagram | YouTube
Use #CiscoU and #CiscoCert to join the conversation.


Please add the information about:
A)
the default command that allows IPSEC traffic to bypass any acl’s configured on your interfaces:
sysopt connection permit-ipsec
B)
the need of NAT statements
So lets say your internal network at site1 on asa1 is 192.168.5.0/24 and your internal network at site2 on asa2 is 192.168.6.0/24
2 options –
1)
asa1# static (inside,outside) 192.168.5.0 192.168.5.0 netmask 255.255.255.0
asa2#static (inside,outside) 192.168.6.0 192.168.6.0 netmask 255.255.255.0
2)
asa1#access-list vpntraffic permit ip 192.168.5.0 255.255.255.0 192.168.6.0 255.255.255.0
nat (inside) 0 access-list vpntraffic
asa2#access-list vpntraffic permit ip 192.168.6.0 255.255.255.0 192.168.5.0 255.255.255.0
nat (inside) 0 access-list vpntraffic
Yep… both are important topics related to VPN creation and design. However, this post was focused on the tunnel initiation process for IPSEC tunnels – the design and configuration of tunnels was out of scope for this one… 🙂
But since you asked about them
a) I generally disable “sysopt connection permit-ipsec. Even for a VPN connecting two of my own internal sites, I like to explicitly identify what traffic is allowed to pass through the firewall from “outside” to “inside” in my ACLs.
b) With both ASA and FTD firewalls, you need some kind of NAT statement for traffic passing thorough the tunnel. Typically this would be “identity NAT” to result in not performing NAT on this traffic. But sometimes you do need to NAT the traffic if there is subnet overlap between sites.
Could you review policy based vs route based tunnels? Why, how they differ, can they work together, and what is the default
Eric, great topic idea for a future post. There are so many types of tunneling options available that picking the right one can definitely be a challenge. I’ll put it on my list to consider for future discussions.
Thank you for delving into the technical intricacies of IPSEC VPN tunnel creation! Understanding the nuts and bolts of VPN protocols is essential for ensuring secure and reliable connections. Your article highlights the complexity involved in setting up these tunnels, and it reminds me of how a VPN router can simplify this process for network administrators. By configuring a VPN router, the intricate tasks of establishing and managing multiple VPN connections become more centralized and manageable. This in-depth look at IPSEC VPN tunnel creation serves as a reminder of the importance of a well-designed and secure network architecture, with VPN routers as key components. Well done!