
Are you ready to have your mind blown by something so cool you’ll wonder how you lived without it before? Of course you are… so without further a-do let me introduce you to virlutils, the NetDevOps command line tool for Cisco VIRL and Cisco CML.
If you are not familiar with VIRL or CML, they are network modeling and simulation tools from Cisco that allow engineers to design, share and run network simulations composed of both Cisco and 3rd party devices. VIRL is for single users and CML is designed for enterprises looking for a large shared platform for simulations. And if you are new to the NetDevOps revolution, might I suggest popping over to checkout Embrace NetDevOps, Say Goodbye to a “Culture of Fear” after you finish reading this post.
If you prefer to watch and listen rather than read… here’s a great video intro to virlutils
The backstory…
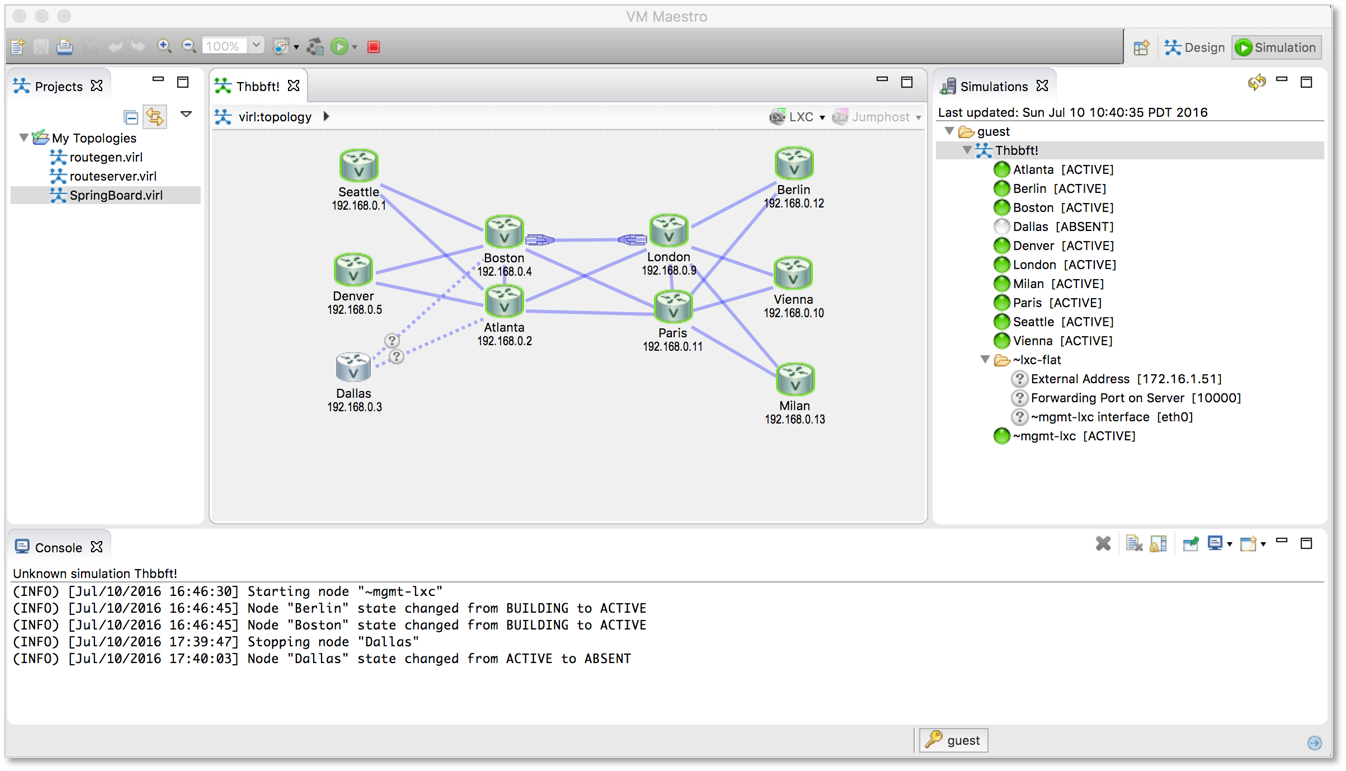
If you’ve used VIRL before, you’re likely familiar with the VM Maestro GUI for creating and managing your simulations. Maybe you’ve even explored “UWM” the web management interface. Both are useful for creating a new topology, or getting started with the tools. However, as a network developer I tend to avoid pointing and clicking my way through tasks.
I’ve long been a fan of the open source tool Vagrant by Hashicorp. It provides a CLI interface developers can use to easily create and manage their dev environments for software projects, and I’ve written DevNet Learning Labs that will help you see how Vagrant can fit into the network developers workflow. I love the simplicity of typing “vagrant up” and having my network created automatically, but when working with a network topology larger than 2 (or maybe 3) nodes Vagrant + VirtualBox struggles to meet demands.
It was out of the experiences with Vagrant that I started thinking about how awesome it would be if we could just “virl up”. I had this vision of network engineers just like you sitting down to run through a demo you saw on a webinar or at Cisco Live in DevNet Zone… You open up your command line terminal and enter
git clone https://github.com/CiscoDevNet/really_awesome_demo
virl up
And with that you have the entire demo up and running…
I bounced the idea off one of the sharpest NetDevOps engineers I know, Kevin Corbin. Kevin immediately saw the potential of the idea, and, like the network automation unicorn that he is, he built some POC code for virlutils over a weekend. Now several months and many additional features later, virlutils has become a key part of my regular workflow. It is definitely time for everyone to benefit from this great project. Let’s take a look at how it works!
virlutils makes it easy to start a network simulation
Like any network automation project worth looking at, virlutils is written in Python and available up on PyPi. Simply “pip install” to get going. (Note: virlutils will work in both Python 2.7 and 3.6 work and the use of a virtual environment is recommended)
virlup-demo\ $ python3.6 -m venv venv
virlup-demo\ $ source venv/bin/activate
(venv) virlup-demo\ $ pip install --upgrade virlutils
Collecting virlutils
.
.
Successfully installed ... virlutils-0.8.2
Next you need to let virlutils know about your VIRL or CML server. There are several ways to do this (see documentation), but the simplest is to create a file called “.virlrc” in your home directory that contains the address and credentials for your server.
(venv) virlup-demo\ $ cat ~/.virlrc
VIRL_HOST=10.194.141.30
VIRL_USERNAME=guest
VIRL_PASSWORD=guest
The next step is to “virl up” your simulation. But what simulation?… If you have a simulation topology that you have already created, you can simply save the “.virl” file in your directory as “topology.virl” (any file name will work, but virlutils will look for topology.virl by default). But what if you don’t have a topology file handy? Well let’s “virl search” for one…
(venv) virlup-demo\ $ virl search
 Displaying 6 Results
 ╒══════════════════════════════╤═════════╤═══════════════════════════════════════════════╕
 │ Name                         │ Stars   │ Description
 ╞══════════════════════════════╪═════════╪═══════════════════════════════════════════════╡
 │ virlfiles/2-ios-router       │ 0       │ hello world virlfile
 ├──────────────────────────────┼─────────┼───────────────────────────────────────────────┤
 │ virlfiles/extranet           │ 2       │ mock extranet hub and spoke topology
 ├──────────────────────────────┼─────────┼───────────────────────────────────────────────┤
 │ virlfiles/9_router_mesh      │ 0       │ Simple 9 router mesh with link level config
 ├──────────────────────────────┼─────────┼───────────────────────────────────────────────┤
 │ virlfiles/datacenter         │ 0       │ A classic dc design with core/dist/access layer
 ├──────────────────────────────┼─────────┼───────────────────────────────────────────────┤
 │ virlfiles/genie_learning_lab │ 0       │ Topology used for Genie learning labs
 ├──────────────────────────────┼─────────┼───────────────────────────────────────────────┤
 │ virlfiles/devbox             │ 0       │
 ╘══════════════════════════════╧═════════╧═══════════════════════════════════════════════╛
Along with virlutils, Kevin and his crack team of NetDevOps developers, created the GitHub organization virlfiles to post sample topology files for the community to use. “virl search” shows the available topologies available to grab from the community. Let’s spin up a simple “2-ios-router” simulation.
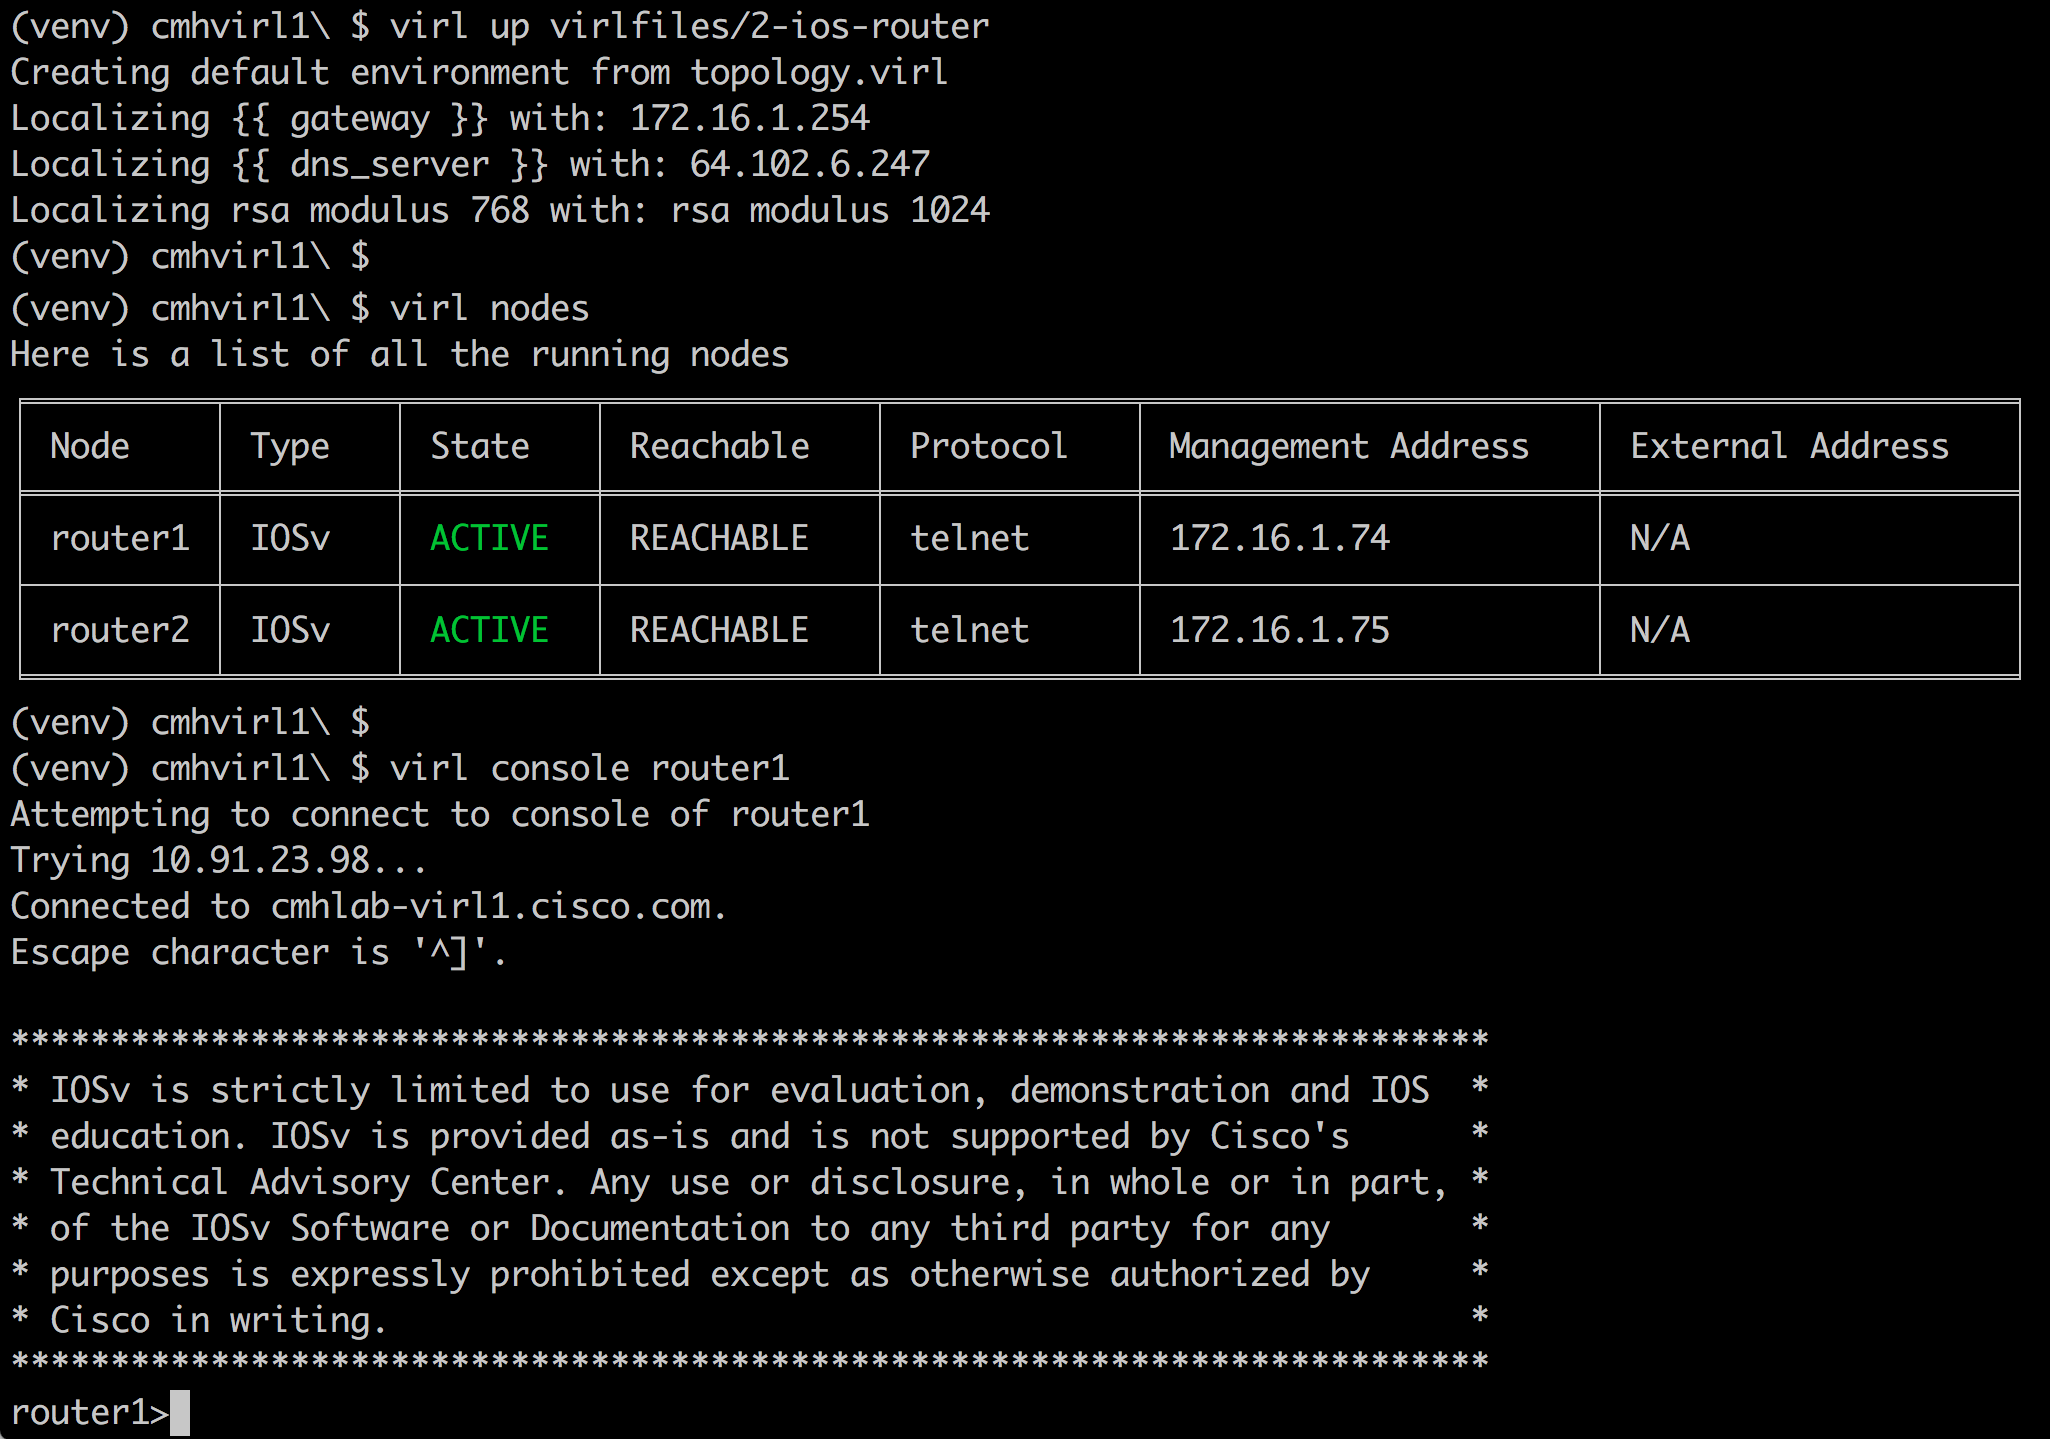
(venv) virlup-demo\ $ virl up virlfiles/2-ios-router
Creating default environment from topology.virl
Localizing {{ gateway }} with: 10.194.141.30
Localizing {{ dns_server }} with: 8.8.8.8
Localizing rsa modulus 768 with: rsa modulus 1024
It’s that easy to start a simulation! All the “localizing” bits in the output show more of the flexibility of virlutils. The full details are more than I’ll cover in a blog post, but the short version is that virlutils supports injecting variables into topologies for local install settings like network subnets for nodes and DNS servers – dynamically filling them in at start time based on the specific configuration of your VIRL server.
You can check the status of your simulation with a couple of commands. “virl ls” will give you the simulation details, and “virl nodes” will drill into the nodes within the simulation itself.
(venv) virlup-demo\ $ virl ls
Running Simulations
╒════════════════════════════╤══════════╤════════════════════════════╤═══════════╕
│ Simulation                 │ Status   │ Launched                   │ Expires   │
╞════════════════════════════╪══════════╪════════════════════════════╪═══════════╡
│ virlup-demo_default_Q2CMja │ ACTIVE   │ 2018-06-27T18:07:23.834101 │           │
╘════════════════════════════╧══════════╧════════════════════════════╧═══════════╛

(venv) virlup-demo\ $ virl nodes
Here is a list of all the running nodes
╒═════════╤════════╤═════════╤═════════════╤════════════╤══════════════════════╤════════════════════╕
│ Node    │ Type   │ State   │ Reachable   │ Protocol   │ Management Address   │ External Address   │
╞═════════╪════════╪═════════╪═════════════╪════════════╪══════════════════════╪════════════════════╡
│ router1 │ IOSv   │ ACTIVE  │ UNREACHABLE │ telnet     │ 10.194.141.32        │ N/A                │
├─────────┼────────┼─────────┼─────────────┼────────────┼──────────────────────┼────────────────────┤
│ router2 │ IOSv   │ ACTIVE  │ REACHABLE   │ telnet     │ 10.194.141.33        │ N/A                │
╘═════════╧════════╧═════════╧═════════════╧════════════╧══════════════════════╧════════════════════╛
You connect to the consoles of the nodes with “virl console” and directly attach to any running device. If your VIRL server is configured with a network that supports access to the management IP space, you can also use “virl ssh” and “virl telnet”.
(venv) virlup-demo\ $ virl console router1
Attempting to connect to console of router1
Trying 10.194.141.33...
Connected to virl-test.
Escape character is '^]'.

router1>en
Password:
router1#sh ip int bri
Interface IP-Address OK? Method Status Protocol
GigabitEthernet0/0 10.194.141.33 YES NVRAM up up
GigabitEthernet0/1 10.255.0.5 YES NVRAM up up
Loopback0 192.168.0.1 YES NVRAM up up
router1#
telnet> quit
Connection closed.


(venv) virlup-demo\ $ virl telnet router1
Attemping telnet connectionto router1 at 10.194.141.33
Trying 10.194.141.33...
Connected to 10.194.141.33.
Escape character is '^]'.

User Access Verification

Username: cisco
Password:


router1#exit
Connection closed by foreign host.
You now have a fully functional network simulation and you didn’t need to click your mouse at all! Pretty amazing right! But we aren’t done yet… not by a long shot.
Using virlutils with other NetDevOps Tools
If you’re interested in NetDevOps uses for VIRL, odds are you’re also looking at other tools for configuration management, network testing, etc. Well, so were we when developing and iterating on virlutils – specifically Cisco NSO, PyATS, and Ansible. The second step in most of our projects after “virl up” was to create some inventory or test-bed file for the simulation. After about the 10th time creating the file, the “DRY” principal kicked in (DRY = Don’t Repeat Yourself) and “virl generate” was born.
Let’s supposed we wanted to write some Ansible playbooks for our newly launched simulation. Well fire off a “virl generate ansible”…
(venv) virlup-demo\ $ virl generate ansible
Placing router1 into ansible group all
Placing router2 into ansible group all
Writing default_inventory.yaml
And with that we have a new file “default_inventory.yaml” that provides a foundation for an inventory file with the details straight from the running simulation. You can add some custom extensions to topology definition for your nodes to influence Ansible groups if you so desire.
(venv) virlup-demo\ $ cat default_inventory.yaml
all:
 children:
 all:
 hosts:

router1:
 ansible_host: 172.16.1.129
 console_server: 10.91.23.99
 console_port: 17000

router2:
 ansible_host: 172.16.1.130
 console_server: 10.91.23.99
 console_port: 17003
And with that you are ready to start config managing away.
You’ll likely still need to update/tweak your inventory for your specific use case, but this saves a ton of time right! And what better way to use that time than to explore another excellent NetDevOps tool, PyATS, and “virl generate pyats” to start doing network testing and verification along with configuration management.
What’s Next!
What did I tell you amazing right! Be sure to toss out a “virl –help” to see the other commands available (Hint: “virl down” will end a simulation)
If you have your own VIRL or CML server to use, definitely give virlutils a try with it. If you don’t have a handy VIRL server, you can use one of ours. DevNet Sandbox leverages VIRL as the foundation of a few different Sandboxes, and we recently launched a “Multi-IOS Cisco Test Network” Sandbox that provides a nice beefy VIRL server you can use for general NetDevOps testing and simulation.
And remember, virlutils was built by NetDevOps engineers, for NetDevOps engineers. Along the way if you run into any problems, please open an Issue and let us know what happened so we can get it resolved ASAP. And virlutils continues to evolve and add new features to meet our demands. If you have any ideas on how to make virlutils even better let us know in an Issue or by providing a Pull Request.
We’d love to hear what you think. Ask a question or leave a comment below.
And stay connected with Cisco DevNet on social!
Twitter @CiscoDevNet | Facebook | LinkedIn
Visit the new Developer Video Channel


Great an interesting as usual !!!
that was a big missing piece in virl thanks for implementing!
Can't wait testing!
Hi Hank,
This may be off-topic, but is there a VIRL router model that includes a Serial interface?
Thanks!
Vincent, I know the CSR and N9000v both support mapping a virtual serial port to them and then attaching via a socket connection into the hypervisor, but I've only worked with them using VirtualBox and vSphere, never through VIRL (or the underlying KVM hypervisor).
Out of curiosity, what is the use case?
Hi Hank,
I am attempting to follow along with some training that Andre Laurent has put together for CCNA R&S Live Study Sessions / troubleshooting.
Looks like the “Multi-IOS Cisco Test Network” is no longer available in DevNet. Will that be coming back? Sounds like a great place to experiment.
Also, FYI for anyone who missed it; in order to do 'virl generate ansible' – you first have to edit your topology file and include XML tags to denote which groups you want your nodes to show up in. e.g. <entry key="ansible_group" type="String">mygroup</entry> — would be nice if there was a way to tag those via ANK/VMM.
Bar Foo (great name btw),
The Multi IOS sandbox was down for a bit while we did some maintenance and updates, but it's available again now so take a look.
And yeah, if you want the generated Ansible inventory file to have group information, you will need include the "ansible_group" extension. I typically just add these directly in the XML topology file I store in the repo with the code, but you an also do this through the properties within VMM.
Hank
Great and useful post. Thanks!!!!