
It’s a new year and a new decade, so it’s time for a NEW BLOG about network automation. I am getting ready for Cisco Live Europe 2020 and want to give everyone a preview of some of what I’ll be talking about in my session How DevNet Sandbox Built an Automated Data Center Network in Less than 6 Months – DEVNET-1488. If you’ll be in Barcelona, please register and join me for a look at how we approached this project with a goal to “innovate up to the point of panic” and brought in a lot of new NetDevOps and network automation processes. But don’t worry if you’re reading this from far off in the future, or aren’t attending CLEUR, this blog will still be wildly entertaining and useful!
The last several blogs I talked a bit about Network Service Based Automation (Part 1 and Part 2), and in today’s blog I want to build on those by showing where the details that provide the INPUT to the automation comes from – something often called the Source of Truth.
What is a Source of Truth?
If you’ve been kicking around the network automation space for awhile, you may have run across this term… or maybe you haven’t, so let me break it down for you.
Let’s say you are diving into a project to automate the interface configuration for your routers. You’re going to need 2 things (well likely more than 2, but for this argument we’ll tackle 2).
First, you’ll need to develop the “code” that applies your desired standards for interface configuration. This often includes building some configuration template and logic to apply that template to a device. This code might be Python, Ansible, or some other tool/language.
Second, you need to know what interfaces need to be configured, and the specifics for each interface. This often includes the interface name (ie Ethernet1/1), IP address info, descriptions, speed/duplex, switch port mode, and so on. This information could be stored in a YAML file (a common case for Ansible), a CSV file, dictionaries and lists in Python, or somewhere else.
Then your code from the “first” will read in the details from the “second” to complete the project.
The “Source of Truth” is that second thing. It is simply the details that are the desired state of the network. Every project has a “Source of Truth”, even if you don’t think of it that way. There are many different tools/formats that your source of truth might take.
Simple Sources of Truth include YAML and CSV files and are great for small projects and when you are first getting started with automation. However, many engineers and organizations often find themselves reaching a point in their automation journey where these simple options are no longer meeting their needs. It could be because of the sheer amount of data becomes unwieldy. Or maybe it’s the relationships between different types of data. Or it could be that the entire team just isn’t comfortable working in raw text for their information.
When text based options aren’t meeting the needs anymore, organizations might turn to more feature rich applications to act as their Source of Truth. Applications like Data Center Infrastructure Management (DCIM) and IP Address Management (IPAM) can definitely fill the role of the Source of Truth. But there is a key difference in using a DCIM/IPAM tool as an automation Source of Truth from how we’ve traditionally used them.
How a DCIM or IPAM becomes a Source of Truth
In the past (before automation), the data and information in these tools was often entered after a network was designed, built, and configured. The DCIM and IPAM data was a “best effort” representation of the network typically done begrudgingly by engineers who were eager to move onto the next project. And if we are honest with ourselves, we likely never trusted the data in there anyway. The only real “Source of Truth” for how the network was configured was the actual network itself. Want to know what the desired configuration for a particular switch was? Well go log into it and look.
With Source of Truth driven network automation, we spin the old way on its head. The first place details about the network are entered isn’t at the CLI for a router, but rather into the IPAM/DCIM tool. Planning the IP addresses for each router interface – go update the Source of Truth. Creating the list of VLANs for a particular site – go update the Source of Truth. Adding a new network to an existing site – go update the Source of Truth.
The reason for the change is that the code you run to build the network configuration will read in the data for each specific device from the Source of Truth at execution time. If the data isn’t in your DCIM/IPAM tool, then the automation can’t work. Or if the data isn’t correct in the DCIM/IPAM tool, then the automation will generate incorrect configuration.
It’s also worth noting now that a Source of Truth can be used as part of network validation and health tests as well as for configuration. Writing a network test case with pyATS and Genie to verify all your interfaces are configured correctly? Well how do you know what is “correct”? You’d read it from your Source of Truth. I call that “Source of Truth driven Network Validation” and I’ll tackle it more specifically in a future blog post.
Source of Truth Driven Automation in Action!
Enough exposition, let’s see this in action.
The Source of Truth that we use in DevNet Sandbox for most information is Netbox. Netbox is an open source DCIM/IPAM tool originally developed by the network automation team at Digital Ocean for their own needs, and has been popular with many engineers and enterprises looking for a tool of their own. For a dive into Netbox, checkout this video where the project owners for Netbox, Jeremy Stretch and John Anderson, discuss it at TechField Day.
Let’s suppose we need to add a new network to our main internal admin environment in the Sandbox with the following basic information.
- The name of the network will be demo-sourceoftruth
- It will need an IP prefix assigned to it from the appropriate IP space
- Ethernet 1/3 on the switch sjcpp-leaf01-1 needs to be configured as an access port for this network
The automation to do the actual configuration of the VLAN, SVI, interface config, etc is already done (I covered that in Network Service Based Automation Part 1 – The Experience), what I need to do is update the Source of Truth that will drive the automation. This involves the following steps:
- Creating a new VLAN object
- Allocating an available prefix and assigning to the new VLAN
- Updating the details for port Ethernet 1/33 to be an access port on this VLAN
Note: You can click on the screen images that follow to enlarge for easier viewing.
Step 1: Creating a new VLAN object
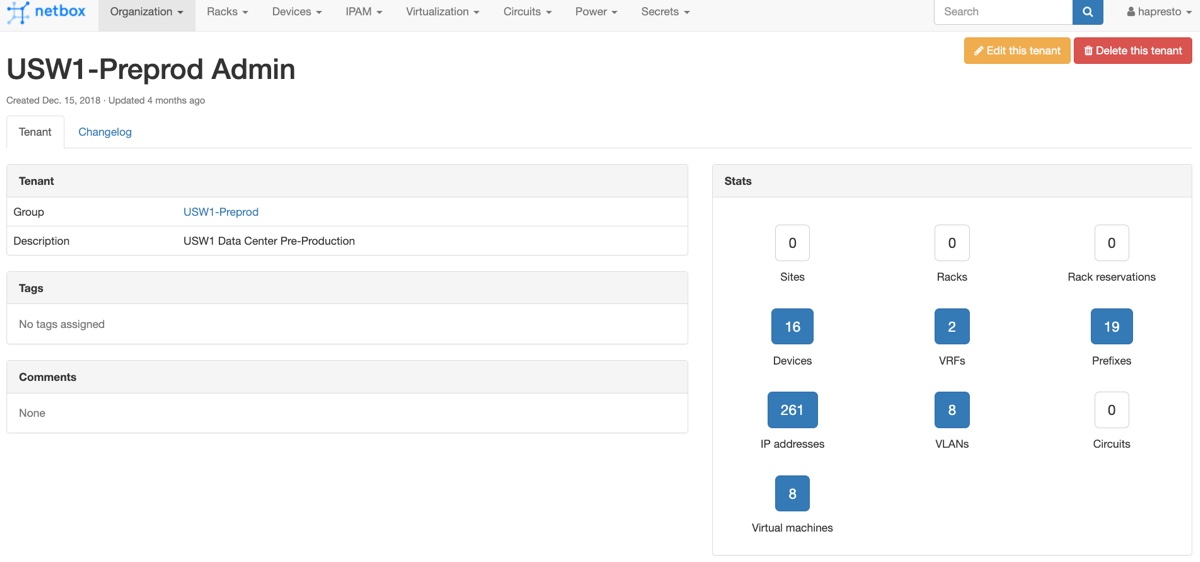
I start in Netbox at the Tenant view for our Admin environment. From here I can easily view all the DCIM and IPAM details for this environment.
I click on VLANs to see the current list of VLANs.
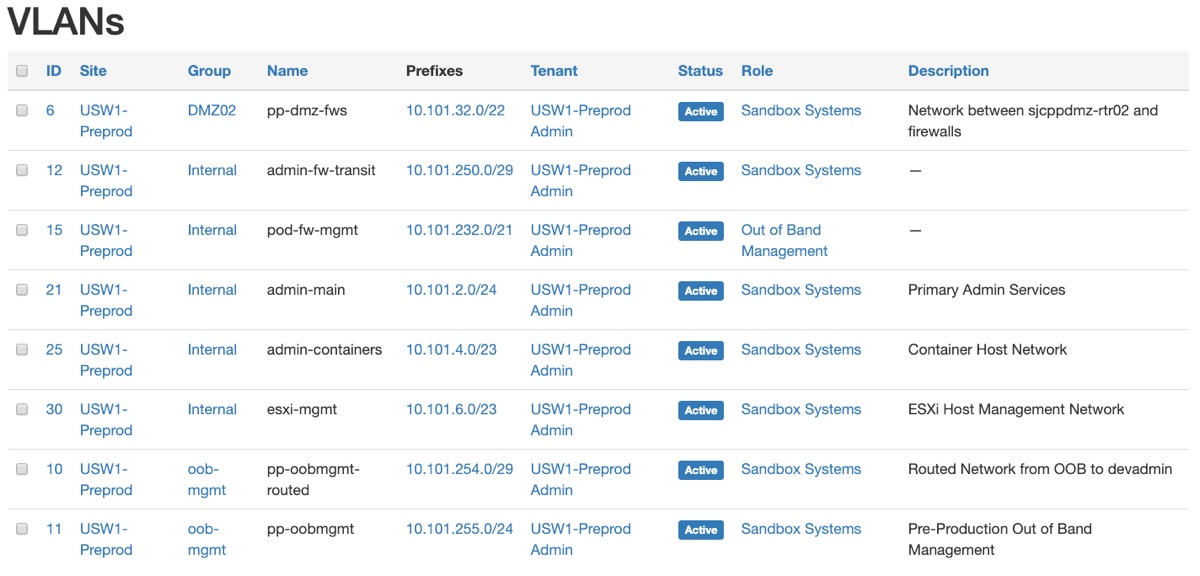
The “Group” column represents the VLAN Group in Netbox – which is a way to organize VLANs that are part of the same switching domain where a particular VLAN id has significance. This new network will be in the “Internal” group. I click on “Internal” on any of the VLANs to quickly jump to that part of Netbox so I can find an available VLAN id to use.
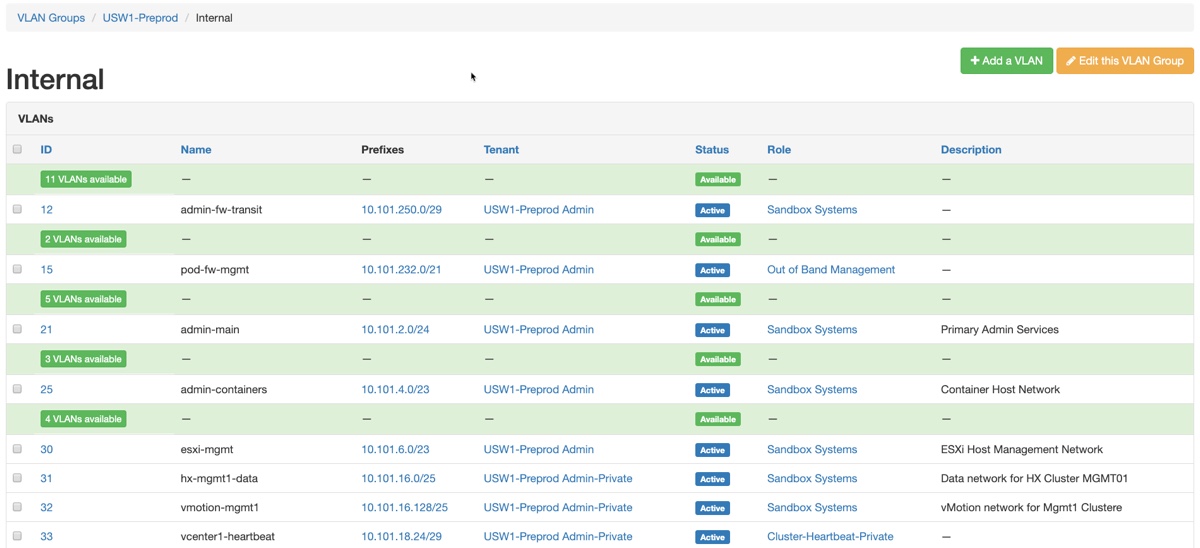
I see that there are 4 VLANs available between 25 and 30, and I click on the green box to add a new on in that space.
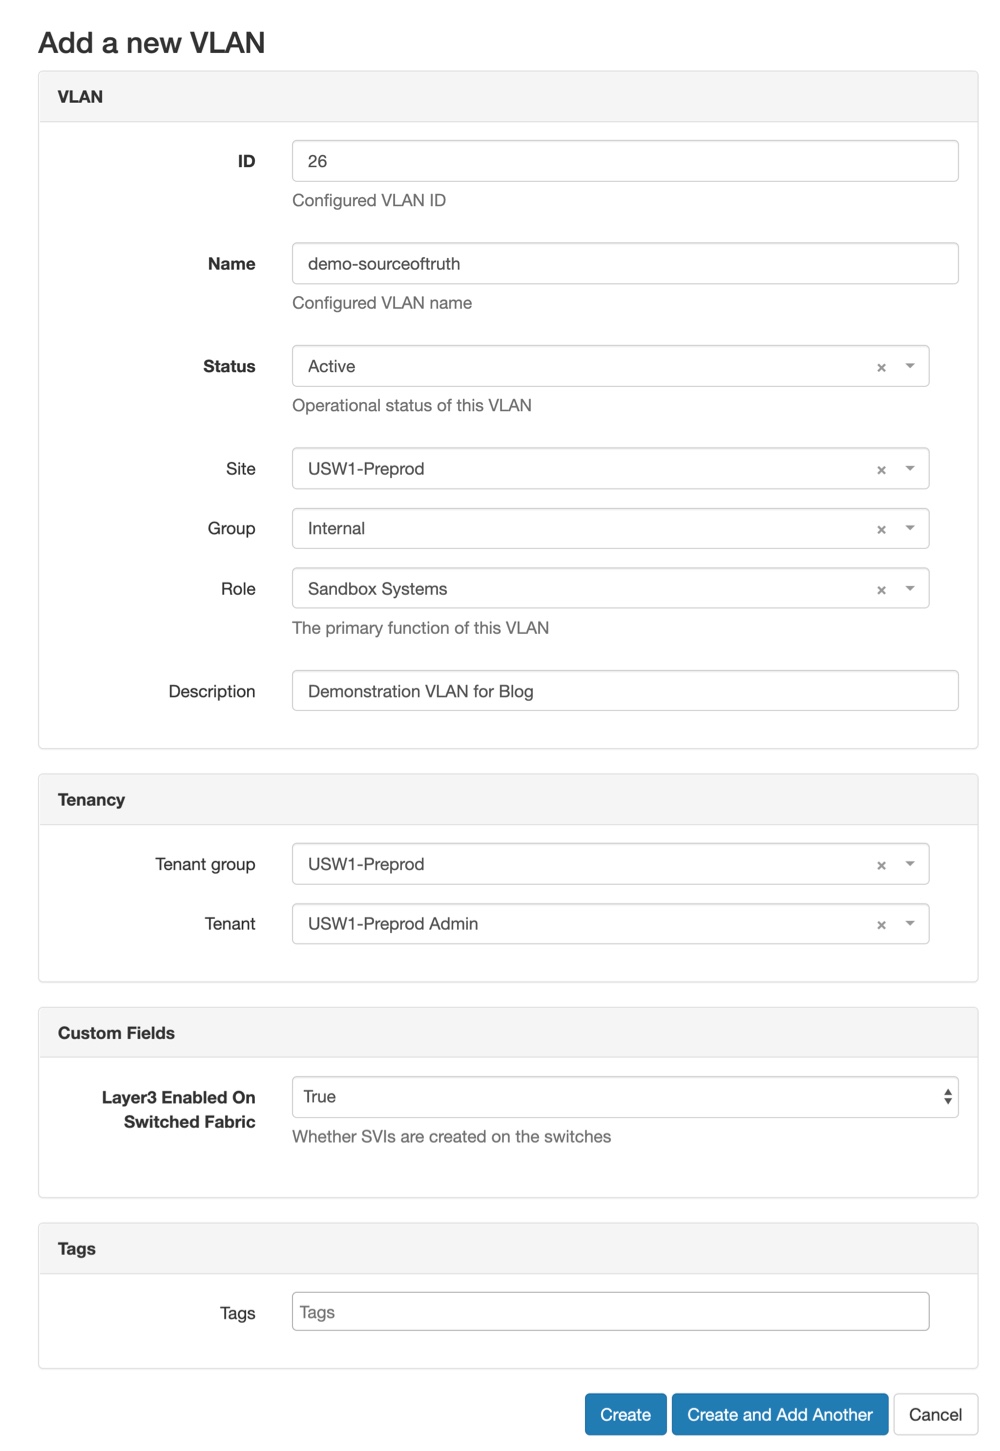
I provide the new name for this network, and indicate it’s role will be for “Sandbox Systems”. As this new network will be part of the Admin Tenant, I select the proper Group and Tenant from the drop downs. Netbox supports creating custom fields for data that you need, and we’ve created a field called “Layer3 Enabled on Switched Fabric” to indicate whether SVIs should be setup for a network. In this case that is True. After providing the details, I click “Create” to create this new VLAN.
Step 2: Allocating an available prefix and assigning to the new VLAN
Netbox is a full featured IPAM, so let’s walkthrough allocating a prefix for the VLAN.
I start at the Supernet for admin networks at this site, 10.101.0.0/21 to find an available prefix.
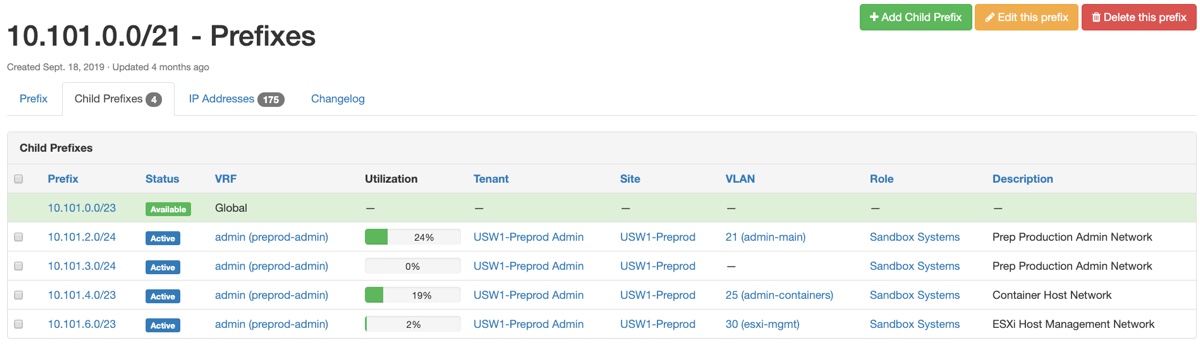
I click on the Available range, to jump to the “Add a New Prefix” interface.
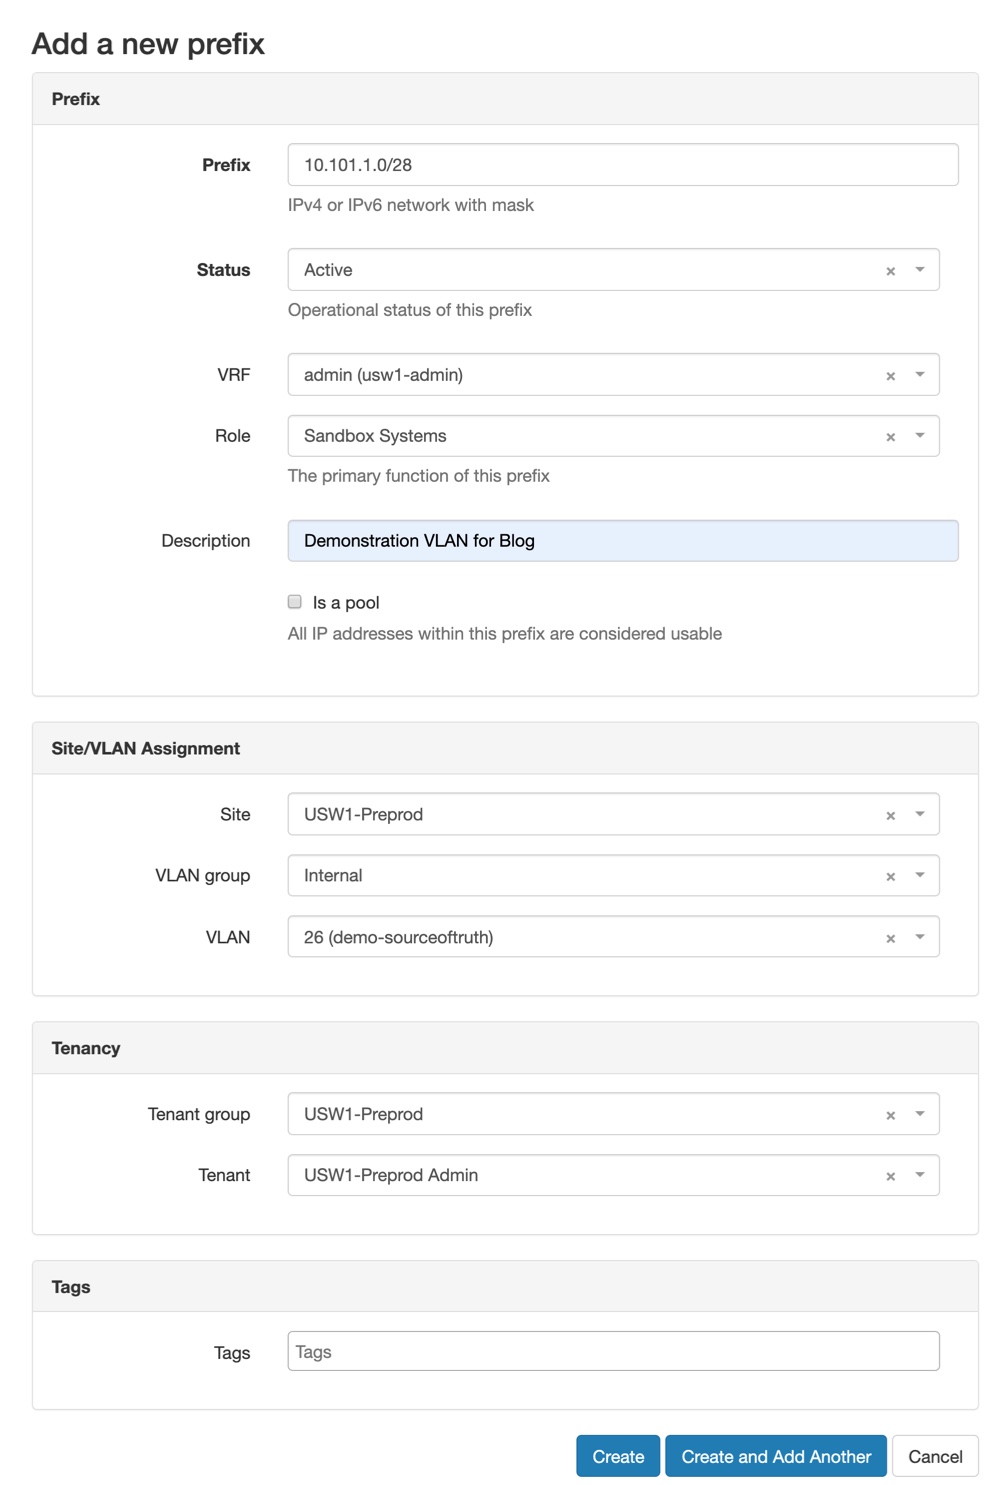
I start by updating the Prefix to be the proper size I want, picking the Role (this matches the VLAN role), providing a good description so folks know what this is for. I then choose the new VLAN we just created to associate this prefix to using the drop downs and search options provided in the UI. Lastly I pick the Admin tenant and click “Create”
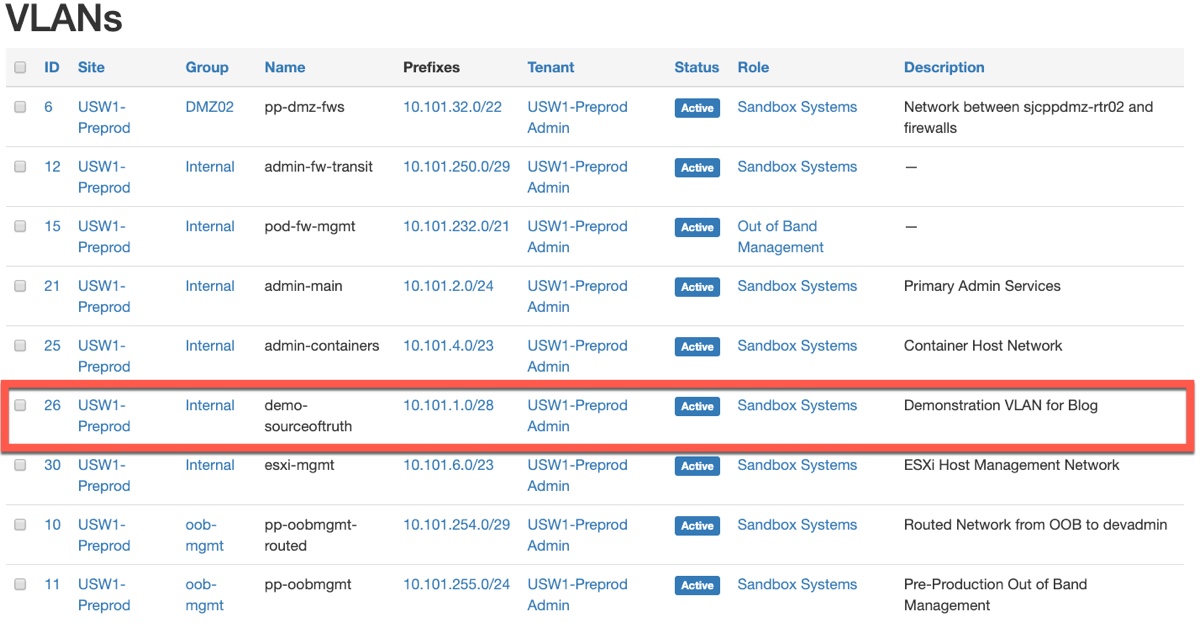
Now if I go back and look at the VLANs associated with the Admin Tenant, I can see our new VLAN in the list with the Prefix allocated.
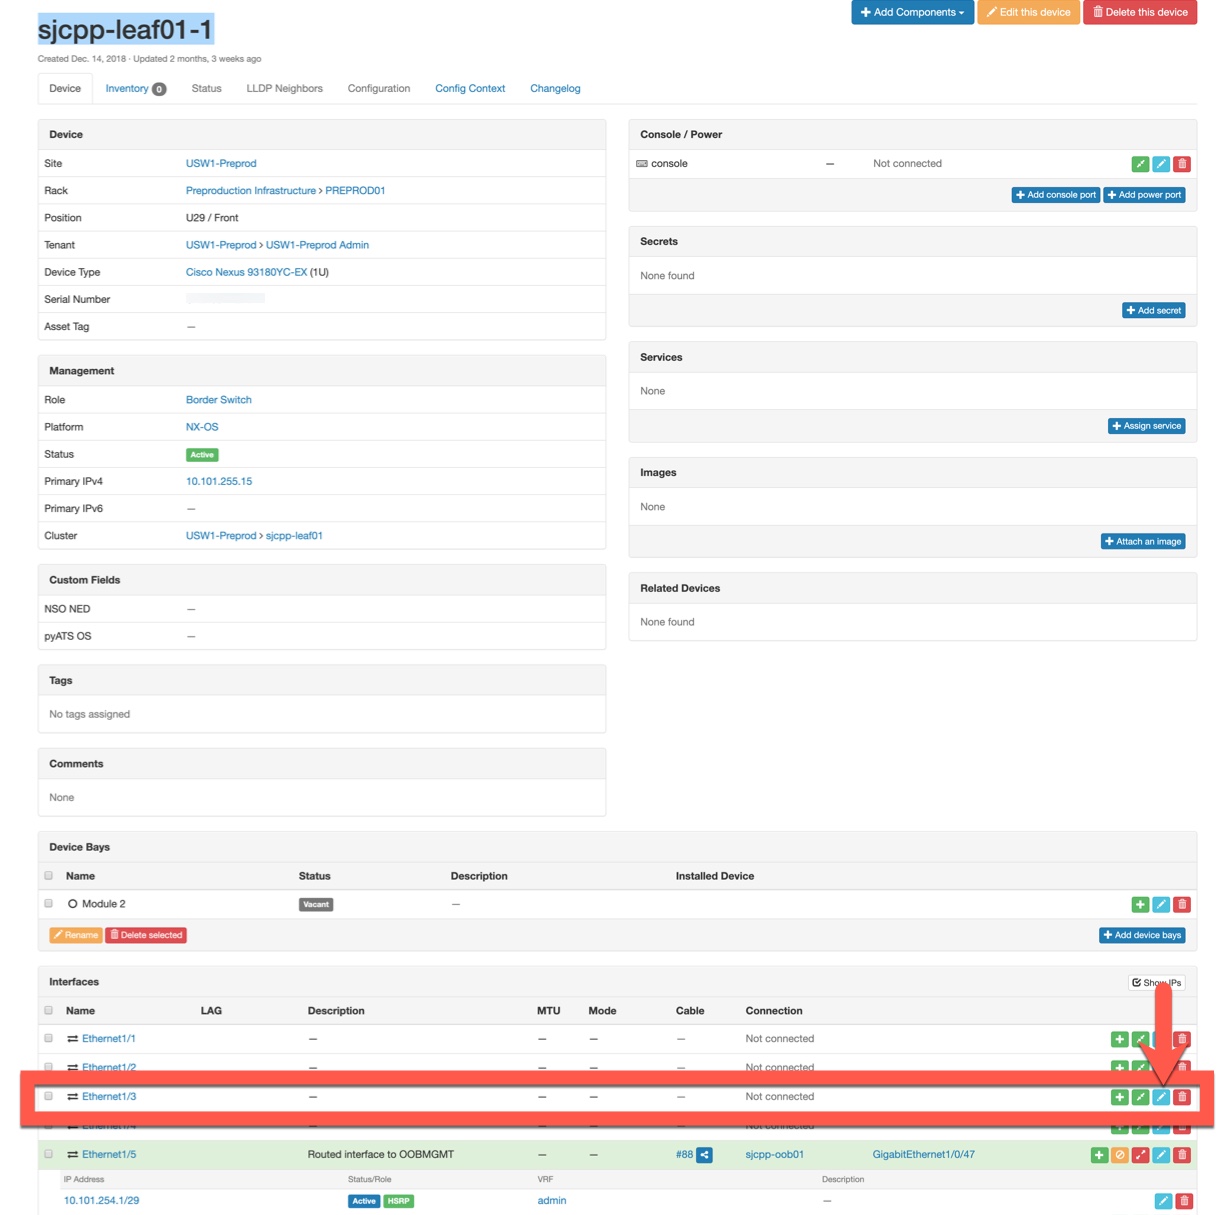
Step 3: Updating the details for port Ethernet 1/3 to be an access port on this VLAN
The final step in Netbox is to indicate the physical switch interfaces that will have devices connected to this new VLAN.
I navigate in Netbox to the device details page for the relevant switch. At the bottom of the page are all the interfaces on the device. I find interface Ethernet 1/3 and click the “Edit” button.
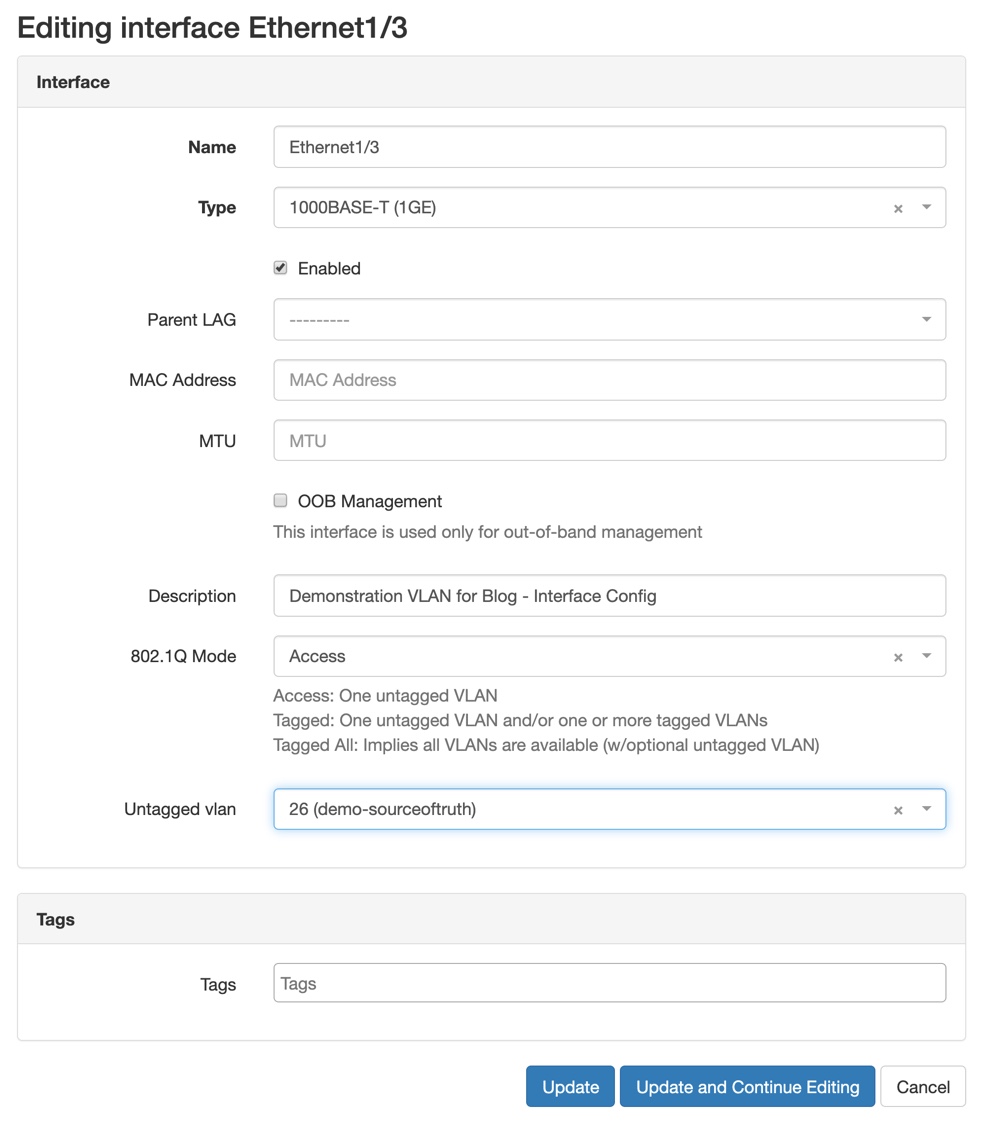
I update the interface configuration with an appropriate Description, set the 802.1Q Mode to Access, and select our new VLAN as the Untagged VLAN for the port. Then click “Update” to save the changes.
Applying the New Network Configuration
With our Source of Truth now updated with the new network information, we simply need our network automation to read this data in and configure the network. There are many ways this could be done, including a fully automated option where a webhook from Netbox kicks off the automation. In our environment we are adopting network automation in stages as we build experience and confidence. Our current status is that we execute the automation to process the data from the Source of Truth to update the network configuration manually.
Reminder that I’ve already run through our automation in preview posts
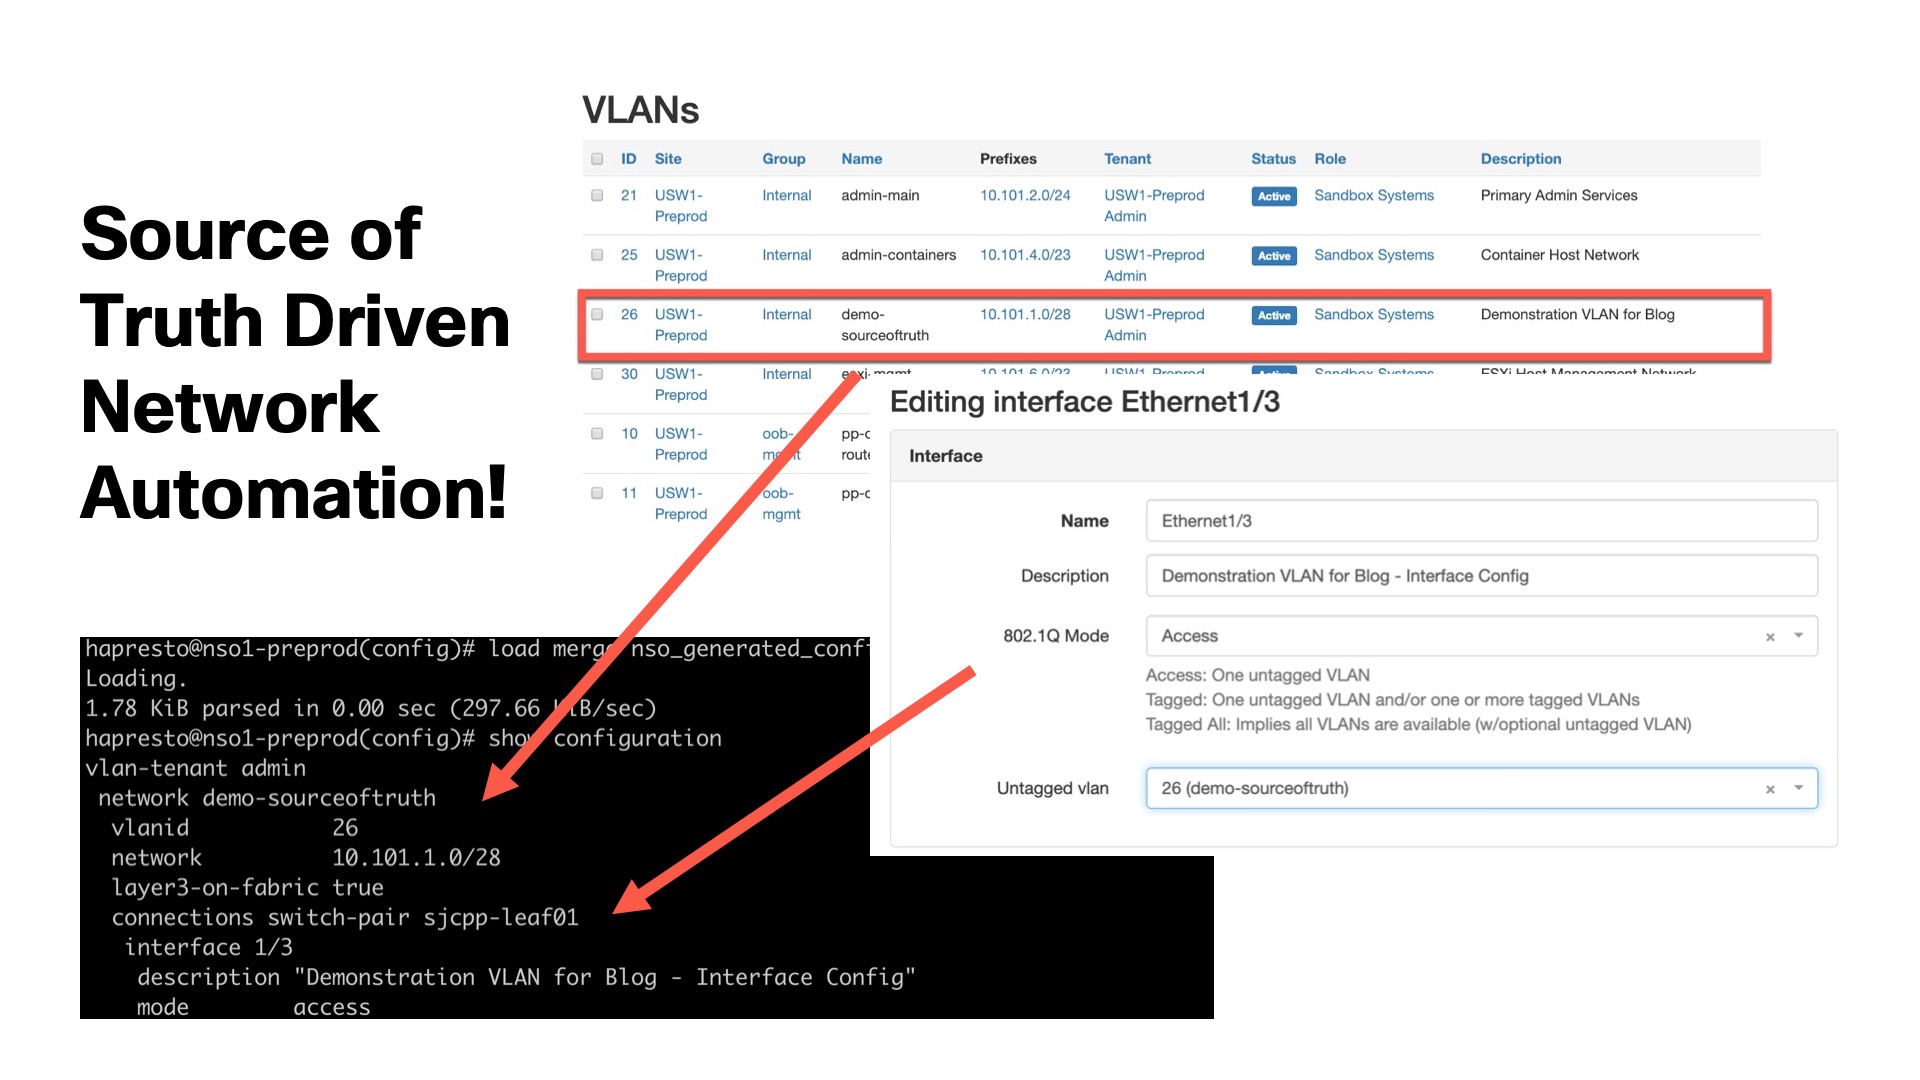
When I run the automation to update the network configuration with the new Source of Truth info, here are the changes to the vlan-tenant configuration for our admin environment.
hapresto@nso1-preprod(config)# load merge nso_generated_configs/vlan-tenant_admin.xml
Loading.
1.78 KiB parsed in 0.00 sec (297.66 KiB/sec)

hapresto@nso1-preprod(config)# show configuration
vlan-tenant admin
  network demo-sourceoftruth
    vlanid 26
    network 10.101.1.0/28
    layer3-on-fabric true
    connections switch-pair sjcpp-leaf01
      interface 1/3
      description "Demonstration VLAN for Blog - Interface Config"
      mode access
Here you can see the new network being created, along with the VLAN id, prefix, and even the physical interface configurations. All this detail was pulled directly from Netbox by our automation process.
And if you’d like to see the final network configuration that will be applied to the network after processing the templates in our network service by NSO, here it is.
    device {
        name sjcpp-leaf01-1
        data vlan 26
              name demo-sourceoftruth
             !
             interface Vlan26
              no shutdown
              vrf member admin
              ip address 10.101.1.2/28
              no ip redirects
              ip router ospf 1 area 0.0.0.0
              no ipv6 redirects
              hsrp version 2
              hsrp 1 ipv4
               ip 10.101.1.1
               preempt
               priority 110
              exit
             exit
             interface Ethernet1/3
              switchport mode access
              switchport access vlan 26
              no shutdown
              description Demonstration VLAN for Blog - Interface Config
              mtu 9216
             exit
    }
    device {
        name sjcpp-spine01-1
        data vlan 26
              name demo-sourceoftruth
             !
    }
Note: The service also updates vCenter to create a new port-group for the vlan, as well as Cisco UCS, but I’m only showing the typical network configuration here.
Finishing Up!
Hopefully this gives you a better idea about how a Source of Truth fits into network automation projects, and how a tool like Netbox provides this important feature for enterprises.
But one thing before I fully wrap up… After I talk about, or show something like this to engineers, I often hear comments like “Netbox looks neat, but I could have done the same thing with 10 lines of YAML”. And that is a totally valid point. The jump to a tool like Netbox for your Source of Truth from the simpler text based options has a cost in setup time, complexity, and effort for your team. Not every team will need to make the change, but from my experience many teams find themselves outgrowing YAML files as their automation projects and skills mature. My goal in this post was to give you some helpful information and an example of what can be done when you reach that point.
If you’d like to hear more about how the DevNet Sandbox team is adopting network automation and other NetDevOps practices, please join me in Barcelona for DEVNET-1488: How DevNet Sandbox Built an Automated Data Center Network in Less than 6 Months, or look for the recording after the event in the Cisco Live On Demand Catalog. You can already find the CLUS2019 session where I discussed some of our plans that lead up to the recent project I am covering in Barcelona.
Some other great resources include:
- Code Exchange Repo on DevNet Sandbox NSO Resources
- Hands On Learning Labs
- DevNet Sandboxes
- Details about the new DevNet Certifications
- What’s happening in the DevNet Zone at Cisco Live Europe
Now it’s your turn. What do you use for a Source of Truth? Let me know in the comments, or ping me over on Twitter at hfpreston. Talk to you soon!
We’d love to hear what you think. Ask a question or leave a comment below.
And stay connected with Cisco DevNet on social!
Twitter @CiscoDevNet | Facebook | LinkedIn
Visit the new Developer Video Channel


