
Q: How do you eat a whale?
A: One bite at a time… or so the saying goes. Admittedly, I don’t know of anyone who eats whale one bite at a time (or any way otherwise for that matter). But we can all agree that breaking large problems into smaller pieces is a valuable arrow in the quiver of problem-solving techniques. It’s a practice that certainly applies in the world of programming.
Once the problem is broken down and implemented, however, how can we convey what we learned to others? One way is using Jupyter Notebook to combine documentation authored in markdown together with live code. As an example, a developer writes small blocks of Python to vet an algorithm, a function, or syntax. Once verified, it is documented, saved, and the code is then added to the IDE, such as VSCode, where the main Python code is developed.
This post shows a simple Python example that retrieves physical compute inventory claimed in Cisco Intersight. In this example, the items in the inventory are UCS X-Series compute nodes managed by IMM (Cisco Intersight Managed Mode).
What is Jupyter Notebook?
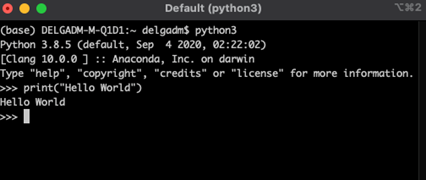
Jupyter Notebook is an open-source web application used to create and share code along with narrative text. It’s used extensively in academia especially by data scientists. If you have experience with Python you may be familiar with IDLE (see the screenshot below). IDLE lets you execute Python code directly from the command line without needing to run a *.py file. You run your line(s) of code and verify things work and when you are finished, you close your session with <cntrl><d> and you move on with life. What if you wanted to share what you tried with someone else? Assuming you copy/pasted the contents of your shell session, would someone else be able to understand what the flow of what you were trying? Could you refer to it later and understand the flow of what you did?
IDLE does the job but it has limitations when it comes to documenting and sharing ideas. Enter Jupyter Notebook, an interactive way of documenting and executing live code from a web-based interface. It runs as an interactive web application supporting markdown and code execution with support for over 100 programming languages (called “kernels”) including Python, PowerShell, and Matlab just to name a few. I’ll show you examples in both Python and PowerShell since those are commonly used to interface with Cisco compute API’s.
How Jupyter Notebook works – A very simple tutorial
First, be sure to first install Jupyter Notebook if it’s not already on your machine. Once installed, you can launch the browser by entering the command jupyter notebook from the command line. When the command is executed a new browser tab opens with the Jupyter notebook interface.
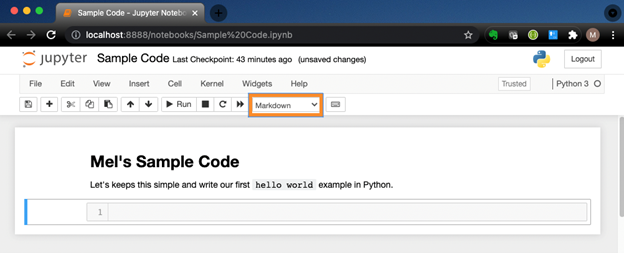
In the example below, we use Python 3 as our language of choice with the first entry authored with markdown and the second “hello world” passed to the print function. For the first entry, select Markdown as the type of content to run, enter markdown syntax, followed by simultaneously pressing the <shift> and <enter> keys and voila! The markdown is rendered.
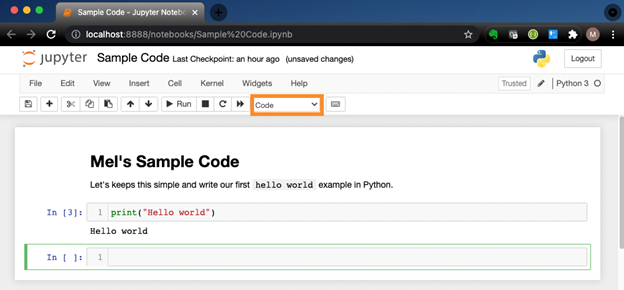
In the next entry, select Code from the highlighted pulldown, enter one or more lines of code, followed by simultaneously pressing <shift> and <enter>. The code runs and the results are displayed just below the code. Well, that was easy!
Pro Tip: Not sure what to pass else you can pass to print? Select the field where you entered the print function and followed by simultaneously pressing the <shift> and <tab> keys. You will see a documentation snippet describing the function.

Show Me a Real-World Example
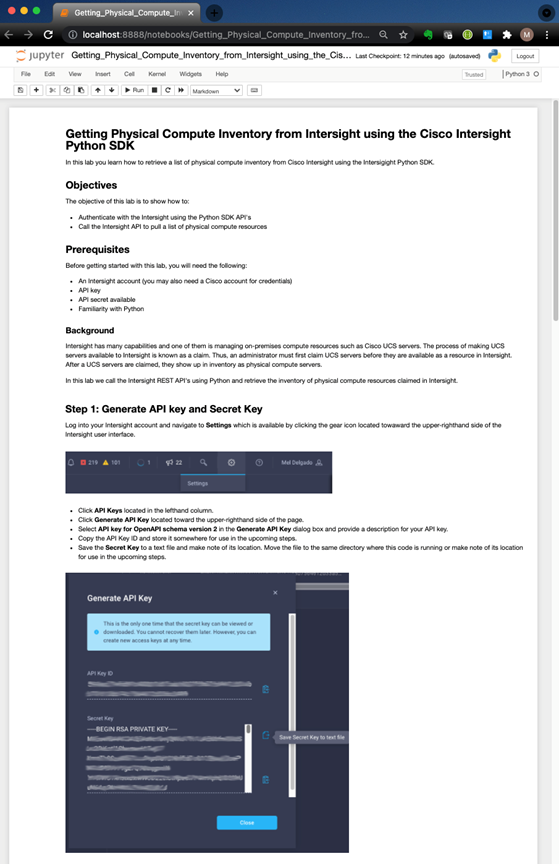
The examples above are right up there with the ‘hello world’ examples you undoubtedly encountered when learning a new language. Next, let us dive into the real-world scenario of calling the Intersight API to retrieve a list of physical compute items from claimed inventory while documenting how you accomplished it.
The specifics of how to go about making the code authenticate and such are covered in the file itself for this post, the example is cut back for brevity, but you can download the code from DevNet’s Code Exchange if you would like to follow along and try it. The examples available in Python and PowerShell.
Here are the steps taken to retrieve physical compute inventory:
- Import the necessary Python modules
- Populate the AUTH variable and define the base URL
- Run a GET operation on the URI of compute/PhysicalSummaries
- Inspect the JSON data returned by the call
- Print the results
Documenting and Executing Code
In step 1 below, you see these steps in action broken apart into smaller pieces along with documentation explaining what each step does along with the live code. If fact, we do not need to discuss the steps in this blog since it is already contained in the Jupyter Notebook. Instead, we pass along a few pro tips.
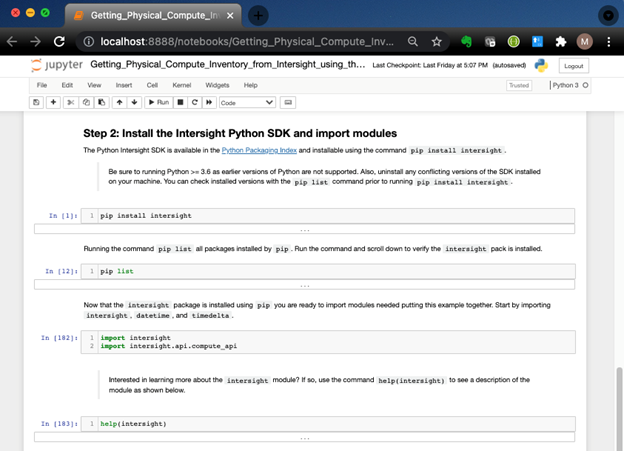
In Step 2, instructions for installing the Python SDK and importing modules are provided with the code for each just below it. Pressing <shift><enter> runs the code and produces a result. The number of lines to execute is up to you and the instructions executed remain in memory.
Pro tip: JSON responses are often lengthy. To manage how you view the output, click the output cell, in this case cell 23. Click once and you see the smaller scrollable window, click twice and you see the full-length listing. If you double-click, the data is hidden. The screenshot below shows the cells with the results hidden.
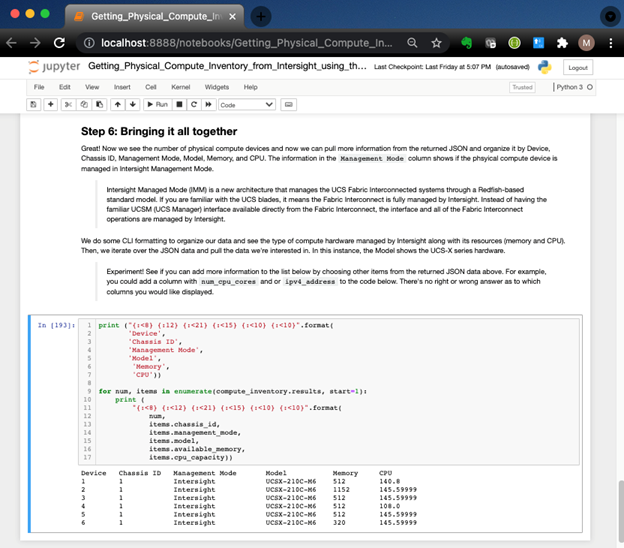
Finally, if you skip ahead to step 6 you will see the number of UCS X-Series compute nodes currently in our inventory along with how the hardware is completely managed by Intersight by virtue of its management mode also known as IMM (Intersight Management Mode).
Conclusion
As you can see, a coding problem was broken up into smaller pieces and documented along the way. Live code is provided inline which you can modify and execute and, if needed, you can also copy and paste the code snippets to their Python IDE of choice for the final *.py file.
We’d love to hear what you think. Ask a question or leave a comment below.
And stay connected with Cisco DevNet on social!
Twitter @CiscoDevNet | Facebook | LinkedIn
Visit the new Developer Video Channel


Thank You For sharing Jupyter Notebook its help full understand