
 The author of this blog is Khaled Abuelenain. Khaled is the Consulting Director at Acuative, and a double CCIE (RS & SP).
This is Part 3 of the “Introduction to Programmability” series. If you haven’t already done so, I strongly urge you to check out Parts 1 & 2 before you proceed. You will be missing on a lot of interesting information if you don’t.
Part 1 of this series defined and explained the terms Network Management, Automation, Orchestration, Data Modeling, Programmability and API. It also introduced the Programmability Stack and explained how an application at the top layer of the stack, wishing to consume an API exposed by a device at the bottom of the stack, does that.
Part 2 then introduced and contrasted two types of APIs: RPC-based APIs and RESTful APIs. It also introduced the NETCONF protocol, which is an RPC-based protocol/API, along with the (only) encoding that it supports and uses: XML.
Note: You will notice that I use the words API and protocol interchangeably. As mentioned in Part 2, a NETCONF API means that the client and server will use the NETCONF protocol to communicate together. The same applies to a RESTCONF API. Therefore, both NETCONF and RESTCONF may be labelled as protocols, or APIs.
In this part of the series, you will see the other type of APIs in action, namely RESTful APIs. You will see first how vanilla HTTP works. Then we will build on what we introduced in Part 2 and dig just a little deeper into REST. Then explain the relationship between HTTP, REST and RESTful APIs. I like to classify RESTful API into two types: Industry-standard and native (aka vendor/platform-specific). We will briefly cover RESTCONF, an industry-standard API as well as NX-API REST, a native API exposed by programmable Nexus switches. Finally, you will see how to consume a RESTful API using Python.
On a side note, you may be wondering how so much information will be covered in one blog post. Well, the challenge has always existed between depth and breadth with respect to topic coverage. In this series, I attempt to familiarize you with as many topics as possible and answer as many common questions related to programmability as feasible. The intention is not for you to come out of this 15-minute read an expert, but to be able to identify concepts and technologies that thus far have sounded foreign to you as a network engineer.
HTTP
As a network engineer, before I got into network programmability many many years ago, I knew that HTTP was the protocol on which the Internet was based. I knew, as required by my work, that HTTP was a client-server protocol that used TCP port 80 (and 443 in the case of HTTPS). I also knew it had something to do with the URIs I entered into my web browser to navigate to a web page. That was it.
But what really is HTTP ?
HTTP stands for HyperText Transfer Protocol. Hypertext is text that contains one or more hyperlinks. A hyperlink is a reference or pointer to data known as the resource or the target of the hyperlink. The text of the hyperlink itself is called the anchor text. That target may be a number of things such as a webpage on the Internet, a section in a Word document or a location on your local storage system.
A little piece of trivia: In 1965 an American scientist called Ted Nelson coined the term hypertext to describe non-linear text. Non-linear refers to a lack of hierarchy for the links between the documents. Then in 1989, Sir Timothy Berners-Lee, wrote the first web client and server implementation that utilized hypertext. That protocol would be used to fetch the data that a hyperlink pointed to and eventually became HTTP. Today, Sir Timothy is best known as the inventor of the World Wide Web.
Therefore, pressing on the anchor text https://blogs.cisco.com/developer/intro-to-programmability-2 will send a request to the blogs.cisco.com server to fetch the resource at /developer/intro-to-programmability-2, which is the HTML content of the webpage at that URI. This content will be parsed and rendered by the web browser and displayed in the browser window for you to view.
So an HTTP workflow involves a client establishing a TCP connection to an HTTP server. This connection is done over port 80 by default, but the port is usually configurable. Once the TCP session is up, the client sends a number of HTTP request messages. The server responds to each request message with a response message. Once the HTTP transactions are completed, the TCP session is torn down by either of the endpoints.
A client HTTP request message includes a Universal Resource Identifier (URI) that is a hierarchical address composed of segments separated by a slash (/). This URI identifies the resource on the server that the client is targeting with this request. In the realm of network programmability, the resource identified by a URI may be the interface configuration on a switch or the neighbors in the OSPF neighbor table on a router.
The client request message will also include an HTTP method that indicates what the client wishes to do with the resource targeted by the URI in the same request. An example of a method is GET which is used to retrieve the resource identified by target URI. For example, a GET request to the URI identifying the interface configuration of interface Loopback 100 will return the configuration on that interface. A POST method, on the other hand, is used to edit the data at the target URI. You would use the POST method to edit the configuration of interface Loopback 100.
In addition to the URI and method, an HTTP request includes a number of header fields whose values hold the metadata for the request. Header fields are used to attach information related to the HTTP connection, server, client, message and the data in the message body.
Figure 1 shows the anatomy of an HTTP request. At the top of the request is the start line composed of the HTTP method, URI and HTTP version. Then comes the headers section. Each header is a key-value pair, separated by a colon. Each header is on a separate line. In more technical terms, each header is delimited by a Carriage Return Line Feed (CRLF). The headers section is separated from the message body with an empty line (two CRLFs). In the figure, the message body is empty, since this is a GET request: the client is requesting a resource from the server, in this case, the operational data of interface GigabitEthernet2, so there is no data to send in the request, and hence, no message body.
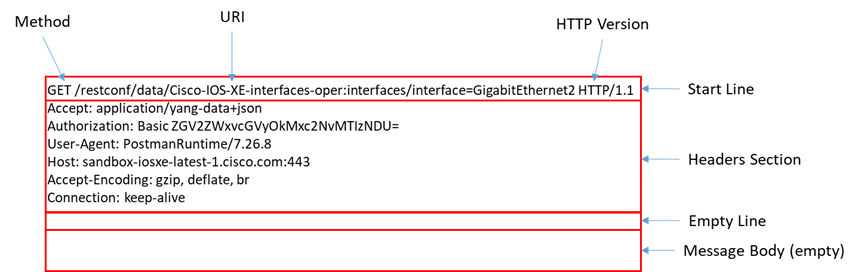 Figure 1 – Anatomy of an HTTP request
When a server receives a request from the client, it processes the request, and sends back an HTTP response message. An HTTP response message will include a status code that indicates the result of processing the request, and a status text that describes the code. For example, the status code and text 200 OK indicate that the request was successfully processed, while the (notorious) code and text 404 Not Found indicate that the resource targeted by the client was not found on the server.
The format of a response message is very similar to a request, except that the start line is composed of the HTTP version, followed by a status code and text. Also, the body is usually not empty. Figure 2 shows the anatomy of an HTTP response message.
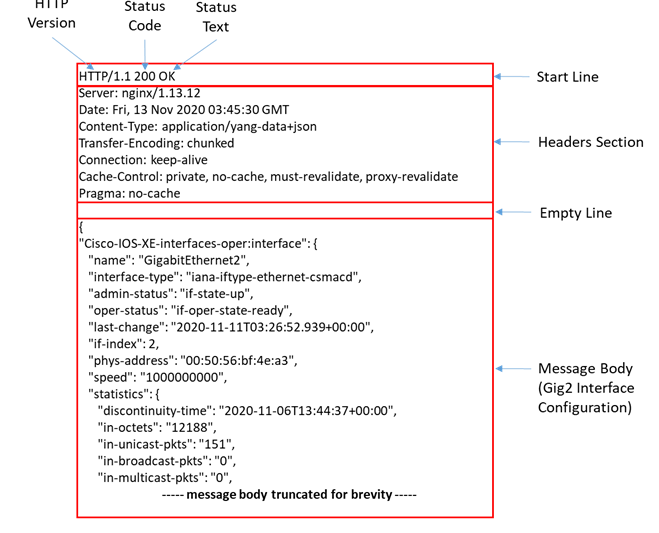 Figure 2 – Anatomy of an HTTP response message
Studying and hence understanding and using HTTP revolves around the following points:
– Target URI: You need to know the correct syntax rules of a URI, such as which characters are allowed and which are not, and what each segment of the URI should contain. URI segments are called scheme, authority, path, query and fragment. You also need to understand the correct semantics rules of a URI, that is, to be able to construct URIs to correctly target the resources that you want to operate on. URI syntax rules are universal. Semantics rules, on the other hand, depend on which protocol you are working with. In other words, a syntactically correct URI that targets a specific resource using RESTCONF will not be the same URI to target that same resource on that same device using another RESTful API, such as NX-API REST.
– Request method: You need to know the different request methods and understand the effect that each would have on a resource. GET fetches a resource (such as a web page or interface configuration) while POST edits a resource (such as add a record to a database, or change the IP address on a router interface). Commonly used methods are GET, HEAD, OPTIONS, POST, PATCH PUT and DELETE. The first three are used to retrieve a resource while the other four are used to edit, replace or delete a resource.
– Server status codes: Status codes returned by servers in their HTTP response messages are classified into the following sub-categories:
- 1xx: Informational messages to the client. The purpose of these response messages is to convey the current status of the connection or transaction in an interim response, before the final response is sent to the client.
- 2xx: The request was successfully processed by the server. Most common codes in this category are 200 (OK) and 201 (Created). The latter is used when a new resource is created by the server as a result of the request sent from the client.
- 3xx: Used to redirect the client, such as when the client requests a web page and the server attempts to redirect the client to a different web page (common use-case is when a web page owner changes the location of the web page and wishes to redirect clients attempting to browse to the old URI).
- 4xx: Signals that there is something wrong with the request received from the client. Common codes in this category are 401 (Bad Request), 403 (Forbidden), and 403 (Not Found).
- 5xx: Signals an error on the server side. Common status codes in this category are 500 (Internal Error), 503 (Service Unavailable), and 504 (Gateway Timeout).
– Message body: Understanding how to construct the message body. If model-driven programmability is used, the message body will depend on two things:
- Syntax rules governed by the encoding used: a message encoded in XML will have different syntax rules than a message encoded in JSON, even if both are intended to accomplish the same task
- Semantics rules governed by the data model used: You may target the same resource and accomplish the same end result using two (or more) different message bodies, each depending on the hierarchy of elements defined by the referenced data model.
– Headers: Understanding which headers to include in your request message is very important to get the results you want. For example, in Figure 1 the first header right after the start line Accept: application/yang-data+json is the client’s way of telling the server (the DevNet IOS-XE router/sandbox in this case) that it will only accept the requested resource (the interface operational data) encoded in JSON. If this field was application/yang-data+xml, the server’s response body would have been encoded in XML instead. Header values in response messages also provide valuable information related to the server on which the resource resides (called origin server), any cache servers in the path, the resources returned, as well as information that will assist to troubleshoot error conditions in case the transaction did not go as intended.
HTTP started off at version 0.9, then version 1.0. The current version is 1.1 and is referred as HTTP/1.1. Most of HTTP/1.1 is defined in the six RFCs 7230 – 7235, each RFC covering a different functional part of the protocol.
HTTP/2 is also in use today, however, RFC 7540 states that “This specification [HTTP/2.0] is an alternative to, but does not obsolete, the HTTP/1.1 message syntax. HTTP’s existing semantics remain unchanged.” This means that HTTP/2.0 does not change the message format of HTTP/1.1. It simply introduces some enhancements to HTTP/1.1. Therefore, everything you have read so far in this blog post remains valid for HTTP/2.
HTTP/2 is based on a protocol called SPDY developed Google. HTTP/2 introduces a new framing format that breaks up an HTTP message into a stream of frames and allows multiplexing frames from different streams on the same TCP connection. This, along with several other enhancements and features promise a far superior performance over HTTP/1.1. The gRPC protocol is based on HTTP/2.
It may come as a surprise to some, but HTTP/3 is also under active development, however, it is not based on TCP altogether. HTTP/3 is based on another protocol called QUIC initially developed by, as you may have guessed, Google, then later adopted by the IETF and described in draft-ietf-quic-transport. HTTP/3 takes performance to whole new level. However, HTTP/3 is still in its infancy.
HTTP uses the Authorization, WWW-Authenticate, Proxy-Authorization and Proxy-Authenticate headers for authentication. However, in order to provide data confidentiality and integrity, HTTP is coupled with Transport Layer Security (TLS 1.3). HTTP over TLS is called HTTPS for HTTP Secure.
But what does HTTP have to do with REST and RESTful APIs ?
As you have read in Part 2 of this series, REST is a framework for developing APIs. It lays down 6 constraints, 5 mandatory and 1 optional. As a reminder, here are the constraints:
- Client-Server based
- Stateless
- Cacheable
- Have a uniform interface
- Based on a layered system
- Utilize code-on-demand (Optional)
In a nutshell, HTTP is the protocol that is leveraged to implement an API that complies with these constraints. But again, what does all this mean?
As you already know by now, HTTP is a client-server protocol. That’s the first REST constraint.
HTTP is a stateless protocol, as required by the second constraint, because when a server sends back a response to a client request, the transaction is completed and no state information pertaining to this specific transaction is maintained on the server. Any single client request contains all the information required to fully understand and process this request, independent of any previous requests.
Ever heard of cache servers ? An HTTP resource may be cached at intermediate cache servers along the path between the client and server if labeled as cacheable by the sending endpoint. Moreover, HTTP defines a number of header fields to support this functionality. Therefore, the third REST constraint is satisfied.
HTTP actually does not deal with resources, but rather with representations of these resources. Data retrieved from a server may be encoded in JSON or XML. Each of these is a different representation of the resource. A client may send a POST request message to edit the configuration of an interface on a router, and in the process, communicates a desired state for a resource, which, in this case, is the interface configuration. Therefore, a representation is used to express a past, current or desired state of a resource in a format that can be transported by HTTP, such as JSON, XML or YAML. This is actually where the name REpresentational State Transfer (REST) comes from.
The concept of representations takes us directly to the fourth constraint: regardless of the type of resource or the characteristics of the resource representation expressed in a message, HTTP provides the same interface to all resources. HTTP adheres to the fourth constraint by providing a uniform interface for clients to address resources on servers.
The fifth constraint dictates that a system leveraging RESTful APIs should be able to support a layered architecture. A layered architecture segregates the functional components into a number of hierarchical layers, where each layer is only aware of the existence of the adjacent layers and communicates only with those adjacent layers. For example, a client may interact with a proxy server, not the actual HTTP server, while not being aware of this fact. On the other end of the connection, a server processing and responding to client requests in the frontend may rely on an authentication server to authenticate those clients.
The final constraint, which is an optional constraint, is support for Code on Demand (CoD). CoD is the capability of downloading software from the server to the client, to be executed by the client, such as Java applets or JavaScript code downloaded from a web site and run by the client web browser.
Therefore, by providing appropriate, REST-compliant transport to a protocol in order to expose an API to the external world, HTTP makes that protocol or API RESTful.
Are you still wondering what is HTTP, REST and RESTful APIs ?
JSON – JavaScript Object Notation
Similar to XML, JSON is used to encode the data in the body of HTTP messages. As a matter of fact, the supported encoding is decided by the protocol used, not by HTTP. NETCONF only supports XML while RESTCONF supports both XML and JSON. Other APIs may only support JSON. Since XML was covered in Part 2 of this series, we will cover JSON in this part.
Unlike XML, that was developed to be primarily machine-readable, JSON was developed to be a human-friendly form of encoding. JSON is standardized in RFC 8259. JSON is much simpler than XML and is based on four simple rules:
- Represent your objects as key-value pairs where the key and value are separated with a colon
- Enclose each object in curly braces
- Enclose arrays in square brackets (more on arrays in minute)
- Separate objects or array values with commas
Let’s start with a very simple example – an IP address:
{“ip”: “10.20.30.40”}
The object here is enclosed in curly braces as per rule #2. The key (ip) and value (10.20.30.40) are separated by a colon as per rule #1. Keep in mind that the key must be a string and therefore will always be enclosed in double quotes. The value is also a string in the example since it is enclosed in double quotes. Generally, a value may be any of the following types:
- String: such as “Khaled” – always enclosed in double quotes
- Number: A positive, negative, fraction, or exponential number, not enclosed in quotes
- Another JSON object: shown in the next example
- Array: An ordered list of values (of any type) such as [“Khaled”,“Mohammed”,“Abuelenain”]
- Boolean: true or false
- null: single value of null
A very interesting visual description of value types is given here: https://www.json.org/.
Now assume that there is an object named address that has two child JSON objects, ip and netmask. That will be represented as follows:
{
  "address": {
    "ip": "100.100.100.100",
    "netmask": "255.255.255.255"
  }
}
Notice that the objects ip and netmask are separated by a comma as per rule #4.
What if the address object needs to hold more than one IP address (primary and secondary) ? Then it can be represented as follows:
{
  "address": [
    {
      "ip": "100.100.100.100",
      "netmask": "255.255.255.255"
    },
    {
      "ip": "200.200.200.200",
      "netmask": "255.255.255.255"
    }
  ]
}
In this example, address is a JSON object whose value is an array, therefore, everything after the colon following the key is enclosed in square brackets. This array has two values, each an JSON object in itself. So this is an array of objects. Notice that the in addition to the comma separating the ip and netmask objects inside each object, there is also a comma after the closing curly brace around the middle of the example. This comma separates the two values of the array.
And that’s about all you need to know about JSON !
Standards-based vs. Native RESTful APIs: RESTCONF & NX-API REST
As you have seen in the previous section, any RESTful protocol/API employing HTTP at the Transport Layer (of the programmability stack – NOT the OSI 7-layer model) will need to define three things:
- What encoding(s) does it supports (XML, JSON, YAML, others) ?
- How to construct a URI to target a specific resource ? A URI is a hierarchical way of addressing resources, and in its absolute form, a URI will uniquely identify a specific resource. Each protocol will define a different URI hierarchy to achieve that.
- Which data models are supported and, combined with point number 1 above, will decide what the message body will look like.
RESTCONF is a standards-based RESTful API defined in RFC 8040. RESTCONF is compatible with NETCONF and is sometimes referred to as the RESTful version of NETCONF. This means that they can both coexist on the same platform without conflict. Although RESTCONF supports a single “conceptual” datastore, there are a set of rules that govern the interaction of RESTCONF with NETCONF with respect to datastores and configuration. While NETCONF support XML only, RESTCONF supports both XML and JSON. RESTCONF supports the same YANG data models supported by NETCONF. Therefore, a message body in RESTCONF will be model-based just as you have seen with NETCONF, with a few caveats. However, RESTCONF only implements a subset of the functions of NETCONF.
The architectural components of RESTCONF can be summarized by the 4-layer model in Figure 3. The 4 layers are Transport, Messages, Operations and Content. Just like NETCONF.
 Figure 3 – The RESTONF architectural 4-Layer model
Now to the RESTful part of RESTCONF. RESTCONF supports all HTTP methods discussed so far. The key to understanding RESTCONF then is to understand how to construct a URI to target a resource. While it is out of scope of this (very) brief introductory post to get into the fine details of the protocol, it is important to get at least a glimpse of RESTCONF URI construction, as it is the single most important factor differentiating the protocol right after its compatibility with NETCONF. The resource hierarchy for RESTCONF is illustrated in Figure 4.
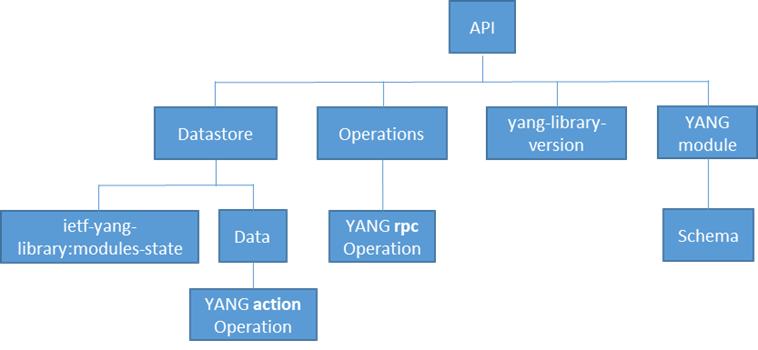 Figure 4 – Resource hierarchy in RESTCONF
The branch of this hierarchy that relates to configuration management and datastores is
API -> Datastore -> Data. A URI in RESTCONF has the general format of
https://device_address:port/API_Resource/Datastore_Resource/Resource-Path
Without getting into too much details, the Cisco implementation of RESTCONF uses the string restconf as the value of the API Resource and the string data as the value of the Datastore Resource. So on the DevNet IOS-XE Sandbox, for example, all RESTCONF URIs will start with https://sandbox-iosxe-latest-1.cisco.com:443/restconf/data/. In the next section you see how to configure a loopback address using a RESTCONF URI and a YANG data model.
Now on the other side of the spectrum are native RESTful APIs. Native RESTful APIs are vendor-specific and are usually platform specific as well. On example of a RESTful API that is widely used by the programmability community is NX-API REST that is exposed by programmable Nexus switches. NX-API REST is a RESTful API that uses HTTP request and response messages composed of methods, URIs, data models and status codes, like all other RESTful APIs. However, this API uses a Cisco-specific data model called the Management Information Tree (MIT). The MIT is composed of Managed Objects (MO). Each MO represents a feature or element on the switch that can be uniquely targeted by a URI.
When the switch receives an HTTP request to an NX-API REST URI, an internal Data Management Enginer (DME) running on the switch validates the URI, substitutes missing values with default values, where applicable, and, if the client is authorized to perform the method stated in the client request, the MIT is updated accordingly.
Similar to RESTCONF, NX-API REST supports payload bodies in both XML and JSON.
Again, due to the nature of this blog post, it will not be possible to dig deep into the details of the MIT to learn how to construct URIs for this native API, but you can find great guidance in the following documents:
- Open NX-OS Documentation
- Cisco Nexus 3000 and 9000 Series NX-API REST Documentation
- Cisco Nexus 3000 and 9000 Series NX-API REST SDK User Guide and API Reference, Release 9.3(x)
RESTful APIs and Python
The requests package has been developed to abstract the implementation of an HTTP client using Python. The Python Software Foundation recommends using the requests package whenever a “higher-level” HTTP client-interface is needed (https://docs.python.org/3/library/urllib.request.html).
The requests package is not part of the standard Python library, therefore it has to be manually installed using pip. Example 1 shows the installation of requests using pip3.7.
Example 1 Installing the requests package using pip
[kabuelenain@server1 ~]$ sudo pip3.7 install requests

Collecting requests

  Using cached https://files.pythonhosted.org/packages/51/bd/23c926cd341ea6b7dd0b2a00aba99ae0f828be89d72b2190f27c11d4b7fb/requests-2.22.0-py2.py3-none-any.whl

Requirement already satisfied: idna<2.9,>=2.5 in /usr/local/lib/python3.7/site-packages (from requests) (2.7)

Requirement already satisfied: certifi>=2017.4.17 in /usr/local/lib/python3.7/site-packages (from requests) (2018.10.15)

Requirement already satisfied: chardet<3.1.0,>=3.0.2 in /usr/local/lib/python3.7/site-packages (from requests) (3.0.4)

Requirement already satisfied: urllib3!=1.25.0,!=1.25.1,<1.26,>=1.21.1 in /usr/local/lib/python3.7/site-packages (from requests) (1.24.1)

Installing collected packages: requests

Successfully installed requests-2.22.0

[kabuelenain@server1 ~]$
After the requests package is installed, you are ready to import it into your code. Using the requests package is primarily based on creating a response object, and then extracting the required information from that response object.
The simplified syntax for creating a response object is:
Response_Object = requests.method(uri, headers=headers, data=message_body)
To create an object for a GET request, in place of requests.method, use requests.get. For a POST request, use requests.post, and so forth.
Replace the uri parameter in the syntax with the target URI. The headers parameter will hold the headers and the data parameter will hold the request message body. The uri should be a string, the headers parameter should be a dictionary and the data parameter may be provided as a dictionary, string, or list. The parameter data=payload may be replaced by json=payload, in which case the payload will be encoded into JSON automatically.
Some of the information that you can extract from the Response Object is:
- Response_Object.content: The response message body (data) from the server as a byte object (not decoded).
- Response_Object.text: The decoded response message body from the server. The encoding is chosen automatically based on an “educated guess”.
- Response_Object.encoding: The encoding used to convert Response_Object.content to Response_Object.text. You can manually set this to a specific encoding of your choice.
- Response_Object.json(): The decoded response message body (data) from the server encoded in json, if the response resembles a json object (otherwise an error is returned).
- Response_Object.url: The full (absolute) target uri used in the request.
- Response_Object.status_code: The response status code.
- Response_Object.request.headers: The request headers.
- Response_Object.headers: The response headers.
In Example 2, a POST request is sent to the DevNet IOS-XE Sandbox to configure interface Loopback123. Looking at the URI used, you can guess that the Python script is consuming the RESTCONF API exposed by the router. Also, from the URI as well as the message body, it is evident that the YANG model used in this example is ietf-interfaces.yang (available at https://github.com/YangModels/yang/tree/master/vendor/cisco/xe/1731).
Example 2 POST request using the requests package to configure interface Loopback123
#!/usr/bin/env python3

import requests

url = 'https://sandbox-iosxe-latest-1.cisco.com:443/restconf/data/ietf-interfaces:interfaces/'

headers = {'Content-Type': 'application/yang-data+json',
    'Authorization': 'Basic ZGV2ZWxvcGVyOkMxc2NvMTIzNDU='}
payload = '''
{
  "interface": {
    "name": "Loopback123",
    "description": "Creating a Loopback interface using Python",
    "type": "iana-if-type:softwareLoopback",
    "enabled": true,
    "ietf-ip:ipv4": {
      "address": {
        "ip": "10.0.0.123",
        "netmask": "255.255.255.255"
      }
    }
  }
}
'''

Response_Object = requests.post(url,headers=headers,data=payload,verify=False)

print('The server response (data) as a byte object: ','\n\n',Response_Object.content,'\n')

print('The decoded server response (data) from the server: ','\n\n',Response_Object.text,'\n')

print('The encoding used to convert Response_Object.content to Response_Object.text: ','\n\n', Response_Object.encoding,'\n')

print('The full (absolute) URI used in the request: ','\n\n',Response_Object.url,'\n')

print('The response status code: ','\n\n',Response_Object.status_code,'\n')

print('The request headers: ','\n\n',Response_Object.request.headers,'\n')

print('The response headers :','\n\n',Response_Object.headers,'\n')
Example 3 shows the result from running the previous script.
Example 7-3 Running the script and creating interface Loopback123
[kabuelenain@server1 Python-Scripts]$ ./int-loopback-create.py

/usr/lib/python3.6/site-packages/urllib3/connectionpool.py:847: InsecureRequestWarning: Unverified HTTPS request is being made. Adding certificate verification is strongly advised. See: https://urllib3.readthedocs.io/en/latest/advanced-usage.html#ssl-warnings

  InsecureRequestWarning)

The server response (data) as a byte object:

 b''

The decoded server response (data) from the server:

The encoding used to convert Response_Object.content to Response_Object.text:

 ISO-8859-1

The full (absolute) URI used in the request:

 https://sandbox-iosxe-latest-1.cisco.com:443//restconf/data/ietf-interfaces:interfaces/

The response status code:

 201

The request headers:

 {'User-Agent': 'python-requests/2.20.0', 'Accept-Encoding': 'gzip, deflate', 'Accept': '*/*', 'Connection': 'keep-alive', 'Content-Type': 'application/yang-data+json', 'Authorization': 'Basic ZGV2ZWxvcGVyOkMxc2NvMTIzNDU=', 'Content-Length': '364'}

The response headers :

 {'Server': 'nginx/1.13.12', 'Date': 'Fri, 13 Nov 2020 11:00:28 GMT', 'Content-Type': 'text/html', 'Content-Length': '0', 'Connection': 'keep-alive', 'Location': 'https://sandbox-iosxe-latest-1.cisco.com/restconf/data/ietf-interfaces:interfaces/interface=Loopback123', 'Last-Modified': 'Fri, 13 Nov 2020 11:00:14 GMT', 'Cache-Control': 'private, no-cache, must-revalidate, proxy-revalidate', 'Etag': '"1605-265214-914179"', 'Pragma': 'no-cache'}

[kabuelenain@server1 Python-Scripts]$
As you can see, the status code returned in the server response message is 201 (Created) which means that the Loopback interface was successfully created. You may have noticed that the message body (actual data in the message) is empty, since there is nothing to return back to the client. However, the Location header in the response headers (highlighted in the example) returns a new URI that points to the newly created resource.
This is it for today ! Thank you for reading this post and please do let us know what you think in the comments section below, and whether you have any questions, comments or suggestions for future posts.
Related Resources
- Visit the DevNet Networking Dev Center to learn more network programming and Cisco networking platforms.
- Learn about Cisco’s professional DevNet Certifications
We’d love to hear what you think. Ask a question or leave a comment below.
And stay connected with Cisco DevNet on social!
Twitter @CiscoDevNet | Facebook | LinkedIn
Visit the new Developer Video Channel


This is GOLD!!!!
Thank you very much Trevor. Glad you liked it.
very insightful thank you the wizard
Thank you very much Verlaine. I’m glad you found it insightful and useful.
Very informative but so much to learn.
Thank you very much