
Previous posts in the NetDevOps Series are available here. This is part 1 of 3, on how to run your own demo using CI/CD pipelines for network configuration management.
Now that you know about some of the most important building blocks for programmability, it is time to see them working together and how they are used to build business-relevant solutions that help managing our networks. And what better way to learn about them than getting our hands dirty by going through some demos?
The following demo requires a DevNet sandbox: an environment where you have all the required platforms and elements that you will need for those demos. In our case we need a big server to run VIRL simulations for all network devices we will discuss later, and another server to run our VCS, NSO, etc.
You may find the required sandbox for our demo using this link, and reserve it for up to one week exclusively for you!
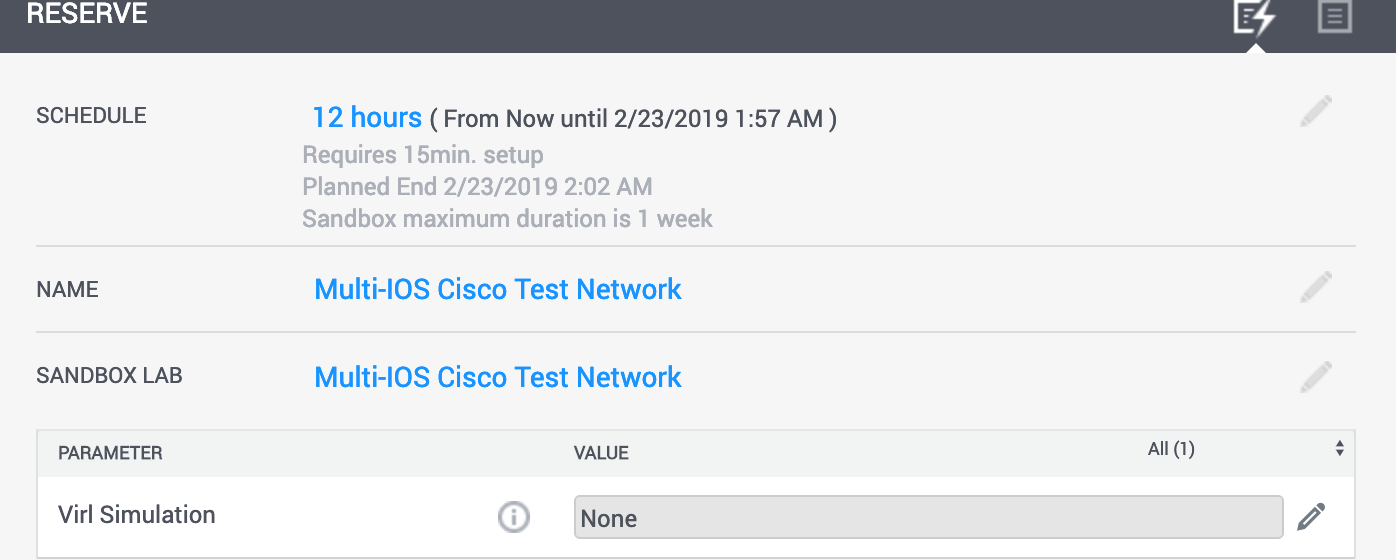
Note: when doing the reservation please choose ‘None’ for simulation, as we will be launching the required topologies as part of the setup process.
Spinning up the whole system will take roughly 15 mins, so please look at this strangely satisfying pendulum while we get everything ready for you.

Once the setup is ready you will receive an email with all required information to VPN into your sandbox. If you do not have a VPN client you may download AnyConnect here. Connect to your VPN and you are now ready to start working on your demos!
Automating network configuration from testing to production
NetDevOps will deliver consistent version-controlled infrastructure configurations, deployed with parallel and automated provisioning.
And what better way of understanding the real benefits of NetDevOps than building your own setup and seeing how it works? The goal will be to create a complete environment that demonstrates the following benefits across the whole network:
- Track the status of network configurations at any point in time
- Track who proposed and approved each specific configuration change
- Provide visibility on what are the differences of configurations at any point in time vs a previous situation
- Enable rollback to any previous moment in time
- Provide syntax-checking capabilities for network changes in your own local workstation
- Automate the deployment of any proposed change across different environments (eg. testing, staging, production)
- Model simulated virtual environments to test proposed changes before going to production
- Define and run the required tests set and passing criteria, both in testing and production, before accepting a change as successful
- Automatically rollback any proposed configuration that does not pass the tests set
These are the building blocks we will use to provide such a comprehensive demonstration:
- GitLab: Version Control Server (VCS) with integration capabilities to provide automated pipelines
- Cisco Network Services Orchestrator: formerly Tail-f, it provides end-to-end automation to design and deliver services much faster
- pyATS: automation tool to perform stateful validation of network devices operational status with reusable test cases
- VIRL: network modelling and simulation environment
- Ansible: simple automation
GitLab setup
Open a terminal window (i.e., putty on Windows or terminal on OSX) and ssh to your devbox with the following credentials: developer/C1sco12345
$ ssh developer@10.10.20.50
Once in, clone the repository that includes all required files to build the setup into your devbox.
[developer@devbox ~]$git clone https://github.com/DevNetSandbox/sbx_multi_ios.git
With that, your sandbox devbox includes now all required info to start building the environment.
[developer@devbox ~]$cd sbx_multi_ios/gitlab
[developer@devbox gitlab]$./setup.sh
setup.sh will start and configure your Version Control Server, a GitLab instance inside a Docker container running in your devbox.
The process will take like 5 minutes, so check this out in the meanwhile.

Once your terminal shows the process is finished, you may check that your GitLab containers are running and how they offer their service in port 80.
[developer@devbox gitlab]$docker ps
CONTAINER ID IMAGE COMMAND CREATED STATUS PORTS NAMES
5cd18a397811 gitlab/gitlab-ce "/assets/wrapper" 2 days ago Up 2 days (healthy) 0.0.0.0:80->80/tcp, 0.0.0.0:4567->4567/tcp, 0.0.0.0:32769->22/tcp, 0.0.0.0:32768->443/tcp gitlab_gitlab_1
182c5937b931 gitlab/gitlab-runner "/usr/bin/dumb-init …" 2 days ago Up 2 days
Please point your browser to http://10.10.20.50, the IP address of your devbox (default port 80), and check that you can access your new GitLab service HTTP interface.
CI/CD setup
Now that GitLab is ready, go back to your terminal and let’s run the script to setup the complete CICD environment.
[developer@devbox gitlab]$cd ../cicd-3tier
[developer@devbox cicd-3tier]$./setup.sh
In this case setup.sh will perform the following actions:
- Launch the required VIRL simulations for two different environments: test and production
- Start NSO
- Import test and production network configurations from VIRL to NSO
- Synchronize devices configuration from NSO into VIRL simulations
- Create a new repo in GitLab and initialize it locally in your devbox
- Create locally in devbox the prod and test git branches and push them to GitLab
- List the status of VIRL nodes in production and test
This complete process will take like 10 minutes, so time for your fix.

Congrats, everything is now installed and ready!
VIRL verifications
Now you have two complete simulated environments running in your VIRL server: one for testing, and one replicating what would be a production physical network. Real world scenarios might be diverse: some customers may have a physical network in production, but only a simulated one for testing. Others might also have a real network for testing. Maybe even an additional one for staging and quality assurance before going to production. No matter how, the same principles apply to what we will be demonstrating. In our case the sandbox includes a couple of virtual environments, like the one depicted below, and implemented with VIRL for convenience.
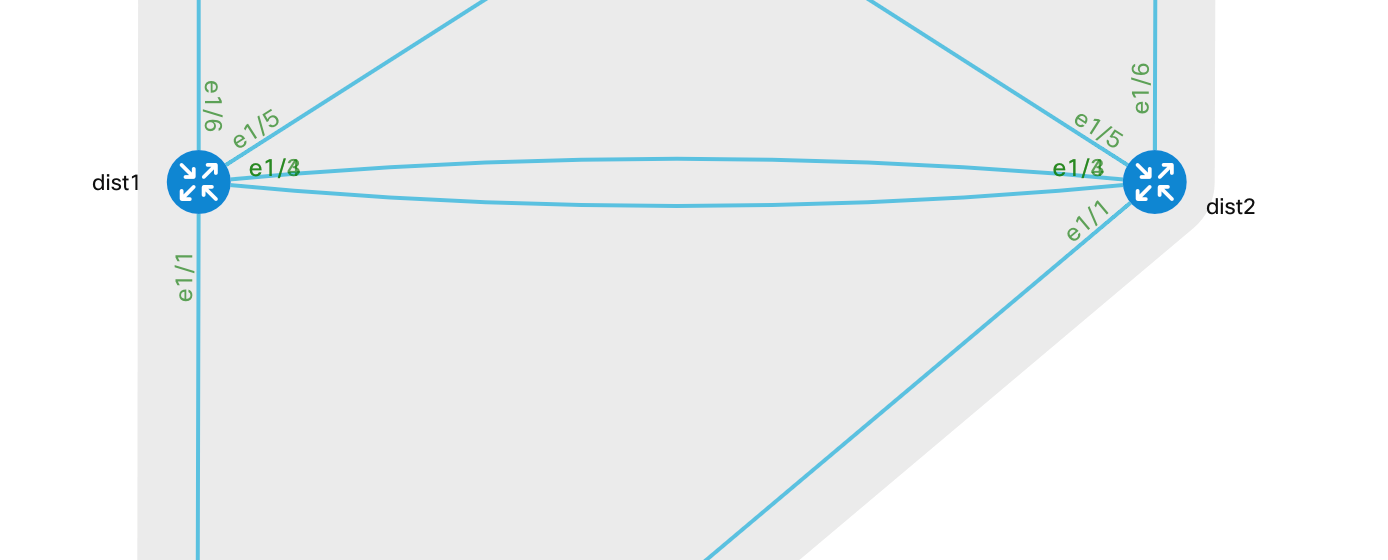
As you can see each environment includes a standard 3-tier architecture, with 2x IOS-XE routers in the Core, 2x NX-OS switches in Distribution, and another 2x NX-OS switches in the Access layer.
You may find VIRL definitions for these two environments at the following locations in your devbox:
-
/home/developer/sbx_multi_ios/cicd-3tier/virl/test/topology.virl -
/home/developer/sbx_multi_ios/cicd-3tier/virl/prod/topology.virl
Please make sure all your simulated routers are readily available (REACHABLE status) in both prod and test. If they are not, your demonstration will fail at different stages.
[developer@devbox test]$pwd
/home/developer/sbx_multi_ios/cicd-3tier/virl/test
[developer@devbox test]$virl nodes
Here is a list of all the running nodes
╒══════════════╤═════════════╤═════════╤═════════════╤════════════╤══════════════════════╤════════════════════╕
│ Node │ Type │ State │ Reachable │ Protocol │ Management Address │ External Address │
╞══════════════╪═════════════╪═════════╪═════════════╪════════════╪══════════════════════╪════════════════════╡
│ test-dist1 │ NX-OSv 9000 │ ACTIVE │ REACHABLE │ telnet │ 172.16.30.213 │ N/A │
├──────────────┼─────────────┼─────────┼─────────────┼────────────┼──────────────────────┼────────────────────┤
│ test-access1 │ NX-OSv 9000 │ ACTIVE │ REACHABLE │ telnet │ 172.16.30.215 │ N/A │
├──────────────┼─────────────┼─────────┼─────────────┼────────────┼──────────────────────┼────────────────────┤
│ test-dist2 │ NX-OSv 9000 │ ACTIVE │ REACHABLE │ telnet │ 172.16.30.214 │ N/A │
├──────────────┼─────────────┼─────────┼─────────────┼────────────┼──────────────────────┼────────────────────┤
│ test-core2 │ CSR1000v │ ACTIVE │ REACHABLE │ telnet │ 172.16.30.212 │ N/A │
├──────────────┼─────────────┼─────────┼─────────────┼────────────┼──────────────────────┼────────────────────┤
│ test-core1 │ CSR1000v │ ACTIVE │ REACHABLE │ telnet │ 172.16.30.211 │ N/A │
╘══════════════╧═════════════╧═════════╧═════════════╧════════════╧══════════════════════╧════════════════════╛
[developer@devbox test]$cd ../prod
[developer@devbox prod]$virl nodes
Here is a list of all the running nodes
╒═════════╤═════════════╤═════════╤═════════════╤════════════╤══════════════════════╤════════════════════╕
│ Node │ Type │ State │ Reachable │ Protocol │ Management Address │ External Address │
╞═════════╪═════════════╪═════════╪═════════════╪════════════╪══════════════════════╪════════════════════╡
│ core2 │ CSR1000v │ ACTIVE │ REACHABLE │ telnet │ 172.16.30.222 │ N/A │
├─────────┼─────────────┼─────────┼─────────────┼────────────┼──────────────────────┼────────────────────┤
│ core1 │ CSR1000v │ ACTIVE │ REACHABLE │ telnet │ 172.16.30.221 │ N/A │
├─────────┼─────────────┼─────────┼─────────────┼────────────┼──────────────────────┼────────────────────┤
│ access1 │ NX-OSv 9000 │ ACTIVE │ REACHABLE │ telnet │ 172.16.30.225 │ N/A │
├─────────┼─────────────┼─────────┼─────────────┼────────────┼──────────────────────┼────────────────────┤
│ dist2 │ NX-OSv 9000 │ ACTIVE │ REACHABLE │ telnet │ 172.16.30.224 │ N/A │
├─────────┼─────────────┼─────────┼─────────────┼────────────┼──────────────────────┼────────────────────┤
│ dist1 │ NX-OSv 9000 │ ACTIVE │ REACHABLE │ telnet │ 172.16.30.223 │ N/A │
╘═════════╧═════════════╧═════════╧═════════════╧════════════╧══════════════════════╧════════════════════╛
If any of the nodes stay in UNREACHABLE status please try the following options:
1. Go into the environment directory (prod or test) and restart the node.
[developer@devbox cicd-3tier]$cd virl/test
[developer@devbox test]$virl stop test-dist2
[developer@devbox test]$virl start test-dist2
2. If that does not work, then connect into that specific node (with virl ssh or virl console) and reboot it (password is cisco).
[developer@devbox test]$virl ssh core1
Attemping ssh connectionto core1 at 172.16.30.221
Warning: Permanently added '172.16.30.221' (RSA) to the list of known hosts.
cisco@172.16.30.221's password:

core1#reload
3. If it still refuses to cooperate, stop the whole environment…
[developer@devbox test]$cd /home/developer/sbx_multi_ios/cicd-3tier
[developer@devbox cicd-3tier]$./cleanup.sh
… and then restart it.
[developer@devbox cicd-3tier]$./setup.sh
Congrats, both of your VIRL environments are now ready!
See you next week to start configuring your local setup, stay tuned!
Any questions or comments please let me know in the comments section below, Twitter or LinkedIn.
Join DevNet to access the learning labs, docs, and sandboxes you need for network automation. And check out the NetDevOpsLive! webinar series, and this expert-led, video course for learning network programmability basics.
We’d love to hear what you think. Ask a question or leave a comment below.
And stay connected with Cisco DevNet on social!
Twitter @CiscoDevNet | Facebook | LinkedIn
Visit the new Developer Video Channel


