
 Guest blog by:
Jacob McGill
Network Automation Engineer
Network to Code
Ansible has quickly become a popular platform for network engineers to get started with network automation and eliminate repetitive day to day tasks. There have been Ansible plug-ins (in the form of modules) for Cisco IOS, NX-OS, and IOS-XR for quite some time, but only recently has support been added to Ansible for Cisco Application Centric Infrastructure (ACI).
In the latest Ansible release (version 2.4), thirty-two (32) Cisco ACI modules were added to Ansible core. This means you get this functionality as soon as you install Ansible! These modules allow you to manage ACI fabrics just like you’d manage any other device type with Ansible–through the use of resource-specific and idempotent tasks including one module that allows you to send any arbitrary JSON/XML object to the APIC.
Let’s take a look and see how to get started with these modules.
Basic Intro to Ansible
If you’re new to Ansible, you only need two things to start automating with Ansible: an inventory file (contains what devices you’re automating) and a playbook (contains your automation instructions).
ACI Inventory File
Our sample inventory file looks like this and it’s just pointing to the public always-on APIC Sandbox environment:

As you can see, it’s literally just one line in a text file. Note, in our example, we’re storing credentials in the inventory file as it’s the quickest way to highlight what Ansible can do for ACI. For production, you may want to check out Ansible Vault or Tower.
ACI Playbooks
Ansible uses playbooks written in YAML to define the tasks we want to execute against an ACI fabric (in this case). The playbook also defines which devices those tasks will be executed against.
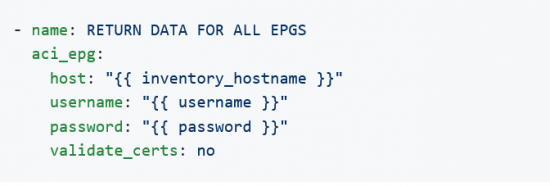
Here is a sample playbook that we use to retrieve tenant and EPG information from an existing ACI fabric. Note that many modules in Ansible support the state parameter with the values of present and absent, the ACI modules support a 3rd value called query that allows us to simply query and retrieve information for the given resource. In this context, a resource is either tenant data or EPG data.
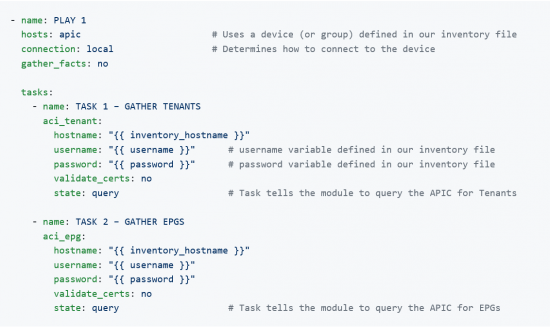
Executing the Playbook
You then invoke this playbook from your Linux terminal by using the ansible-playbook command and passing the inventory file and playbook file:
![]()
Note, we’ve add the -v verbose flag as this allows us to see the data being gathered from each task. You can subsequently write this data to a file using the copy or template modules to create nice automated reports.
Using ACI Resource Specific Modules
Now that you have an understanding of how to use and create a basic playbook using ACI modules, let’s take a deeper look. As stated already, the ACI modules support three state values:
- present – ensures the object exists and is configured per the task’s parameters
- absent – ensures the object does not exist
- query – retrieves configurations and state for the object or object type
The query state considers all ACI class parameters and returns the most specific results based on the parameters that are passed to the module.
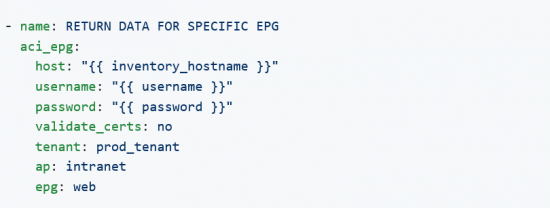
For example, this task will return just the data on the specific EPG called web:
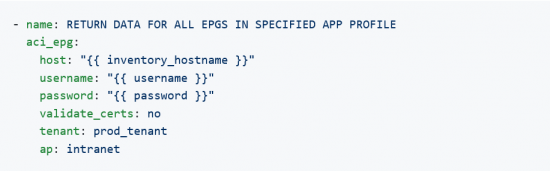
 This task will return all EPGs in the specified Application Profile, intranet, since the epg parameter is not provided:
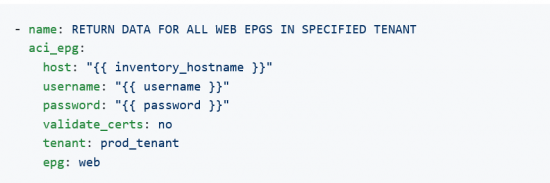
 This task will return all “web” EPGs in the specified Tenant regardless of Application Profile since the ap parameter is not provided:
This task will return all EPGs configured on the APIC since it does not pass any ACI class parameters:
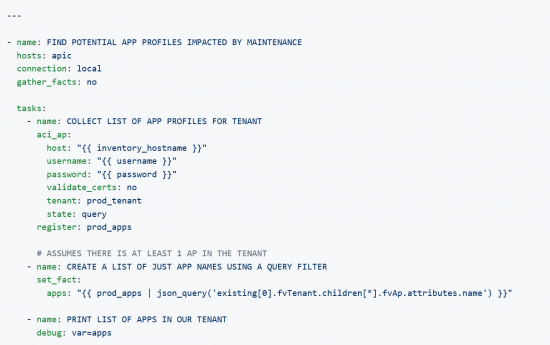
Each of the possible combinations have potential use cases; we will look at gathering all App Profiles for a specified tenant. This data could be useful to gather potential impacted Applications for a maintenance window. We will use the aci_ap module to collect the data, the set_fact module to extract just the useful data, and the debug module to display the App Profiles.
From the terminal, we can invoke this playbook and see the list of apps for the “prod_tenant”:
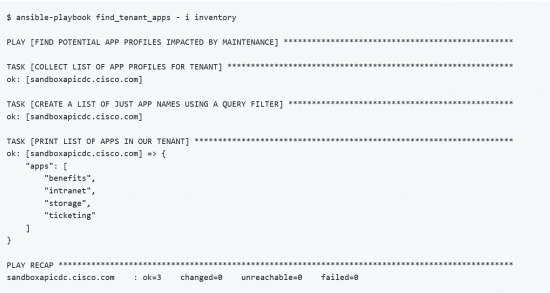
Note, in this case, we did not need to use the -v flag to see the data collected as we registered and saved the return data, massaged the data to just get the app names, and then printed them using the debug module.
The results from this execution show 4 apps belonging to the tenant, e.g. benefits, intranet, storage, and ticketing.
So far all we did was gather data simply because it’s a great way to start automating and many examples out there only focus on configuration. However, all you would need to do is change the state parameter to present to ensure a given configuration exist making it quite easy to either configure, un-configure, or simply query and fetch data from an APIC.
Finally, let’s take a look at the aci_rest module.
Using ACI REST Module
The aci_rest module allows us to make any request to the APIC. The previous modules were resource-specific, .e.g they’re purpose built for a given object like tenants, EPGs, contracts, filters, etc. The aci_rest is a “catch all” that allows you to make ANY API call, but it does require you to fully understand the API and the ACI object model.
We will focus on making GET requests, but if you start to use this for POST requests, the body can use YAML syntax if that is preferred over JSON or XML.
One of the extra abilities we get with the REST module is the ability to query for health, faults, and event-logs using query filters:
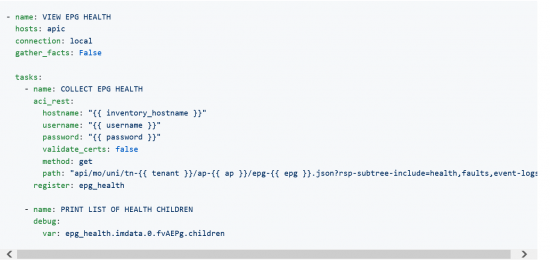
This playbook uses variables for the path as indicated by the double curly braces ({{ variable }}). We will pass these variables in as we call the playbook from the terminal as Ansible extra vars using the `–extra-vars command line flag.
Let’s take a look:
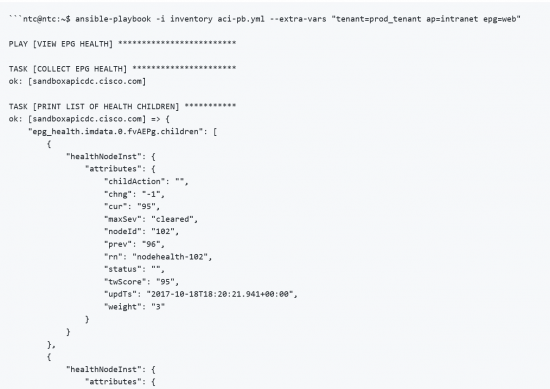
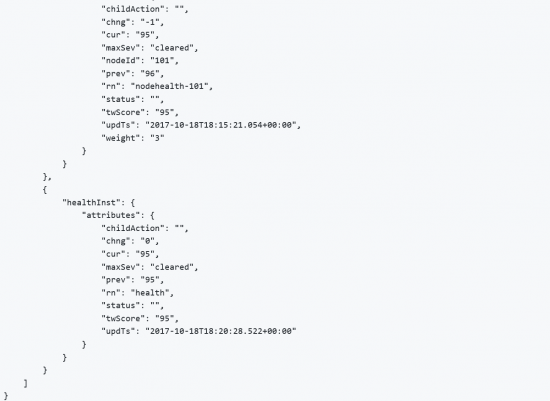
This example only had children for the “health” filter, so that is all that is returned. The EPG has a health score of “95” as do 2 of the nodes that have End Points connected to them; likely their is a minor issue with those two leaf nodes.
As you can see, the aci_rest module provides full access to the APIC REST API, but the downside is that it requires the user to know how to build the URL, including any query strings that help narrow the returned data.
This was meant purely to whet your appetite with getting started with Ansible to automate your ACI infrastructure. There is no need to be in the APIC GUI clicking around when you can leverage a platform like Ansible.
Interested to learn more? Check out the Introduction to using Ansible to automate ACI DevNet Learning Lab.
We’d love to hear what you think. Ask a question or leave a comment below.
And stay connected with Cisco DevNet on social!
Twitter @CiscoDevNet | Facebook | LinkedIn
Visit the new Developer Video Channel


