
I have had a number of questions about the best way to migrate from APIC-EM to DNA Center for Plug and Play (PnP) provisioning of devices. The PnP API was very popular in APIC-EM and both the PnP functionality as well as API have been enhanced in DNA Center. While the older workflow style API still exist in DNAC, they are relatively complex and have no UI component.
Transition approaches
I used to have two answers to the “how do I migrate” question. One approach was to transition (just use the workflow API), and the other was to transform (move to the new “site base” API).
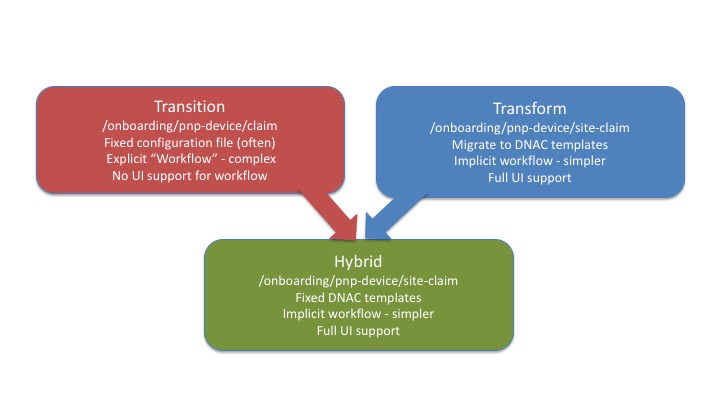
If you had static configuration files for devices (e.g. some other tool to generate them) you would typically choose the first option. If you were more interested in templates with variables, you would choose the second.
There is now a hybrid option, using the new site-claim API, with a “fixed” configuration template.
PnP API
First a look at the PnP API and how they work. There are two steps, 1) Add a device and 2) Claim a device.
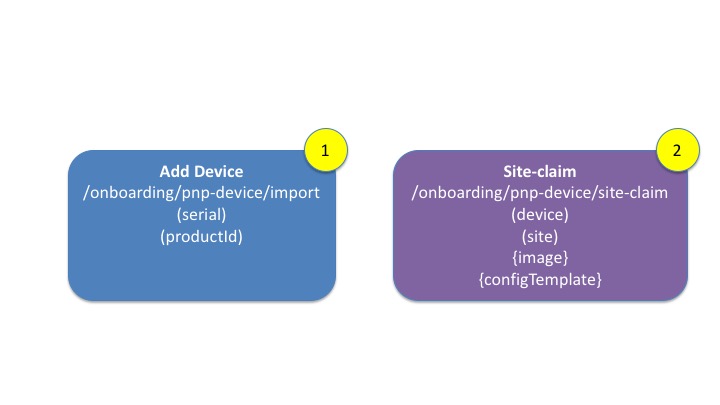
Step one adds the device to the PnP device table. This can happen in two ways, unplanned (where the device discovers DNA Center), or pre-planned (where the device is inserted into DNA Center). This step is unchanged from APIC-EM and uses the /import API endpoint. All that is required is the model of the device and the serial number.
Once the device is part of the PnP table, it can then be claimed. In the past, the workflow based API used the /claim API endpoint. The newer /site-claim API endpoint is now recommended. This requires a device (from step1) and a site. There are optional attributes for image upgrade and configuration template.
These steps are seen in the UI. The first device (“pre-planned”) has been added to DNA Center, but not claimed. The second device was added and claimed to a site. The source of both devices was “User” which indicates they were pre-planned as opposed to “Network” which indicates an un-planned device.

Using the Scripts
These scripts are available on github. The readme has instructions on installing them. The scripts use the dnacentersdk I described in this post.
The first step is to upload the configuration files as templates. These should be stored in the “Onboarding Configuration” folder.
$ ./00load_config_files.py --dir work_files/configs
Processing:switch1.cfg: adding NEW:Commiting e156e9e6-653d-4016-85bd-f142ba0659f8
Processing:switch3.cfg: adding NEW:Commiting 9ae1a187-422d-41b9-a363-aafa8724a5b2
Second step is to edit a CSV file contain the devices to be uploaded, and the configuration file. This file deliberately contains some errors (missing config file and missing image) as examples.
$ cat work_files/devices.csv
name,serial,pid,siteName,template,image
adam123,12345678902,c9300,Global/AUS/SYD5,switch1.cfg,cat3k_caa-universalk9.16.09.05.SPA.bin
adam124,12345678902,c9300,Global/AUS/SYD5,switch2.cfg,cat3k_caa-universalk9.16.09.05.SPA.bin
adam_bad_image,12345678902,c9300,Global/AUS/SYD5,switch2.cfg,cat3k_caa-universalk9.16.09.10.SPA.bin
Third step is to use the script to upload the devices into DNA Center. The missing configuration and missing image are flagged.
$ ./10_add_and_claim.py --file work_files/devices.csv
Device:12345678902 name:adam123 siteName:Global/AUS/SYD5 Status:PLANNED
##ERROR adam124,12345678902: Cannot find template:switch2.cfg
##ERROR adam_bad_image,12345678902: Cannot find image:cat3k_caa-universalk9.16.09.10.SPA.bin
adam_bad_image,12345678902,c9300,Global/AUS/SYD5,switch2.cfg,cat3k_caa-universalk9.16.09.10.SPA.bin
This will be reflected in the PnP page in DNA Center.
![]()
Under the Covers
Using the SDK abstracts the API. For those that want to understand the payloads in more detail, here is a deeper dive into the payloads.
Templates
The following API call will get the projectId for the “Onboarding Configuration” folder.
GET dna/intent/api/v1/template-programmer/project?name=Onboarding%20Configuration
The result will provide the UUID of the project. It also provides a list of the templates, so could be used to find the template. A different call is required to get the template body, as templates are versioned. The “id” below is the master template “id”
[
    {
        "name": "Onboarding Configuration",
        "id": "bfbb6134-8b1a-4629-9f5a-435a13dba75a",
        "templates": [

            {
                "name": "switch1.cfg",
                "composite": false,
                "id": "e156e9e6-653d-4016-85bd-f142ba0659f8"
            },
A better way to get the template is to call the template API with a projectId as a query parameter. It is not possible to lookup a template by name, the only option is to iterate through the list of results.
GET dna/intent/api/v1/template-programmer/template?projectId=bfbb6134-8b1a-4629-9f5a-435a13dba75a
Templates have versions. There is the master template Id, as well as an Id for each version. The example below only has one version “id”: “bd7cfeb9-3722-41ee-bf2d-a16a8ea6f23a”
{
        "name": "switch1.cfg",
        "projectName": "Onboarding Configuration",
        "projectId": "bfbb6134-8b1a-4629-9f5a-435a13dba75a",
        "templateId": "e156e9e6-653d-4016-85bd-f142ba0659f8",
        "versionsInfo": [
            {
                "id": "bd7cfeb9-3722-41ee-bf2d-a16a8ea6f23a",
                "author": "admin",
                "version": "1",
                "versionTime": 1590451734078
            }
        ],
        "composite": false
    }
To get the body of the template (to compare SHA hash), use the template API call, for the specific version.
GET dna/intent/api/v1/template-programmer/template/bd7cfeb9-3722-41ee-bf2d-a16a8ea6f23a
Will return the body. Templates apply to a productFamily and softwareType. These will be used when creating or updating templates.
{
    "name": "switch1.cfg",
    "tags": [],
    "author": "admin",
    "deviceTypes": [
        {
            "productFamily": "Switches and Hubs"
        }
    ],
    "softwareType": "IOS-XE",
    "softwareVariant": "XE",
    "templateContent": "hostname switch1\nint g2/0/1\ndescr nice  one\n",
    "templateParams": [],
    "rollbackTemplateParams": [],
    "composite": false,
    "containingTemplates": [],
    "id": "bd7cfeb9-3722-41ee-bf2d-a16a8ea6f23a",
    "createTime": 1590451731775,
    "lastUpdateTime": 1590451731775,
    "parentTemplateId": "e156e9e6-653d-4016-85bd-f142ba0659f8"
}
To add a new template, there are two steps. The template has to be created, then committed. The second step is the same as updating an existing template, which creates a new version. Notice the deviceTypes and softwareType are required.
POST dna/intent/api/v1/template-programmer/project/bfbb6134-8b1a-4629-9f5a-435a13dba75a/template
{
     "deviceTypes": [{"productFamily": "Switches and Hubs"}],
     "name": "switch4.cfg",
     "softwareType": "IOS-XE",
     "templateContent": "hostname switch4\nint g2/0/1\ndescr nice  four\n"
}
This will return a task, which needs to be polled.
{
       "response": {
                 "taskId": "f616ef87-5174-4215-b5c3-71f50197fe72",
                 "url": "/api/v1/task/f616ef87-5174-4215-b5c3-71f50197fe72"
        },
        "version": "1.0"
}
Polling the task
GET dna/intent/api/v1/task/f616ef87-5174-4215-b5c3-71f50197fe72
The status is successful and the templateId is “57371b95-917b-42bd-b700-0d42ba3cdcc2”
{
  "version": "1.0",
  "response": {
    "username": "admin",
    "rootId": "f616ef87-5174-4215-b5c3-71f50197fe72",
    "serviceType": "NCTP",
    "id": "f616ef87-5174-4215-b5c3-71f50197fe72",
    "version": 1590468626572,
    "startTime": 1590468626572,
    "progress": "Successfully created template with name switch4.cfg",
    "instanceTenantId": "5d817bf369136f00c74cb23b",
    "endTime": 1590468626670,
    "data": "57371b95-917b-42bd-b700-0d42ba3cdcc2",
    "isError": false
  }
}
The final step is to commit the change to the template.
POST dna/intent/api/v1/template-programmer/template/version
{
  "templateId": "57371b95-917b-42bd-b700-0d42ba3cdcc2"
}
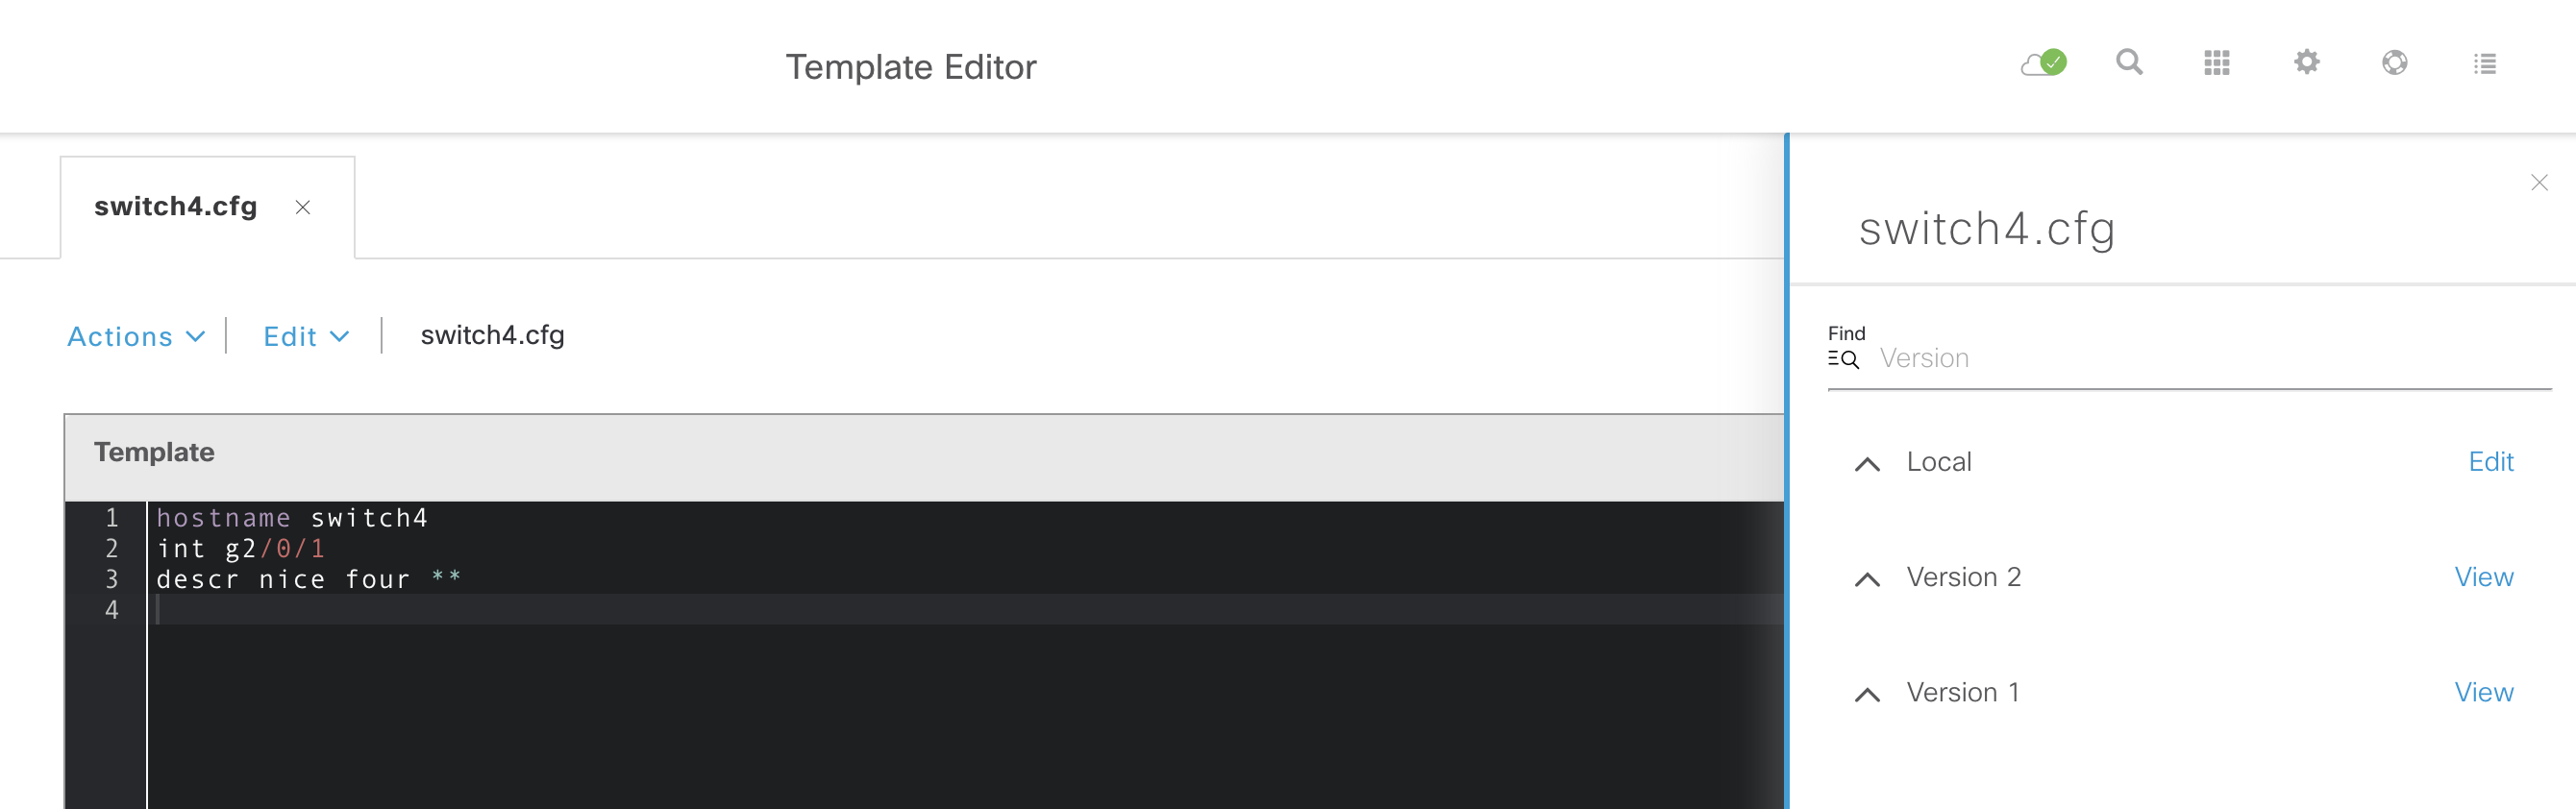
To update an existing template, it is a PUT rather than POST. Again, the deviceTypes and softwareType are required.
PUT dna/intent/api/v1/template-programmer/template
{
 "deviceTypes": [ { "productFamily": "Switches and Hubs" } ],
 "id": "57371b95-917b-42bd-b700-0d42ba3cdcc2",
 "name": "switch4.cfg",
 "softwareType": "IOS-XE",
 "templateContent": "hostname switch4\nint g2/0/1\ndescr nice four **\n"
}
Again, a task is returned, which needs to be polled.
{
  "version": "1.0",
  "response": {
    "username": "admin",
    "rootId": "52689b1e-e9b8-4a60-8ae9-a574bb6b451c",
    "serviceType": "NCTP",
    "id": "52689b1e-e9b8-4a60-8ae9-a574bb6b451c",
    "version": 1590470080172,
    "startTime": 1590470080172,
    "progress": "Successfully updated template with name switch4.cfg",
    "instanceTenantId": "5d817bf369136f00c74cb23b",
    "endTime": 1590470080675,
    "data": "57371b95-917b-42bd-b700-0d42ba3cdcc2",
    "isError": false
  }
}
The final step is to commit the change, as when first creating the template. The UI will show two versions of this template.
Site
To find the siteId, a simple lookup is used, with the name as a query parameter. This is the fully qualified name of the site.
GET dna/intent/api/v1/site?name=Global/AUS/SYD5
This will return the siteId.
{
  "response" : [ {
    "parentId" : "ace74caf-6d83-425f-b0b6-05faccb29c06",
    "systemGroup" : false,
    "additionalInfo" : [ {
      "nameSpace" : "Location",
      "attributes" : {
        "country" : "Australia",
        "address" : "177 Pacific Highway, North Sydney New South Wales 2060, Australia",
        "latitude" : "-33.837053",
        "addressInheritedFrom" : "d7941b24-72a7-4daf-a433-0cdfc80569bb",
        "type" : "building",
        "longitude" : "151.206266"
      }
    }, {
      "nameSpace" : "ETA",
      "attributes" : {
        "member.etaCapable.direct" : "2",
        "member.etaReady.direct" : "0",
        "member.etaNotReady.direct" : "2",
        "member.etaReadyNotEnabled.direct" : "0",
        "member.etaEnabled.direct" : "0"
      }
    } ],
    "groupTypeList" : [ "SITE" ],
    "name" : "SYD5",
    "instanceTenantId" : "5d817bf369136f00c74cb23b",
    "id" : "d7941b24-72a7-4daf-a433-0cdfc80569bb",
    "siteHierarchy" : "80e81504-0deb-4bfd-8c0c-ea96bb958805/ace74caf-6d83-425f-b0b6-05faccb29c06/d7941b24-72a7-4daf-a433-0cdfc80569bb",
    "siteNameHierarchy" : "Global/AUS/SYD5"
  } ]
}
Image
To find the imageid, for upgrading software, search for the image by imageName. NOTE, on some platforms this is different to name.
GET dna/intent/api/v1/image/importation?imageName=cat3k_caa-universalk9.16.09.05.SPA.bin
Returns the imageUuid, and a lot of other information about the image, including model numbers etc.
{
    "response": [
        {
            "imageUuid": "04d69fe0-d826-42e9-82c0-45363a2b6fc7",
            "name": "cat3k_caa-universalk9.16.09.05.SPA.bin",
            "family": "CAT3K_CAA",
            "version": "16.9.5",
            "md5Checksum": "559bda2a74c0a2a52b3aebd7341ff96b",
            "shaCheckSum": "a01d8ab7121e50dc688b9a2a03bca187aab5272516c0df3cb7e261f16a1c8ac355880939fd0c24cc9a79e854985af786c430d9b704925e17808353d70bf923f4",
            "createdTime": "2020-05-26 04:20:42.904",
            "imageType": "SYSTEM_SW",
            "fileSize": "450283034 bytes",
            "imageName": "cat3k_caa-universalk9.16.09.05.SPA.bin",
            "applicationType": "",
            "feature": "",
            "fileServiceId": "94eccf65-a1dd-47ca-b7c4-f5dd1a8cdeb7",
            "isTaggedGolden": false,
            "imageSeries": [
                "Switches and Hubs/Cisco Catalyst 3850 Series Ethernet Stackable Switch",
                "Switches and Hubs/Cisco Catalyst 3650 Series Switches"
            ],
Add Device
To add the device, supply a serialNumber, and pid. The name is optional. The aaa parameters are not used prior to DNAC 1.3.3.7. They are used to solve an issue with “aaa command authorization”.
POST dna/intent/api/v1/onboarding/pnp-device/import
[
  {
    "deviceInfo": {
      "serialNumber": "12345678902",
      "aaaCredentials": {
        "username": "",
        "password": ""
      },
      "userSudiSerialNos": [],
      "hostname": "adam123",
      "pid": "c9300",
      "sudiRequired": false,
      "stack": false
    }
  }
]
The response contains the deviceId, other attributes have been removed for brevity. At this point the device appears in PnP, but is unclaimed.
{
                 "successList": [
                     {
                         "version": 2,
                         "deviceInfo": {
                             "serialNumber": "12345678902",
                             "name": "12345678902",
                             "pid": "c9300",
                             "lastSyncTime": 0,
                             "addedOn": 1590471982430,
                             "lastUpdateOn": 1590471982430,
                             "firstContact": 0,
                             "lastContact": 0,
                             "state": "Unclaimed",

                         "tenantId": "5d817bf369136f00c74cb23b",
                         "id": "5eccad2e29da7c0008613b69"
                     }
Site-Claim
To claim the device to a site, use the siteId, imageId, templateId(configId) from earlier steps. Notice the master templateId is used, rather than a specific version. The master gets the latest version of the template by default. The type should be “Default”. If you are using a stack, then the type would be “StackSwitch”. Wireless Access points will set the type field to “AccessPoint”.
POST dna/intent/api/v1/onboarding/pnp-device/site-claim
{
  "configInfo": {
    "configId": "e156e9e6-653d-4016-85bd-f142ba0659f8",
    "configParameters": []
  },
  "type": "Default",
  "siteId": "d7941b24-72a7-4daf-a433-0cdfc80569bb",
   "deviceId": "5eccad2e29da7c0008613b69",
  "imageInfo": {
    "skip": false,
    "imageId": "04d69fe0-d826-42e9-82c0-45363a2b6fc7"
  }
}
The response shows success, and this is reflected in the PnP UI.
{
      "response": "Device Claimed",
      "version": "1.0"
}
More on Stacks
One major innovation in DNAC PnP is support for stack renumbering. Prior to this, it was recommended that stack members be powered on two minutes apart, from top to bottom. This was to ensure a deterministic interface numbering. Stack renumbering is a much better solution to this problem. One of two stack cabling methods can be used, and the serial number of the top-of-stack switch is required.
There are two implications for API calls for the pre-planned workflow. The first is for the add device call. The stack parameter needs to be set to True.
POST dna/intent/api/v1/onboarding/pnp-device/import
[
  {
    "deviceInfo": {
      "serialNumber": "12345678902",
      "aaaCredentials": {
        "username": "",
        "password": ""
      },
      "userSudiSerialNos": [],
      "hostname": "adam123",
      "pid": "c9300",
      "sudiRequired": false,
      "stack": true
    }
  }
]
The second is the site-claim. The type needs to be changed to “StackSwitch” and two extra attributes are required.
Note: The topOfStackSerialNumber has to be the same as the serial number used to add the device. In other words, add the device with the serial number you intend to use for the top of stack. It does not matter which switch in the stack initiates contact, as the stack will provide all serial numbers to DNAC.
POST dna/intent/api/v1/onboarding/pnp-device/site-claim
{
  "configInfo": {
    "configId": "e156e9e6-653d-4016-85bd-f142ba0659f8",
    "configParameters": []
  },
  "type": "StackSwitch",
  "topOfStackSerialNumber":"12345678902",
  "cablingScheme":"1A",

  "siteId": "d7941b24-72a7-4daf-a433-0cdfc80569bb",
  "deviceId": "5eccad2e29da7c0008613b69",
  "imageInfo": {
    "skip": false,
    "imageId": "04d69fe0-d826-42e9-82c0-45363a2b6fc7"
  }
}
What Next?
This blog shows a simple example for migration from the APIC-EM PnP API. This script can also handle switch stacking if required.
In the meantime, if you would like to learn more about Cisco DNA Center, visit Cisco DNA Center Dev Center on DevNet.
Thanks for reading
@adamradford123
We’d love to hear what you think. Ask a question or leave a comment below.
And stay connected with Cisco DevNet on social!
Twitter @CiscoDevNet | Facebook | LinkedIn
Visit the new Developer Video Channel


