
For the past couple months I have been working on the next installment (among some other exciting things) of the DNAC automation journey.
As you’ve seen in Part 1 and Part 2 of this series, it is super simple to get started with the Cisco DNA Center Python SDK and build your first automation use case.
I’ve been asked about this use case numerous times from our awesome DevNet Community, so thought I’d cover it here.
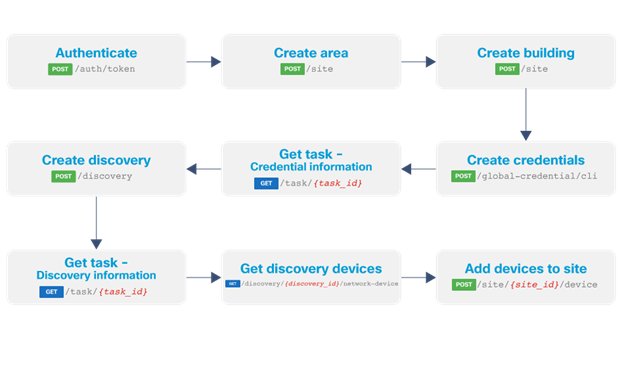
Today, I am going to show you how to leverage the Cisco DNA Center Python SDK to:
- Automate your site creation
- Automate device discovery
- Assign your newly discovered devices to the site

Sounds like a lot… right?
Not really! Let’s start by dissecting the process and the different APIs we will be using to accomplish the task at hand.
First: What is Discovery API?
Discovery API allows the user to execute a discovery of network devices on the infrastructure using different techniques like IP Range, CDP, etc. Also, it can be done with SNMP, SSH, NETCONF, among others.
The goal here is to walk you through:
- Creating an area
- Creating a building
- Creating a floor
- Executing a network discovery
- Getting the discovery results
- Assign the newly discovered devices to the recently created site
Now, sit back, relax, and let’s go on this ride together!
Endpoints and methods used
- POST /dna/system/api/v1/auth/token
- POST /dna/intent/api/v1/site
- POST /dna/intent/api/v1/global-credential/cli
- POST /dna/intent/api/v1/discovery
- GET /dna/intent/api/v1/task/{task_id}
- GET /dna/intent/api/v1/discovery/{discovery_id}/network-device
- POST /dna/system/api/v1/site/{site_id}/device
Create an Area, Building, and Floor
Whether you have to define your site layout from scratch, or you are migrating from another network controller into DNAC, it doesn’t matter, the logic is the same. We will read the site information from an external source, in this case a JSON file , render the JSON and fire off a POST request to DNAC to build the site.
One thing to keep in mind, site hierarchy is Global > Area > Building > Floor .
Let’s create the site hierarchy programmatically. The function below will take site payload read from JSON data and execute
- POST /dna/intent/api/v1/site
def create_new_site(site):
  global site_id
  try:
    resp = dnac.sites.create_site(payload=site)
    if site['type'] == "floor": # Capture site ID to be used to add discovered devices to it and set SITE_ID
      site_id = get_site_info(site['site']['floor']['parentName'] + "/" + site['site']['floor']['name'])
  except ApiError as e:
    print(e)
  else:
    return resp.response
You can see how simple it is to create a new site using the SDK
dnac.sites.create_site(payload=site) This method is used to create Areas, Buildings and Floors. The deciding factor about the type of site is in the supplied payload. Below is a sample of what the payload for creating a building looks like. Notice the hierarchical connection between defining a building to its parent (area):
{
 "type": "building",
 "site": {
  "area": {
   "name": "AREA 51",
   "parentName": "Global"
  },
  "building": {
   "name": "Deep Space",
   "parentName": "Global/AREA 51",
   "address": "Mercury, NV 89023"
  }
 }
}
Execute Device Discovery
Now that we have completed our site creation, we should tell DNAC to go out and discover all the devices. There are different types of discovery that we can leverage:
- Discover devices an IP Address/Range
- Discover devices using CDP
- Discover devices using LLDP
In this case we will initiate discovery based on range of IP address. The code snippet below initiates a new discovery and captures the progress of the discovery. Keeping in mind that DNAC tasks are asynchronous we will have to keep checking while device discovery is in progress
ip_address_range = "10.10.20.80-10.10.20.84"
global_creds_id = ["3eaff876-cf7e-4226-9af0-3901a5772334", "d34baa08-36ab-4b2b-8944-b8fae1af4669"]

discovery = dnac.network_discovery.start_discovery(
  discoveryType="Range", preferredMgmtIPMethod="UseLoopBack", ipAddressList=ip_address_range,
  protocolOrder="ssh,telnet", globalCredentialIdList=global_creds_id,
  name="Discovery-{}".format(random.randint(0, 1000))
)
task_info = dnac.task.get_task_by_id(discovery.response.taskId)
task_progress = task_info.response.progress
Getting the discovery results
Okay we are almost there!!
Once the discovery task is complete. DNAC will return a list of discovered devices IDs. At this point we will need to use the Enrichment APIs to get more information about them. This is the easy part, we simply use the devicesclass in our awesome SDK and get more info for each discovered device:
for device in discovered_devices_list:
   device = dnac.devices.get_device_by_id(id=device)
Et Voila! Now we just have to add the devices to site.
Assign discovered devices to site
So here is what we have so far:
- Newly created sites
- Discovered devices
- Detailed information about the devices
Leveraging the sites class in our SDK we will use the assign_device_to_site method to assign devices to site.
 device_to_add = {"device": [{"ip": ip}]}
 info = dnac.sites.assign_device_to_site(site_id=site_id,payload=device_to_add)
We are officially DONE!
Congratulation!
Small time investment pays off in the long run. Imagine having to migrate hundreds of sites with thousands of devices. Using APIs and programmatically doing this can be quick and easy. I’ve put together everything we talked about here in a nicely formatted code using Rich Python library to give you user feedback on terminal as the discovery is happening.
Check out the resources below for complete code and see you in soon with Part 4 of our journey together!
Resources
- Github Code Repo
- Cisco DNA Center Dev Center
- DevNet Network Automation Exchange
- Cisco DevNet Certification
We’d love to hear what you think. Ask a question or leave a comment below.
And stay connected with Cisco DevNet on social!
Twitter @CiscoDevNet | Facebook | LinkedIn
Visit the new Developer Video Channel


