
Hello fellow network automation engineers, it’s been a few weeks but I’m back with a great question from Evan Fareed.
I would like to automate configuring the basic device settings and interface addressing on the initial device setups using CML 2. What would you recommend as the best strategy or resources to proceed? I don’t know whether to use Postman vs. Ansible vs. Python scripts vs. pyATS vs. Hashicorp tools vs. Lions, Tigers and Bears! Oh My! (I added that last part ?)
Evan has hit upon something I expect many of us have as well. I know I have. Cisco Modeling Labs is a great tool for learning all aspects of networking, including automation. But sometimes the work to setup and prepare the test network can take as long as labbing up the topic of the day. What options are there for making the setup and management of your lab topology fast, easy, and automated?
The TLDR Answer
Shortly after getting Evan’s question by email I sent him an answer with some ideas and pointers to look into. However, I knew I wanted to take time to do a full write-up diving into HOW to accomplish the task not just a description of WHAT you could do. Later in this post, I will dig into the technical bits and bytes demonstrating the suggestions, but here’s the quick and dirty answer to the question.
There are two strategies or options you can take to providing a baseline configuration for a CML network topology.
Option 1, you can include the initial configurations as part of the lab/simulation definition. Every node in a CML topology has a base/starting configuration. CML has a default base configuration for each node type that is pretty minimal, but you can add anything you like to the customize the initial configuration to your heart’s desire. Then every time you start the simulation from scratch, or wipe and restart a node, the device will start with that configuration.
Option 2, you can start the simulation with a very minimal configuration (or no configuration), and use an automation tool to store and send the configuration. Which tool to use (Ansible, pyATS, Python, etc) is really up to you and which tool you prefer or are trying to learn. Each one of the tools you mentioned is a great thing to add to your skills so you can’t really go wrong with any of them. And advantage to an Option 2 approach is that you can have a single “physical network topology” and deploy different configurations onto the devices depending on what a particular lab session demands.
Some things to consider as you move forward with an Option 2 solution:
- Each of the tools need an inventory/testbed file that provides the list of devices and how to connect to them (addresses/credentials). As in option 1, you can bake management addresses and credentials in to the starting configuration (the default creds for network devices should be cisco / cisco). If you don’t include a management address, you can use the included console/terminal server feature of CML. With this you’d ssh to the CML server and then open a connection to the devices like you’re on a terminal server.
- A possible advantage for pyATS is that CML2 provides an API (I don’t know if it’s made it to the GUI yet) where you can download a ready to go pyATS Testbed file for any simulation that includes connection information using the CML as a console server approach. This is pretty handy.
And Now Let’s Dive In!
Now if you know me at all, you know I could go on for days about Cisco Modeling Labs and network automation, but I need to scope this post a bit to avoid writing a college dissertation. With that in mind, I’m going to assume a basic familiarity with CML2 and focus the in-depth look at using pyATS for network automation (what can I say, I’m a big fanboy). If you’d prefer to use another tool for network automation, I have no doubt you can extend the examples from here to Ansible, Nornir, or any of the other excellent options available.
I’ll be leveraging the Cisco Modeling Labs Enterprise DevNet Sandbox for this post. This Sandbox provides free demonstration access to anyone interested in looking into Cisco Modeling Labs for their own use before they buy. And while it’s the “Enterprise” version of the tool, all of the examples and techniques I go through will work with a “Personal” version as well.
If you’re looking for details on licensing and pricing for CML, checkout the page on DevNet.
Including Configurations as Part of the Lab Definition
This option is easiest to use, though it does limit flexibility some.
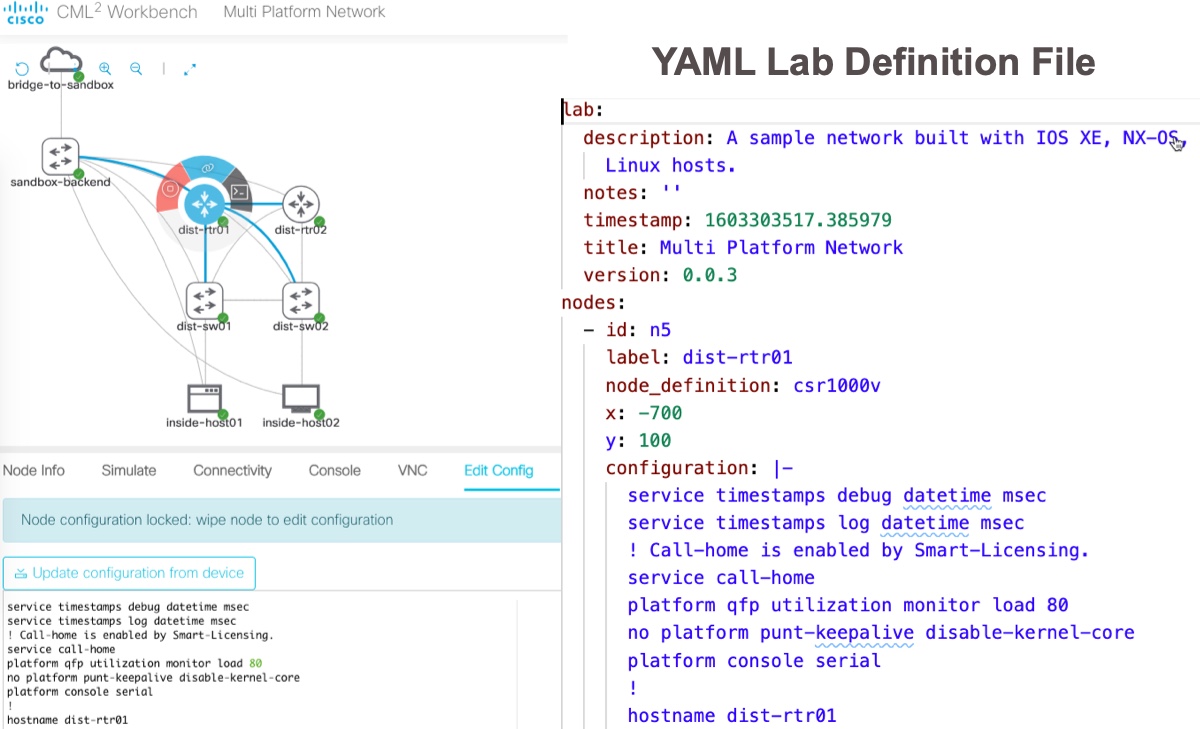
If you reserve the DevNet Sandbox, you’ll find that it starts with a lab topology already created and up and running. This lab called “Multi Platform Network” is a common topology used across several sandboxes and includes a basic network composed of Nexus switches, IOS XE routers, and a couple Linux hosts. I happened to have created this topology and I used this option when I built the lab. If you select any one of the nodes and click the “Edit Config” tab in the details you will see the base configuration used for the node.
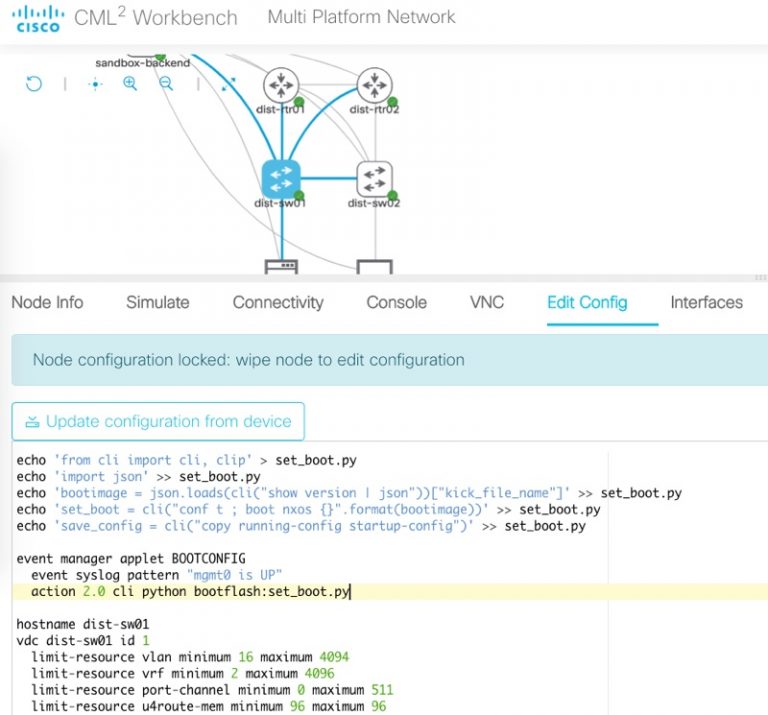
In the image above you can see the initial configuration applied to this Nexus 9000v switch for the “dist-sw01” in the topology. This is only the start of the configuration, but if you scroll down you would find configuration for VLANs, features, interfaces, etc.
You maybe wondering about the bunch of “echo” commands at the top of the configuration. A interesting aspect of the process by which an NX-OS device takes an initial configuration at startup is that commands setting the boot image for the switch is IGNORED by the switch initialization process. I can only assume this is so that a startup configuration will work no matter what version of NX-OS is running on the switch. The challenge is that if the Nexus 9000v in a simulation crashes without a boot command configured, it gets stuck at the dreaded “loader >” prompt. Crashes of simulated virtual network devices aren’t unusual when there is any resource sharing of vCPU or vRAM happening. To solve this problem, we worked out this unique automation solution that leverages EEM and a Python script to configure the boot command on the switch after it boots up. It worked so well, I was able to inspire the CML development team to implement the feature in CML itself. Pretty neat!
Make note of the button “Update configuration from device”. If you have updated the configuration of this node as it is running and wish to save these changes to the topology for later use, you can click this button to replace the configuration in the lab definition with what is running on the device now.
Each device in the topology has an initial configuration, including the Linux hosts. The CML uses the industry standard VM initialization process cloud-init for setting the base configuration on the Linux hosts. In the small snippet of the configuration for “inside-host01” you can see the network interface configuration being applied.
   write_files:
  - path: /etc/rc.local
    owner: root:root
    permissions: '0755'
    content: |-
      #!/bin/sh
      ifconfig enp0s9 up 10.10.20.179 netmask 255.255.255.0
      route add -net 0.0.0.0/0 gw 10.10.20.254 dev enp0s9
      ifconfig enp0s2 up 172.16.101.11 netmask 255.255.255.0
      route add -net 172.16.0.0/16 gw 172.16.101.1 dev enp0s2
      route add -net 172.31.0.0/16 gw 172.16.101.1 dev enp0s2
      exit 0
While working on the topology through the CML web GUI is easy and FUN, downloading and saving your lab definitions has it’s own advantages. You can share the topologies with friends, or start up the same topology on different CML instances. It also allows you to use a “Lab as Code” approach to defining and customizing your lab. CML2 lab definitions are in YAML, a widely used data format by network automation engineers and tools. You’ll find the base configurations for each device within the YAML file, and easy to update. Just be careful to maintain the strict YAML formatting – whitespace management can be a challenge.
lab:
  description: A sample network built with IOS XE, NX-OS, IOS XR, and ASA devices.  Includes
    Linux hosts.
  notes: ''
  timestamp: 1603303517.385979
  title: Multi Platform Network
  version: 0.0.3
nodes:
  - id: n5
    label: dist-rtr01
    node_definition: csr1000v
    x: -700
    y: 100
    configuration: |-
      service timestamps debug datetime msec
      service timestamps log datetime msec
      ! Call-home is enabled by Smart-Licensing.
      service call-home
      platform qfp utilization monitor load 80
      no platform punt-keepalive disable-kernel-core
      platform console serial
      !
      hostname dist-rtr01
Configuring a CML Network with pyATS
One of my favorite tools for network automation is pyATS, and I’m not the only one. Under the hood, Cisco Modeling Labs 2 leverages pyATS for some of the tasks it takes to build and manage the network simulations. To do anything with pyATS a testbed file that defines the network being managed is required, and CML makes this testbed file available via API for every lab you run.
I expect we’ll eventually see the pyATS Testbed available to download from the CML GUI in a future release. But until then “We ♥ APIs”
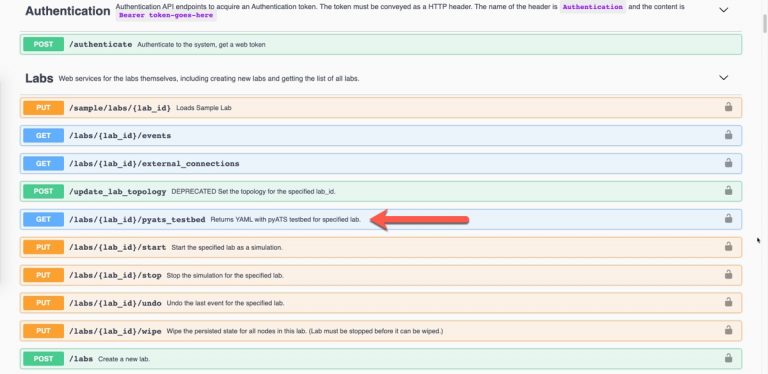
The REST API documentation for CML is hosted on the CML server itself in Swagger/OpenAPI spec, making them very developer friendly. If you read through them you’ll find that the API request for the pyATS Testbed looks like this:
GET /labs/{lab_id}/pyats_testbed
You need the lab_id (a short hexadecimal identification number) and simply send a GET request. Of course you’ll need to have authenticated first to retrieve a token to include in the authorization header. The CML2 API is quite nice and easy to use, but that isn’t how I normally interact with CML2 programmatically. Instead I work using one of two Python libraries.
The first one is virl2-client. This is the “official” Python library for CML2 and is built and maintained by the CML development team (Hi Ralph!). You install the library with pip and can find the documentation for it hosted on CML itself under “Tools > Client Library“. The virl2-client library is intended to be imported into a Python script and used like any other library. Here’s a snippet how it can be used to download the pyATS testbed file for a lab.
from virl2_client import ClientLibrary

# Create a client object for interacting with CML
client = ClientLibrary("https://10.10.20.161", "developer", "C1sco12345", ssl_verify=False)

# Find your lab. Method returns a list, this assumes the first lab returned is what you want
lab = client.find_labs_by_title("Multi Platform Network")[0]

# Retrieve the testbed for the lab
pyats_testbed = lab.get_pyats_testbed()

# Write the YAML testbed out to a file
with open("lab_testbed.yaml", "w") as f:
    f.write(pyats_testbed)
The second library is virlutils (or cmlutils). The virlutils library started life several years ago as a command line interface for working with VIRL 1.x similar to how vagrant is used for working with virtual machine environments. It became widely popular in the NetDevOps and network automation space for anyone using VIRL or CML 1.x as part of their work despite being an “unofficial library”. When Cisco Modeling Labs 2 was released, I was happy that the value of the tool was recognized and development continued to add support for CML 2. (Thanks Joe!) You install virlutils using pip.
Much of the original virlutils library was written and maintained by Kevin Corbin, one of the best network automation engineers I’ve ever had the pleasure of working with. I think of him anytime I “virl up” or tackle a new and interesting challenge. I miss you Kevin, you were taken from us much too soon.
Unlike virl2_client, virlutils is intended to be used from the command line, no Python coding required. This makes it very useful for something like retrieving the pyATS testbed for a lab. Here’s what that looks like.
# First, you need to create the .virlrc file for your CML server
cat .virlrc

VIRL_HOST=10.10.20.161
VIRL_USERNAME=developer
VIRL_PASSWORD=C1sco12345
CML_VERIFY_CERT=False

# "Use" the desired lab
cml use "Multi Platform Network"

# Generate a testbed file for the lab
cml generate pyats --output testbed.yaml

Writing testbed.yaml
Adding Credentials to the Testbed
No matter which approach you use to generate the testbed file, there are a couple of things you’ll need to do before jumping into pyATS, and they relate to the credentials for the integrated CML2 terminal server and the network devices themselves. Here is the top of the generated testbed file.
testbed:
  name: Multi Platform Network
  tacacs:
    login_prompt: 'login:'
    password_prompt: 'Password:'
    username: '%ENV{PYATS_USERNAME}'
  passwords:
    tacacs: '%ENV{PYATS_PASSWORD}'
    enable: '%ENV{PYATS_AUTH_PASS}'
    line: '%ENV{PYATS_PASSWORD}'
devices:
  terminal_server:
    os: linux
    type: linux
    connections:
      cli:
        protocol: ssh
        ip: 10.10.20.161
        username: change_me
        password: change_me
Note the use of values like “‘%ENV{PYATS_USERNAME}'” for the tacacs and passwords. By default the testbed is setup to look for the device credentials as environment variables. This is a nice feature as you can use any number of options for managing and securing these credentials. As this is a simple simulation, I’m going to change those to “cisco” as those are the credentials in my simulation.
Next, under the “terminal_server” device, you see how “change_me” is listed for the credentials for the CML server. You could create environment variables for these credentials, or just update them to the account used for CML. As this is the DevNet Sandbox, I’ll update them to “developer / C1sco12345”.
Before we leave the testbed file, let’s look at how devices are going to be connected. Here is the definition of one of the devices from the topology.
  dist-rtr01:
    os: iosxe
    type: router
    series: csr1000v
    tacacs:
      username: cisco
    passwords:
      tacacs: cisco
    connections:
      defaults:
        class: unicon.Unicon
      a:
        protocol: telnet
        proxy: terminal_server
        command: open /ec3f5f/n5/0
Under connections, you can see that the testbed is setup to use a proxy connection through the “terminal server” (which is the CML server itself) and then a command “open /ec3f5f/n5/0”. You can test how this will work by telnetting to the CML server yourself and running this command. There are great “help” and “tab” options on the CML server to make the terminal server feature easy to use. This method of connecting to devices is nice, because it does NOT require outside IP connectivity from the CML topology to the “real world”.
Testing the Testbed
With the testbed finished, let’s try it out.
Start by validating the testbed file to make sure it is well formatted.
pyats validate testbed testbed.yaml
This should complete without any errors, however you’ll likely see some warnings listed. These warnings are due to the nature of the ever evolving world of network automation tools. pyATS is updated far more frequently than CML, or the CML Sandbox, and this means while the testbed file that was generate will work, it may not be using the “latest testbed schema” from pyATS. As CML updates come out and are applied to the Sandbox, these warnings should reduce or be removed completely.
/Users/hapresto/virtualenvs/std/bin/pyats:8: DeprecationWarning: 'tacacs.username' is deprecated in the testbed YAML.  This key has been moved to 'credentials'.
  sys.exit(main())
/Users/hapresto/virtualenvs/std/bin/pyats:8: DeprecationWarning: 'passwords.tacacs' is  deprecated in the testbed YAML.  Use 'credentials' instead.
  sys.exit(main())

.
.

Warning Messages
----------------
 - Device 'dist-rtr01' missing 'platform' definition
 - Device 'dist-rtr02' missing 'platform' definition
 - Device 'dist-sw01' missing 'platform' definition
 - Device 'dist-sw02' missing 'platform' definition
 - Device 'inside-host01' missing 'platform' definition
 - Device 'inside-host02' missing 'platform' definition
 - Device 'terminal_server' missing 'platform' definition
 - Device 'terminal_server' has no interface definitions
After we’ve validated the testbed, let’s see if we can actually connect to the devices and retrieve some details. For this test we’ll continue to use the pyats CLI to look at the configured VLANs on one of the switches.
pyats parse --testbed-file testbed.yaml "show vlan" --device dist-sw01
And here is the expected partial output
{
  "vlans": {
    "101": {
      "interfaces": [
        "Port-channel1",
        "Ethernet1/1",
        "Ethernet1/2",
        "Ethernet1/11"
      ],
      "mode": "ce",
      "name": "prod",
      "shutdown": false,
      "state": "active",
      "type": "enet",
      "vlan_id": "101"
    },
    "102": {
      "interfaces": [
        "Port-channel1",
        "Ethernet1/1",
        "Ethernet1/2"
      ],
      "mode": "ce",
      "name": "dev",
      "shutdown": false,
      "state": "active",
      "type": "enet",
      "vlan_id": "102"
    }
Configuring the CML Network with pyATS
Now that we see how we can get a pyATS testbed up and operational let’s see how we can use that to update the configuration of a network device in the simulation. This post is already turning into a novella (thanks for sticking with me), so I won’t be going super deep into network configuration with pyATS. For that checkout the links at the bottom of this post for some suggestions on documentation.
The pyATS library is a robust solution for network automation, and it offers many options to the developer. The first way many of use automate the network is by sending CLI commands through Python. pyATS makes that very easy. Here is an example on how you can create a loopback interface with CLI commands.
# import the base Genie object
from genie.conf import Genie

# Initialize a pyATS testbed object
testbed = Genie.init("testbed.yaml")

# Create a variable for our router and connect to it
dist_rtr01 = testbed.devices["dist-rtr01"]
dist_rtr01.connect(learn_hostname=True,log_stdout=False)

# Send configuration to router
dist_rtr01.configure('''
    interface loopback 11
    description Created with pyATS and CLI
    ip address 10.255.255.1 255.255.255.255
''')

# Disconnect from the router
dist_rtr01.disconnect()
But network automation should strive to be more than just a different way to work with CLI. pyATS includes a robust library of objects that can allow you to program your network in a much more Pythonic way. Here’s a similar example using the “Interface” object.
# import the base Genie object
from genie.conf import Genie

# import the Interface configuraiton object
from genie.conf.base import Interface

# Initialize a pyATS testbed object
testbed = Genie.init("testbed.yaml")

# Create a variable for our router and connect to it
dist_rtr01 = testbed.devices["dist-rtr01"]
dist_rtr01.connect(learn_hostname=True,log_stdout=False)

# Create an Interface object and configure the settings
new_loopback = Interface(device = dist_rtr01, name = "Loopback12")
new_loopback.ipv4 = "10.255.255.2"
new_loopback.ipv4.netmask = "255.255.255.255"
new_loopback.description = "Created with pyATS and Objects"

# Build the device specific configuration and apply to router
new_loopback.build_config()

# Disconnect from the router
dist_rtr01.disconnect()
What’s nice about the object method of configuration is that it doesn’t matter if the device is NX-OS, IOS, IOS-XR, or any other device supporting the model. The code to configure is the same, pyATS will do the device specific rendering when you “build_config()”.
You can explore the models included with pyATS and the platforms each support starting in the Documentation.
Final Thoughts
Whoa… what a marathon post. I hope you all found it interesting and helped you think of some ideas you might use yourself. As promised, here are some handy links to dive deeper into the related topics.
- Cisco Modeling Labs on DevNet – Links for examples, docs, and sandbox are listed
- pyATS on DevNet – Lots of great documentation, videos, and examples
- Some great YouTube Videos on Cisco Modeling Labs 2.x
- Introduction to pyATS from Season 1 of NetDevOps Live
- Another pyATS Video from Season 2 of NetDevOps Live
- An Introduction to Writing Network Tests with pyATS I did at PyCon2020
That’s all for now. Got a burning question you’d like to “Ask Hank”? Let me know in the comments, on Twitter (@hfpreston), or send me an email (hapresto@cisco.com).
We’d love to hear what you think. Ask a question or leave a comment below.
And stay connected with Cisco DevNet on social!
Twitter @CiscoDevNet | Facebook | LinkedIn
Visit the new Developer Video Channel


Hey Hank, thanks for this great blog post. I tried to follow your instructions but stuck at the line “pyats parse –testbed-file testbed.yaml “show vlan” –device dist-sw01″. I got an error message: “invalid choice: ‘parse’ (choose from ‘clean’, ‘create’, ‘logs’, ‘run’, ‘secret’, ‘shell’, ‘validate’, ‘version’)”. Maybe you can quickly help here.
My versions:
You are currently running pyATS version: 21.2
Python: 3.8.0 [64bit]
You can reach me on Webex. I pinged you there.
Thanks!
Very quick help from Hank. Don’t forget to install Genie before trying pyATS parsing!
Thanks!