Networks are the roadways that connect and allow communication to occur between our devices. We take several aspects of our home network for granted. On our home networks, we can have smartphones, personal computers, smart TVs, smart internet-connected video playback devices (i.e., Apple TV and Google Chromecast), and much more. And there’s something unique that our personal home network allows us to do with these devices. It builds routes — paths for data to communicate amongst the various devices — and only amongst the devices on that network. Pretty simple, user-friendly, and convenient stuff, right?
Let’s discuss a specific use case: sharing content from an iPhone to an Apple TV. If we want to share content from an iPhone to an Apple TV, it starts by simply clicking on the AirPlay icon on an iPhone; which allows us to view the Apple TV that may be on our network. This is because our private home network realizes which devices are connected to it, and it is maintaining that information in cache, allowing for quick streaming access from the iPhone to the Apple TV. At home, with just one SSID — of course, you may have more in your particular setup, for example, an additional Guest SSID, but let’s assume we only have one for our scenario — we have simplicity because we’re able to see and utilize the particular link-local-multicast-based protocols (like mDNS based AirPlay) that the smart-devices allow. We can use these services securely and seamlessly on our private network.
That means a neighbor cannot cast to the Apple TV that resides on my personal network from her iPhone unless she joins my home network. Amazing right? And that’s how it should work. Our home network is where we get to define who gets to utilize the functionalities that our smart devices offer.
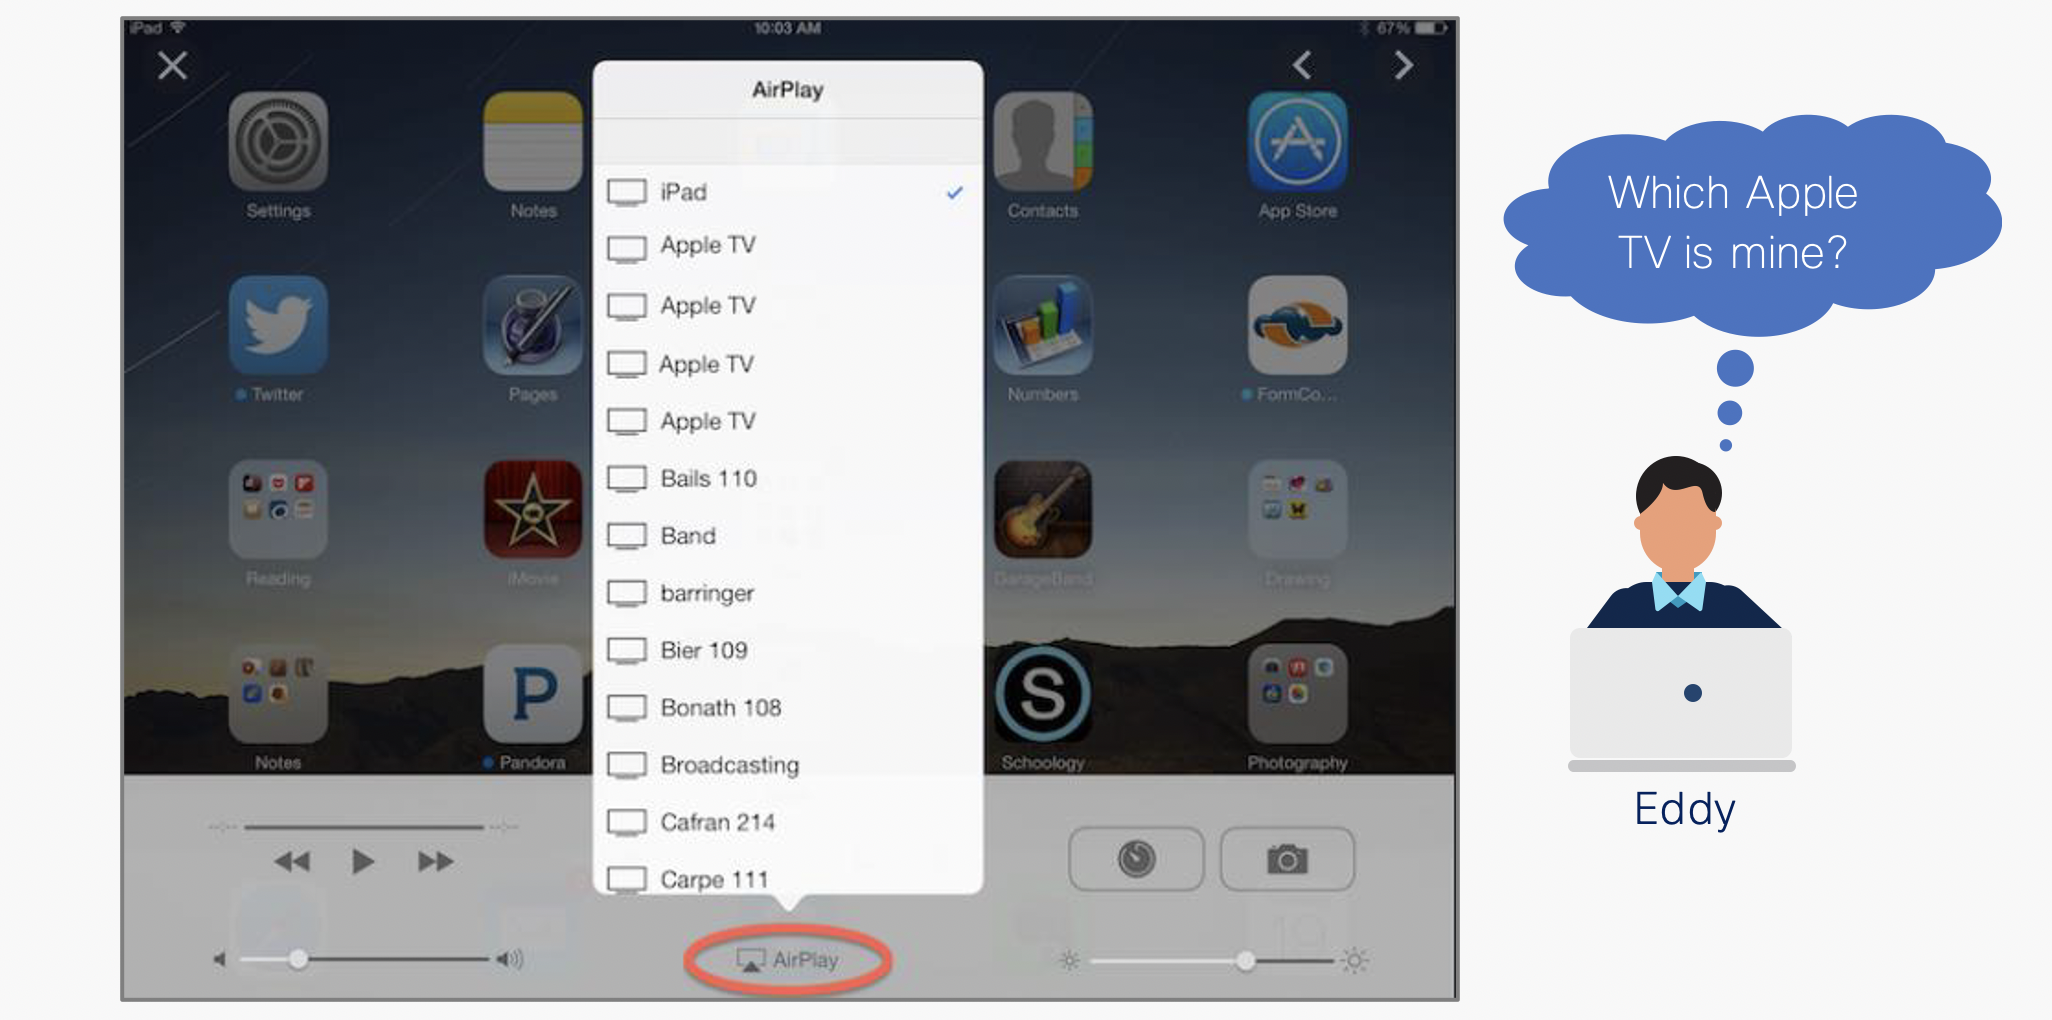
But now let’s take that same use case and place it into a different setting: we have a university student named Eddy, living at the campus dormitory at his university, with multiple smart devices, including an iPhone, MacBook, Apple TV, gaming console, printer, and more. Just like Eddy, there are many other students in the dormitory that also have smart devices. But there’s only one SSID for Eddy and all the other students to connect to; and all of Eddy’s smart devices (and also those of others) are all connected to the same SSID. Which is fine. Everyone gets to have routes to the internet and can stream content.
So far, so good. But there’s a caveat now. When Eddy tries to AirPlay from his iPhone, not only does he see his own Apple TV, but he also sees all the other Apple TVs connected to his dormitory’s SSID (see Figure 1). He can cast content to his, or any of the other Apple TVs on the network. This can be a problem as there is no ability to control who uses whose personal devices.
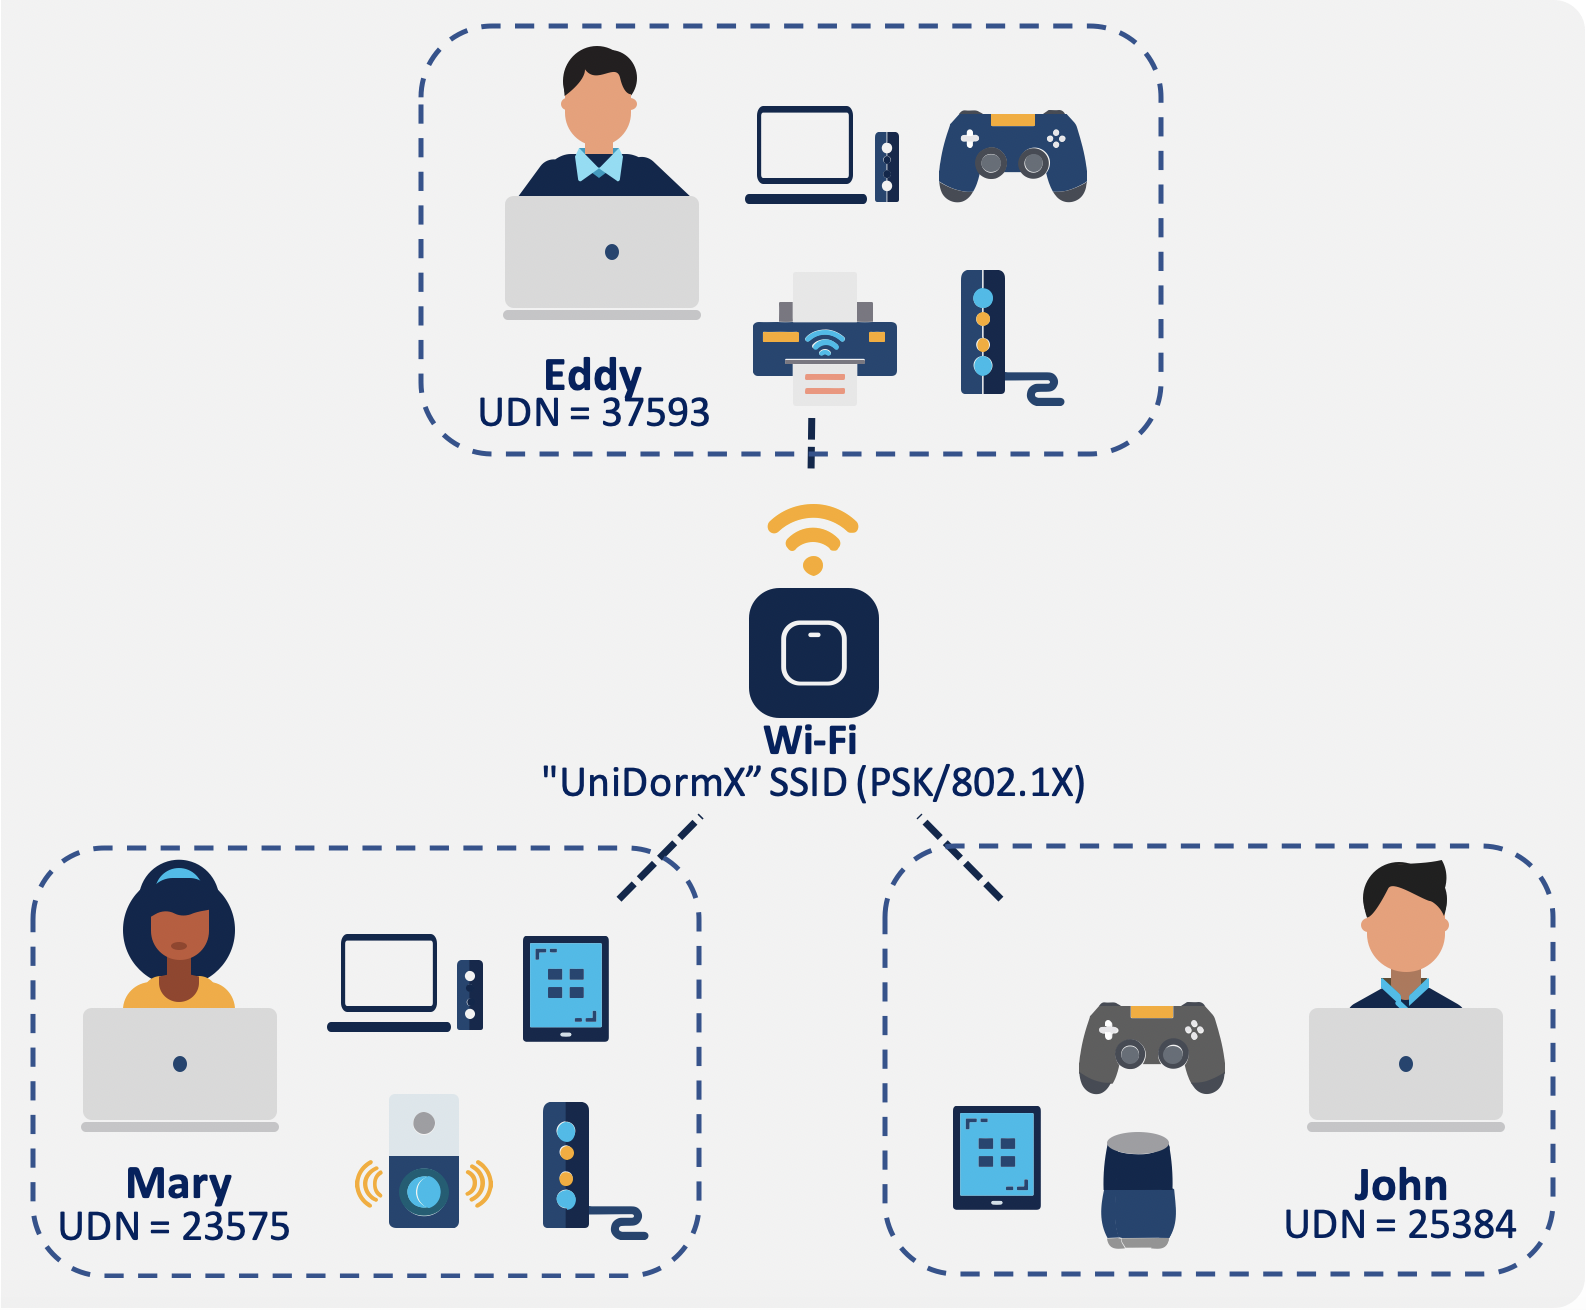
This is where Cisco User Defined Network (UDN) comes into the picture. With the Cisco UDN solution, networks (even those with the largest pools of devices within the same SSID) can be segmented into smaller, defined networks that allow for users to privatize their smart-device use. For example, in terms of a university dormitory, we can segment the network, so each student is only allowed to use mDNS services amongst their own devices. This way, Eddy’s next-door roommate Mary won’t be able to cast to his Apple TV, and in turn, Eddy won’t be able to cast to hers—while all being connected to the same SSID! Each student will have their own private network, their own unique UDN (see Figure 2). But that’s not all. With the Cisco UDN solution, additional privileges can be assigned so others can use someone else’s smart devices as guest users—which we will discuss later in this blog. It is truly a smart method to privatize and secure your personal set of smart devices on a large enterprise network.
Your Network, Defined by You
Cisco User Defined Network allows for the segmentation of a large network into smaller pieces, providing for a similar experience to that of a private home network. Cisco User Defined Network’s main intent is the ability to privatize and secure any individual’s set of devices, within a large, centrally switched network.
Privatize
With Cisco UDN, Eddy (see Figure 2) is the only person who has access to his devices. Therefore, Mary and John will not even be able to view the particular devices that Eddy possesses. If for example, they try using an mDNS service, they will be restricted to being able to view and use only the devices on their personal UDN. Now, Eddy can be at peace in knowing that no one will accidentally (or intentionally) try to cast or share content to his devices without his permission. He has created a private network around his set of devices.
Secure
With the ability to be private comes the benefit of security. As Mary cannot share content with Eddy’s devices (without his consent), he has the additional peace of mind of security. This of course, is in addition to the standard security measures taken by the dormitory’s network!
Getting Started
From a user perspective, the only aspect that is required for the Cisco User Defined Network is the Cisco UDN mobile app, and some information from the smart devices that are to be onboarded onto the network (see Table 1). The solution is built with simplicity in mind. Device on-boarding can happen without even being on the network on which the UDN will reside! In our university example, Eddy can onboard his devices to his university’s network and have his UDN created before he even arrives to the location.

The Onboarding Process
The user will download the Cisco UDN app on their smartphone or tablet, and from there will be able to log into the application using the credentials provided to them from their organization’s network administration team. For example, upon signing into the mobile app, Eddy will have the ability to on-board devices using multiple methods: (1) scanning the network for all the devices connected to the network and selecting which ones he would like to onboard or (2) manually adding the information for the device(s) he’d like to onboard by either doing a camera scan for the MAC addresses or by physically entering the MAC address of the device(s) into the Cisco UDN app.
Device Sharing with Guests
Not only can we utilize and use the personal devices we have allocated within our created User Defined Network, but we also have the ability to invite guests and provide access to others to utilize the devices on our personal UDN. This is also done through the Cisco UDN mobile app.
Let us assume that Eddy and John are friends and would like to play video games together on their gaming console. Or let’s say that John has a smart speaker and wants to bring it to Eddy’s dorm and allow for Eddy to also be able to cast music from his personal phone to that speaker. Eddy can invite John to his personal UDN, allowing John the ability to use the devices on Eddy’s UDN. And once John leaves Eddy’s room, Eddy can then remove John from his UDN with just a touch of a button—reclaiming control of his devices. Which is awesome!
Monitor and Control
Not only can devices and guests be added to a specific UDN using the Cisco UDN mobile app, but monitoring and maintenance of the UDN is also a great functionality allowed through the Cisco UDN app. A user can view all the devices on their UDN, see their information, add more devices, reclaim the devices that may be on a different UDN, and remove devices that they don’t want on the UDN as well. With Cisco’s User Defined Network, the privatization, security, and control of one’s own network has never been easier.
For More Information
Learn more about the Cisco User Defined Network:
Subscribe to the Networking blog