
It’s Pi Day, everyone — my favorite crowd-sourced holiday. And not just because of my deep affection for fruit/sugar-filled pastries. Nope, since it was first released ten years ago, I’ve loved the Raspberry Pi microcomputer. So, when I was asked if I had any ideas for a Pi-Day blog, I knew exactly what I wanted to write. So, I bring you… 5 Reasons a Raspberry Pi Belongs in Your Network Lab!
Reason #1: Raspberry Pi powered network services
I remember when I was studying for my CCIE and building out my network lab. This was before the route/switch (now called enterprise networks) lab was virtualized, and my lab was made up of 4 Catalyst 3K switches and 6 ISR G2 routers. While most of the blueprint focused on routing protocols, layer 2 networking, and spanning-tree (so much spanning-tree), a CCIE is still expected to understand and work with network services.
What do I mean by “network service”? In this case, I’m referring to protocols like DHCP, DNS, NTP, TACACS, RADIUS, TFTP, FTP, etc, etc. These services are fundamental to the proper operation of just about any production network, but it can be a bit of a pain and feel like a waste of time and resources to set them up in the network lab you use for studying. When engineers don’t just skip them completely, often they will take advantage of the minimal capabilities available on network devices themselves within the lab. And while a Cisco router can act as a DHCP or DNS server, it isn’t exactly a realistic setup; there are limitations on what you can do.
Enter the Raspberry Pi. For anywhere between 15 to 40 dollars, you can add a Linux server to your lab that can run these services and, in some cases, use the same software used in your production network.
Always looking for a good reason to lab something up, I started a new git repository and decided to try some of these out myself.
You want to see an example? Of course, I can never say no to you. Let me show you a preview of…
Pi-DHCP
For a more thorough walkthrough of setting up ISC DHCP Server on a Raspberry Pi see Using a Raspberry Pi as a DHCP Server in my git repository.
ISC DHCP Server (sometimes just called “dhcpd”) is a widely used DHCP server, and a great one to add to your lab. In fact, many of the example DHCP configuration guides from Cisco use ISC DHCP as the reference server. Installing it onto a Raspberry Pi is as easy as:
sudo apt-get install isc-dhcp-server
Like most Linux applications, you configure the DHCP server with a config file. Here’s the one I put together for my home lab:
# dhcpd.conf

# DNS Configuration for the network lab
option domain-name "lab.example";
option domain-name-servers 192.168.192.11;

# Setting the default lease time to 2 minutes and max to 1 hour
default-lease-time 120;
max-lease-time 3600;

# This is the subnet on my home network. No configuration is
# provided because I don't want to listen/reply to requests
# but adding it avoids errors/warnings from the service
subnet 10.92.1.0 netmask 255.255.255.128 {
}

# This is my network lab segment configured on eth0
# A range of IPs to assign is provided, as well as the
# default gateway/router
subnet 192.168.192.0 netmask 255.255.255.0 {
  range 192.168.192.101 192.168.192.120;
  option routers 192.168.192.1;
}

# This assigns a static IP address to a lab client device
host lab-client {
  hardware ethernet b8:27:eb:d3:22:e7;
  fixed-address 192.168.192.12;
}
lab-switch#conf t
Enter configuration commands, one per line.  End with CNTL/Z.
lab-switch(config)#interface vlan 192
lab-switch(config-if)#ip address dhcp
Feb 26 16:00:05 lab-server dhcpd[828]: DHCPDISCOVER from a0:ec:f9:ab:39:d3 via eth0
Feb 26 16:00:06 lab-server dhcpd[828]: DHCPOFFER on 192.168.192.101 to a0:ec:f9:ab:39:d3 (lab-switch) via eth0
Feb 26 16:00:06 lab-server dhcpd[828]: DHCPREQUEST for 192.168.192.101 (192.168.192.11) from a0:ec:f9:ab:39:d3 (lab-switch) via eth0
Feb 26 16:00:06 lab-server dhcpd[828]: DHCPACK on 192.168.192.101 to a0:ec:f9:ab:39:d3 (lab-switch) via eth0
How awesome is that!? As a Linux server, a Raspberry Pi can provide just about any network service you need in your lab. Here are some other guides I put together for some of my favorite services in my network lab.
- DHCP Server with ISC DHCP Server
- DNS Server with Bind9
- Dynamic DNS fro ISC DHCP and Bind
- TACACS Server with tac_plus
Reason #2: Raspberry Pi network clients
While experimenting and learning how routing protocols, VLANs, and spanning-trees work can keep a network engineer busy for hours, at some point you are probably going to want to see some traffic from clients on your network. Where do you get clients? Maybe you have some old computers lying around gathering dust. Or maybe you bought an old server off eBay. Or in a pinch, you can use one of your network routers or switches as a client. Those options work… but each of them has their own downsides.
Things like:
- Even old laptops, desktops, and servers can cost a lot of money
- Maintaining 5+-year-old hardware can be a big-time investment
- Space, noise, power, ugliness
A Raspberry Pi is a great option. For the same money as a couple of old, obsolete servers you can buy several brand-new Raspberry Pis. They are simple devices, easy to setup and reset to default by imaging an SD card. And they are small, silent, and take up far less power than an old server.
There are several different Raspberry Pi models available today, so be sure to order the one that has the network connectivity that meets your needs. I generally like to pick up models that have both wireless networking and a physical Ethernet interface included.
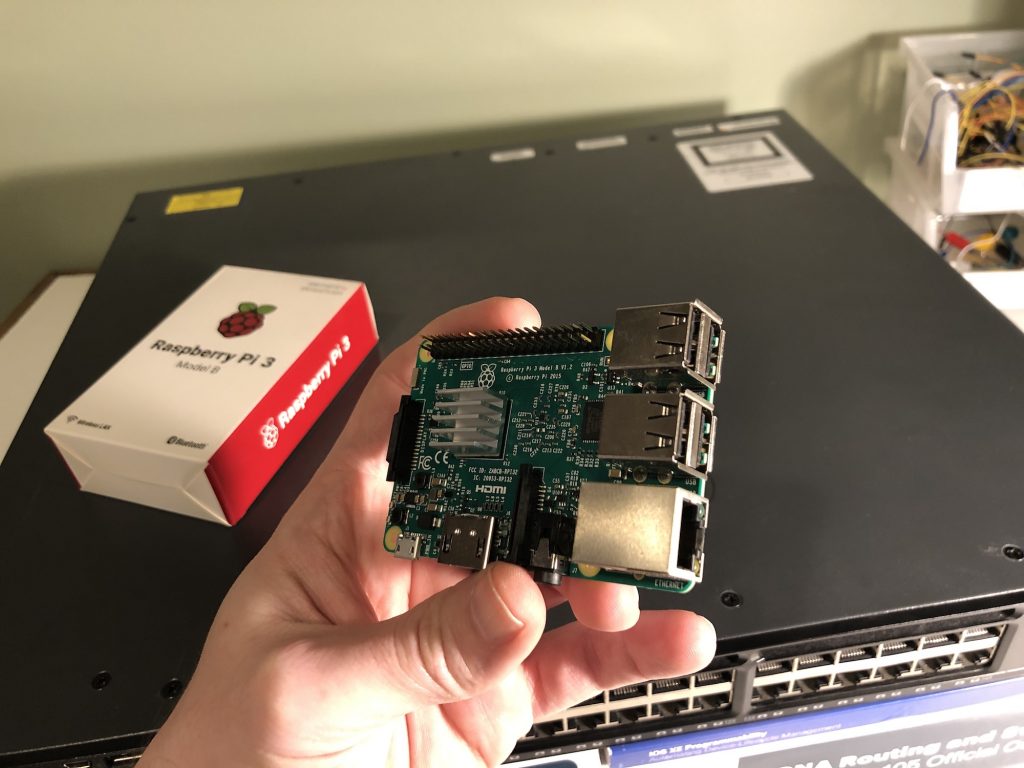
This is one of the Raspberry Pi Model 3Bs that I have in my lab. Sure, it was released in 2015, but still runs like a champ. I have about five of these that I use for different projects.
Reason #3: Raspberry Pi lab management station
Building on the second reason, the Raspberry Pi can be more than just a simple client endpoint in your lab. It makes a pretty darn good lab management station. What I mean by ‘lab management station’ is the workstation you use for doing network configurations, managing devices, upgrading software, etc. Basically, all the things you probably use your laptop for.
I know what you are thinking… “Hank, are you telling me to throw away my laptop? I really like my laptop. It’s got stickers and everything all over it.”
No, that’s not what I’m saying. I don’t know about your lab setup, but I’ve got my network lab tucked away in a corner of my office. And while it’s not as uncomfortable or awkward as some data closets or data centers I’ve worked in, it isn’t exactly as ergonomically designed as my normal desk area. But a lot of network lab work requires console connections to devices, moving network cables from one device to another, starting something and coming back hours later.
The approach I’ve taken is using one of my Raspberry Pis as a dedicated lab management station.
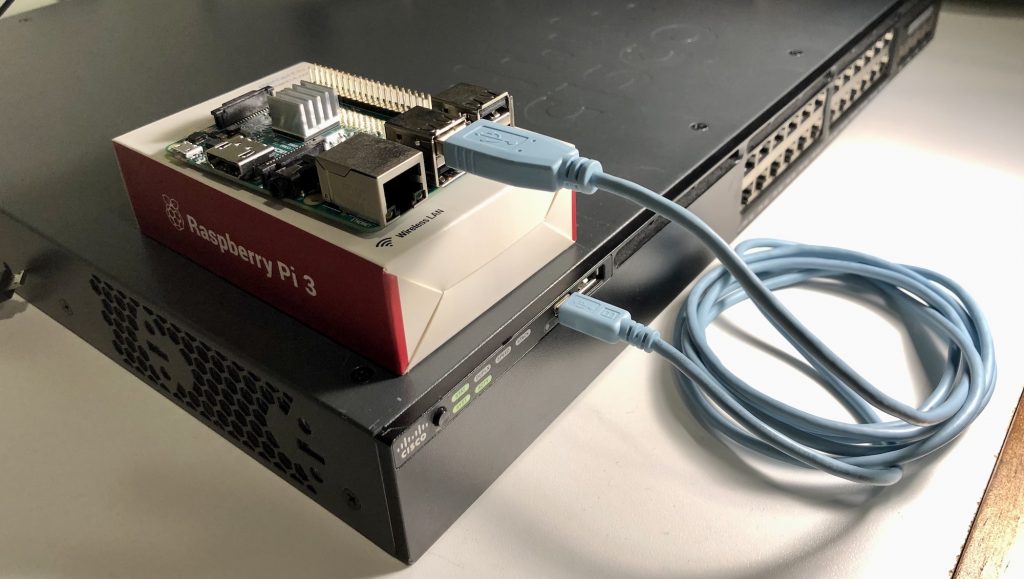
Some Raspberry Pi models come with 4 or more USB ports, so I can connect and leave console cables to the switches and routers for easy console access whenever I make a mistake and need to get direct access.
# Find the USB Console device for my switch
pi@lab-client:~ $ ls -l /dev/ttyAC*
crw-rw---- 1 root dialout 166, 0 Mar  4 14:48 /dev/ttyACM0

# Open a serial connection to the switch
pi@lab-client:~ $ screen /dev/ttyACM0 9600

# Configure / Manage the switch
lab-switch>en
Password:
lab-switch#show ip int bri | exc unas
Interface              IP-Address      OK? Method Status                Protocol
Vlan192                192.168.192.101 YES DHCP   up                    up
I connect the Raspberry Pi to my home wireless, and the physical ethernet connection to the lab switch. This dual attached network setup allows me to SSH into the Raspberry Pi from the comfort of my desk and have the same connectivity as if I were sitting on the floor next to the gear.
Tip from Hank: When you connect a computer to both wireless and wired networks at the same time, all modern operating systems will prefer the wired connection over the wireless one. This makes complete sense from a performance perspective, but in a lab use case like this it may not be what you want. This is controlled by a route “metric” just like on a network router. You can configure the Raspberry Pi to have a higher metric for the ethernet interface than wireless. Example:
interface eth0
static ip_address=192.168.192.12/24
static routers=192.168.192.1

# By default ethernet interfaces are given a metric
# 200 + interface index. This would make the eth0
# routes preferred over wlan0. But I need wlan0 to
# be preferred to allow internet access. So I set
# the metric for the eth0 interface to 500
metric 500
For more details on network configuration of a Raspberry Pi see my short guide TL:DR for Configuring Network Interfaces on Raspberry Pi in my git repository.
There is one more benefit to using a Raspberry Pi as a lab management station; it gives you a chance to learn and explore Linux. Linux continues to grow in visibility and importance for network engineers, and IT professionals in general. While Linux can be a bit intimidating for engineers more used to the world of Windows or macOS, using a Raspberry Pi as your lab management station gives you the chance to use Linux as part of your exploration and work. You can learn basic Linux skills such as:
- file management
- network configuration and tools
- installing applications
- configuring and managing services
- how to exit vim without unplugging your computer
Reason #4: Raspberry Pi as a network sensor/traffic analysis device
Is there anything that gets a network engineer as excited as sniffing packets on the network? I’m not sure there is… Maybe the first successful ping across a newly built network. That is a pretty sweet feeling as well.
But back to capturing packets… the Raspberry Pi can do this too. And the models that have both wireless and wired network connections are very well suited to the job of network sniffer because you can connect to it over the wireless connection while the wired connection is busy slurping packets.
First up, I install tcpdump on my Raspberry Pi.
sudo apt-get install tcpdump
What about Wireshark you ask? Wireshark can run on a Raspberry Pi too, but it’s a much “heavier” application than tcpdump. What I generally have found best is to capture with tcpdump on the Raspberry Pi, and then analysis the captured file on my main workstation with Wireshark.
Second, configure a monitor session on my lab switch (a Cat 3650) to send all traffic destined to the Raspberry Pi that acts as my DHCP and DNS server to my new sniffer.
! Connection to my lab-server Raspberry Pi
monitor session 1 source interface Gi1/0/1

! Connection to my lab-sniffer Raspberry Pi
monitor session 1 destination interface Gi1/0/11

! Check configuration
show monitor session 1

# Output
Session 1
---------
Type                     : Local Session
Source Ports             :
    Both                 : Gi1/0/1
Destination Ports        : Gi1/0/11
    Encapsulation        : Native
          Ingress        : Disabled
And finally, I use tcpdump to capture all DHCP traffic.
sudo tcpdump -i eth0 -v port 67 or port 68

# Output
tcpdump: listening on eth0, link-type EN10MB (Ethernet), snapshot length 262144 bytes
20:46:02.181634 IP (tos 0x0, ttl 64, id 40790, offset 0, flags [DF], proto UDP (17), length 328)
    192.168.192.102.bootpc > 192.168.192.11.bootps: BOOTP/DHCP, Request from b8:27:eb:d3:22:e7 (oui Unknown), length 300, xid 0xde321e7e, secs 65535, Flags [none]
        Client-IP 192.168.192.102
        Client-Ethernet-Address b8:27:eb:d3:22:e7 (oui Unknown)
        Vendor-rfc1048 Extensions
            Magic Cookie 0x63825363
            DHCP-Message (53), length 1: Request
            Client-ID (61), length 7: ether b8:27:eb:d3:22:e7
            MSZ (57), length 2: 1472
            Hostname (12), length 10: "lab-client"
            Unknown (145), length 1: 1
            Parameter-Request (55), length 14:
            Subnet-Mask (1), Classless-Static-Route (121), Static-Route (33), Default-Gateway (3)
            Domain-Name-Server (6), Hostname (12), Domain-Name (15), MTU (26)
            BR (28), Lease-Time (51), Server-ID (54), RN (58)
            RB (59), Unknown (119)
20:46:02.194360 IP (tos 0x0, ttl 64, id 39778, offset 0, flags [DF], proto UDP (17), length 328)
    192.168.192.11.bootps > 192.168.192.102.bootpc: BOOTP/DHCP, Reply, length 300, xid 0xde321e7e, secs 65535, Flags [none]
        Client-IP 192.168.192.102
        Your-IP 192.168.192.102
        Client-Ethernet-Address b8:27:eb:d3:22:e7 (oui Unknown)
        Vendor-rfc1048 Extensions
            Magic Cookie 0x63825363
            DHCP-Message (53), length 1: ACK
            Server-ID (54), length 4: 192.168.192.11
            Lease-Time (51), length 4: 300
            Subnet-Mask (1), length 4: 255.255.255.0
            Default-Gateway (3), length 4: 192.168.192.1
            Domain-Name-Server (6), length 4: 192.168.192.11
            Domain-Name (15), length 11: "lab.example"
Pretty slick!
For a more thorough walkthrough of doing packet capture/analysis on a Raspberry Pi check out the guide Traffic Analysis and Capture in my git repository.
Reason #5: Raspberry Pi as an application server
And our final reason for today, you can add “applications” to your network lab by running them on the Raspberry Pi. Why would you want to do that you wonder… There are many reasons you might want an application in your home lab.
- Generate realistic client/server traffic for packet capture
- Experiment with quality-of-service configurations to either prioritize or restrict application access
- Build firewall rules around application access
- Create NAT/PAT rules for accessing an application
- Explore and understand protocols like HTTP and REST APIs
And while you could certainly write your own application, in this open-source world there is almost no end to the applications you can quickly install and run on your Raspberry Pi with very limited effort. And it can be even easier if you install Docker on your Raspberry Pi and leverage the large number of ARM-based images available.
Some ideas for applications to run in on your Raspberry Pi
- NetBox – Network Source of Truth
- WordPress – Blog / Website
- Zabbix – Network Monitoring
- Postfix – Email Server
- Plex – Media Server
- RetroPi – Game Emulator (this one is mostly just for fun, might not be a lot of network traffic)
Note: I have not installed all of the above applications on Raspberry Pi so can’t comment firsthand on their setup.
In Summary
Well, there you are. Five excellent reasons a Raspberry Pi should be the next addition you make to your lab. Are you already using a Raspberry Pi in your lab? Tell me about it in the comments or over on Twitter (@hfpreston). So long for now, I’m off to eat that apple pie from the picture. Happy Pi Day!


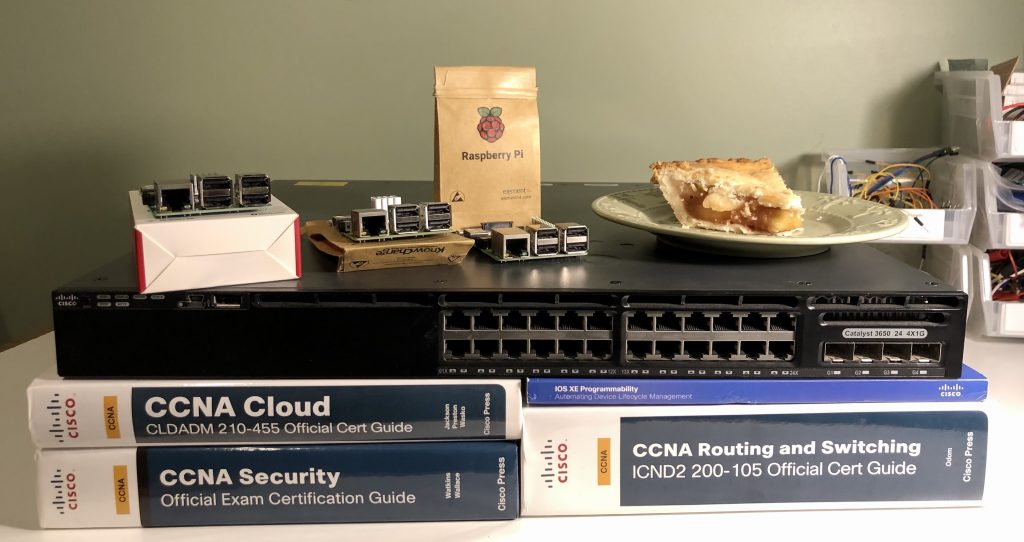
whats a good switch to purchase, like the one seen in the images above, for a home lab network?
The one in the picture is a Catalyst 3650. It is a great switch for the home lab. It was the generation (or two) before Catalyst 9000 switches, but still runs IOS XE. This means features like NETCONF/RESTCONF, GuestShell, and telemetry are all supported.
But it does depend on what you are studying and working on. The basics of layer 2 and 3 networking all can be studied on gear that is years and years old.
Interesting ideas.
Thanks!
0000
0001
Your turn 🙂
0010
Ostinato network traffic generator (ostinato.org) is available for the Raspberry Pi and you can generate a variety of traffic related use cases and good/bad crafted packets. You can use the Ostinato device emulation feature to emulate a whole subnet of hosts as well.
A useful way to run Ostinato on the RPi is to run only the command-line Ostinato agent (called Drone) on the RPi with wired ethernet as the “data/traffic” port (aka front panel port) while wireless can be used as the mgmt port to connect to the agent from the GUI controller running on your laptop. This lets you create traffic streams and control them all from your laptop to generate traffic out of the wired ethernet port to the switch. More than one RPis? No problem – add all of them into the same Ostinato GUI for remote control!
Full disclosure: I’m the creator of Ostinato.
That’s so cool. I’ll have to give Ostinato a try! Thanks for sharing Srivats. Nothing wrong with being proud of and sharing your work!
Forgot to include Thousand eyes enterprise agent. One of my newly favorite uses for a pi.
I love raspery pi
Thousand Eyes is something I really want to get more into. Sadly, I haven’t had the chance yet.
Sir, you say packet capture is “pretty slick”, I think this article is pretty slick. Thank you for sharing.
Ha… but which is slicker?
Another great use for a PI is with kubernetes. Use one or more PIs to run Rancher’s K3S and you’re on your way to having your own k8s cluster.
Agreed. If you’re trying to explore and really dive into Kubernetes, there are few cheaper hardware based ways to get started.
Kubernetes is one of those techs where there is a lot that is implementation specific, particularly in the network stack. So unless your organization builds it’s K8s clusters out of Raspberry Pis, you’ll probably need to explore some of the topics outside of Raspberryland.
I use a Pi for similar things. In addition to using screen there is a ububtu package called ser2net which can turn your pi in to a terminal server hosting multiple console connections accessible remotely or locally via telnet. Just thought I’d give it a mention if no else had already
Thanks. I’ll have to check our ser2net. I’ve had a few people mentioned packages for building full featured terminal servers on Raspberry Pi. I’ve always gone super basic, going to have to check these out.
I need my stickers
Don’t we all…
Hey Hank,
great Post ! I love it.
And daaamn, I almost spilled my coffee laughing so hard “how to exit vim without unplugging your computer”.
Greetings
Dominik
You made my Monday morning Dominik 🙂
I put little comments like those into my blogs hoping someone catches them and enjoys the blog a weee bit more.
Me too! Been there and done that!
As an addition to this great post, we can simply install PiHole and you will get DHCP and DNS servers with beautiful GUI.
Raspberry pi also can be used for IP KVM solutions (tiny pilot, pi-kvm). Personally I tried tiny pilot when setting up my headless server (can be used during initial CIMC setup as well).
I had thought about getting one but now after reading this article I am going to purchase one. Thank you!!
I first learned Ansible using a Raspberry Pi as my Ansible server. Worked great and prepped me for the frustrations of working with ARM processors and automation tools.
Oh man… I remember the first time I had a practical introduction to the significance that processor architecture can make. And it was on a RPi as well. Don’t remember what the tool was, but something I had used a bunch on my laptop didn’t have a version for ARM. Working out how to compile on a first gen RPi wasn’t too bad. But the amount of time it took to run on a RPi vs on my “super powered” laptop was huge 🙂
I have several Pi’s on my network. 1(3B) runs NEMS Linux as the network monitor. 2 (4B’s) running Pihole in an HA pair configuration. The primary Pihole is also running PIVPN with Wireguard. 1 (4B) running Radius and TACACS. I also have a (3B) running RuneAudio. I’ll be installing Netbox on a 4B after reading your article.
What a great article, I love the PI
Thanks Frank! I’m a big fan of all this Pi (with and without the “e”).
I’ve been wanting to run a netflow collector on rpi but never gotten around to it. The plan has been to try vFlow + some storage (clickhouse?) + some frontend (grafana?) which in theory it should be able to scale out if one rpi isn’t enough, which is also why I figured it would be fun project to play around with. Fingers crossed for a rainy summer?
That sounds like a great use case. I think you’ll find scale issues pretty quickly if you tried to use it in a production setting, but for lab and seeing how it works and RPi should be perfect.