Try this AppDynamics/Webex Teams Mashup
What is great about Cisco Webex Teams is that I can start working on the desktop client and pick up where I left off when I go mobile via my iOS or Android client. Since both the desktop and mobile clients support notifications, I never have to worry about receiving an important message from a team that I’m collaborating with. In addition to these benefits, there are a number of API’s that allow you to create bots to enhance your workflows.
Recently I’ve had the opportunity to get to work with the powerful tools that AppDynamics (AppD) has to offer. In addition to automatically and dynamically mapping out your application flow and providing business transaction scoring and correlation, AppDynamics has a powerful monitoring and alert system. Like other monitoring systems you are able to send out SMS or email alerts based upon various criteria. What is really cool is that the AppDynamics controller can fire HTTP requests at a web server!
Use the Webex Teams APIs to do Really Cool Things
This opens up a variety of use cases where we can take advantage of the Webex Teams API’s to do really cool things! For example, we could develop a Cisco Webex Teams Bot that creates a triage space to start troubleshooting an issue that AppDynamics detects. The bot can also pre-populate the necessary team space members as well as post links/logs and other information necessary to hit the ground running in triaging the issue.
Let’s get started!
Server Restart Meet Triage Bot
I already have AppD monitoring a couple of my own Webex Teams Bots, so let’s setup App Dynamics and a Webex Teams Bot to do the following in case a server I’m monitoring restarts. Here is a high level view of the architecture.
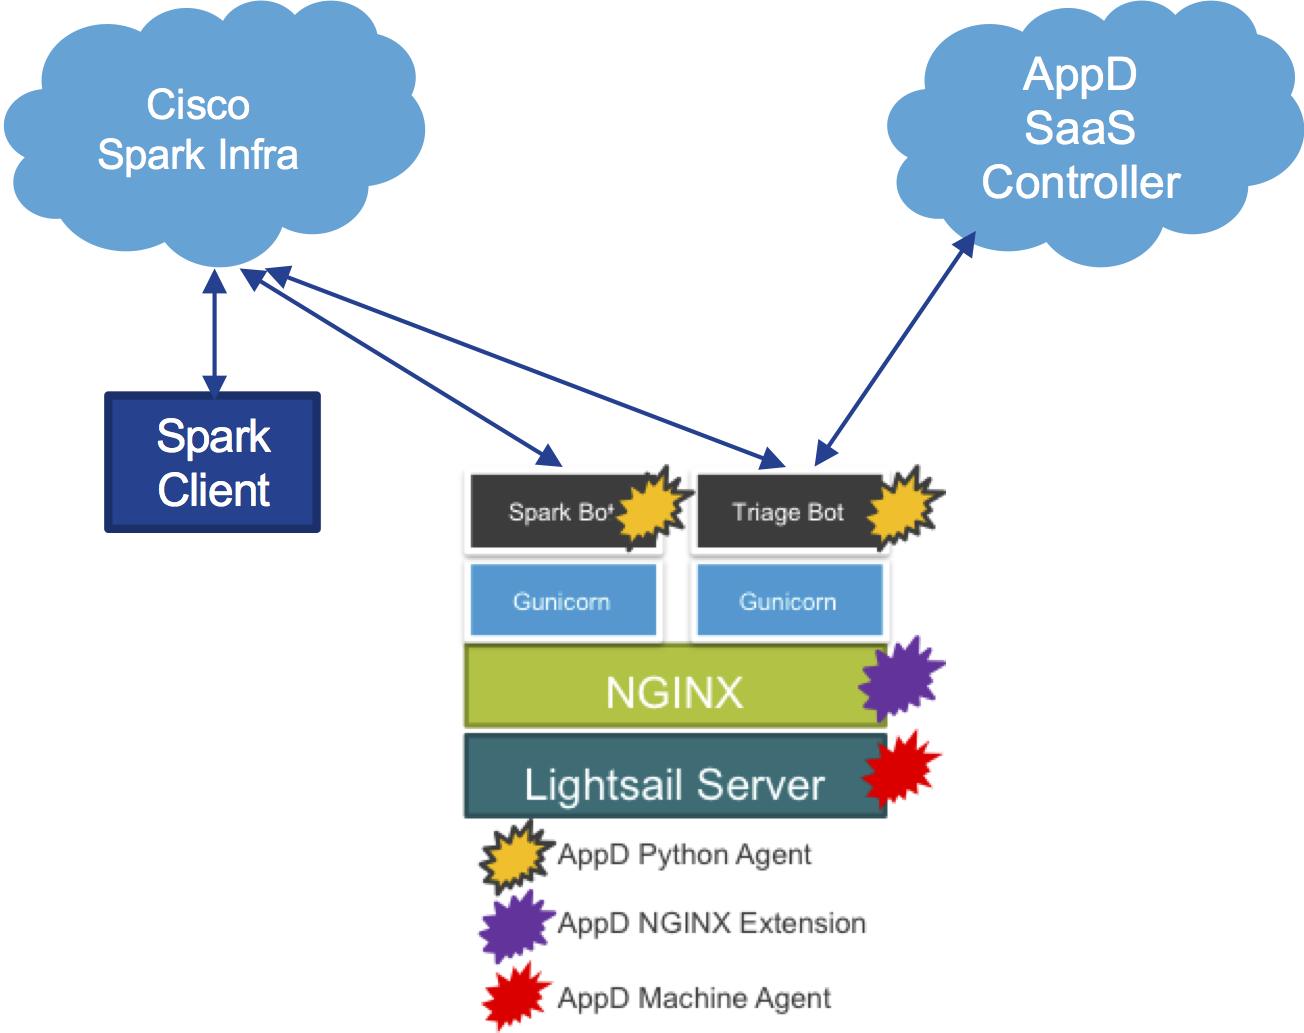
When AppD discovers a restart, I would like the following to happen:
- AppD send an HTTP request to the bot we’ll call AppD Triage Bot. The body of the request should include:
- List of team members to be added to the Webex Teams space
- Issue name and description
- Link to more information on the AppD controller
- Upon receipt of the a valid HTTP request, the AppD Triage Bot will:
- Create the WebEx Teams space
- Populate the space with team members
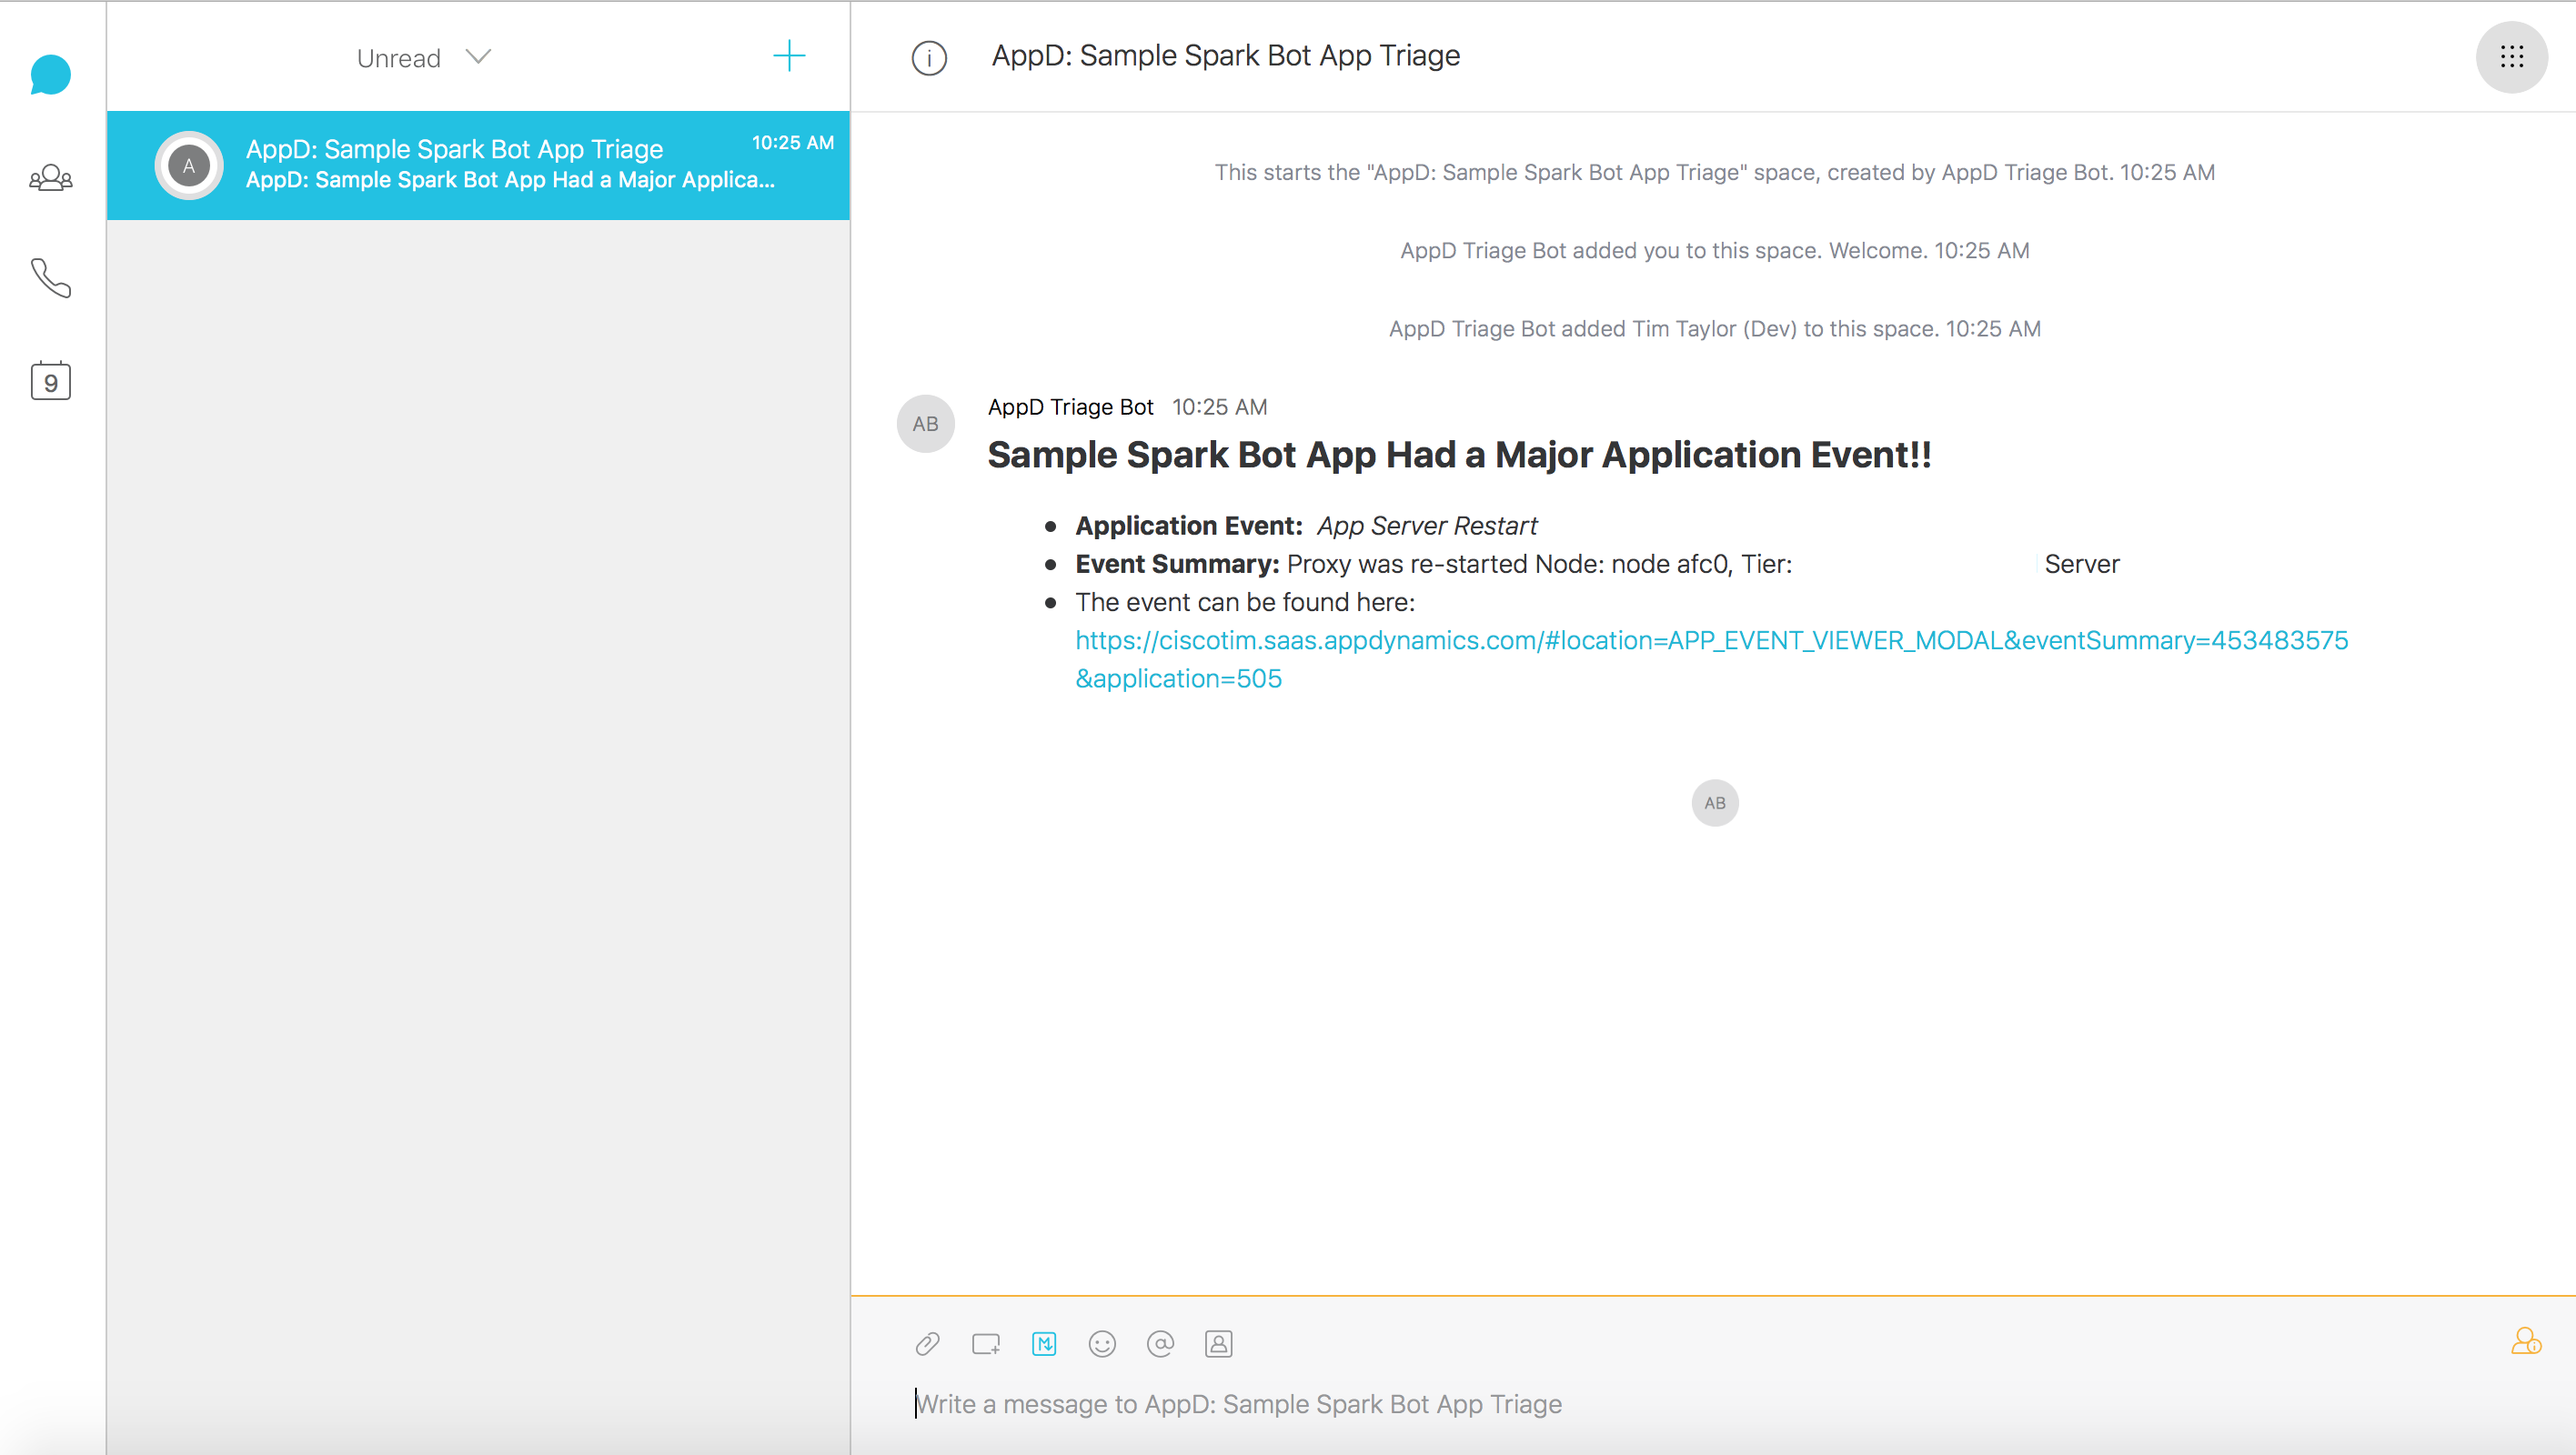
- Post an informative message to the newly created team space so that the team understands what is going on, and
- Provide a deep link to more relevant information on the AppD controller.
Here is a high-level view of the call flow.
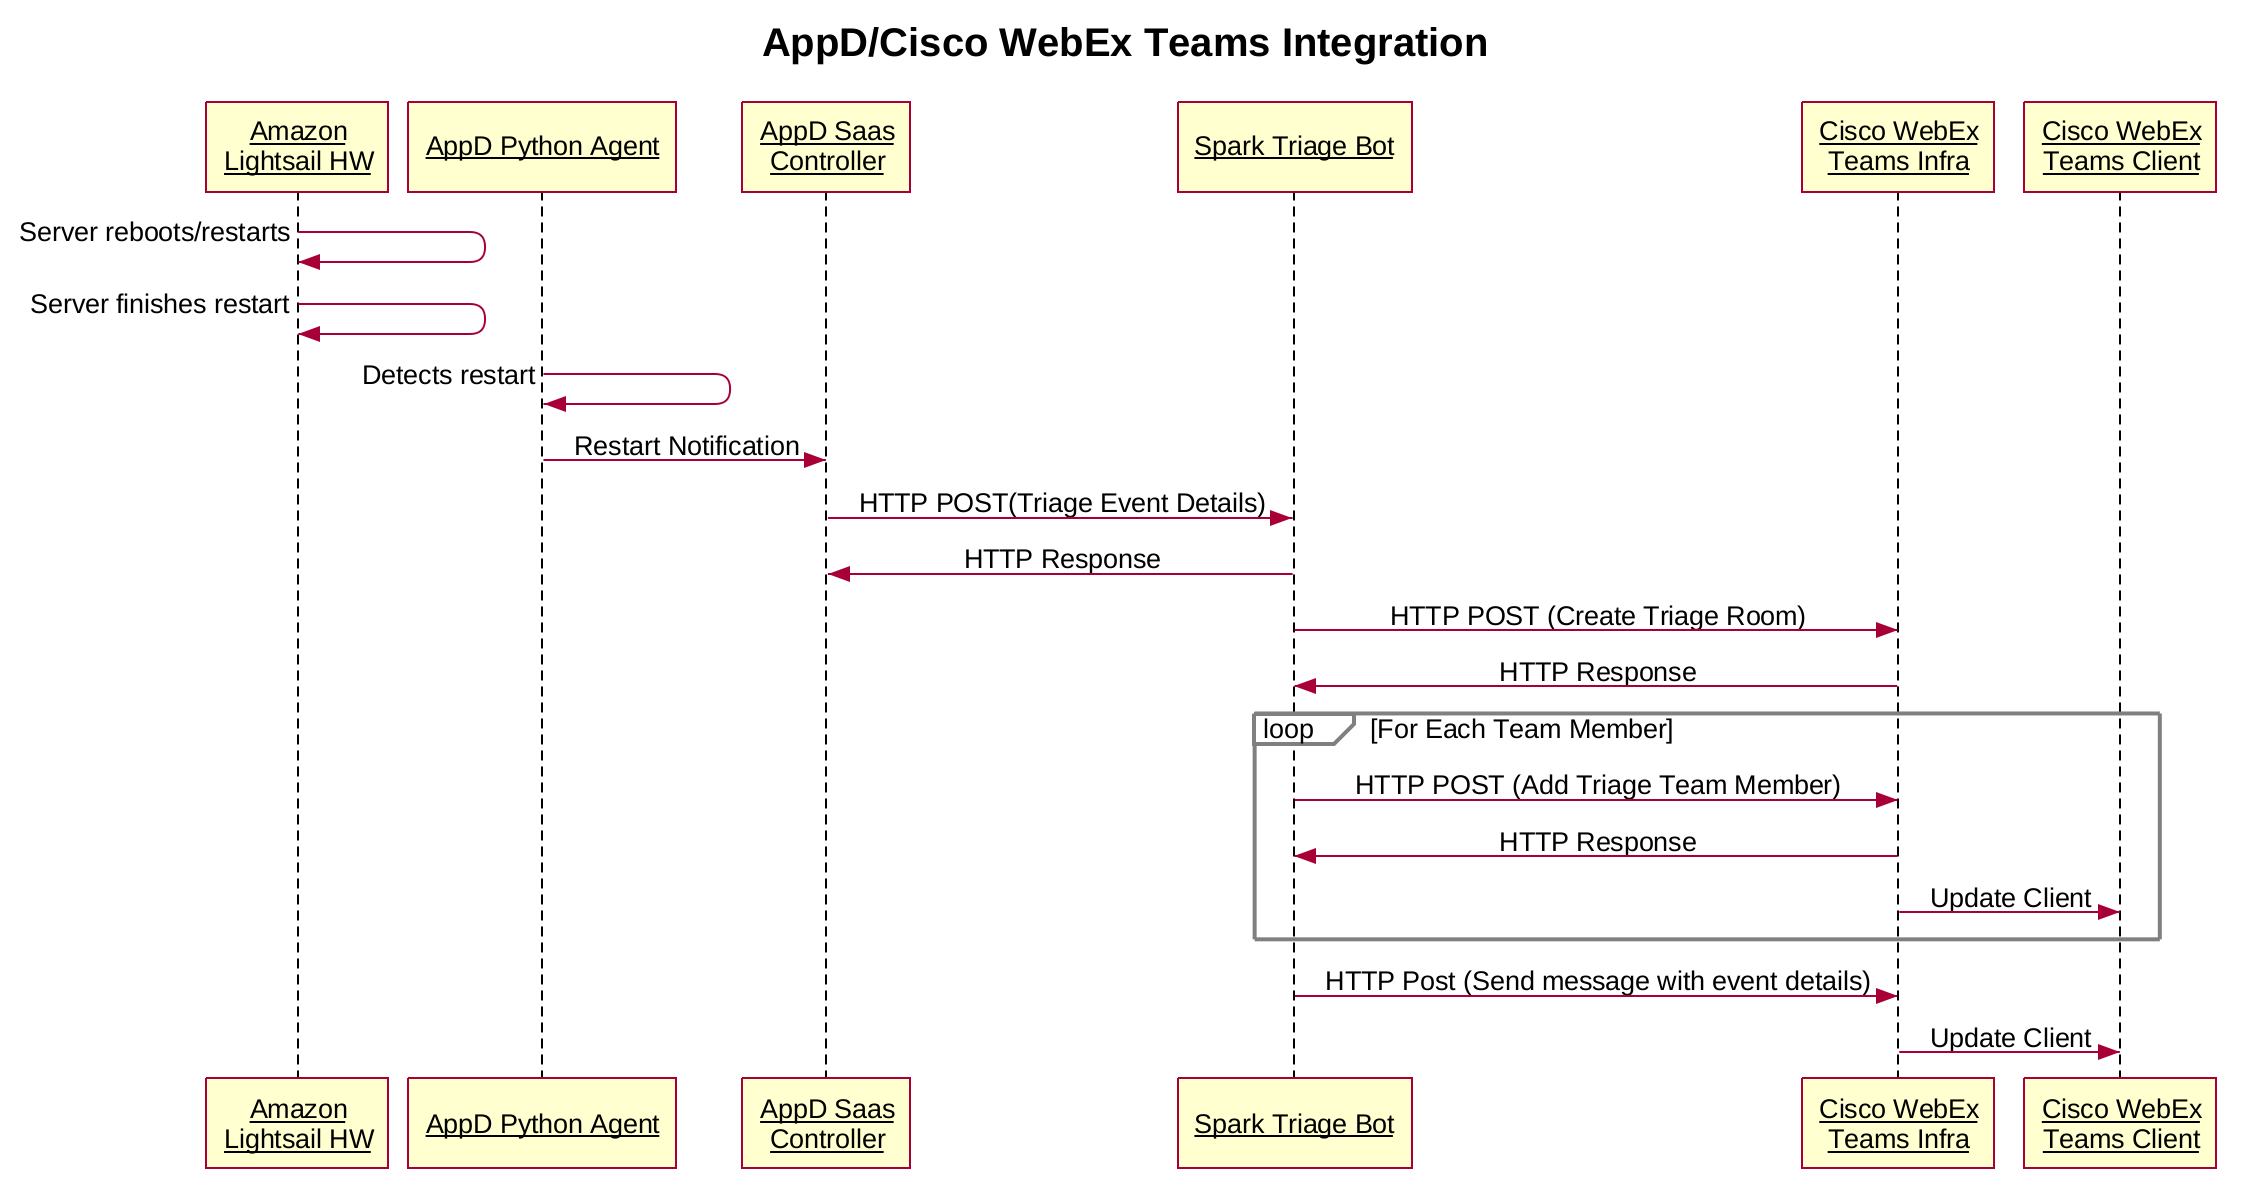
Let’s Go Deeper
In order for the monitor and alert functionality to work on AppDynamics, you need to create a Policy that defines the criteria that you want to monitor and the action that you want to take. In order to do this, log into your controller and click the “Alert & Respond” Tab. Once you are on the “Alert & Respond” Tab, you will want to choose your application from the drop down menu and then click “Policies”. This will take you to a list where you can edit, delete and create new policies.
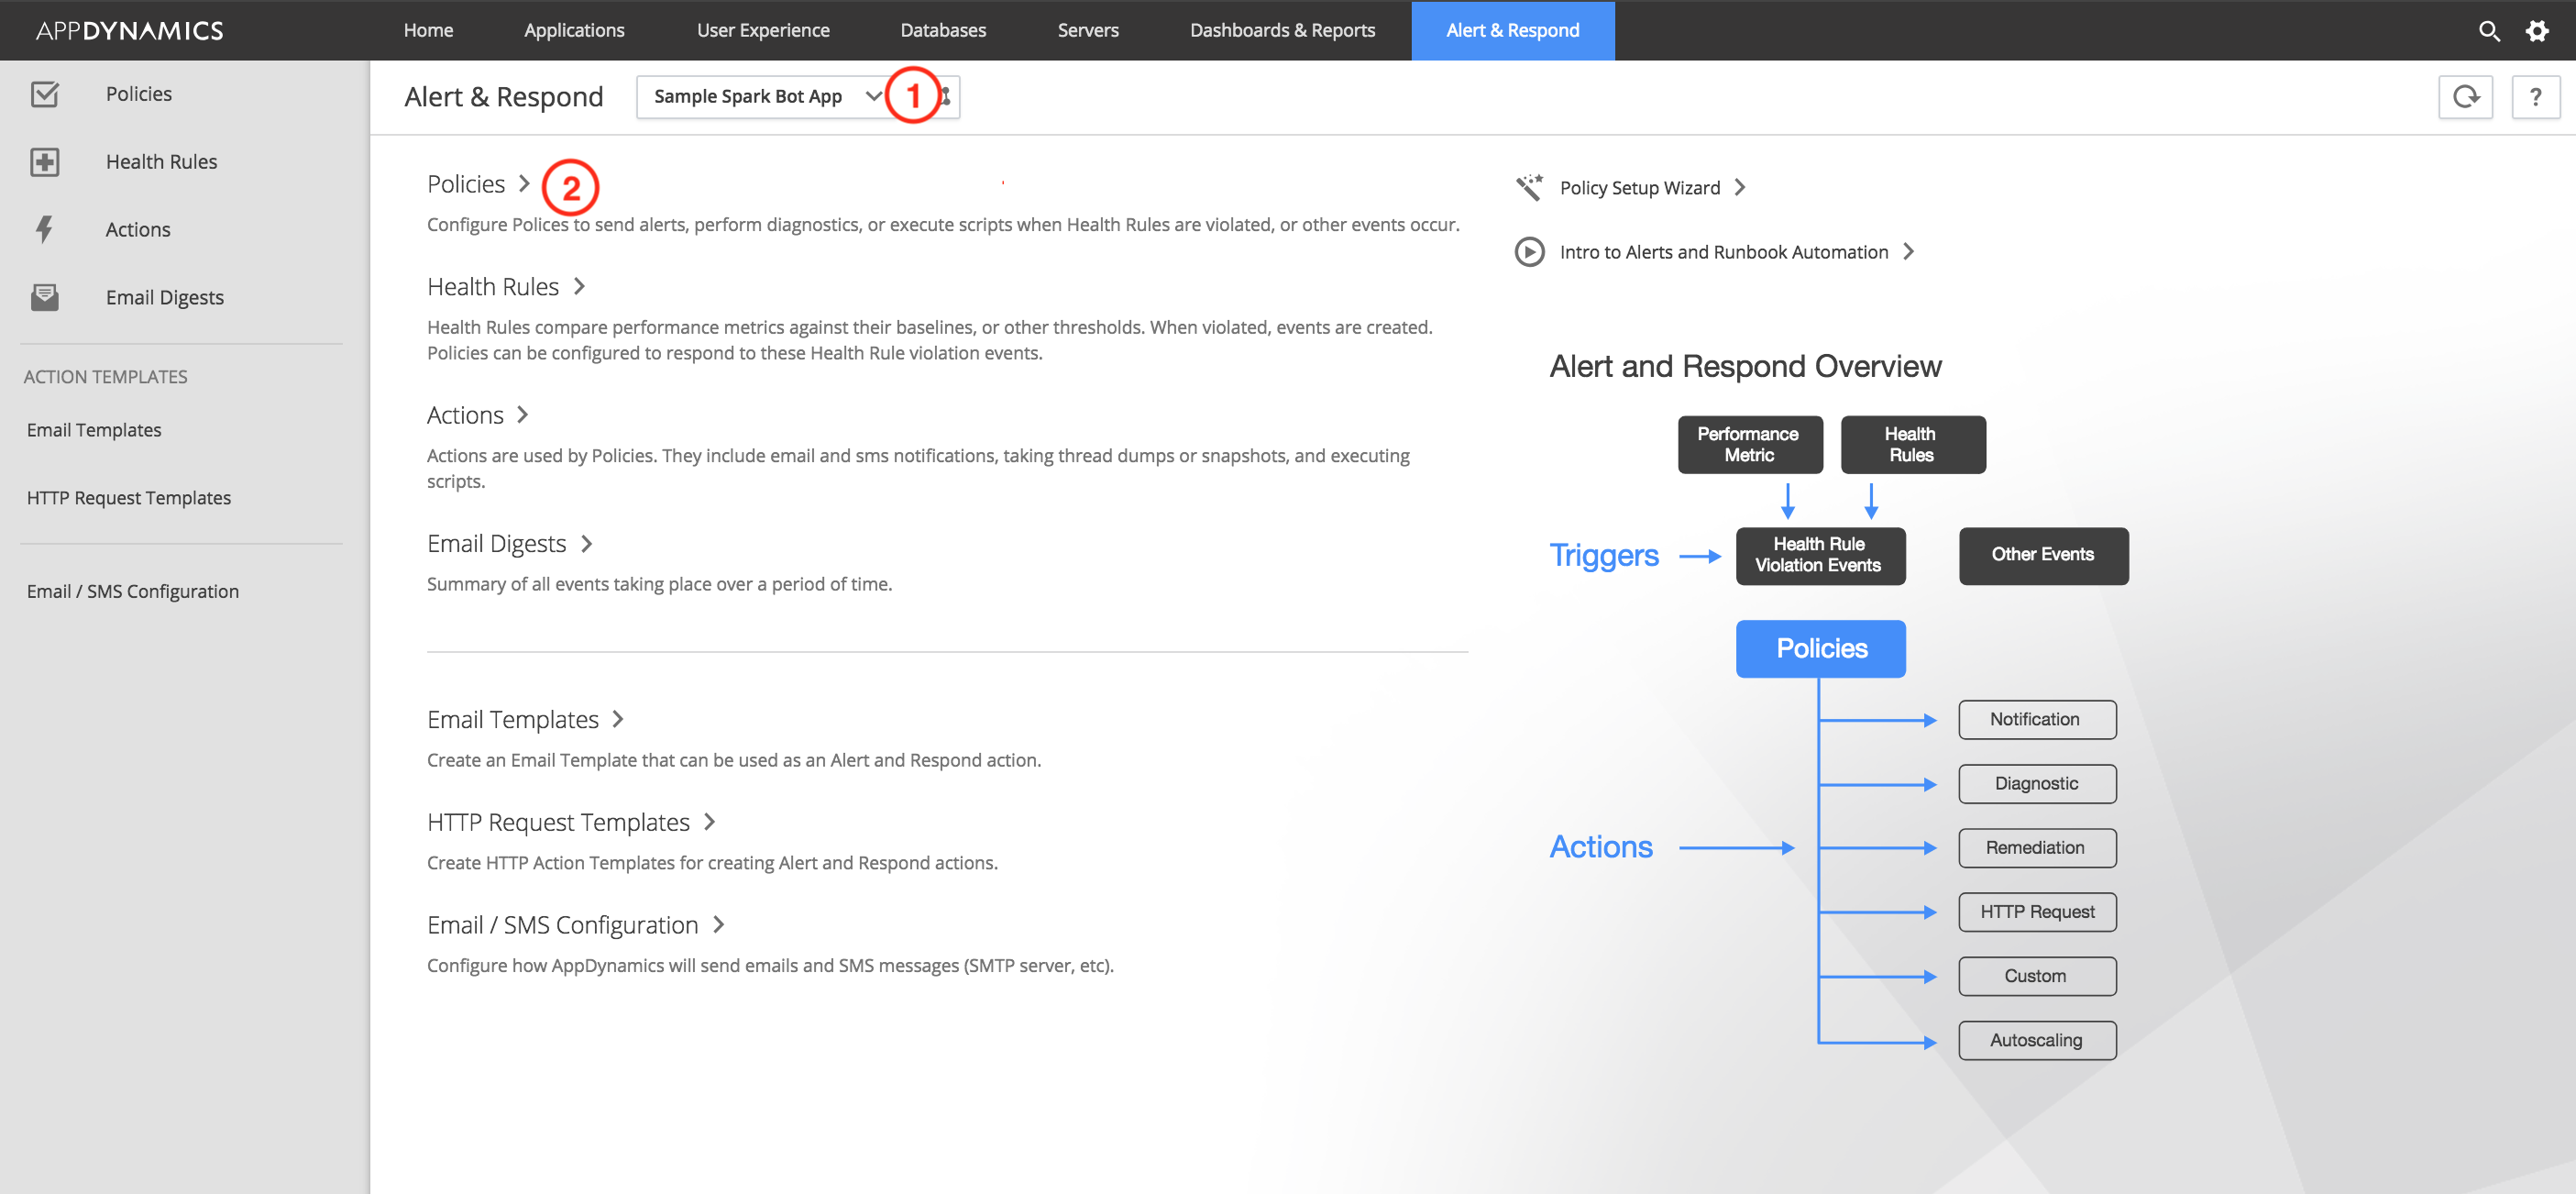
If you have not already done so, create/add a policy.
The monitoring criteria can be performance metrics, health rules related to business transaction performance or specific events like a server restart. It can really be anything you like. For example, say some of your business transactions start slowing down to unacceptable level. Trigger the alert! For the sake of simplicity, I’ve decided to go with a simple server restart.
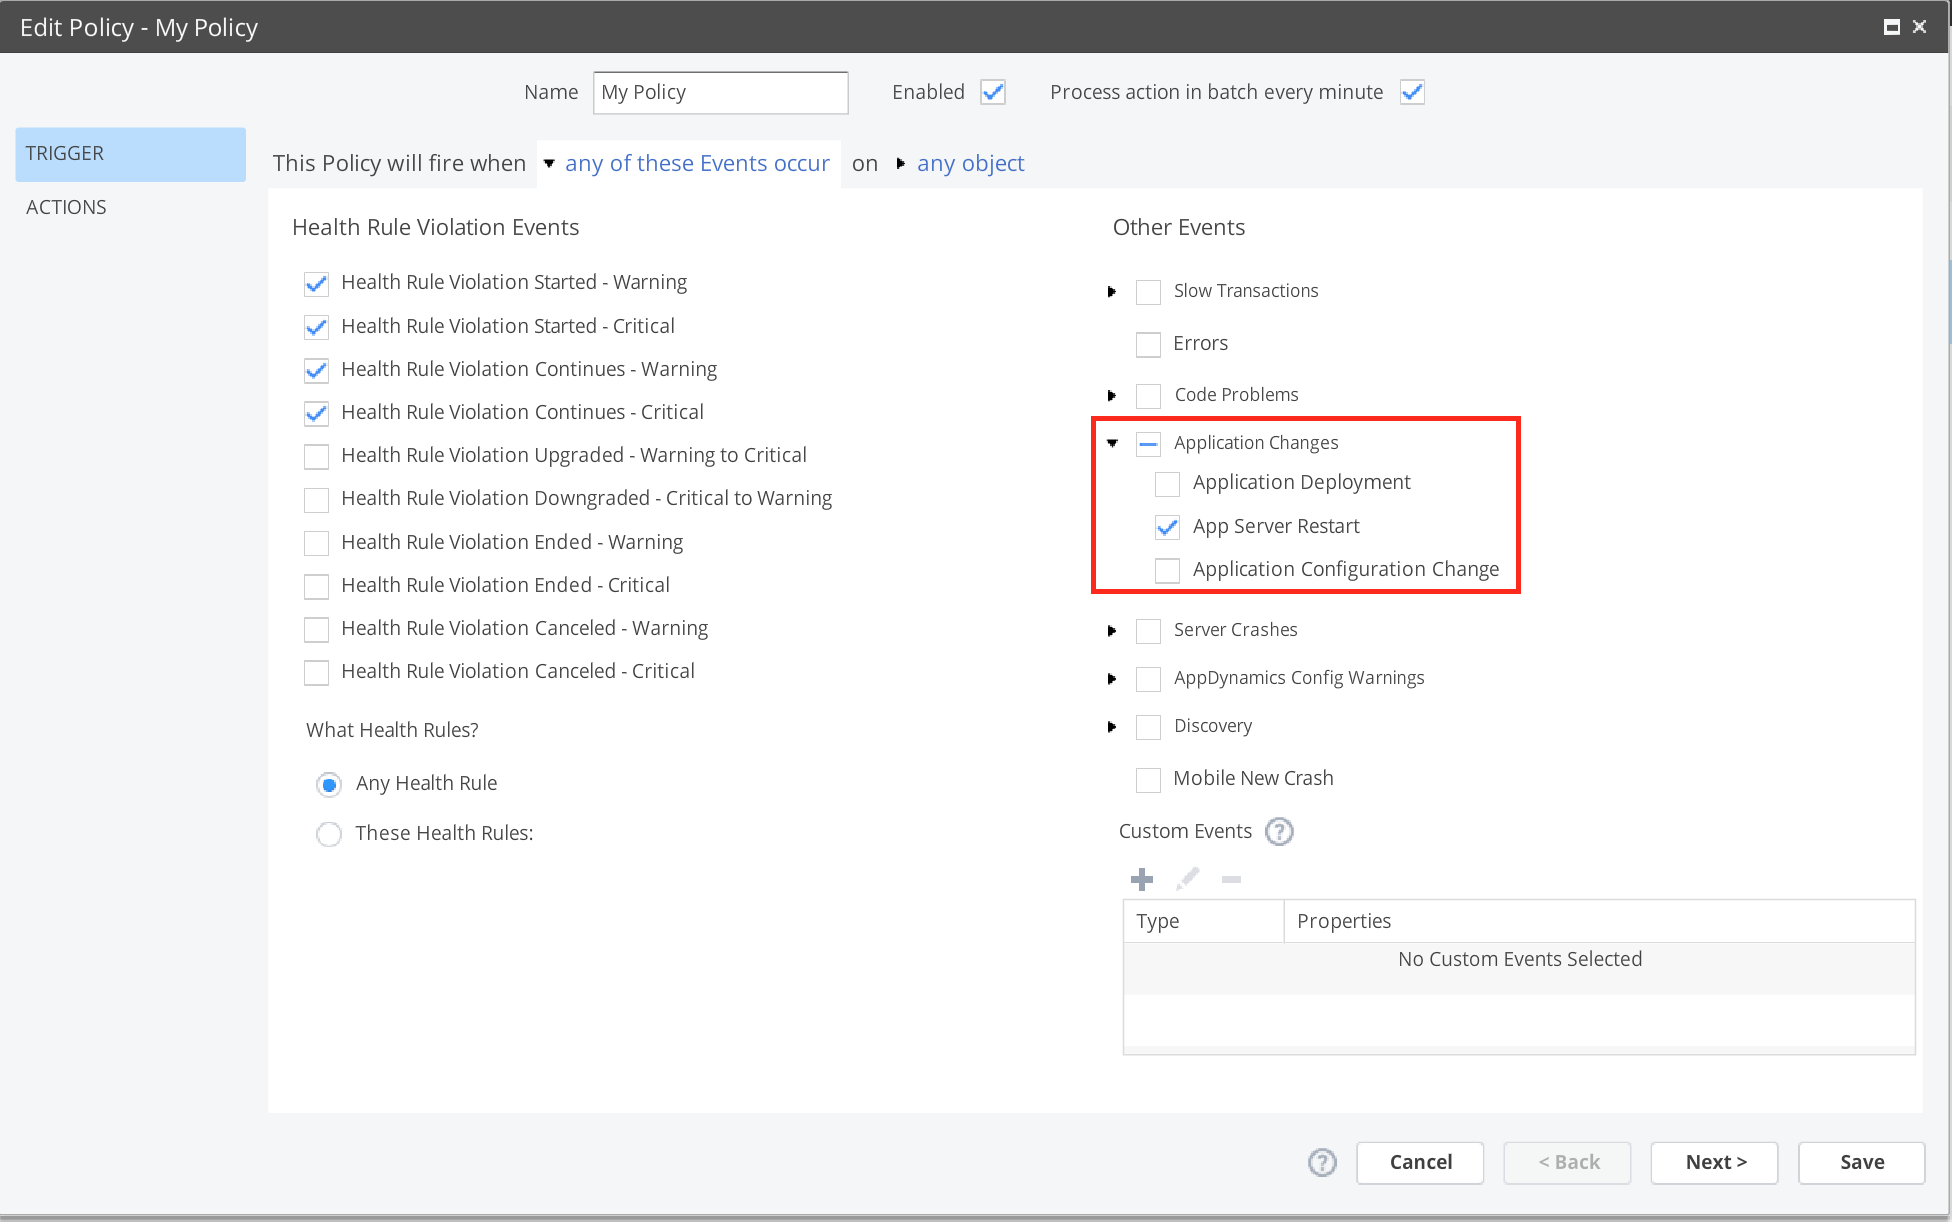
In order to take action with an HTTP Request, we first have to define an HTTP Request Template. With the policy and HTTP Request defined for our case, when a server that we are monitoring restarts, the AppD controller will fire an HTTP Request to our AppD Triage Bot.
Creating an HTTP Request Template is fairly straight forward and I’d recommend checking out the documentation for a quick primer. The main things you will need to fill out in the form includes:
- Name of the Template,
- URL of the Triage Bot Web Server,
- Both the “Accept” and “Content-Type” request headers,
- Add your own customer header called **Triage-Auth-Token**. This header is populated with a secret token that should be stored in an environmental variable on your bot server. It is used to authenticate your webhook
- Payload MIME Type, and
- Payload JSON
It is this HTTP Request Payload that we need to customize that will allow us to really differentiate our bot and provide a lot of context to our Webex Teams triage space. The body will be a JSON dictionary that will contain two arrays, defined in the following way:
- An array of team members that the bot will populate the space with, and
- An array of events that have triggered the alert HTTP Request
The team members are pretty easily populated, but how do we get events? Well, fortunately, the gurus at AppD allow scripting of the HTTP Template Request Body via Apache Velocity. In a nutshell, the Apache Velocity Templating language allows us to populate the contents of the request body at alert time so that we have the most up to date contextual information possible.
here is the JSON body snippet for the payload template:
[cc lang=”python” width=”600″ height=”450″]{
“triageEmailList”: [
“superawesomeuser@yourgreatcompany.com”,
“supersupportguy@yourgreatcompany.com”
],
“events”: [
#foreach(${event} in ${fullEventList})
#set( $msg = $event.summaryMessage.replace(“”, “\\n”) )
{
“app”: “${event.application.name}”,
“appid”: “${event.application.id}”,
“tier”: “${event.tier.name}”,
“node”: “${event.node.name}”,
“time”: “${event.eventTime}”,
“deeplink”: “${event.deepLink}”,
“name”: “${event.displayName}”,
“severity”: “${event.severity}”,
“message”: “${msg}”
}
#if($velocityCount != $fullEventList.size()) , #end
#end
]
}[/cc]
Let’s break it down. The first dictionary entry, triageEmailList, is the list of team members we want to add to the space. The second dictionary entry is the list of events that generated the alert. Velocity allows us to script this into a set of key/value pairs that the Triage Bot can process and build a contextually relevant message for the triage space. As you can see from the listing, we can provide a bunch of information including the specific application name, the name of the alert, it’s severity, alert message info. Most importantly there is a deep link provided that allows the team to immediately start looking into the issue at hand.
When the HTTP Request is fired, the JSON body looks something like this:
The resulting JSON body looks like this:
[cc lang=”python” line_numbers=”True” width=”600″ length=”450″]{
“events”: [
{
“app”: “Super Awesome Spark Bot”,
“appid”: “505”,
“deeplink”:”https://xyz.saas.appdynamics.com/#location=APP_EVENT_VIEWER_MODAL&eventSummary=132914372&application=505″,
“message”: “Proxy was re-started Node: node afc0, Tier: Web Server”,
“name”: “App Server Restart”,
“node”: “node afc0”,
“severity”: “INFO”,
“tier”: “Web Server”,
“time”: “Thu Jan 11 09:51:25 PST 2018”
}
],
“triageEmailList”: [
“superawesomeuser@yourgreatcompany.com”,
“supersupportguy@yourgreatcompany.com”
]
}
[/cc]
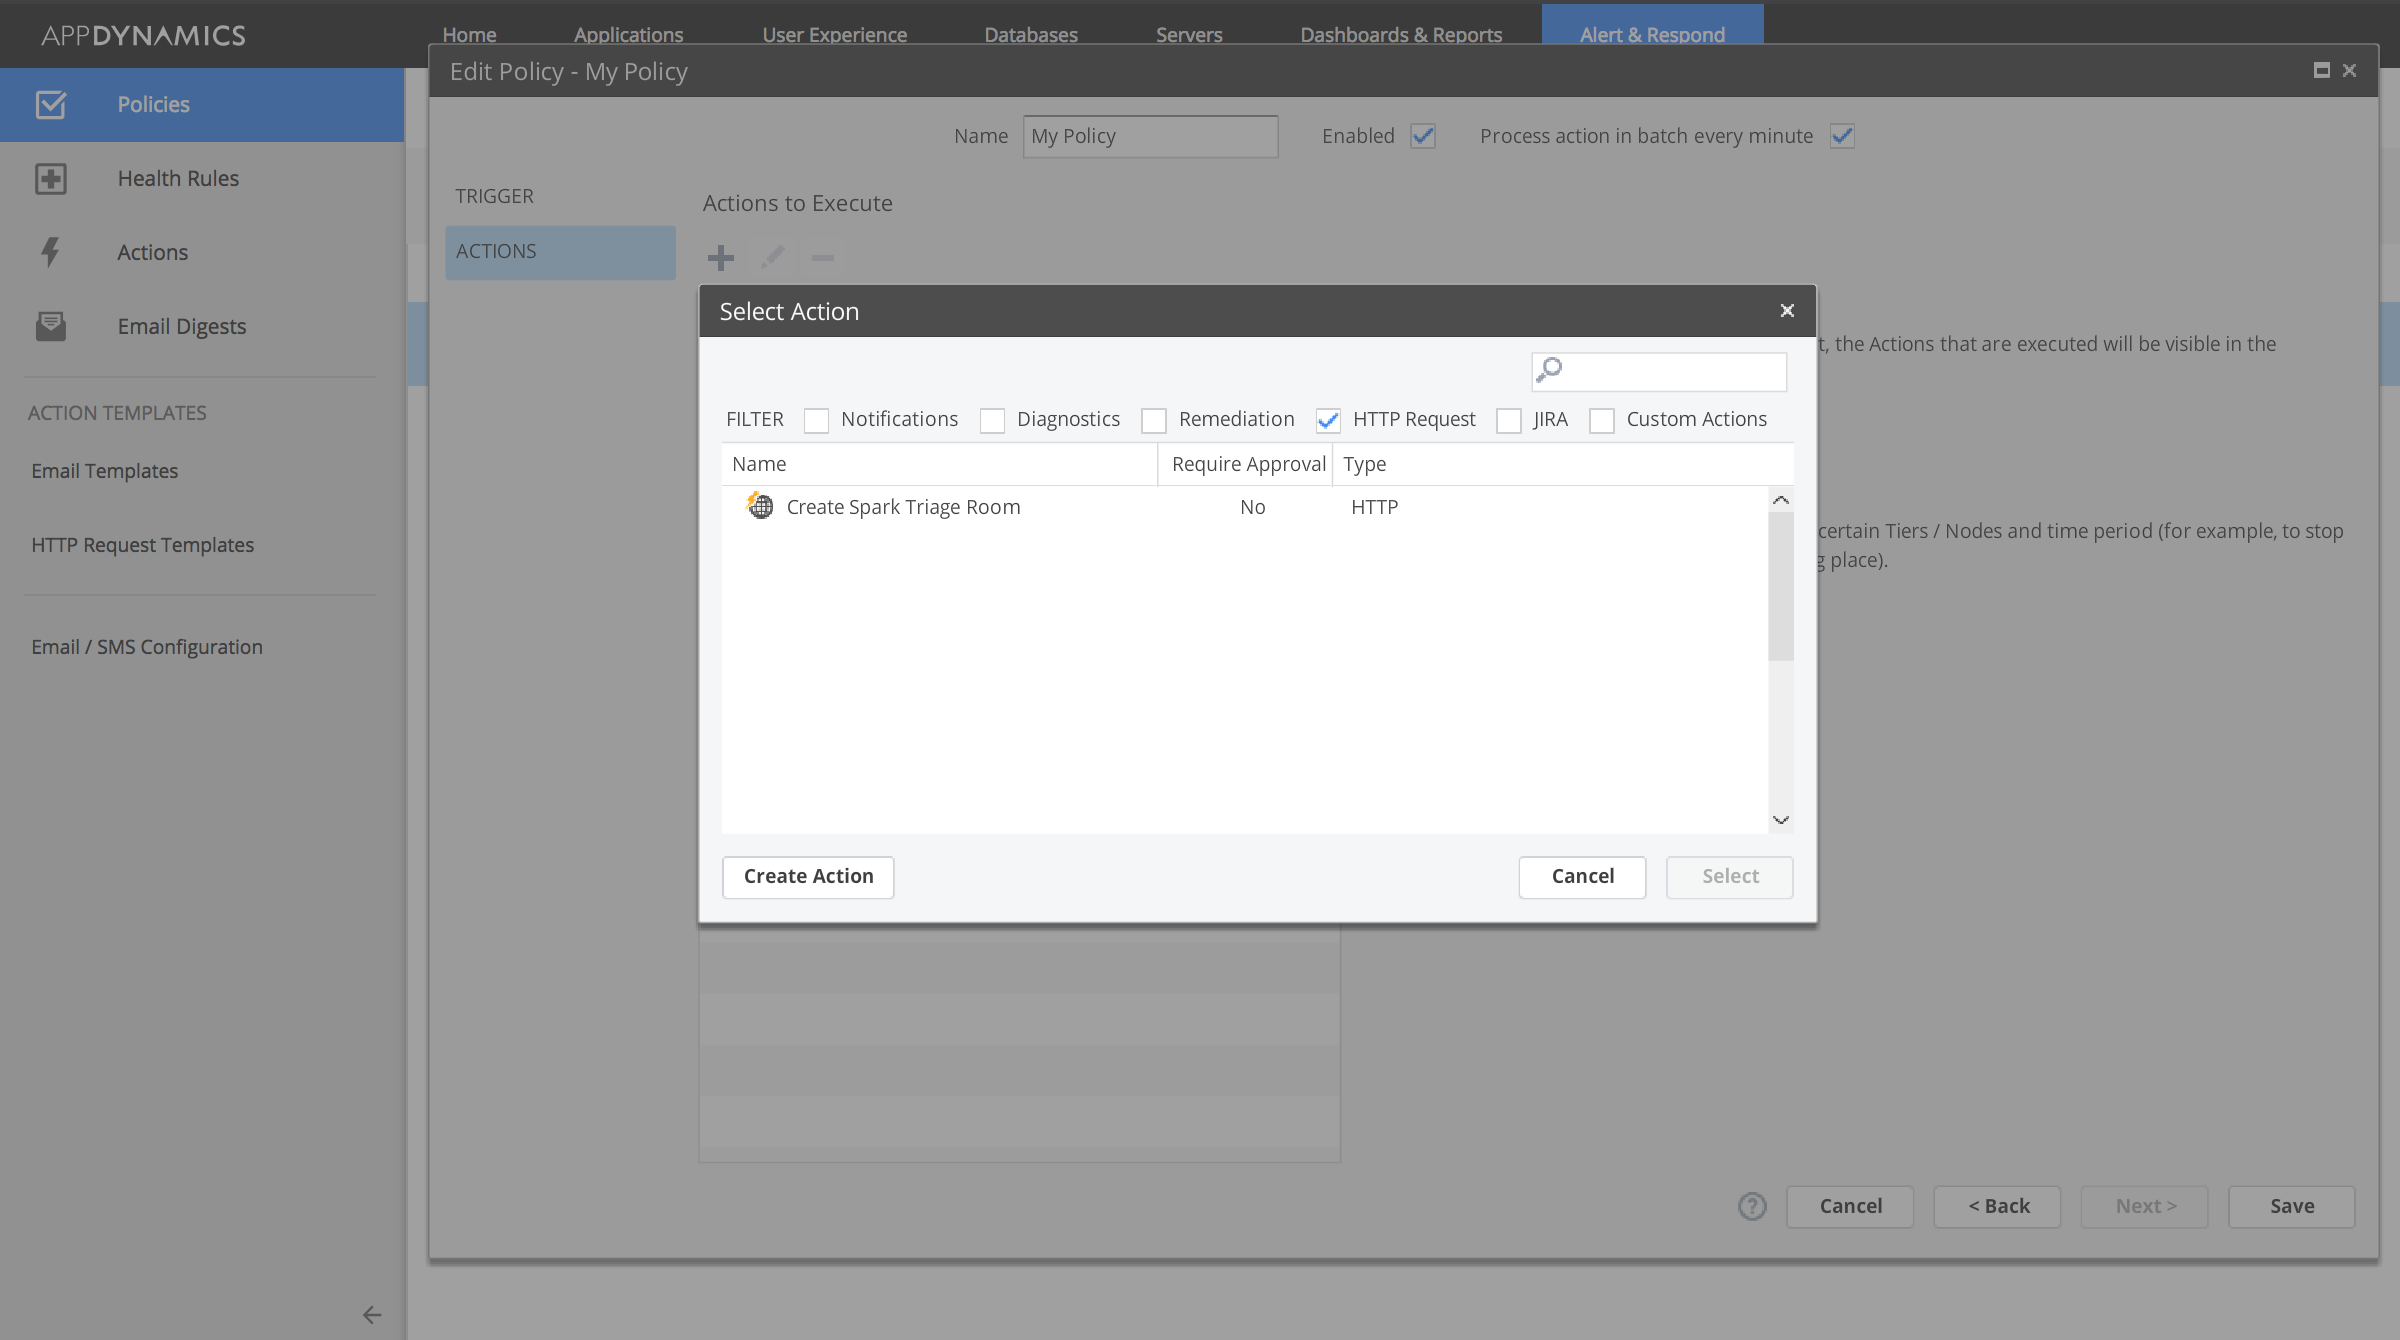
Now that we have created the HTTP Template, we need to go back into the Policy we created and assign an action. So go back, edit your policy, select “Actions” and then add the newly created HTTP Template.
The Code
Now let’s look at the Triage Bot code. It is a simple Python based Flask application that takes the request, parses the JSON payload, and creates the Webex Teams space. So let’s break down the code.
The first part is standard Flask stuff:
[cc lang=”python” width=”600″]
@app.route(‘/appdtriagebot’, methods =[‘POST’])
def triage_room_required():
date_time = dt.datetime.now()
if verify_incoming_request(request):
request_json = request.json
build_triage_room(request_json)
else:
print(“{}, POST request was NOT successfully verified.”.format(date_time))
return “Ok”
if __name__ == “__main__”:
app.run(host=’0.0.0.0′)
[/cc]
pretty simple. We take the HTTP request, verify it’s coming from our AppD controller via a token embedded in the request and then fire a function, build_triage_room, that takes the request payload and builds the space. We will do the following:
- Create the WebEx Teams Space with an appropriate name.
- Populate the space with people listed in the *triageEmailList* JSON array in the request payload above, and
- Send a summary of the event that needs triaging to the space. We will want to include an HTML deep link back to the event so that users can dive right in and start troubleshooting.
Now let’s take a look at how we do this in code:
[cc lang=”python” width=”600″ height=”1100″]
def build_triage_room(appd_request_json):
the_url = “https://api.ciscospark.com/v1/rooms”
date_time = dt.datetime.now()
print(“{}, build_triage_room start”.format(date_time))
# Get the event from the request json
event = appd_request_json[‘events’][0]
# Get the app name from the event
app_name = event[‘app’]
# Create the title of the room from the app name we just pulled
message_json = {“title”: “AppD: {} Triage”.format(app_name)}
#Grab our bot_token that we stored in the environment because it’s not a good thing to store it in code.
bot_token = os.environ.get(‘APPD_TRIAGE_BOT_ACCESS_TOKEN’)
# Create the HTTP Post for creating the triage room
message_response = requests.post(the_url, json=message_json, verify=True, headers={‘Authorization’: ‘Bearer {}’.format(bot_token),’Accept’:’application/json’})
# Handle potential errors gracefully. In this case just print something to STDOUT
if message_response.status_code==200:
message_response_json = json.loads(message_response.text)
date_time = dt.datetime.now()
print(“{}: Creation of the room was successful”.format(date_time))
# Creating the room was successful. Now we need to populate the room with people necessary to triage it.
#
# First we need the room id of the room we just created.
room_id = message_response_json[‘id’]
date_time = dt.datetime.now()
# We get that list of people from the JSON message.
email_list = appd_request_json[‘triageEmailList’]
populate_spark_room_members(room_id, bot_token, email_list)
# Retrieve the event that caused this and post it as a message to the room
# Post to the room
date_time = dt.datetime.now()
print(“{}: Posting event info to the room”.format(date_time))
events = appd_request_json[‘events’]
populate_spark_room_message(room_id, bot_token, events)
else:
date_time = dt.datetime.now()
print(“{}: failure, received status code: {}”.format(date_time, message_response.status_code))
date_time = dt.datetime.now()
print(“{}, build_triage_room end”.format(date_time))
[/cc]
Here is a screenshot of the finished product!
Conclusion
So, to wrap up, we took two different Cisco products and tied them together to make something greater than the sum of their parts. We utilized AppDynamics alerting and monitoring functionality to trigger a Cisco Webex Teams Bot to:
- Create a Webex Teams space
- Invite a list of participants who are need to root cause and solve the problem
- Post to the space an informative message with a deep link back to the AppD Controller so that the team can dive right in and start troubleshooting.
Hopefully you can see the possibilities that leveraging the AppD functionality and Cisco Webex Teams API’s allow. The code for the bot can be found on the CiscoSE GitHub page. Check it out, give it a try and see if you can embrace and extend it into your own workflows.
Good Luck!
We’d love to hear what you think. Ask a question or leave a comment below.
And stay connected with Cisco DevNet on social!
Twitter @CiscoDevNet | Facebook | LinkedIn
Visit the new Developer Video Channel

Great Article , Thanks for posting !!
Will it be possible for AppD to collect diagnostic info using the machineagent deployed on the target server.
The Standalone Machine Agent collects basic hardware metrics from the server's OS. It also has support for for creating extensions to generate custom metrics. You can leverage this info as well as info collected from your server and app agents to help you narrow down the cause of your issue.
That is the great thing about AppD. All the information from you application flow in one dashboard