
Use this Script to Turbocharge Webex Teams Bot Development
When I first started developing Webex Teams bots, I immediately was drawn to ngrok for its simplicity and power. It allowed me to rapidly start prototyping my bot and to do quick demos. It was simple to setup up very quickly and has a great Client API set that allowed me to dig into the details if I needed to troubleshoot. This article is not meant to be an extensive tutorial on ngrok, so if you are interested in more information on including it in your workflow, see the following links:
- 6 awesome reasons to use ngrok when testing webhooks
- Cisco DevNet Learning Labs – Run a Cisco Spark Bot locally. Note you will need a free Cisco DevNet account to access this link.
Because of the ephemeral nature of the ngrok tunnels, though, it is somewhat of a nuisance to develop your bots because every time you tear down an ngrok tunnel and build it back up at a later time, you end up with a different URL for the webhook. If you’ve prototyped or demo’d a Webex Teams bot before, then you know that you then have to update the webhook with the new URL. This means going to the developer site and modifying the webhook by hand. The process goes somewhat like this:
- Bring up an ngrok tunnel
- Go to the Webex Teams website
- Update your webhook to the new URL that ngrok just gave you.
- Run the demo
- Shut down your demo
- Rinse, lather and repeat every time you need to bring up the tunnel!
The same basic process is applies when beginning to prototype your bot. Bring up a tunnel, update the webhooks, develop/test, tear down the tunnel, rinse and repeat. Don’t forget that you need to use your bot’s token rather than your developer token for #3 above. Plus you need to make sure that you don’t make any copy/paste mistakes, etc. Yucky, manual work!
Fortunately we can mashup the ngrok Client and Webex Teams API’s to do this in a more elegant and automated fashion.
Solution
So the process for automating this is relatively simple, so let’s dive in. Typically it is as simple as this:
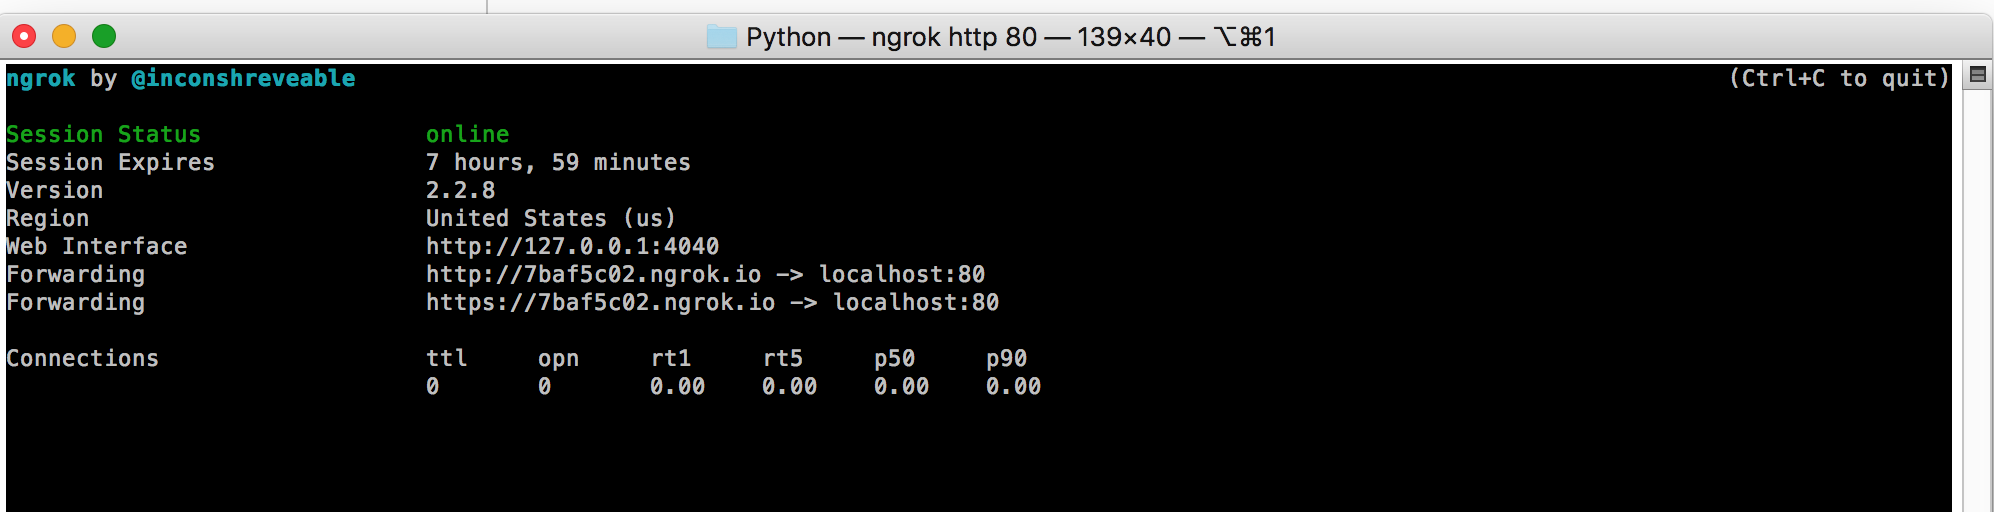
First, bring up the tunnel using ngrok:
[cc lang=”bash”]
./ngrok http 80
[/cc]
You will end up with something along these line as output in the terminal.
We then run the ngrok-startup.py with two arguments. The first is the port you want the tunnel to be listening on and the second is the name of the new tunnel.
[cc lang=”bash”]
python3 ngrok_startup.py 443 “super_awesome_demo_bot”
[/cc]
which will result in a series of status messages describing what the script is doing:

And we are done. The script used the ngrok Client API to tear down the existing tunnels, create new ones and then update your bot’s webhook. Now you able to iterate your bot PoC and then demo it live without going through all those manual steps a bunch of times.
The Code
I know a wall of text isn’t very interesting, but you may not be familiar with these specific APIs. So I’m going to walk through the five core functions. The full script can be found on the Cisco SE Github site.
So let’s take a looksie at some interesting API nuggets. Since ngrok automatically creates a set of tunnels at startup, in order to start with a clean slate, we will tear those down and create a new set.
The ngrok client API couldn’t be easier to use. We start by first getting a list of the open tunnels.
[cc lang=”python” width=”600″ height=”450″]
def get_tunnels_list(ngrok_base_url):
print(“get_tunnels_list start”)
error = “”
active_tunnels = list()
print(” Getting the list of tunnels…”)
tunnel_list_url = ngrok_base_url + tunnels_api_uri
r = requests.get(tunnel_list_url, verify=False)
print(” …Received List of Tunnels…”)
# get the json object from the response
json_object = json.loads(r.text)
tunnels = json_object[‘tunnels’]
if r.status_code==200:
for potential_tunnel in tunnels:
active_tunnels.append(potential_tunnel)
else:
error=” Unable to list of tunnels”
print(“get_tunnels_list end”)
return active_tunnels,error
[/cc]
As you can see above, we send an http GET request to the local ngrok client. If successful, we get a list of the currently open tunnels.
Next we delete all the tunnels on the list. There should only be two, but we iterate through the entire list we get anyways.
[cc lang=”python” width=”600″ height=”450″]
def delete_active_tunnels(tunnel_list, ngrok_base_url):
print(“delete_active_tunnels start”)
errors=list()
tunnel_delete_base_url = ngrok_base_url + tunnel_delete_uri
print(” beginning delete of tunnels…”)
for tunnel_to_delete in my_active_tunnels:
tunnel_name = tunnel_to_delete[‘name’]
tunnel_delete_complete_url = tunnel_delete_base_url + tunnel_name
delete_request = requests.delete(tunnel_delete_complete_url, verify=False)
if delete_request.status_code != 204:
errors.append(“Error Deleting tunnel: {}”.format(tunnel_name))
print(” …ending delete of tunnels…”)
print(“delete_active_tunnels end\n”)
return errors
[/cc]
Again, pretty self explanatory. We take the list of tunnels we received from the previous code snippet and delete each tunnel with an HTTP DELETE request.
Next we create a new tunnel, using the tunnel name provided in the second argument of the ngrok_startup.py command.
[cc lang=”python” width=”600″ height=”450″]
def public_tunnel_for_name(tunnel_name, tunnel_port, ngrok_base_url):
print(“public_tunnel_for_name start”)
errors=list()
public_tunnel = ()
create_tunnel_url = ngrok_base_url + tunnels_api_uri
# make sure you change the port!!”
print(” creating new tunnel…”)
tunnel_json = { ‘addr’ : tunnel_port, ‘proto’ : ‘http’, ‘name’ : tunnel_name}
create_tunnel_response = requests.post(create_tunnel_url,json=tunnel_json,verify=False)
if create_tunnel_response.status_code != 201:
errors.append(“Error creating tunnel: {}”.format(create_tunnel_response.status_code))
else:
jsonObject = json.loads(create_tunnel_response.text)
public_tunnel = (jsonObject[‘public_url’],jsonObject[‘uri’])
print(” …done creating new tunnel”)
print(“public_tunnel_for_name end\n”)
return public_tunnel,errors
[/cc]
To create the tunnel, we just send an HTTP POST request to the ngrok client with a JSON snippet containing the port, the protocol, and a name for the tunnel. If all goes well, the ngrok client sends back a JSON payload with a new URL that your bot can use as its new web hook.
With the new tunnel URL in hand we can start working with the Webex Teams Webhook API’s. It’s important to note that you need to have your bot’s authorization token in the headers of all your Webex Teams API requests. In the script, this and other variables are set via environmental variables and stored in a python dictionary as follows:
[cc lang=”Python” width=”600″ height=”450″]
dev_token = os.environ.get(‘SPARK_DEV_TOKEN’)
webhook_request_headers = {
“Accept” : “application/json”,
“Content-Type”:”application/json”,
“Authorization”: “Bearer {}”.format(dev_token)
}
[/cc]
The first thing we do is delete the existing webhook.
[cc lang=”Python” width=”600″ height=”450″]
def delete_prexisting_webhooks():
print(“delete_prexisting_webhooks start”)
errors=list()
print(” deleting existing webhook…”)
webhooks_list_response =requests.get(webhook_base_url,headers=webhook_request_headers, verify=False)
if webhooks_list_response.status_code != 200:
errors.append(“Error getting list of webhooks: {}”.format(webhooks_list_response.status_code))
else:
webhooks = json.loads(webhooks_list_response.text)[‘items’]
if len(webhooks) > 0:
for webhook in webhooks:
delete_webhook_url = webhook_base_url + ‘/’ + webhook[‘id’]
delete_webhook_response = requests.delete(delete_webhook_url,headers=webhook_request_headers)
if delete_webhook_response.status_code != 204:
errors.append(“Delete Webhook Error code: {}”.format(delete_webhook_response.status_code))
print(” …Deleted existing webhooks”)
print(“delete_prexisting_webhooks end\n”)
return errors
[/cc]
As you can see from the code block, first we need to get a list of webhooks and then iterate through the list. Sending HTTP DELETE requests as we go. This could be somewhat problematic if you have multiple webhooks for the same bot. But we are only using this script to help us automate our basic PoC/demo bot where we would probably only have a single webhook firing.
Finally, we create the new webhook. Using the super handy Webex Teams API’s we can easily create a new webhook.
[cc lang=”Python” width=”600″ height=”450″]
def update_webhook(webhook_request_json):
print(“update_webhook start”)
webhook_creation_response = requests.post(webhook_base_url, json=webhook_request_json,
headers=webhook_request_headers)
if webhook_creation_response.status_code == 200:
print(‘ Webhook creation for new tunnel successful!’)
else:
print(‘ Webhook creation for new tunnel was not successful. Status Code: {}’.format(
webhook_creation_response.status_code))
print(“update_webhook end\n”)
[/cc]
And that is it! Easy, peasy, lemon, squeezy! The remainder of the script is the “main” function that calls each of the above functions and does the appropriate error handling as it progresses through the various steps.
Conclusion
Ok, so to recap, we now have a script that automates some of the manual work associated with developing a Webex Teams bot or performing a demo on your machine. We no longer have to update our bot’s webhook manually whenever we create a new ngrok tunnel.
I hope you find this script useful in automating your Webex Teams bot demos and proof of concepts. Give it a whirl and feel free to branch the code on the Cisco SE GitHub site if you have any enhancements or fixes.
We’d love to hear what you think. Ask a question or leave a comment below.
And stay connected with Cisco DevNet on social!
Twitter @CiscoDevNet | Facebook | LinkedIn
Visit the new Developer Video Channel


As always, your articles are really interesting and instructive, and I always learn something new. Thanks for sharing Tim!
Thanks Anne!