
This is part 3 of how to run your own demo using CI/CD pipelines for network configuration management. Previous posts in the NetDevOps Series are available here.
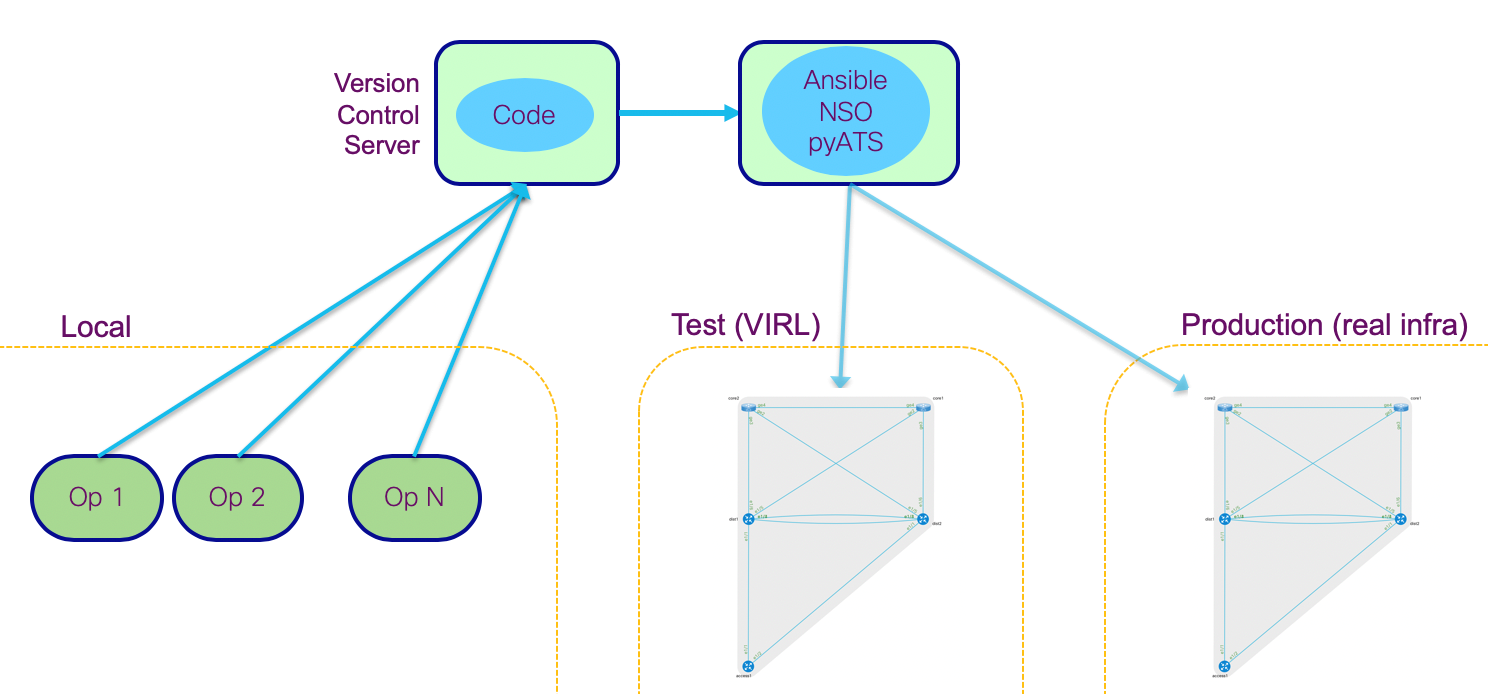
In the last two posts we have setup our server and local environments. So, it is now time to look at the actual demonstration on the power of CI/CD pipelines applied to network configurations. Our demo will include the following architecture and elements, to show how a completely automated CI/CD pipeline could be applied to a network configuration environment end-to-end, including test and production environments.
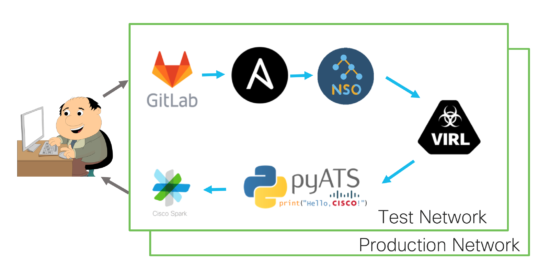
The flow will be as follows: our network operator will interact with GitLab to propose any candidate configuration changes. Ansible and NSO will deploy those changes into a virtual test environment (with VIRL) and run automated tests (with pyATS) to verify the expected results after the change. If everything goes well, then our VCS will run the same process in the production environment to implement those changes in the real network. Nice!
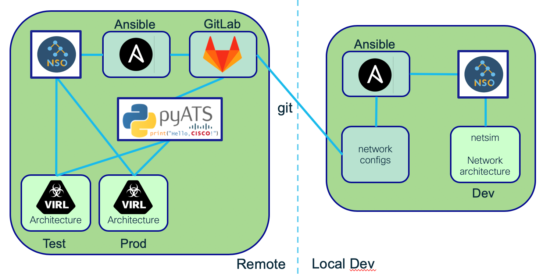
Integrating that environment with the local setup we built in the previous section, will result in a comprehensive architecture where your local environment uses the same tools (NSO & Ansible) as the remote ones. Locally it will only do the syntax checking, and once configurations are pushed to the remote GitLab, the same set of tools will also deploy and test the proposed changes, first into a test environment and then into production. Talk about consistency…
After performing the setup described in the last posts, your GitLab Version Control Server (VCS) is now ready. Please find the new infrastructure-as-code repository by pointing your browser to http://10.10.20.50/developer/cicd-3tier, and login with developer/C1sco12345. Leave that window open, as we will use it to run the demo.
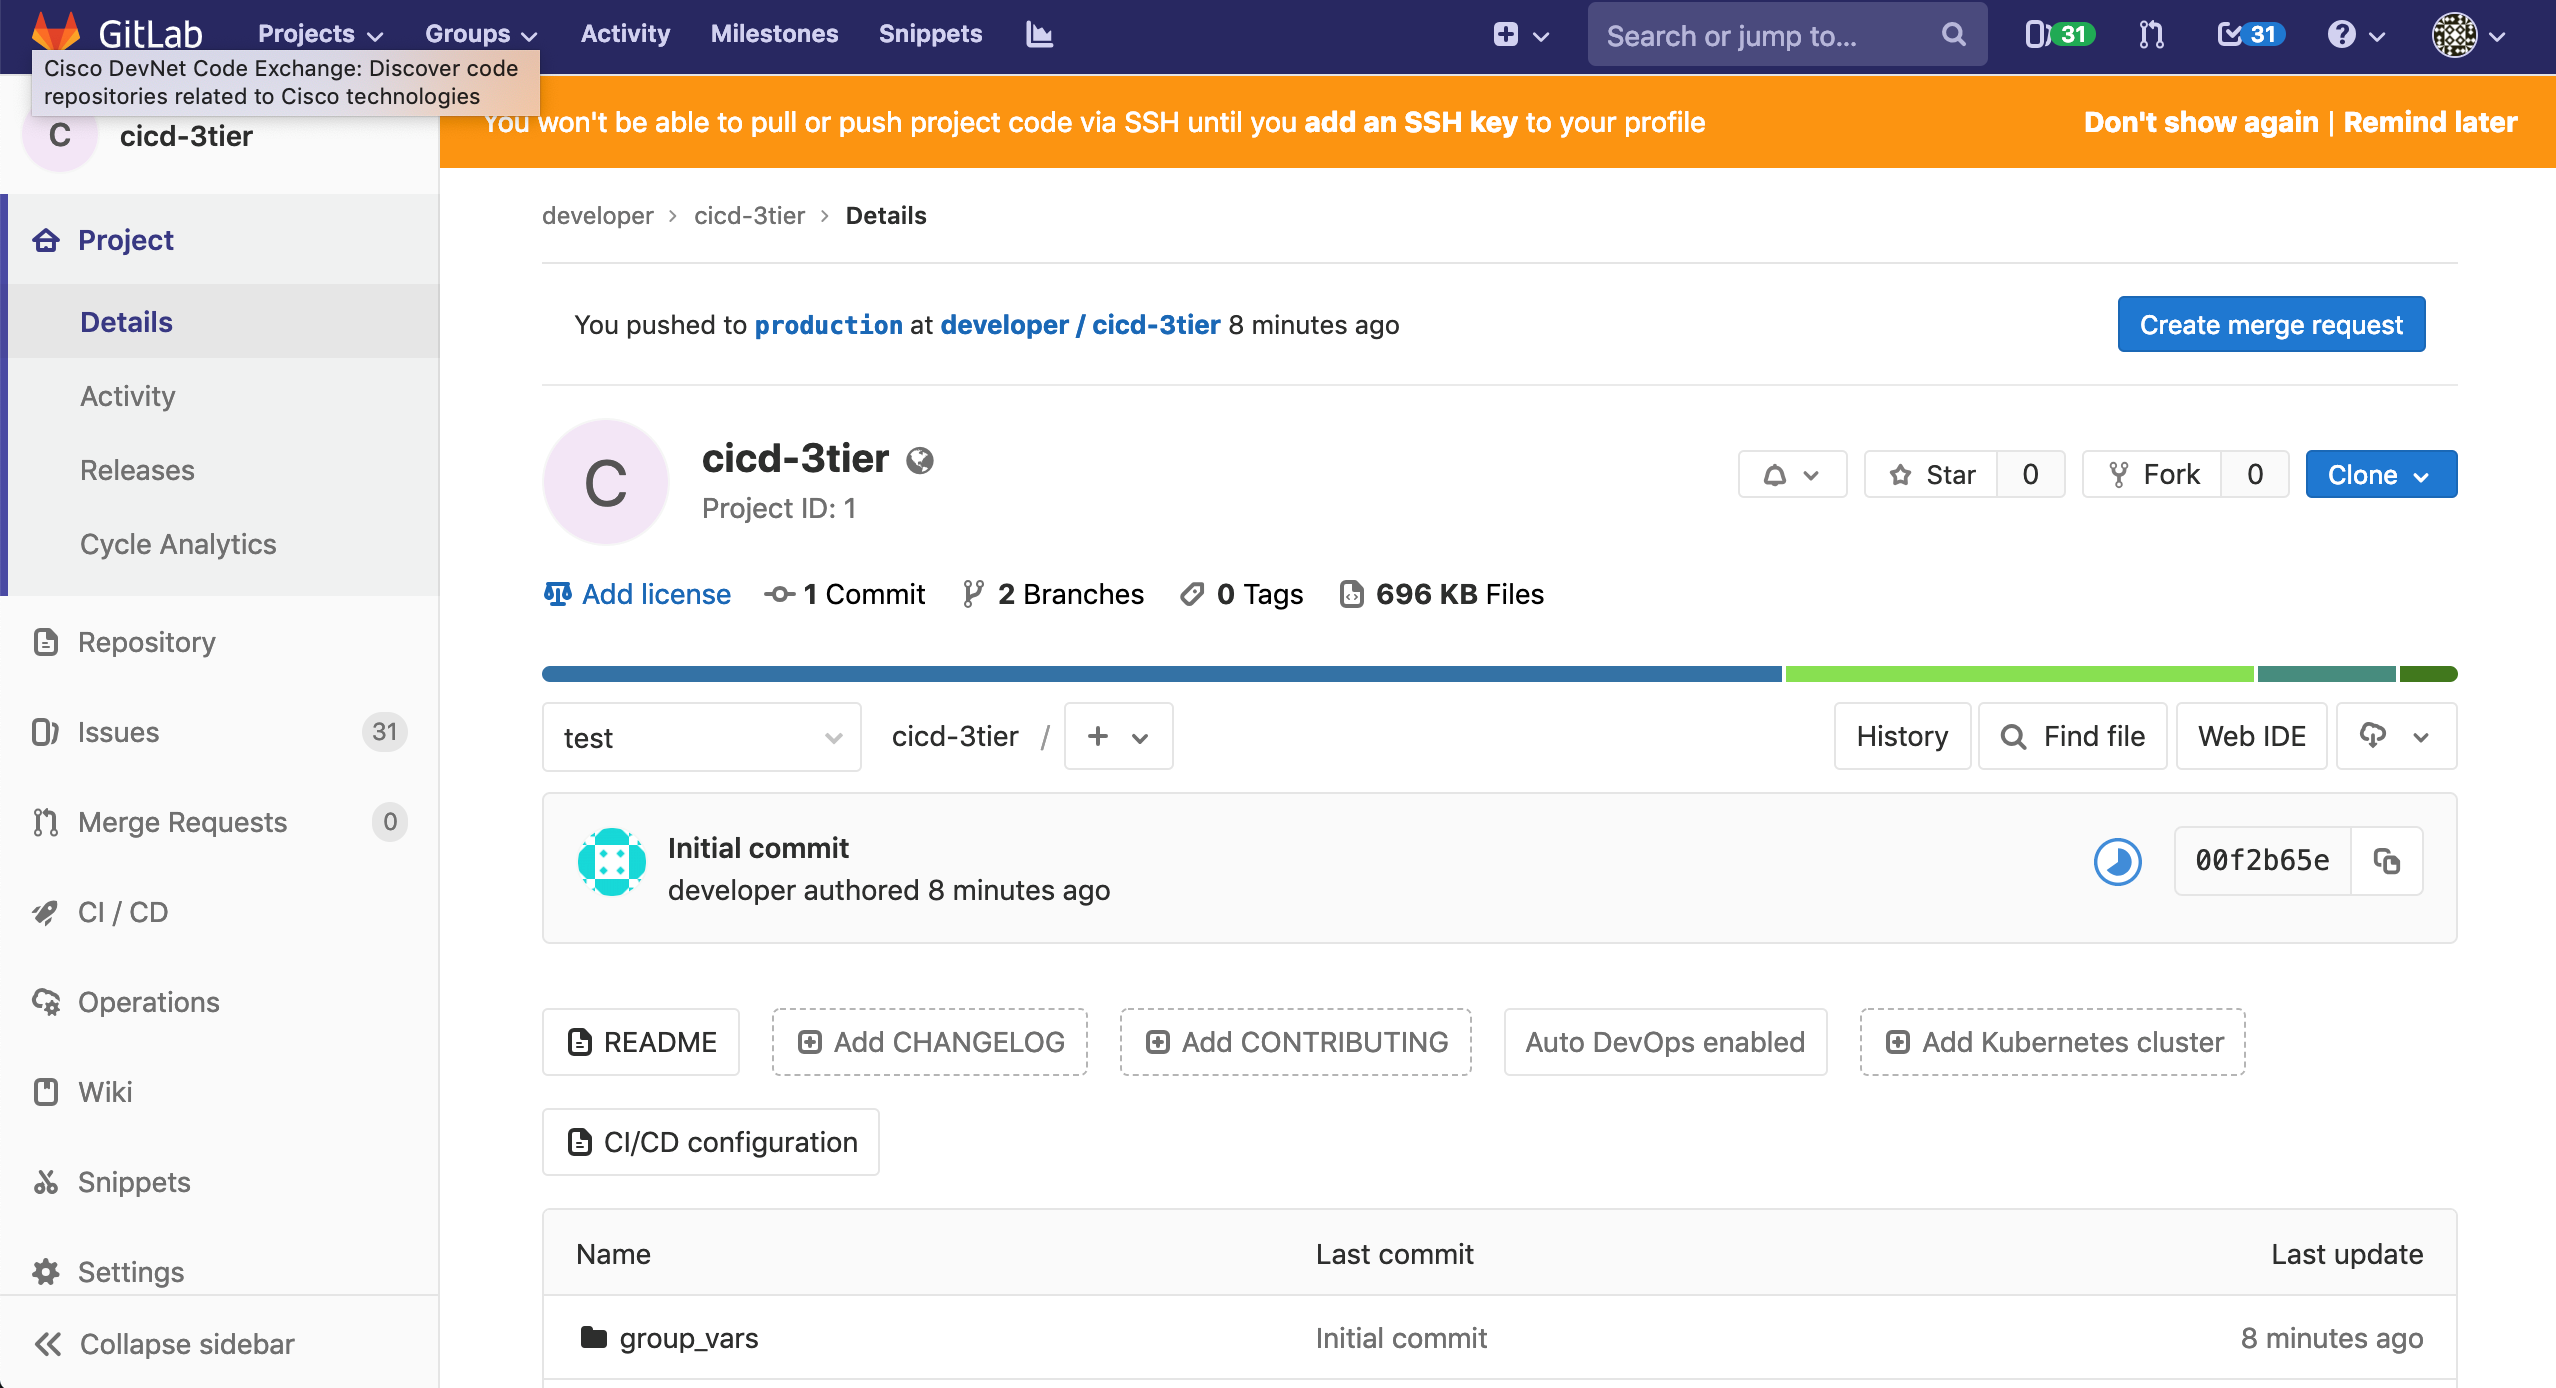
The repository (or repo) stores all required files and configurations to work with during the demo. These are the key files and folders you need to know:
- .gitlab-ci.yml is the pipeline definition, including all different steps to follow in the automation process
- virl is the folder used by VIRL to define the emulated architectures (both in test and prod)
- tests is the folder used by pyATS for automated testing
- group_vars, host_vars and inventory are folders used by Ansible to automate configurations deployment
If you did not follow the optional local setup process, please clone a copy of the repository from GitLab to your local workstation (if you already did it in the previous section, please skip this step). Use this command to ensure demo credentials are embedded in the git configuration.
$ git clone http://developer:C1sco12345@10.10.20.50/developer/cicd-3tier
$ cd cicd-3tier
You will need to edit some of the files in this local repo, so please choose your favorite editor / IDE (integrated development environment). One possible option is Visual Studio Code, but you could also just defer to using something simpler like vi or any other text editor.
First of all, please take a look at the .gitlab-ci.yml pipeline file definition.
$ cat .gitlab-ci.yml
You will see our pipeline definition includes the following steps:
- Use Ansible to validate configurations that need to be applied to NSO and network devices are syntactically correct (linting), for the three environments: dev (local), test and production.
- Deploy those configurations to the test environment.
- Run automated testing in the test environment to make sure the resulting network state is the expected one.
- Deploy those configurations to the production environment. In this case you will see it specifies when: manual, meaning we would like to explicitly initiate the deployment process to production. allow-failure: false means that in case of failure when deploying in production the system should automatically roll-back to the previous state.
- Run automated testing in the production environment to make sure the resulting network state is the expected one.
Important note: for our demonstration we will use two simulated environments: test and production. It is more convenient for us to use a simulated environment for production, but in a real-world scenario the production environment would be built on real equipment from the production network.

Let’s take a look at our network configurations.
$ cd host_vars
$ ls
access1.yaml core1.yaml core2.yaml dist1.yaml dist2.yaml
As you can see there is one YAML file per device in our network. Those files will be the ones you need to modify to propose network configuration changes in your environment.
In a real-world scenario each network developer would have cloned this repository in their local machine, and work on their own local copy via a specific branch. For our demo we will play the role of one of those network developers and propose changes from our local git repo.
For example, let’s say we would like to change the OSPF router-id of our core1 router, from .1 to .101. We would have to edit core1.yaml, look for the relevant configuration line…
ospf:
    - id: 1
      network:
      - area: 0
        ip: 172.16.0.0
        mask: 0.0.0.3
      - area: 0
        ip: 172.16.0.4
        mask: 0.0.0.3
      - area: 0
        ip: 172.16.0.16
        mask: 0.0.0.3
      - area: 0
        ip: 192.168.1.1
        mask: 0.0.0.0
      router-id: 192.168.1.1
… and change that line to the desired value.
router-id: 192.168.1.101
Save the file.
Right now you have only modified a local text file in your workstation. And git knows about it.
$ git status
On branch master
Your branch is up to date with 'origin/master'.

Changes not staged for commit:
  (use "git add <file>..." to update what will be committed)
  (use "git checkout -- <file>..." to discard changes in working directory)

        modified: core1.yaml

no changes added to commit (use "git add" and/or "git commit -a")

As long as we are happy with this change, we need to add the modified file to our next git commit.

$ git add core1.yaml
$ git commit -am "Update OSPF router-id from .1 to .101"
[master 0b24c9b] Update OSPF router-id from .1 to .101
 1 file changed, 1 insertion(+), 1 deletion(-)
Now is the time to send our proposed configuration change to the remote repo in the VCS GitLab server.
$ git push
warning: redirecting to http://10.10.20.50/developer/cicd-3tier.git/
Counting objects: 4, done.
Delta compression using up to 12 threads.
Compressing objects: 100% (4/4), done.
Writing objects: 100% (4/4), 389 bytes | 389.00 KiB/s, done.
Total 4 (delta 3), reused 0 (delta 0)
To http://10.10.20.50/developer/cicd-3tier
   00f2b65..1b70da9 test -> test
Go back to the browser window that pointed to your GitLab repo at http://10.10.20.50/developer/cicd-3tier, and you will see the update there.
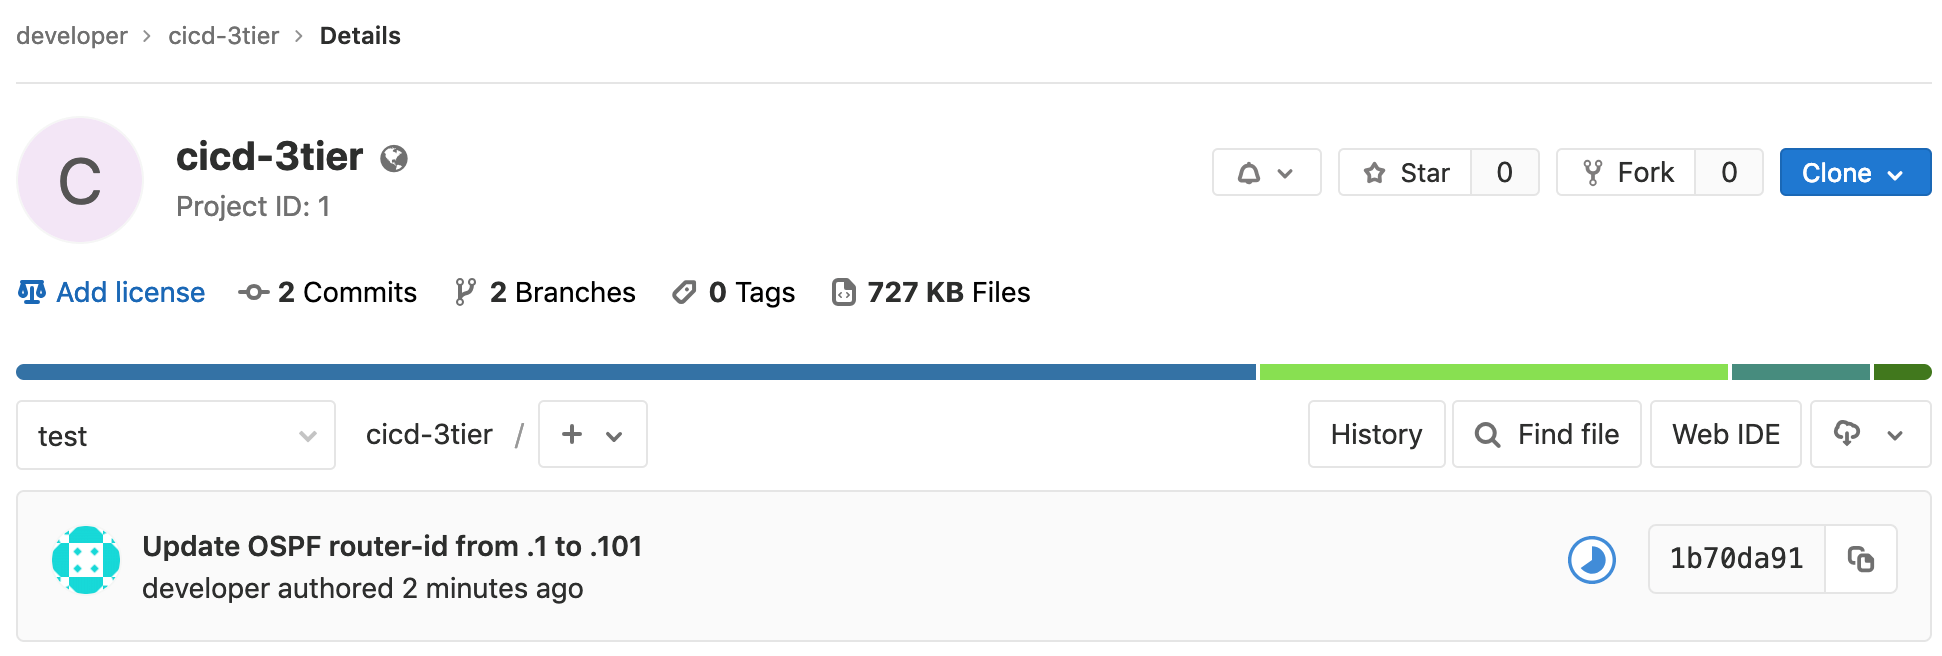
Pushing your proposed change in the new core1.yaml file will automatically start the pipeline defined in the .gitlab-ci.yml file. It is first applied on the test network, and you may check its execution in real-time by clicking on the CI / CD section in the left bar. In this example we would be running pipeline #3.
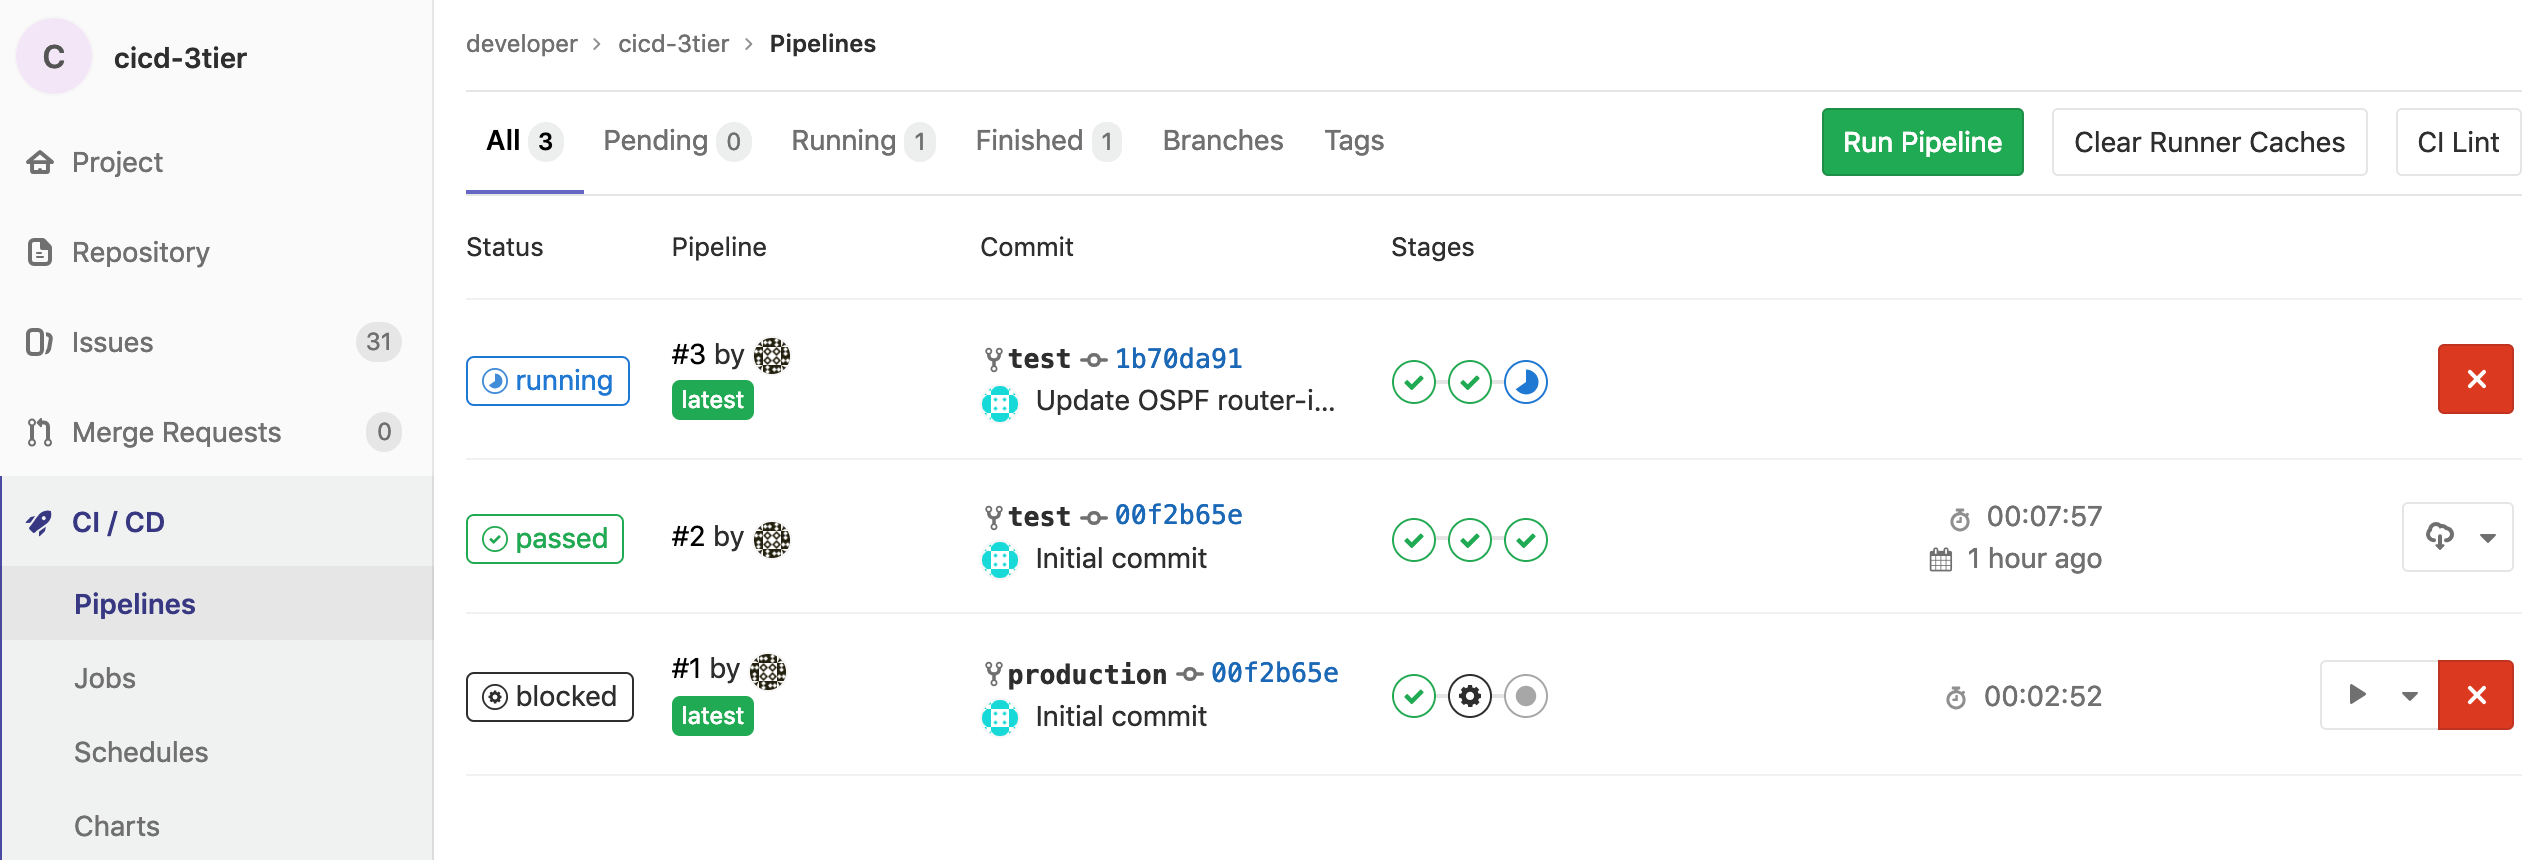
As you can see the pipeline includes 3 subsequent stages: validate, deploy_to_test and verify_deploy_to_test.
These come from the pipeline definition in your .gitlab-ci.yml file.
Clicking on each one of these stages will show you the specific steps followed in there:
1. validate
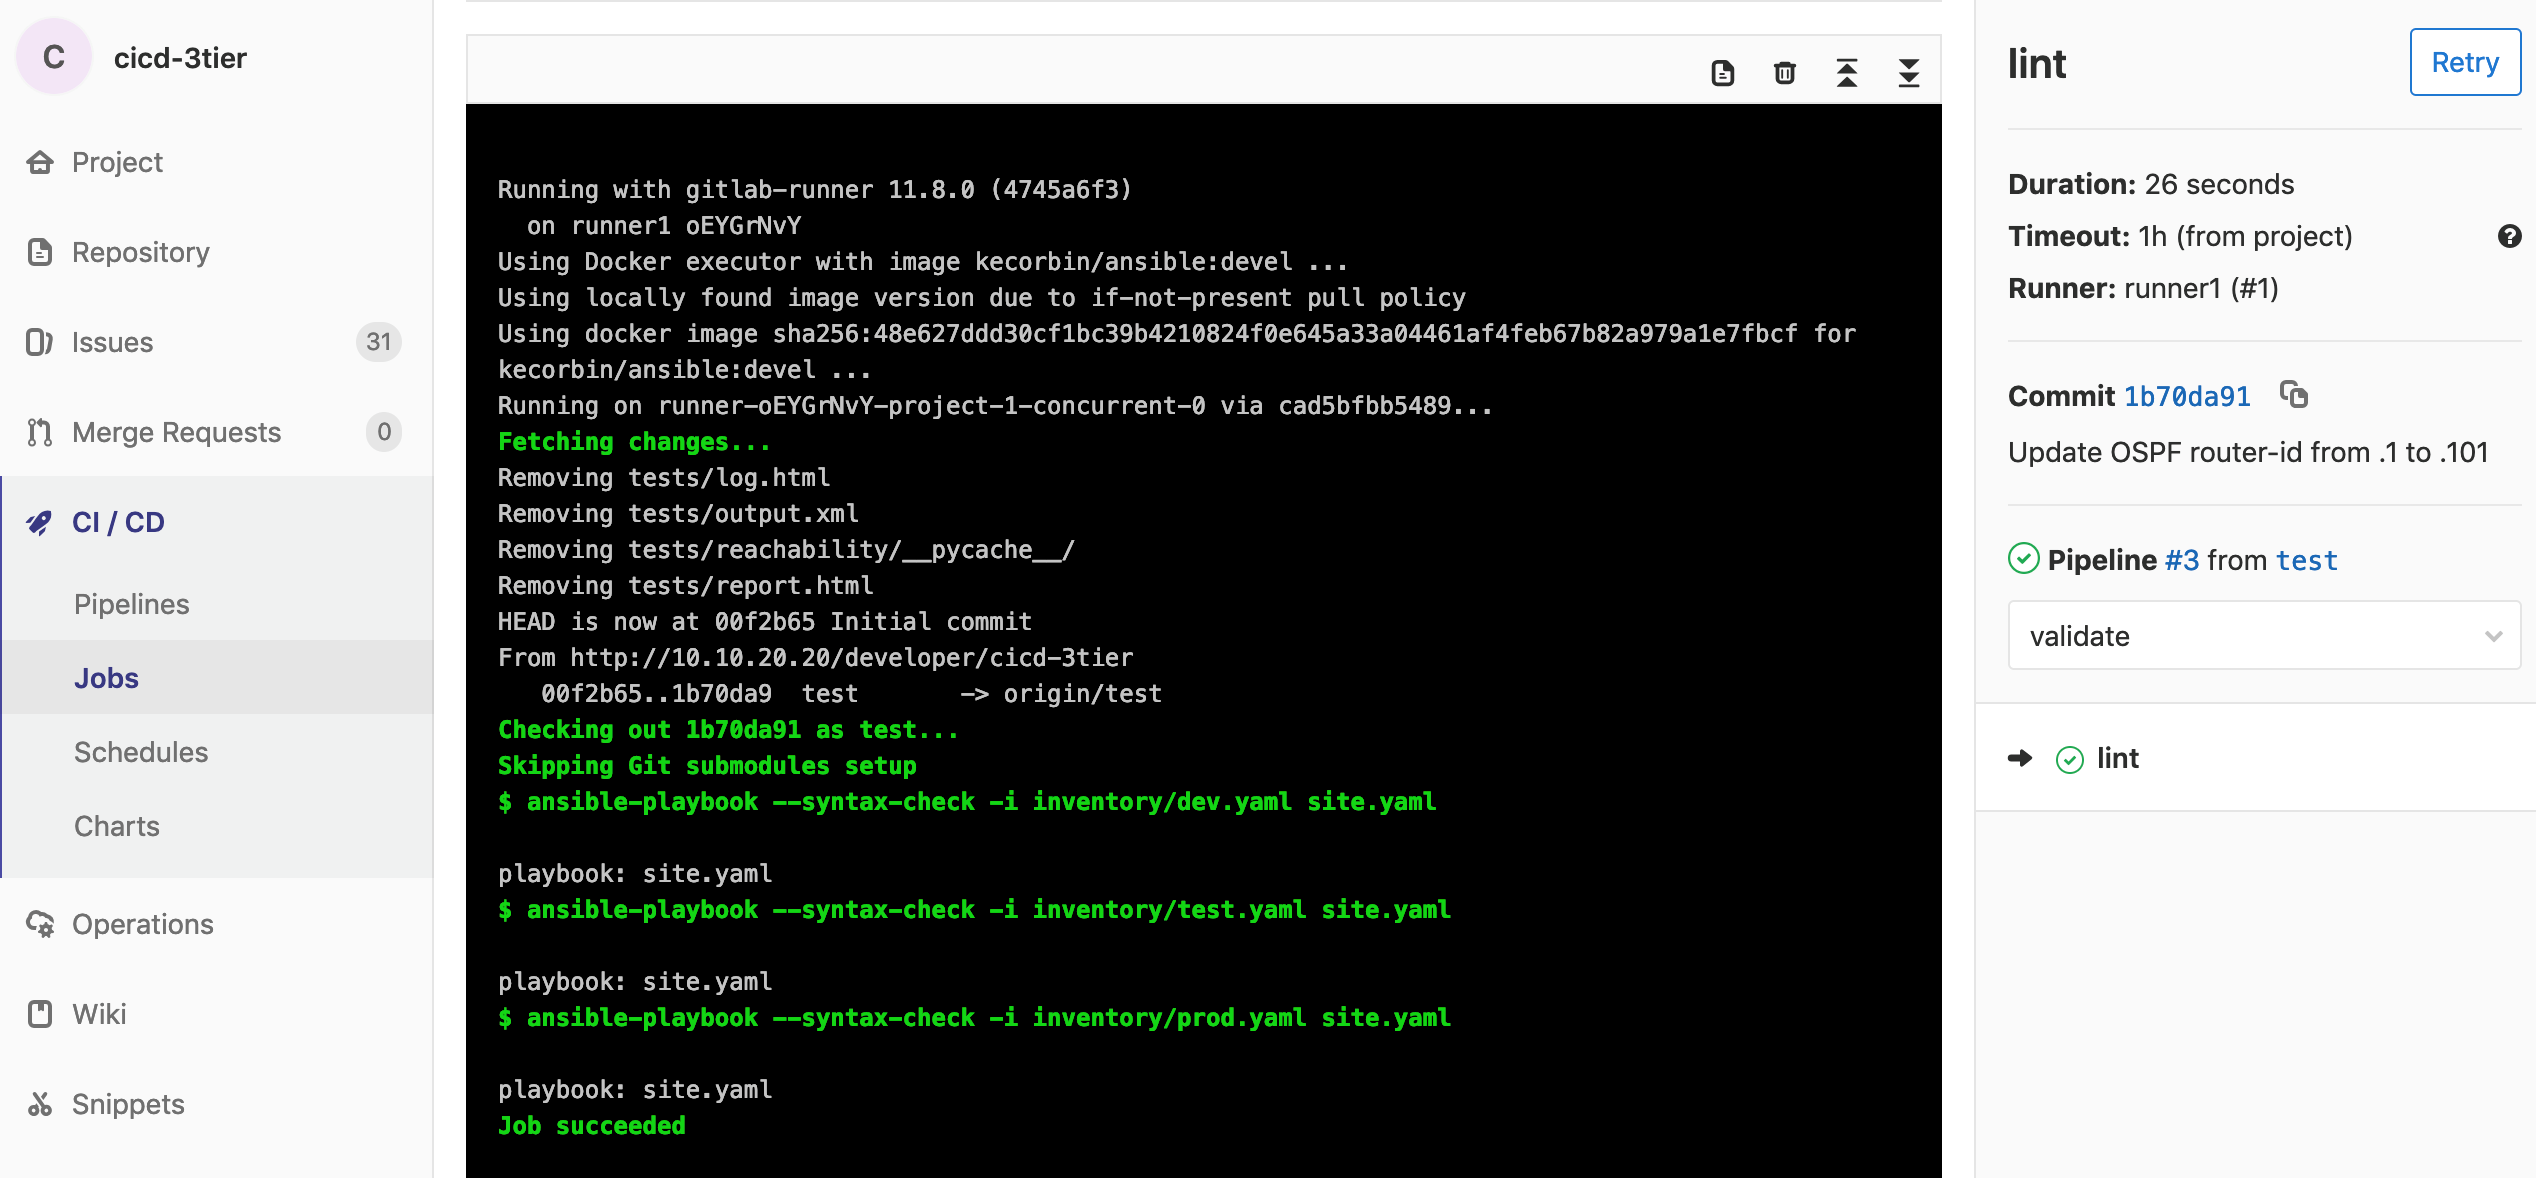
This stage starts a container running Ansible and do the syntax checking (linting) of proposed configurations, including changes, in all 3 environments: dev (local), test and prod.
2. deploy_to_test

Second stage starts a container running Ansible to sync existing configs from NSO to devices, then apply configuration changes to NSO, and finally sync again configs from NSO to devices.
3. verify_deploy_to_test
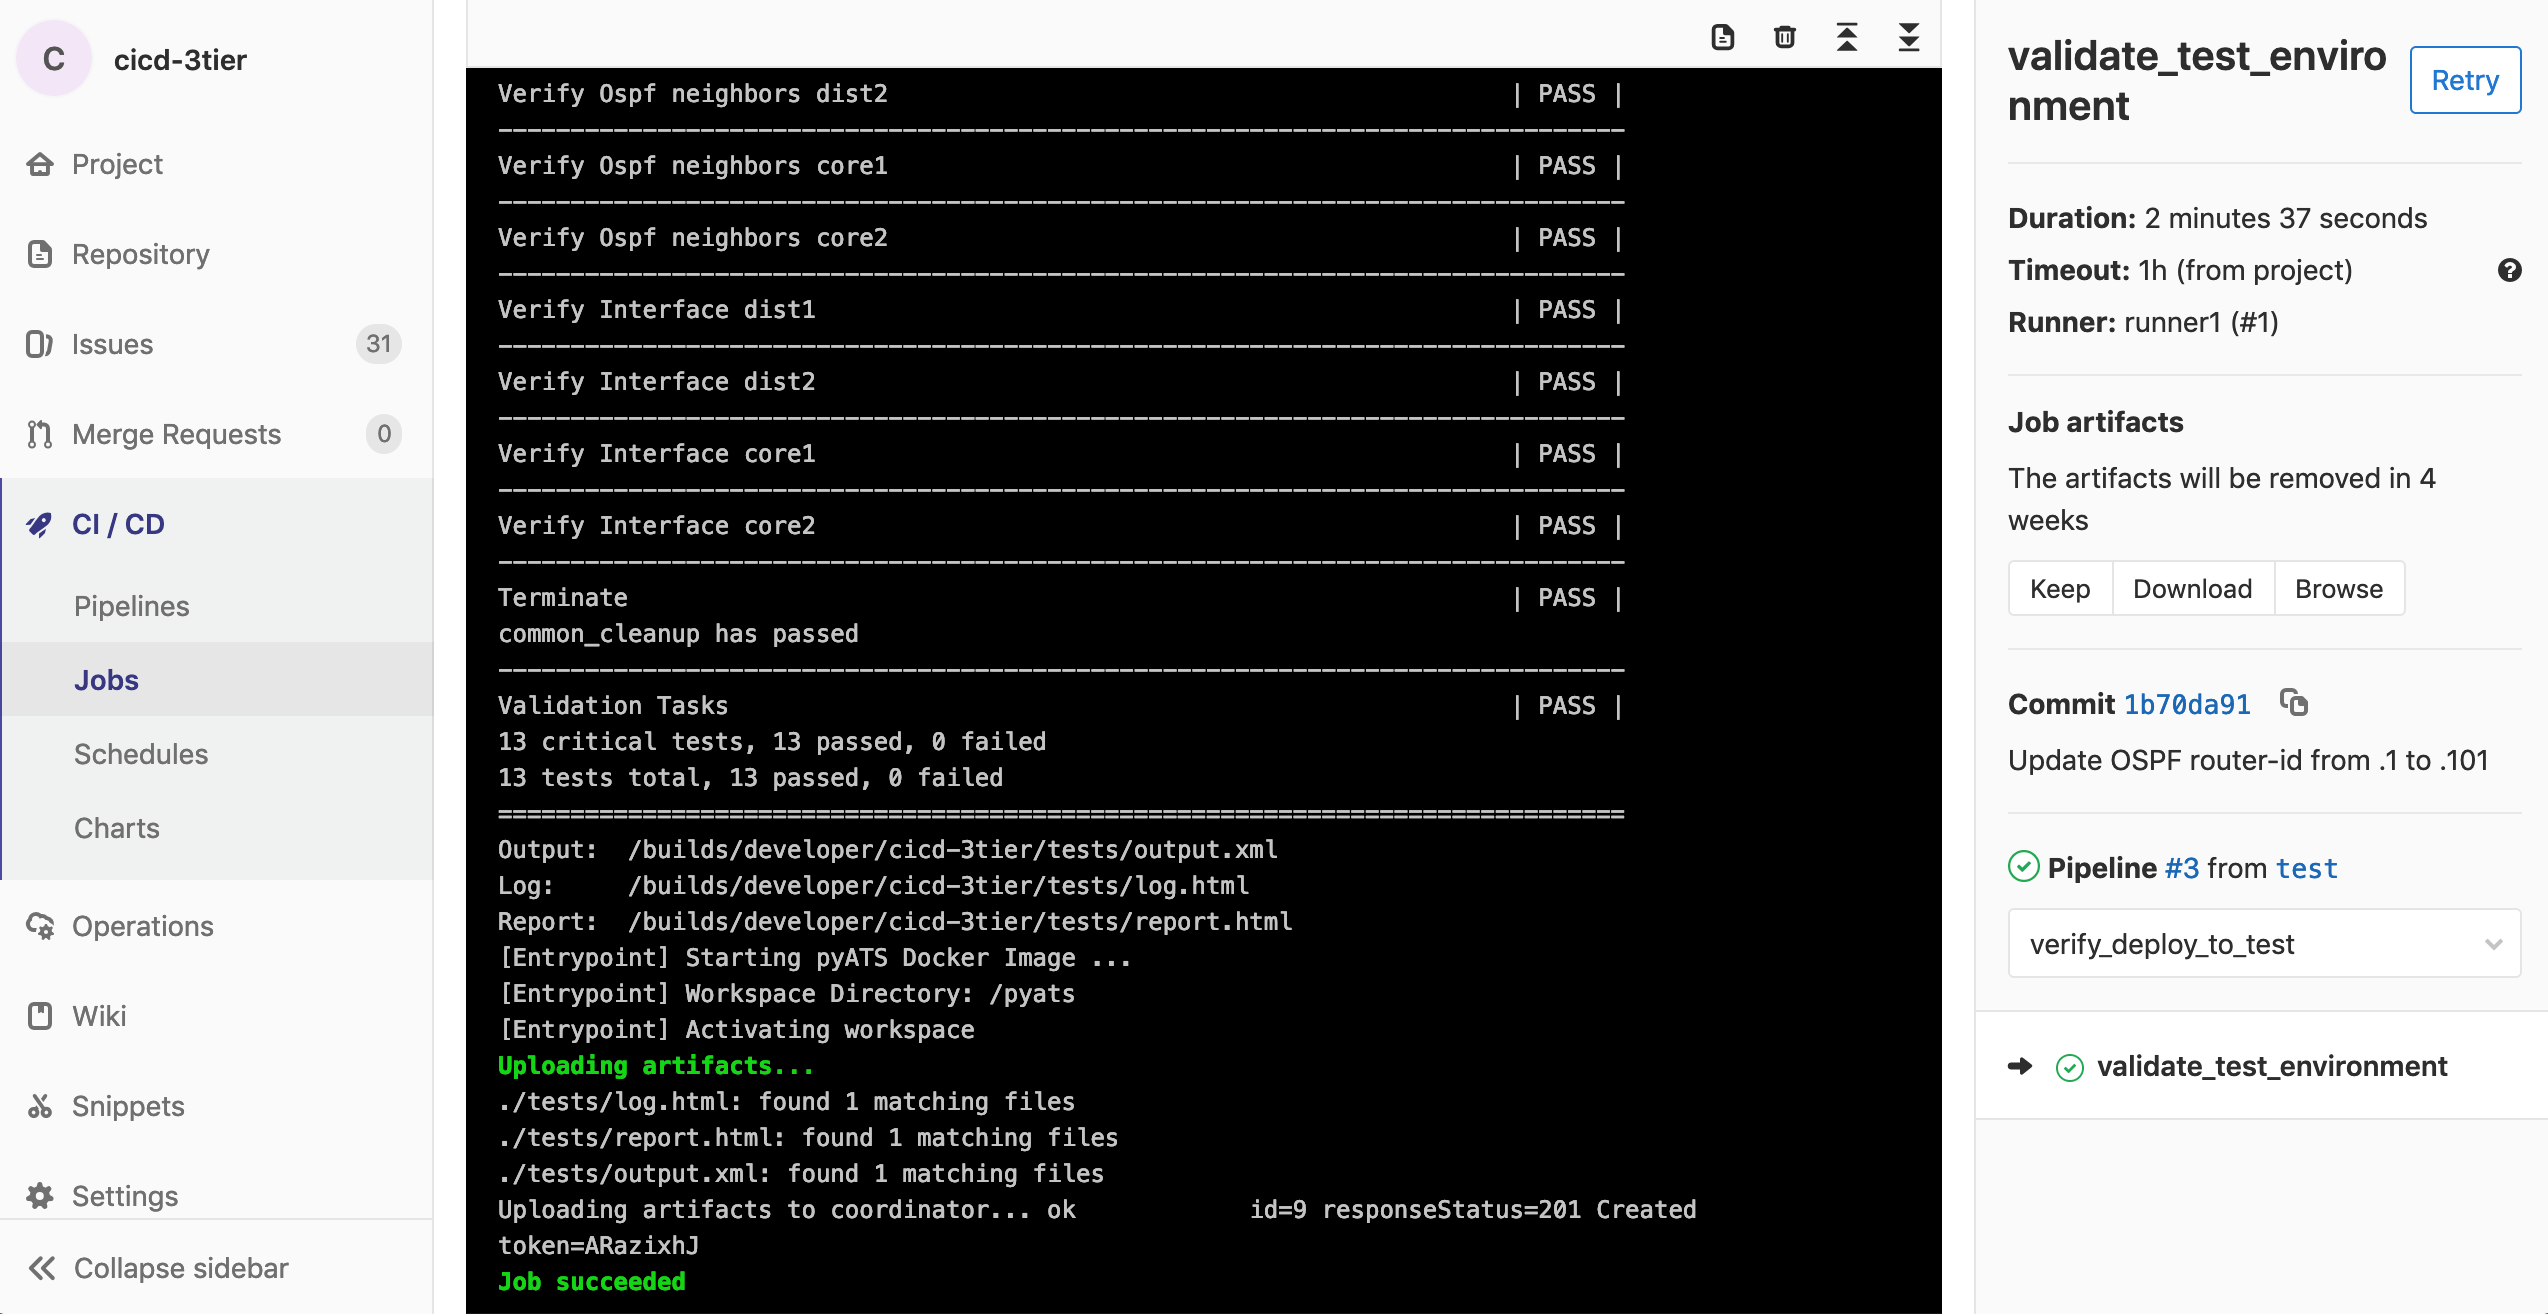
The final stage starts a container running a pyATS image and runs automated tests based on the content of tests/validation_tasks.robot and tests/test_testbed.yml. The set of tests defined for this demo includes not only reachability, but also the number of expected OSPF neighbors and interfaces in each network device after the applied changes.
The whole process will take around 5 minutes until you can see the 3 stages completed successfully in the test environment.
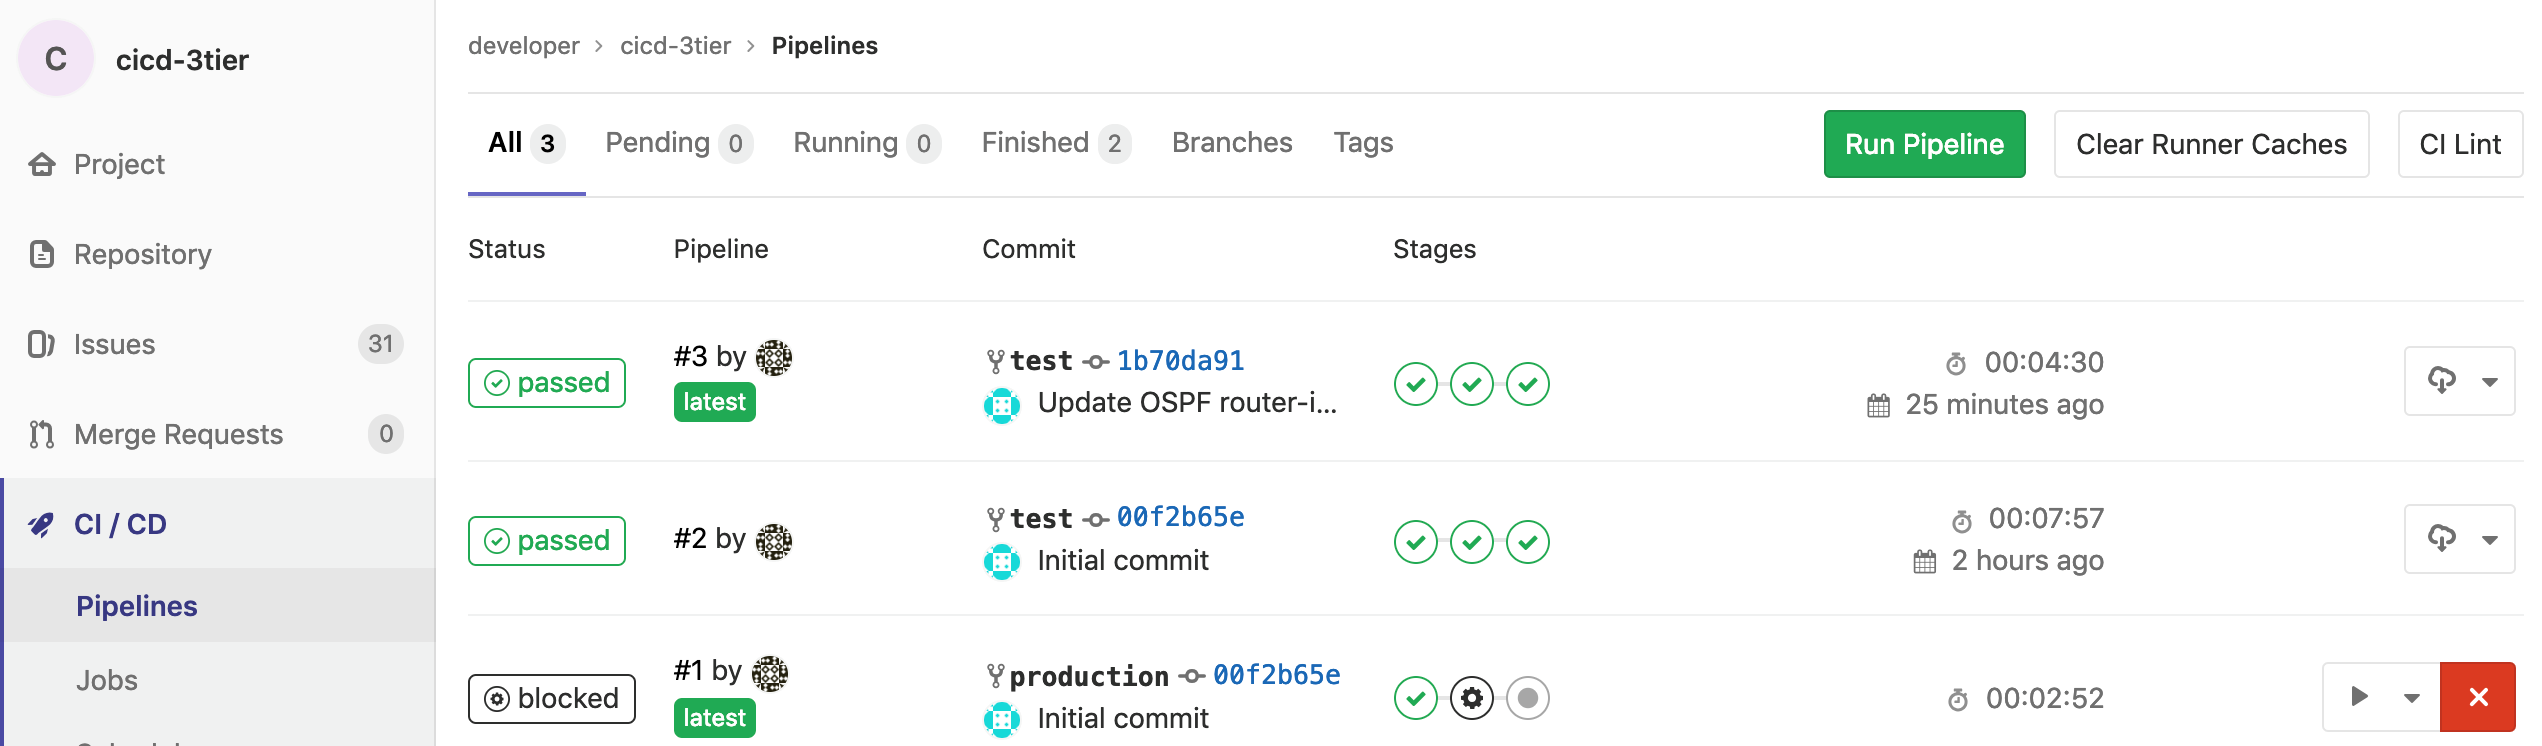
At this point your proposed network configuration change has been completely validated in a VIRL-simulated test environment, and you are now good to propose it to be applied in the real production network.
You can do that by requesting to merge the content of the git test branch into the git production branch.
If you go back to the pipeline section you will see there is a brand new pipeline there, #4, that has been created automatically for you. It includes the same steps as the previous one, but the main difference is that this pipeline is being applied to the production network environment.
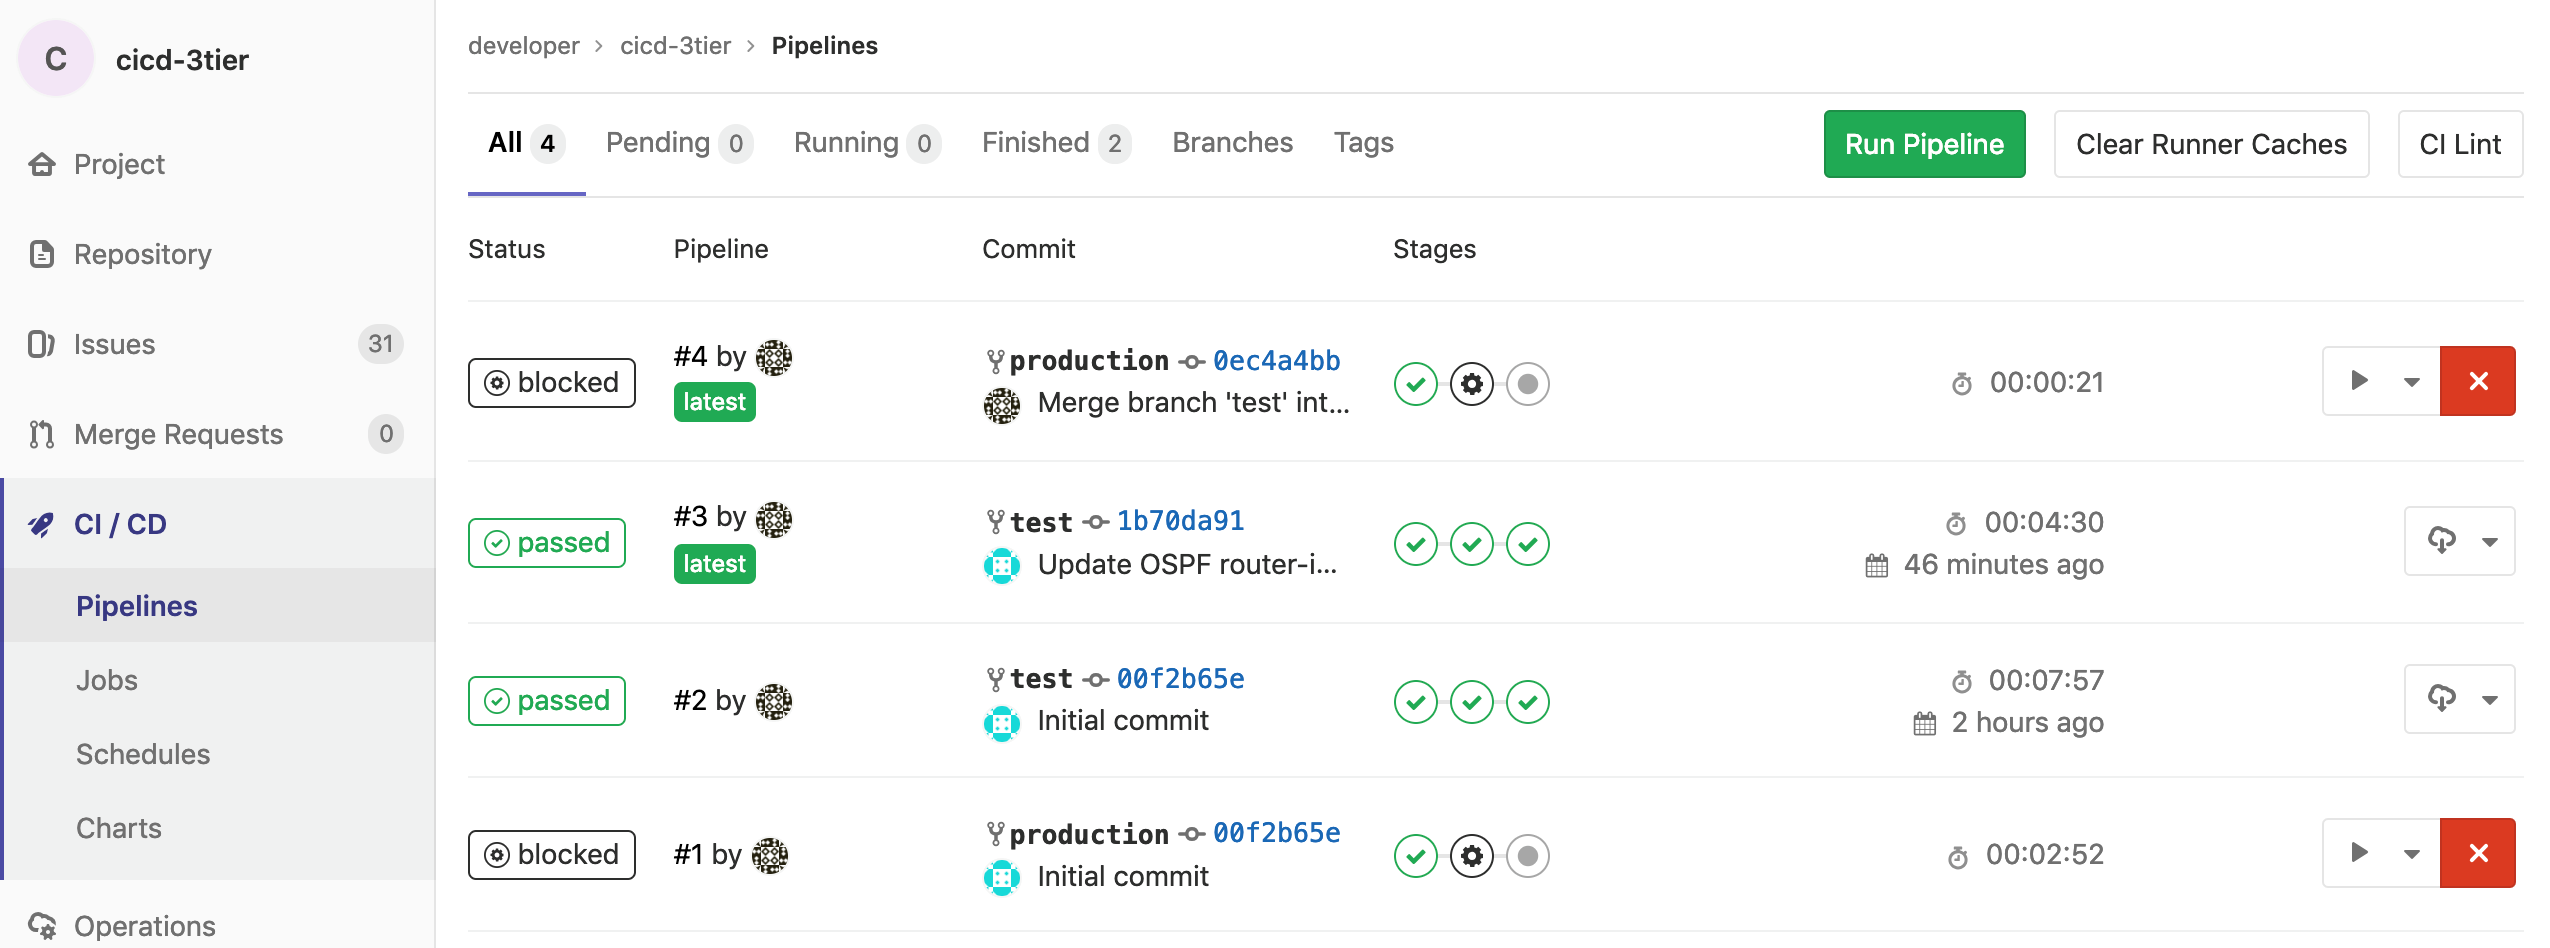
As you can see the production pipeline has the same 3 stages as the pipeline we applied previously in the test environment. However, when running the one in production this pipeline appears as blocked before running the deploy_to_prod stage. The reason is we configured when: manual in the .gitlab-ci.yml pipeline definition file, so that we have to manually confirm we want to actually initiate the deployment in the production network. This is a configuration decision, and maybe useful if you would like to perform the actual change during a maintenance window.
In order to move forward with the pipeline we need to confirm it manually by pressing the play button.

It will automatically start deploying our configuration changes into the production network. If everything goes well, it will successfully complete this stage and move to the next one, to test the results after changes are implemented.
After 5 minutes, by the end of this process you should see the complete pipeline has been successfully executed, and your proposed changes have been tested and finally applied to the production network.

CONGRATULATIONS! You have completed your first NetDevOps demo on how to fully automate and test network configuration changes all the way to production!
Summary
In this NetDevOps demo you have seen a modern approach into version-controlled automated network configuration and testing. The scenario describes how multiple network operators would be able to propose configuration changes, in the same way developers do it for code: using git branches. A standard version control server provides multiple benefits, like automated pipelines, version control and tracking, rollback capabilities, etc. During the demo you have experienced the benefits of being able to locally verify syntax for proposed changes before submitting them. Also, how a simulated environment helps verifying proposed changes are correct, before applying them into the production network. Finally, the set of automated tests helps making sure proposed changes have not had unexpected results on critical business-relevant functionality. This way you have experienced end-to-end automation and testing in a scalable and error-free approach.
See you soon, stay tuned!
Any questions or comments please let me know in the comments section below, or reach me on Twitter or LinkedIn.
Additional Network Automation & Programmability Resources:
- NetDevOpsLive! webinar series
- Network Programmability Basics – expert-led video course
- DevNet Automation Exchange – shared code repositories for network automation
- DevNet Certifications – validate your software skills for the IT teams of the future.
- DevNet Networking Dev Center – explore the wide range of programmability tools and resources
Join DevNet to access the learning labs, docs, and sandboxes you need for network automation.
We’d love to hear what you think. Ask a question or leave a comment below.
And stay connected with Cisco DevNet on social!
Twitter @CiscoDevNet | Facebook | LinkedIn
Visit the new Developer Video Channel


Hi
10.10.20.50/developer/cicd-3tier is not working. Will it be possible to enable it?
Hi John, are you VPN'd into your sandbox reservation? Did you follow the setup process described in my previous two posts? Without that you won't be able to access that specific URL. Cheers.
I would like to have a look at the .gitlab-ci.yml file only without reserving a lab…any way to access it via a public repo?
Sure! You can find it here: https://github.com/DevNetSandbox/sbx_multi_ios/blob/master/cicd-3tier/.gitlab-ci.yml