
 The author of this blog is Khaled Abuelenain. Khaled is the Consulting Director at Acuative, and a double CCIE (RS & SP).
Part 1 of this series defined and explained the terms Network Management, Automation, Orchestration, Data Modeling, Programmability, and APIs. It also introduced the Programmability Stack and explained how an application at the top layer of the stack, wishing to consume an API exposed by the device at the bottom of the stack, does that. The previous post covered data modeling in some detail due to the novelty of the concept for most network engineers. I’m sure that Part I, although quite lengthy, left you scratching your head. At least a little.
So, in this part of the series, I will try to clear some more of the ambiguity related to programmability. As discussed in the previous post, the API exposed by a device uses a specific protocol. For example, a device exposing a NETCONF API will use the NETCONF protocol. The same applies to RESTCONF, gRPC, or Native REST APIs. The choice of protocol also decides which data encoding to use, as well as the transport over which the application speaks with the device.
Where to start?
One of the problems with discussing programmability is where to start. If you start with a protocol, you will need to understand the encoding in order to decipher the contents of the protocol messages. But for you to appreciate the importance of encoding, you need to understand its application and use by the protocol. The chicken first, or the egg! Moreover, with respect to RESTful protocols, you will also need a pretty good understanding of the transport protocol, HTTP in this case, in order to put all the pieces together.
So in order to avoid unnecessary confusion, this part of the series will only cover NETCONF and XML. HTTP, REST, RESTCONF, and JSON will be covered in the next part. Finally, gRPC and GPB will be covered in one last part of this series.
Note: In this blog post we will make very good use of Cisco’s DevNet Sandboxes. In case you didn’t already know that, Cisco DevNet provides over 70 sandboxes that constitute devices in different technology areas, for you to experiment with during your studies. Some of those are always-on, available for immediate use, and others need a reservation. All the sandboxes can be found at: https://devnetsandbox.cisco.com/RM/Topology. For the purpose of this blog, the sandboxes that do not need a reservation will suffice. Any other excuses for not reading on?… I didn’t think so!
APIs: RPC vs REST
In the previous part of this series we looked at APIs and identified them as software running on a device. An API exposed by the device provides a particular function or service to other software that wish to consume this API. The internal workings of an API are usually hidden from the software that consumes it.
For example, Twitter exposes an API that a program can consume in order to tweet to an account automatically without human intervention. Similarly, Google exposes a Geolocation API that returns the location of a mobile device based on information about cell towers and WiFi nodes that the device detects and sends over to the API.
Similarly, an API exposed by, say, a router, is software running on the router that provides a number of functions that can be consumed by external software, such as a Python script.
APIs may be classified in a number of different ways. Several API types (and different classifications) exist today. For the purpose of this blog series, we will discuss two of the most commonly used types in the network programmability arena today: RPC-based APIs and RESTful APIs.
Remote Procedure Call (RPC)-based APIs
A Remote Procedure Call (RPC) is a programmatic method for a client to Call (execute) a Procedure (piece of code) on another device. Since the device requesting the execution of the procedure (the client) is different than the device actually executing that procedure (the server), it is labelled as Remote.
An RPC-based API opens a software channel on the server, exposing the API, to clients, wishing to consume that API, for those clients to request the remote execution of procedures on the server. Both NETCONF and gRPC are RPC-based protocols/APIs. This part of the series will cover NETCONF and describe its RPC-based operation.
Representational State Transfer (REST):
REST is a framework, specification or architectural style that was developed by Roy Fielding in his doctoral dissertations in 2000 on APIs. The REST framework specifies six constraints, five mandatory and one optional, on coding RESTful APIs. The REST framework requires that a RESTful API be:
- Client-Server based
- Stateless
- Cacheable
- Have a uniform interface
- Based on a layered system
- Utilize code-on-demand (Optional)
When an API is described as RESTful, then this API adheres to the constraints listed above.
To elaborate a little, a requirement such as “Stateless” mandates that the client send a request to the API exposed by the server. The server processes the request, sends back the response, and the transaction ends at this. The server does not maintain the state of this completed transaction. Of course, this is an over simplification of the process and a lot of corner cases exist. An API may also be fully RESTful, or just partially RESTful. It all depends on how much it adheres to the constrains listed here.
REST is an architectural style for programming APIs and uses HTTP as an application-layer protocol to implement this framework. Thus far, HTTP is the only protocol designed specifically to implement RESTful APIs. RETCONF is a RESTful protocol/API and will be the subject of an upcoming part of this series, along with HTTP.
Although gRPC is an RPC-based protocol/API, it still uses HTTP/2 at the transport layer (recall the programmability stack from Part I ?) You may find this a little confusing. While it is beyond the scope of this part of the series to describe the operation of gRPC and its encoding GBP, this will be covered in an upcoming part. Stay with me on this series, and I promise that you won’t regret it ! For the sake of accuracy, gRPC also supports JSON encoding.
NETCONF

In the year 2003 the IETF assembled the NETCONF working group to study the shortcomings of the network management protocols and practices that were in use then (such as SNMP), and to design a new protocol that would overcome those shortcomings. Their answer was the NETCONF protocol. The core NETCONF protocol is defined in RFC 6241 and the application of NETCONF to model-based programmability using YANG models is defined in RFC 6244. NETCONF over SSH is covered on its own in RFC 6242.
Figure 1 illustrates the lifecycle of a typical NETCONF session.
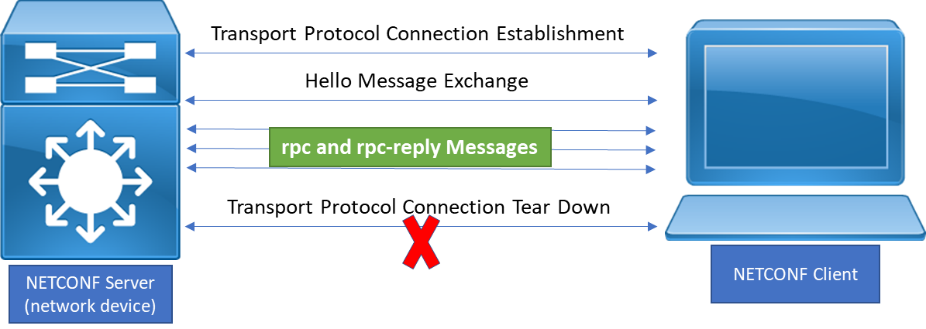 Figure 1 – The lifecycle of a typical NETCONF session
NETCONF is a client-server, session-based protocol. The client initiates a session to the server (the network device in this case) over a pre-configured TCP port (port 830 by default). The session is typically initiated using SSH, but it may use any other reliable transport protocol. Once established, the session remains so until it is torn down by either peer.
The requirement that the transport protocol be reliable means that only TCP-based protocols (such as SSH or TLS) are supported. UDP is not. The NETCONF RFC mandates that a NETCONF implementation support, at a minimum, NETCONF over SSH. The implementation may optionally support other transport protocols in addition to SSH.
The first thing that happens after a NETCONF session is up is an exchange of hello messages between the client and server (either peer may send their hello first). Hello messages provide information on which version of NETCONF is supported by each peer, as well as other device capabilities. Capabilities describe which components of NETCONF, as well as which data models, the device supports. Hello messages are exchanged only once per session, at the beginning of the session. Once hello messages are exchanged, the NETCONF session is in established state.
On an established NETCONF session, one or more remote procedure call messages (rpc for short) are sent by the client. Each of these rpc messages specify an operation for the server to carry out. The get-config operation, for example, is used to retrieve the configuration of the device and the edit-config operation is used to edit the configuration on the device.
The server executes the operation, as specified in the rpc message (or not) and responds with a remote procedure call reply (rpc-reply for short) back to the client. The rpc-reply message contents will depend on which operation was requested by the client, the parameters included in the message, and whether the operation execution was successful or not.
All NETCONF messages (hello, rpc and rpc-reply) must be a well-formed XML document encoded in UTF-8. However, the content of these messages will depend on the data model referenced by the message. You will see what this means shortly !
In a best-case scenario, the client gracefully terminates the session by sending an rpc message to the server explicitly requesting that the connection be closed, using a close-session operation. The server terminates the session and the transport connection is torn down. In a not-so-good scenario, the transport connection may be unexpectedly lost due to a transmission problem, and the server unilaterally kills the session.
The architectural components of NETCONF discussed thus far can be summarized by the 4-layer model in Figure 2. The 4 layers are Transport, Messages, Operations and Content.
 Figure 2 – The NETCONF architectural 4-Layer model
Now roll up your sleeves and get ready. Open the command prompt on your Windows machine or the Terminal program on your Linux or MAC OS machine and SSH to Cisco’s always-on IOS-XE sandbox on port 10000 using the command:
[kabuelenain@server1 ~]$ ssh -p 10000 developer@ios-xe-mgmt-latest.cisco.com
When prompted for the password, enter C1sco12345. Once the SSH connection goes through, the router will spit out its hello message as you can see in Example 1.
[kabuelenain@server1 ~]$ ssh -p 10000 developer@ios-xe-mgmt-latest.cisco.com developer@ios-xe-mgmt-latest.cisco.com's password: <?xml version="1.0" encoding="UTF-8"?> <hello xmlns="urn:ietf:params:xml:ns:netconf:base:1.0"> <capabilities> <capability>urn:ietf:params:netconf:base:1.0</capability> <capability>urn:ietf:params:netconf:base:1.1</capability> <capability>urn:ietf:params:netconf:capability:writable-running:1.0</capability> <capability>urn:ietf:params:netconf:capability:xpath:1.0</capability> <capability>urn:ietf:params:netconf:capability:validate:1.0</capability> <capability>urn:ietf:params:netconf:capability:validate:1.1</capability> <capability>urn:ietf:params:netconf:capability:rollback-on-error:1.0</capability> <capability>urn:ietf:params:netconf:capability:notification:1.0</capability> <capability>urn:ietf:params:netconf:capability:interleave:1.0</capability> <capability>urn:ietf:params:netconf:capability:with-defaults:1.0?basic-mode=explicit&also-supported=report-all-tagged</capability> <capability>urn:ietf:params:netconf:capability:yang-library:1.0?revision=2016-06-21&module-set-id=730825758336af65af9606c071685c05</capability> <capability>http://tail-f.com/ns/netconf/actions/1.0</capability> <capability>http://tail-f.com/ns/netconf/extensions</capability> <capability>http://cisco.com/ns/cisco-xe-ietf-ip-deviation?module=cisco-xe-ietf-ip-deviation&revision=2016-08-10</capability> <capability>http://cisco.com/ns/cisco-xe-ietf-ipv4-unicast-routing-deviation?module=cisco-xe-ietf-ipv4-unicast-routing-deviation&revision=2015-09-11</capability> <capability>http://cisco.com/ns/cisco-xe-ietf-ipv6-unicast-routing-deviation?module=cisco-xe-ietf-ipv6-unicast-routing-deviation&revision=2015-09-11</capability> <capability>http://cisco.com/ns/cisco-xe-ietf-ospf-deviation?module=cisco-xe-ietf-ospf-deviation&revision=2018-02-09</capability> ------ Output omitted for brevity ------ </capabilities> <session-id>468</session-id> </hello>]]>]]>
Example 1 – Hello message from the router (NETCONF server)
Before getting into XML, note that the hello message contains a list of capabilities. These capabilities list three things about the device sending the hello message:
- The version(s) of NETCONF supported by the device (1.0 or 1.1)
- The optional NETCONF capabilities supported by the device (such as rollback-on-error)
- The YANG data models supported by the device
To respond to the server hello, all you need to do is copy and paste the hello message in Example 2 into your terminal.
<?xml version="1.0" encoding="UTF-8"?>
<hello
    xmlns="urn:ietf:params:xml:ns:netconf:base:1.0">
    <capabilities>
        <capability>urn:ietf:params:netconf:base:1.0</capability>
    </capabilities>
</hello>]]>]]>
Example 2 – Hello message from the client (your machine) back to the server
We will break down these messages in a minute – hold your breath!
Example 3 shows an rpc message to retrieve the configuration of interface GigabitEthernet1.
<rpc xmlns="urn:ietf:params:xml:ns:netconf:base:1.0" message-id="101">
    <get-config>
        <source>
            <running />
        </source>
        <filter>
            <native xmlns="http://cisco.com/ns/yang/Cisco-IOS-XE-native">
                <interface>
                    <GigabitEthernet>
                        <name>1</name>
                    </GigabitEthernet>
                </interface>
            </native>
        </filter>
    </get-config>
</rpc>]]>]]>
Example 3 – rpc message to retrieve the configuration of interface GigabitEthernet1
When you copy and paste this message into your terminal (right after the hello), you will receive the rpc-reply message in Example 4.
<?xml version="1.0" encoding="UTF-8"?>
<rpc-reply xmlns="urn:ietf:params:xml:ns:netconf:base:1.0" message-id="101">
    <data>
        <native xmlns="http://cisco.com/ns/yang/Cisco-IOS-XE-native">
            <interface>
                <GigabitEthernet>
                    <name>1</name>
                    <description>MANAGEMENT INTERFACE - DON'T TOUCH ME</description>
                    <ip>
                        <address>
                            <primary>
                                <address>10.10.20.48</address>
                                <mask>255.255.255.0</mask>
                            </primary>
                        </address>
                        <nat
                            xmlns="http://cisco.com/ns/yang/Cisco-IOS-XE-nat">
                            <outside/>
                        </nat>
                    </ip>
                    <mop>
                        <enabled>false</enabled>
                        <sysid>false</sysid>
                    </mop>
                    <negotiation
                        xmlns="http://cisco.com/ns/yang/Cisco-IOS-XE-ethernet">
                        <auto>true</auto>
                    </negotiation>
                </GigabitEthernet>
            </interface>
        </native>
    </data>
</rpc-reply>]]>]]>
Example 4 – rpc-reply message containing the configuration of interface GigabitEthernet1
Note that that the rpc message in Example 3 contains the XML elements rpc and get-config (highlighted in the example). The first indicates the message type and the second is the operation.
The rpc-reply message in Example 4 contains the XML elements rpc-reply and data (highlighted in the example). Again, the first is the message type and the second is the element that will contain all the data retrieved in case the operation in the rpc message is get or get-config.
The above examples are intended to give you a taste of NETCONF. Now let’s get into XML so we can dissect and decipher the 3 types of NETCONF messages.
eXtensible Markup Language (XML) – an interlude
Markup is information that you include in a document in the form of annotations. This information is not part of the original document content and is included only to provide information describing the sections of the document. A packaging of sorts. This markup is done in XML using elements.
Elements in XML are sections of the document identified by start and end tags. Take for example the following element in Example 4:
<description>MANAGEMENT INTERFACE - DON'T TOUCH ME</description>
This element name is description and is identified by the start tag <description> and end tag </description>. Notice the front slash (/) at the beginning of the end tag identifying it as an end tag. The tags are the markup and the content or data is the text between the tags. Not to state the obvious, but the start and end tags must have identical names, including the case. Having different start and end tags defies the whole purpose of the tag.
Elements may be nested under other elements. As a matter of fact, one of the purposes of markup in general and XML in particular is to define hierarchy. Child elements nested under parent elements are included within the start and end tags of the parent element. The description element is included inside the start and end tags of the GigabitEthernet element, which in turn is included inside the tag pair of its parent element interface.
A start and end tag with nothing in-between is an empty element. So an empty description element would look like:
<description></description>
But an alternative, shorter, representation of an empty element uses a single tag with a slash at the end of the tag:
<description/>
The top-most element is called the document or root element. All other elements in the document are children to the root element. In the case of NETCONF messages, the root element is always one of three options: hello, rpc or rpc-reply.
You may have noticed the very first line above the root element:
<?xml version="1.0" encoding="UTF-8"?>
This line is called the XML declaration. Very simply put, it tells the program (parser) that will read the XML document what version of XML and encoding are used. In this case, we are using XML version 1.0 and UTF-8 encoding, which is the encoding mandated by the NETCONF RFC.
The final piece of the puzzle are the attributes. Notice the root element start tag in Examples 3 and 4:
Example 3: <rpc xmlns="urn:ietf:params:xml:ns:netconf:base:1.0" message-id="101">
Example 4: <rpc-reply xmlns="urn:ietf:params:xml:ns:netconf:base:1.0" message-id="101">
The words xmlns and message-id are called attributes. Attributes are used to provide information related to the element in which they are defined.
In the case of the rpc and rpc-reply elements, the attribute xmlns defines the namespace in which this root element is defined. XML namespaces are like VLANs or VRFs: they define a logical space in which an element exists, more formally referred to in programming as the scope. The NETCONF standard mandates that the all NETCONF protocol elements be defined in the namespace urn:ietf:params:xml:ns:netconf:base:1.0. This is why you will find that the xmlns attribute is assigned this value in every single NETCONF message.
Sometimes the attribute is used for elements other than the root element. Take for example the native element in both Examples 3 and 4:
<native xmlns="http://cisco.com/ns/yang/Cisco-IOS-XE-native">
The xmlns attribute, also referring to a namespace, takes the value of the YANG model referenced by this element and all child elements under it, in this case the YANG model named Cisco-IOS-XE-native.
The other attribute is the message-id. This is an arbitrary string that is sent in the rpc message and mirrored back in the rpc-reply message unchanged, so that the client can match each rpc-reply message to its corresponding rpc message. You will notice that in both Examples 3 and 4 the message-id is equal to 101.
An XML declaration along with a root element (along with all the child elements under the root element) comprise an XML document. When an XML document follows the rules discussed so far (and a few more), it is referred to as a well-formed XML document. Rules here refer to the simple syntax and semantics governing XML documents, such as:
- For every start tag there has to be a matching end tag
- Tags start with a left bracket (<) and end with a right bracket (>)
- End tags must start with a left bracket followed by a slash then the tag name. Alternatively, empty elements may have a single tag ending in a slash and right bracket
- Do not include reserved characters (<,>,&,”) as element data without escaping them
- Make sure nesting is done properly: when a child element is nested under a parent element, make sure to close the child element using its end tag before closing the parent element
All NETCONF messages must be well-formed XML documents.
I wish I could say that we just scratched the surface of XML, but we didn’t even get this far. XML is so extensive and has a phenomenal number of applications that I would need several pages to just list the number of books and publications written on XML. For now, the few pointers mentioned here will suffice for a very basic understanding of NETCONF.
NETCONF

Now that you have seen NETCONF in action and have an idea on what each component of the XML document means, let’s dig a little deeper into the rpc message.
The rpc message in Example 3 contains an rpc root element indicating the message type, followed by the get-config element, indicating the operation. NETCONF supports a number of operations that allow for the full lifecycle of device management, some of which are:
- Operations for retrieving state data and configuration: get, get-config
- Operations for changing configuration: edit-config, copy-config, delete-config
- Datastore operations: lock, unlock
- Session operations: close-session, terminate-session
- Candidate configuration operations: commit, discard-changes
The elements that will follow the operations element will depend on which operation you are calling. For example, you will almost always specify the source or destination datastore on which the operation is to take place.
Which brings us to a very important concept supported by NETCONF: datastores. NETCONF supports the idea of a device having multiple, separate, datastores, such as the running, startup and/or candidate configurations. Based on the capabilities announces by the device in the hello message, this device may or may not support a specific datastore. The only mandatory datastore to have on a device is the running-configuration datastore.
Capabilities not only advertise what datastores are supported by the device, but also whether some of these datastores (such as the startup configuration datastore) are directly writable, or the client needs to write to the candidate datastore, and then commit the changes so that the configuration changes are reflected to the running and/or the startup datastores. Engineers working on IOX-XR based routers will be familiar with this concept.
When working with a candidate datastore, the typical workflow will involve the client implementing the configuration changes on the candidate configuration first, and then either issuing a commit operation to copy the candidate configuration to the running-configuration, or a discard-changes operation to discard the changes.
And before working on a datastore, whether the candidate configuration or another, the client should use the lock operation before starting the changes and the unlock operation after the changes are completed (or discarded) since more than one session can have access to a datastore. Without locking the datastore for your changes, several sessions may apply changes simultaneously.
To actually change the configuration, the edit-config operation introduces changes to the configuration in a target datastore, using new configuration in the rpc message body, in addition to a (sub-)operation that specifies how to integrate this new configuration with the existing configuration in the datastore (merge, replace, create or delete). The copy-config operation is used to create or replace an entire configuration datastore. The delete-config operation is used to delete an entire datastore.
NETCONF also supports the segregation between configuration data and state data. The get operation will retrieve both types of data from the router, while the get-config operation will only retrieve the configuration on the device (in the datastore specified in the source element).
In order to limit the information retrieved from the device, whether state or configuration, NETCONF supports two types of filters: Subtree filters and XPath filters. The first type is the default and works exactly as you see in Example 3. You specify a filter element under the operation and include only the branches of the hierarchy in the referenced data model that you want to retrieve. XPath filters use XPath expressions for filtering. XPath filters are part of XML and existed before the advent of NETCONF.
NETCONF and Python
Up till this point we have been sending and receiving NETCONF messages “manually”, which is a necessary evil to observe and study the intricacies of the protocol. However, in a real-life scenario, copying and pasting a hello or rpc message into the terminal, and reading through the data in the rpc-reply message kinda defies the purpose. We are, after all, discussing network programmability for the ultimate purpose of automation ! And an API is a software-to-software interface and not really designed for human consumption. Right ?
So let’s discuss a very popular Python library that emulates a NETCONF client: ncclient. The ncclient library provides a good deal of abstraction by masking a lot of the details of NETCONF, so you, the programmer, would not have to deal directly with most of the protocol specifics. Ncclient supports all the functions of NETCONF covered in the older RFC 4741.
Assuming you are on a Linux machine, before installing the ncclient library, make sure to install the following list of dependencies (using yum if you are on a CentOS or RHEL box):
- setuptools 0.6+
- Paramiko 1.7+
- lxml 3.3.0+
- libxml2
- libxslt
- libxml2-dev
- libxslt1-dev
Then Download the Python Script setup.py from the GitHub repo https://github.com/ncclient/ncclient and run it:
[kabuelenain@localhost ~]$ sudo python setup.py install
Or just use pip:
[kabuelenain@localhost ~]$ sudo pip install ncclient
The ncclient library operates by defining a handler object called manager which represents the NETCONF server. The manager object has different methods defined to it, each performing a different protocol operation. Example 5 shows how to retrieve the configuration of interface GigabitEthernet1 using ncclient.
from ncclient import manager
     filter_loopback_Gig1='''
        <native xmlns="http://cisco.com/ns/yang/Cisco-IOS-XE-native">
            <interface>
                <GigabitEthernet>
                    <name>1</name>
                </GigabitEthernet>
            </interface>
        </native>
       '''
with manager.connect(host='ios-xe-mgmt-latest.cisco.com',
                     port=10000,
                     username='developer',
                     password='C1sco12345',
                     hostkey_verify=False
                     ) as m:
     rpc_reply = m.get_config(source="running",filter=("subtree",filter_loopback_Gig1))
     print(rpc_reply) print(rpc_reply)
Example 5 – An rpc message containing a <get-config> operation using ncclient to retrieve the running configuration of interface GigabitEthernet1
In the Python script in the example, the manager module is first imported from ncclient. A subtree filter is defined as a multiline string named filter_loopback_Gig1 to extract the configuration of interface GigabitEthernet1 from the router.
A connection to the router is then initiated using the manager.connect method. The parameters passed to the method in this particular example use values specific to the Cisco IOS-XE sandbox. The parameters are the host address (which may also be an ip address), the port configured for NETCONF access, the username and password and finally the hostkey_verify, which when set to False, the server SSH keys on the client are not verified.
Then the get_config method, using the defined subtree filter, and parameter source equal to running, retrieves the required configuration from the running configuration datastore.
Finally the rpc-reply message received from the router is assigned to string rpc_reply and printed out. The output resulting from running this Python program is identical to the output seen previously in Example 4.
The manager.connect and get_config methods have a few more parameters that may be used for more granular control of the functionality. Only the basic parameters are covered here.
Similarly, the edit_config method can be used to edit the configuration on the routers. In this next example, the edit_config method is used to change the ip address on interface GigabitEthernet1 to 10.0.0.1/24.
from ncclient import manager
     config_data='''
       <config>
         <native xmlns="http://cisco.com/ns/yang/Cisco-IOS-XE-native">
           <interface>
             <GigabitEthernet>
               <name>1</name>
               <ip>
                 <address>
                   <primary>
                     <address>10.0.0.1</address>
                     <mask>255.255.255.0</mask>
                   </primary>
                 </address>
               </ip>
             </GigabitEthernet >
           </interface>
         </native>
       </config>
       '''
with manager.connect(host='ios-xe-mgmt-latest.cisco.com',
                     port=10000,
                     username='developer',
                     password='C1sco12345',
                     hostkey_verify=False
                     ) as m:
     rpc_reply = m.edit_config(target="running",config=config_data)
     print(rpc_reply)
Example 6 – An rpc message containing an <edit-config> operation using ncclient to change the IP address on interface GigabitEthernet1
The difference between the get_config and edit_config methods is that the latter requires a config parameter instead of a filter, represented by the config_data string, and requires a target datastore instead of a source.
Example 7 shows the output after running the script in the previous example, which is basically an rpc-reply message with an ok element. The show run interface GigabitEthernet1 command output from the router shows the new interface configuration.
### Output from the NETCONF Session ###
<?xml version="1.0" encoding="UTF-8"?>
<rpc-reply xmlns="urn:ietf:params:xml:ns:netconf:base:1.0" message-id="urn:uuid:7da14672-68c4-4d7e-9378-ad8c3957f6c1" xmlns:nc="urn:ietf:params:xml:ns:netconf:base:1.0">
    <ok />
</rpc-reply>

### Output from the router via the CLI showing the new interface configuration ###
csr1000v-1#show run interface Gig1
Building configuration...

Current configuration : 99 bytes
!
interface GigabitEthernet1
 description Testing the ncclient library
 ip address 10.0.0.1 255.255.255.0
end
Example 7 – The rpc-reply message after running the program in Example 6 and the new interface configuration
The ncclient library is only marginally introduced here. For a more comprehensive coverage, check out the corresponding documentation at https://ncclient.readthedocs.io/en/latest/#.
NETCONF is much more involved than what has been briefly described in this post. I urge you to check out RFCs 6241, 6242, 6243 and 6244 and my book “Network Programmability and Automation Fundamentals” from Cisco Press for a more extensive discussion of the protocol.
I hope you had fun today. Look out for the next part of this series covering JSON, HTTP, REST and RESTCONF.
Related Resources
- Visit the DevNet Networking Dev Center to learn more network programming and Cisco networking platforms.
- Learn about Cisco’s professional DevNet Certifications
We’d love to hear what you think. Ask a question or leave a comment below.
And stay connected with Cisco DevNet on social!
Twitter @CiscoDevNet | Facebook | LinkedIn
Visit the new Developer Video Channel


Thanks Great effort, please continue writing such blogs to ease the transformation from CLI to automation in network industry.
Below article might also shed some light on this subject
https://www.linkedin.com/pulse/network-automation-netconfyang-ssh-cisco-devnet-router-khurram-javed
Thank you very much Khurram – I’m glad you liked it.
What Part 1 did was left me anxious for Part 2. The writeup for Part 2 has served to put me in a similar state – make me anxious for Part 3!
I do have a question regarding the following sentence: “The same applies to RESTCONF, gRPC, or Native REST APIs.”
If that sentence had only referenced the RESTCONF and gRPC protocols, I would have been good to go. However, when you include the “Native REST APIx” piece, that caused a little of that head scratching that you referred to about Part 1. From my kindergarten-level understanding, it appears as though you’re mixing things at the Layer 3 of the Programmability Stack with something at Layer 6. If that sentence had read “The same applies to NETCONF, RESTCONF, or gRPC”, I would have used all this bandwidth. Help wipe away the little bit of fog that I’m experiencing on this one sentence.
So I’m very happy that after reading the post, you were anxious and eager for the next part to come out. The best complement I can get is a reader telling me that his interest in a subject was piqued by something I wrote, which means that I’m not as boring as I thought I was 🙂
Now regarding the “Native REST APIs” phrase: Let’s agree that a client-server protocol, as applied to Programmability or otherwise, may be simply defined through a set of messages that use specific syntax and semantic rules, coupled with one or more encodings and transport protocols (in addition to a few more moving parts). It just defines how both peers communicate.
From this perspective, imagine that vendor XYZ decides to define a new protocol and call it XYZConf. The vendor will define the protocol’s messages, syntax and semantic rules, choose (or create) an encoding, as well as a transport protocol. Moreover, this protocol happens to be RESTful by aligning with the RESTful protocol constraints listed in this post (ex. stateless, cacheable, etc.). This vendor then builds a device that acts as a server and exposes an API that uses XYZConf so that clients can speak with this device through (or over ?) this API using XYZConf.
XYZConf is an example of a “Native REST Protocol”. “Native” here is synonymous with “vendor-specific” (similar to native YANG models == vendor-specific YANG models). While both XYZConf and RESTCONF are RESTful protocols, XYZConf is a “native” REST protocol, while RESTCONF is an “industry-standard” REST protocol. Cisco has a number of native REST protocols such as NX-API REST exposed by the majority of Nexus switches today.
I hope this clears the confusion.
Here I am again with another elementary query about something stated in this wonderful writeup. Here’s the sentence that’s prompting my query: “Moreover, with respect to RESTful protocols, you will also need a pretty good understanding of the transport protocol, HTTP in this case …”
In the sentence, it’s the reference to “RESTful protocols” that has me turning the “Comment” box into a “Q&A” platform. My question is, what are the “RESTful protocols” that this makes reference? Does RESTCONF apply as one of the RESTful protocols?
I’m guessing, as thorough as your writeups have been up this point, your not providing a list of actual RESTful protocols at this point is not significant. However, my tendency to want to gather as many of the pieces to the puzzle as possible, as soon as possible, is responsible for submission of this query at this time.
So far, my communications for Part 2 have been comprised of questions, and not so much comments. I want to respect the fact that you did ask for comments, and not a slew a questions, essentially turning your blog into a virtual class. Let me know if these types of queries would be better left to communications outside of your blog.
Many, many thanks for the first two excellent lessons.
Again, thank you Trevor for the compliments. You made my day 🙂
Now let me address your concerns one-by-one.
“My question is, what are the “RESTful protocols” that this makes reference?”: In this post there is a comparison between RPC-based and RESTful APIs. It defines what a RESTful API is “When an API is described as RESTful, then this API adheres to the constraints listed above.” Moreover, Part III will dive a little deeper into REST, so if this section is not very clear, I’m hoping you will be left with minimal confusion after Part III. Keep in mind that this part is NOT about REST, it’s about NETCONF 🙂
“Does RESTCONF apply as one of the RESTful protocols?”: Yes. as I said in the post “RETCONF is a RESTful protocol/API and will be the subject of an upcoming part of this series, along with HTTP.”
“I’m guessing, as thorough as your writeups have been up this point, your not providing a list of actual RESTful protocols….”: Like you said, providing an inventory of all RESTful protocols is not significant. Why is that ? Because there is no way for us to provide a full list of all RESTful protocols/APIs out there. Anyone can write code to expose a RESTful API on a device using, for example, Python. Software developers write RESTful APIs every day all over the world. The only industry-standard RESTful protocol/API in wide use today for network programmability is RESTCONF. Each vendor then has a number of native RESTful APIs that apply only to its equipment/devices. The whole point here is to understand the concepts, and not make inventories of anything.
“So far, my communications for Part 2 have been comprised of questions….”: I’m not sure about my friends at Cisco and what the policy is regarding questions versus comments, but it is always my pleasure to answer any questions from my readers. It gives me an indication of what needs more/better coverage in future posts.
Your comments and questions are always welcome my friend .. have a wonderful day 🙂
You can be sure I had fun with Part 2 of your series. You definitely elevated my knowledge, along with putting into perspective just how much road I have in front of me on this journey. Thanks for the actual exercises. This was absolutely an unexpected bonus. Part 2 put a lot on my plate. I’m going to have to make a second pass through it to come close to fully digesting the content.
Check with the good folks at Cisco Press to learn why your book doesn’t appear anywhere on the site, and your name doesn’t appear in the list of authors – unless you’re going by some alias.
Another great post. Excited to see what Part 3 will bring.
Thanks for this wonderful blog.
Hello Trevor,
Thank you very much for your comment. I’m glad that you found it useful. I just wanted to point out that when writing a blog post, there is always a struggle between covering enough breadth of subjects, versus covering less subjects with sufficient depth. So the post is attempting to introduce a big number of subject with just enough depth to wet your appetite for more. This is the reason why there is a mention of the RFCs and the book, which have a more comprehensive coverage of the subjects.
Let me paste the link to the book here: https://www.ciscopress.com/store/network-programmability-and-automation-fundamentals-9780135183656. My name is the first on the list of authors – I’m not using an alias 🙂 Unfortunately we are running a little late with the book release, but the button for the preorder should be activated very soon. Unfortunately I am not able to copy and paste a snippet from the site here, but I’m sure if you navigate to the link provided in this comment you will land on the correct page on the ciscopress.com website.