Cisco Modeling Labs (CML) 2.6, the latest version of our premier network virtualization platform, is finally here. CML 2.6 offers quite a list of useful tools, with additions like Amazon Web Services (AWS) Cloud deployment and a new Maintenance mode for system admins.
However, I’m here to discuss the feature I’m most excited about:
CML 2.6 includes a revamped Workbench that allows users to see multiple devices, tools, and configs in the same view.
New features within revamped Workbench include:
-
- a menu to add nodes to your workplace.
- a sidebar hub to modify lab elements.
- multi-select and right-click action menus.
- keyboard shortcuts.
- lab actions.
- a panes panel for a more flexible workspace.
Continue reading for an in-depth look inside the Workbench revamp available in Cisco Modeling Labs’ latest feature release.
Inside the CML 2.6 Workbench revamp
Adding nodes with—or without—a mouse
Incorporating new nodes into your workspace is still a straightforward process, whereby you can drag and drop your chosen type of node onto the canvas. But prior to CML 2.6, the interactive drag menu was on the right-side menu. Now, it’s activated by selecting the Add Nodes icon in the Workbench toolbar.
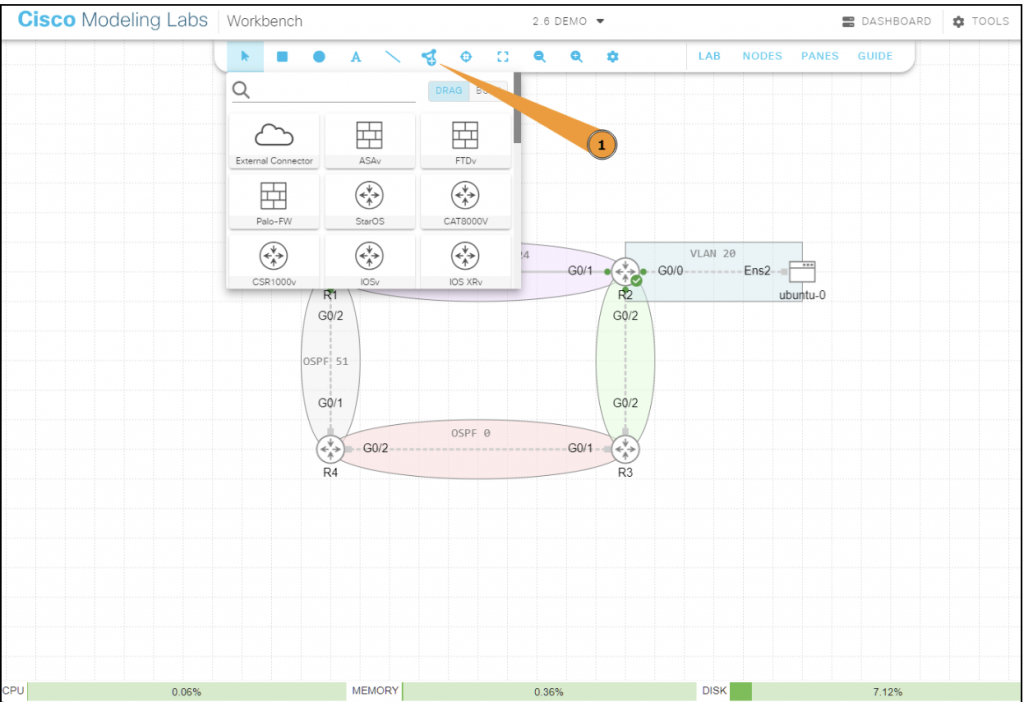
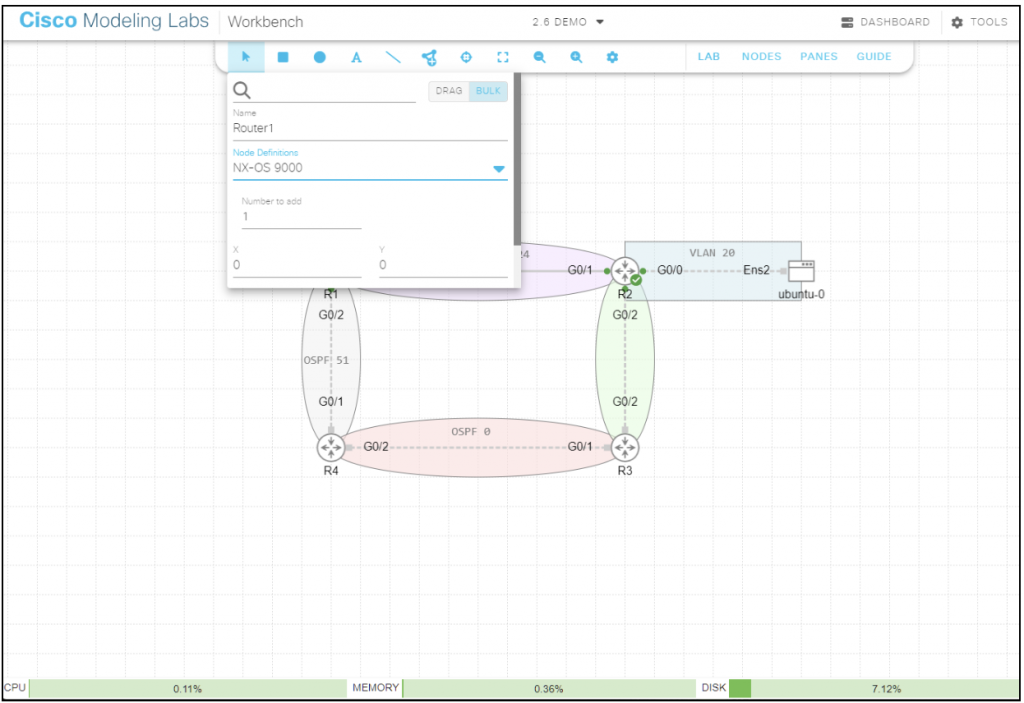
In addition to this traditional method of adding nodes, we’ve introduced a brand-new feature called Bulk Add. It is designed with accessibility in mind, so you can add as many nodes as you need—using only your keyboard, eliminating the need for a mouse.
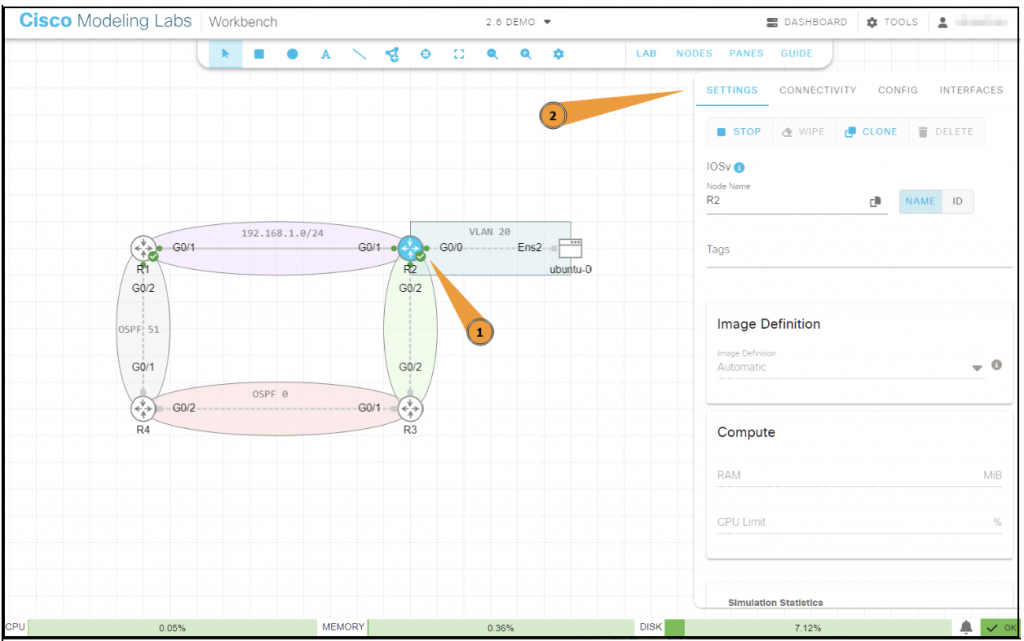
Editing elements in the Sidebar
We have redesigned the user interface to provide a more streamlined and unified experience for users as they edit elements within a lab. Now, in CML 2.6, the Sidebar serves as the single, consolidated hub for changing all your lab elements. Whether you want to edit a node, link, or annotation, simply select it, and the Sidebar will display the relevant editing options.
Using the Multi-select Action menu
You can activate the Multi-Select action menu by selecting multiple elements and right-clicking anywhere on the canvas. This action opens a Context-sensitive menu with a distinct section for each element type.
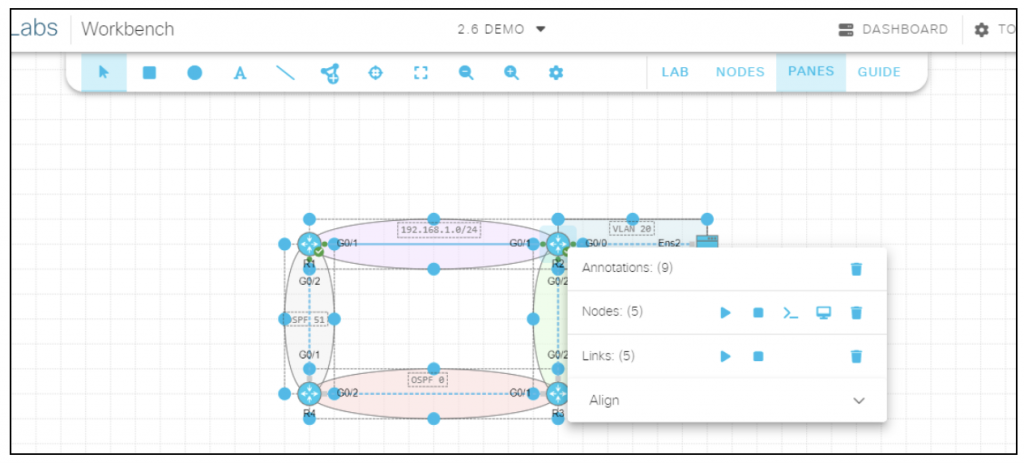
Within each section, you can perform actions on the corresponding element type. Please note: the system currently does not verify the validity of an action. Also, when you select multiple nodes, an Alignment section becomes available in the menu, providing options to align the selected nodes.
Using the Right-click Context menu
The Right-Click Context menu displays when you right-click a type of element: annotation, node, or link. This menu presents a list of actions specifically tailored to the selected element type.

Note: the Right-click Context menu typically provides more actions for each element type compared to the Multi-select Action menu.
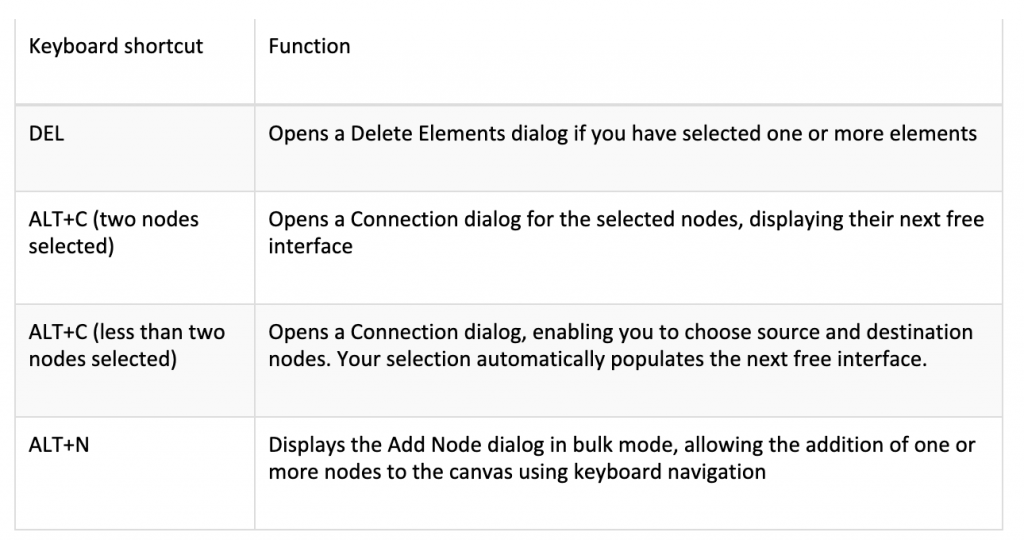
Keyboard shortcuts
Lab Actions menu
You can find the Lab Actions menu in the toolbar under the “LAB” section. You can also activate this menu by right-clicking the canvas while no elements are selected.

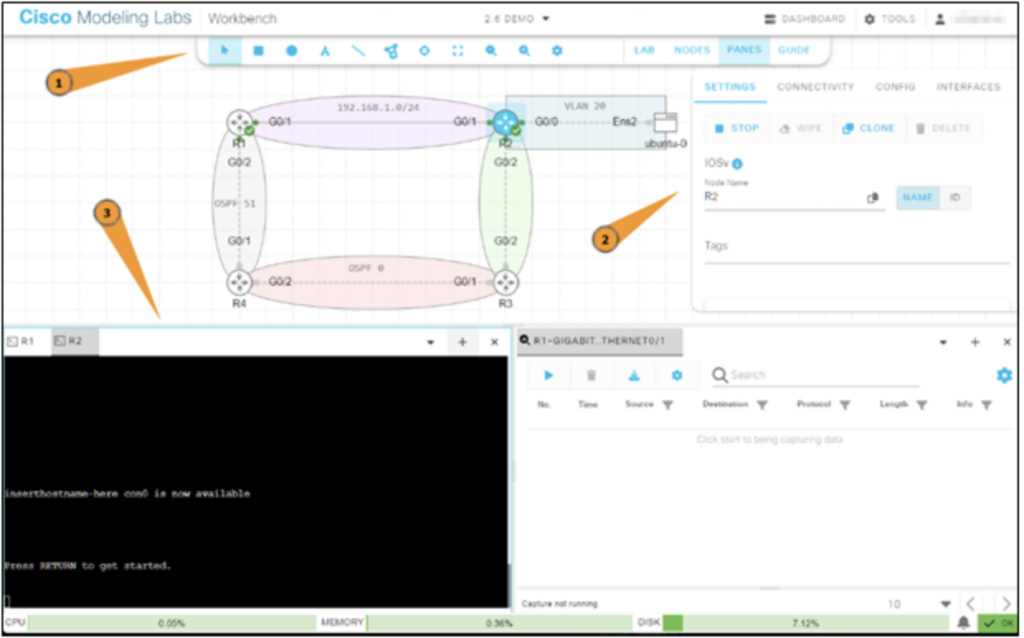
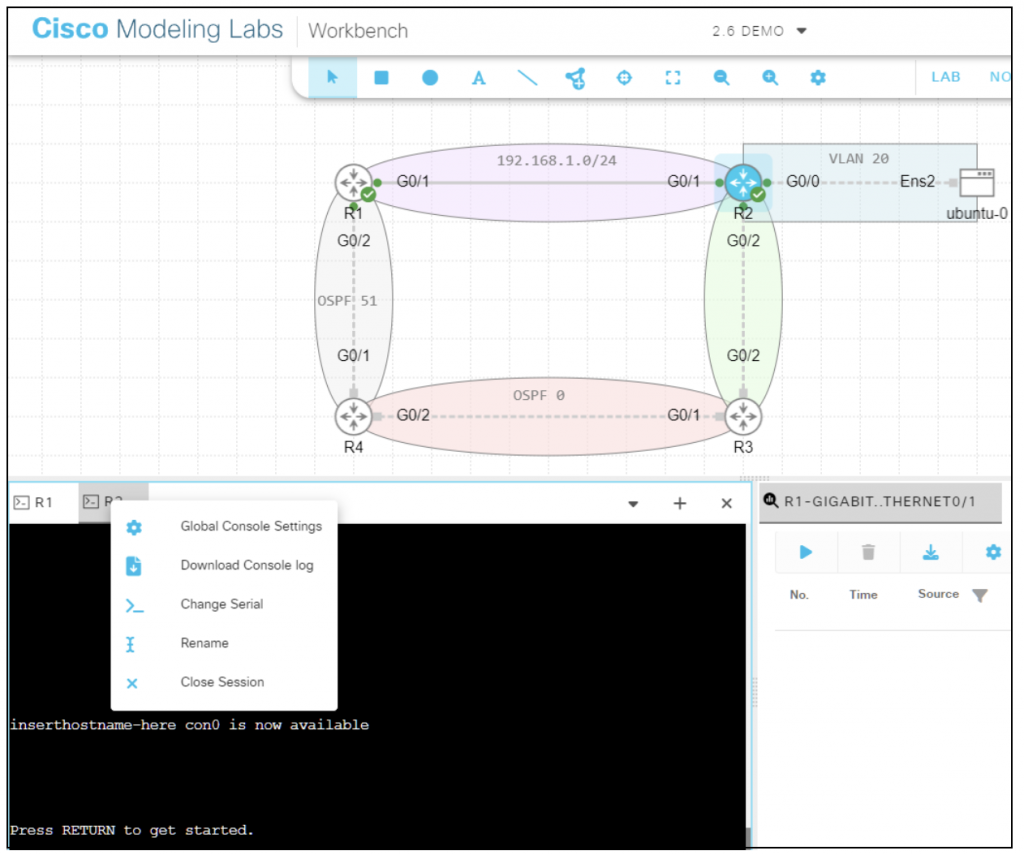
Panes panel
The Panes panel is a versatile tool designed to give you a flexible workspace. For one, the Panes panel allows you to open multiple tabs, each hosting a Console, VNC, or PCAP session. You can also choose how you want to host tabs: in only one pane or across multiple. For instance, you can have one pane containing an open console session while another runs a packet capture.
What to keep in mind when using the Panes panel:
- One single pane is set by default, but you can add others by selecting the “+” icon.
- If you have more than one pane, you will see one pane highlighted with a blue square, which indicates it will be the target for any new sessions you open. (You can change this by clicking in a different pane, which sets it as the new target.)
To open a tab, simply right-click a running link or node, and open the corresponding session for VNC, Console, or PCAP. As an added convenience, you also have the option to select multiple nodes and simultaneously launch multiple sessions, streamlining your workflow.
Once you have a tab open, you can easily reposition it by dragging it from one pane to another. This drag-and-drop functionality provides a straightforward way to organize your workspace according to your preference or need.
The panes and their respective tabs are designed to retain their state on a per-browser and per-lab basis. This means your arrangement of panes and tabs, as well as the content within them, will remain as you set them (even if you navigate away or close your browser), providing a persistent working environment.
Each pane tab is equipped with a context menu, which you can access by right-clicking the tab. This context menu contains options and actions that pertain specifically to the type of tab, giving you a set of relevant controls right at your fingertips.
To make your workspace even more customizable, you can rename tabs to reflect their content or purpose. You can either double-click on the tab, which will allow you to edit the name directly, or right-click on the tab and choose the Rename option from the context menu.
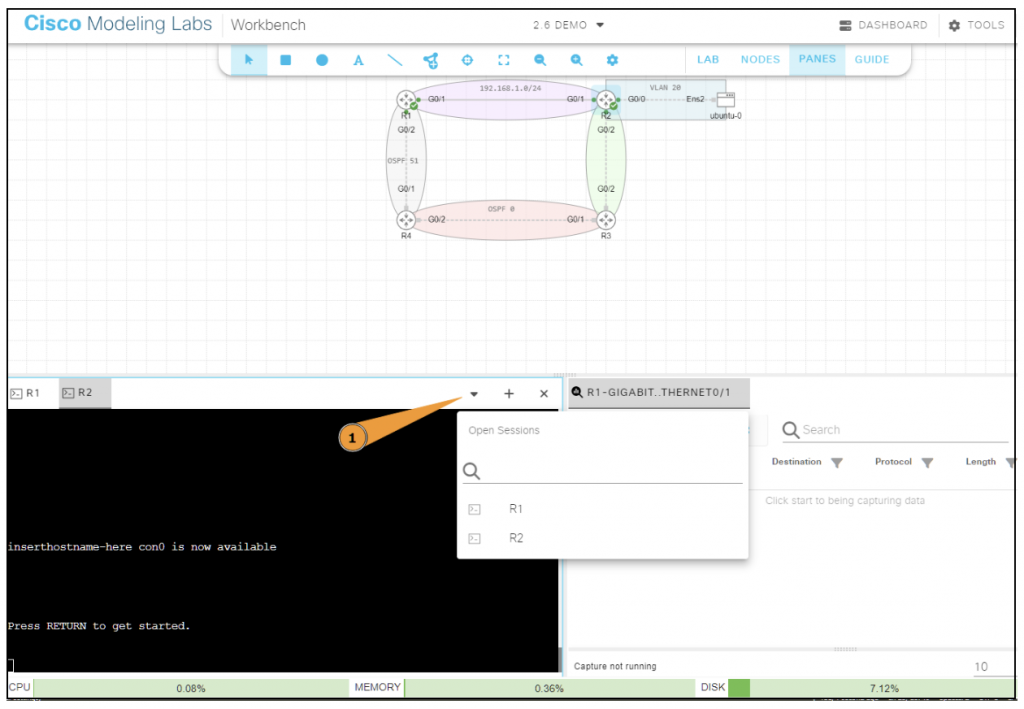
The Carrot Down icon associated with each pane (see below) serves as a gateway to a menu. This menu displays a searchable list of all currently open sessions, making it easy for you to navigate directly to the session you need.
To help you track the relationship between your tabs and their associated elements, you can select a tab to view its corresponding node (or link) on the canvas. This means you can instantly see which parts of your lab you are currently interacting with via your session.
If you need more canvas space temporarily, you can hide and show the Panes panel by clicking the “PANES” toolbar option.
Until next time…
I hope this article has sparked your interest in CML v2.6, the newest version of Cisco Modeling Labs. For more information on what’s new in Cisco Modeling Labs 2.6, view the release notes. You can also watch this recent demo for a guided walkthrough of the new CML 2.6 updates.
I’m eager to hear about your experiences as you give the new Workbench a spin. Please feel free to share your feedback in the comments section below. Until next time, happy labbing… and enjoy exploring all that this update has to offer!
Connect with the CML – Personal Community on the Cisco Learning Network.
Follow Cisco Learning & Certifications
Twitter | Facebook | LinkedIn | Instagram | YouTube
Use #CiscoCert to join the conversation.
Read next: “Get Started with Terraform and Cisco Modeling Labs” by Ralph Schmieder. Read now.


Good Work!
I concur