Part 2 of the 4-part series – Cloud monitoring for Cisco Catalyst switches series
Welcome back to the second blog in our series for cloud monitoring of Cisco Catalyst 9000 switches!
Like I said in my last blog, the most important step in your journey to the cloud starts with visibility. Rather than trying to explain with too many words what I mean by visibility, I’m going to spend some time showing you—so brace yourself for a lot of screenshots.
No matter how you want to manage your network, be it digging deep into the command-line interface (CLI) or making a few clicks in the Meraki dashboard, visualizing your entire network is incredibly important for many reasons. In this blog, I’m going to cover just a few, but I’d love to hear your own reasons in the comments below.
Picture-perfect visualization
First, you want that picture-perfect view of your network. Being able to easily see if everything is online (or not) from a single platform is vital to your business.
For this particular instance, I’m logged into the Cisco San Francisco office network. I can immediately look at the health of the network, shown in the screenshot below.

From here, it’s easy to see I have an issue with two switches. I can click on the switches to see a full list of all of the switches on this network. I can also filter to only see the “unhealthy” switches. We’re going to get into troubleshooting in our next blog, so stay tuned for that.
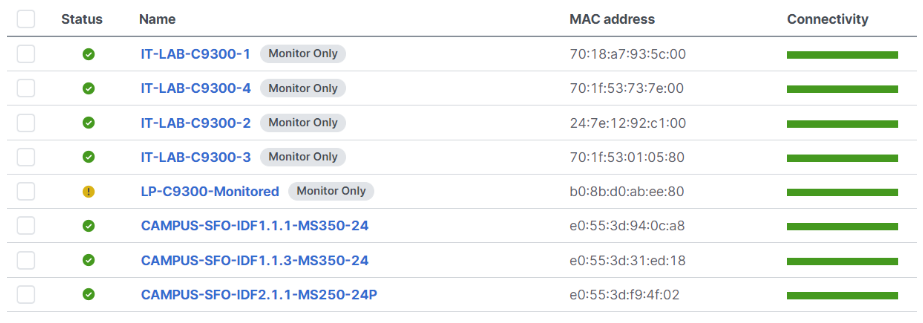
When I view the list of switches in this office, I can easily tell which devices are monitored Catalyst 9000 switches with the “Monitor Only” tag—you can’t miss it! Also in this list, you can see there are several monitored Catalyst 9300s as well as MS350s and one MS250. My point here—if you have a mixed Catalyst and Meraki environment, you can see all of your devices from the Meraki dashboard. I’ll even pop over and show the list of our newest Catalyst Wireless (CW) Wi-Fi 6E access points, check it out:

The ability to see all of my networks in a few clicks is truly a mic-drop moment—pause your reading here for effect.
Monitoring Catalyst switches
Let’s get back to the “Monitor Only” switch. By clicking on the switch you can see all of the necessary information for the switch to work. Again, this is a monitored Catalyst 9300 switch, so you’ll be able to view everything, but you can’t make any configuration changes to a monitor-only switch.
In the initial view of the monitored Catalyst switch, you can view the following:
- Physical address and location
- LAN IP
- Public IP
- Gateway
- Serial numbers: Catalyst and Meraki
- Historical device data and client usage data
- The current firmware version on the switch
Switch port visibility
My personal favorite part about the Meraki dashboard, in case you haven’t noticed, is the ease of use. And my favorite part about the switches is you can actually click on the switch port you want to view. This has been one of my favorite things to show folks live at trade shows.

Let’s choose that fun little uplink port over there, number 24. By clicking into that port you can view configurations (again, no edit on Catalyst switches) and see status items like connectivity, usage, traffic, CDP/LLDP, and PoE usage. You can also do things like cycle a port, mass cycle ports, run a MAC forwarding table, or simply ping an IP. I’ve heard from customers that these last few items are a pretty big deal and make their lives a ton easier.
Network topology—the big picture
Last, but certainly not least, we’re going to come back full circle to the theme of the “big picture” and visualization. The network topology view inside the Meraki dashboard is such a powerful tool. If we follow the same switch here, we can see it in yellow on the far right. We can also see and click into the rest of the network infrastructure from this topology view and see any monitored Catalyst 9000 devices and managed Meraki devices, as well as CW access points.

While it’s been fun to walk you through a cloud-monitored Catalyst 9000 switch and give a high-level overview of the Meraki dashboard, let’s not forget why we’re here. Visualizing your network infrastructure from a single dashboard can be one of the most powerful tools to have in your kit and a really easy and fast way to show immediate value.
If you’re ready now—great! Here’s our getting started guide. If you’re still exploring, check out our on-demand #CiscoChat where I and a couple of colleagues discuss all things cloud monitoring today and what’s coming next.
Also, check back in a month for my next blog. We’ll be covering network troubleshooting.
Learn more about cloud monitoring for Catalyst switches from the experts
Watch our on-demand #CiscoChat


CONNECT WITH US