Background
In my previous blog post, I wrote about the changes in process when using Cisco DNA Center to on-board a network device. At the heart of the PnP process are two key concepts. One is the serial number of the device, which is used to identify it, the other is a template file which is applied to the device when it is on-boarded.
While this process is awesome for many use cases, what happens if you have configuration files generated off-box (somewhere other than Cisco DNA Center). Or, if you do not want to have to know about device serial numbers in advance for creating PnP rules?
While the UI cannot handle these two challenges, the flexibility of the API can, and this blog post will show you how. Here’s a link where you’ll find documentation for the DNA Center APIs. All the on-boarding API endpoints I use are in the PnP section.

Why do it this way?
The first question to answer is why? Why would it make sense to use the API and scripts to automate the PnP process in this manner? There are a couple of reasons and they relate to serial numbers and configuration files.
- If you have an alternative means of creating a network device configuration file, the problem you are trying to solve is getting the configuration file securely onto the device. The current GUI workflow requires a configuration template vs a static file.
- If you are using non-template configuration files, you may not want to worry about shipping specific serial numbers to specific sites, to simplify the logistics of deployment. The current GUI workflow requires a serial number to identify the device, so it can be provisioned with a template.
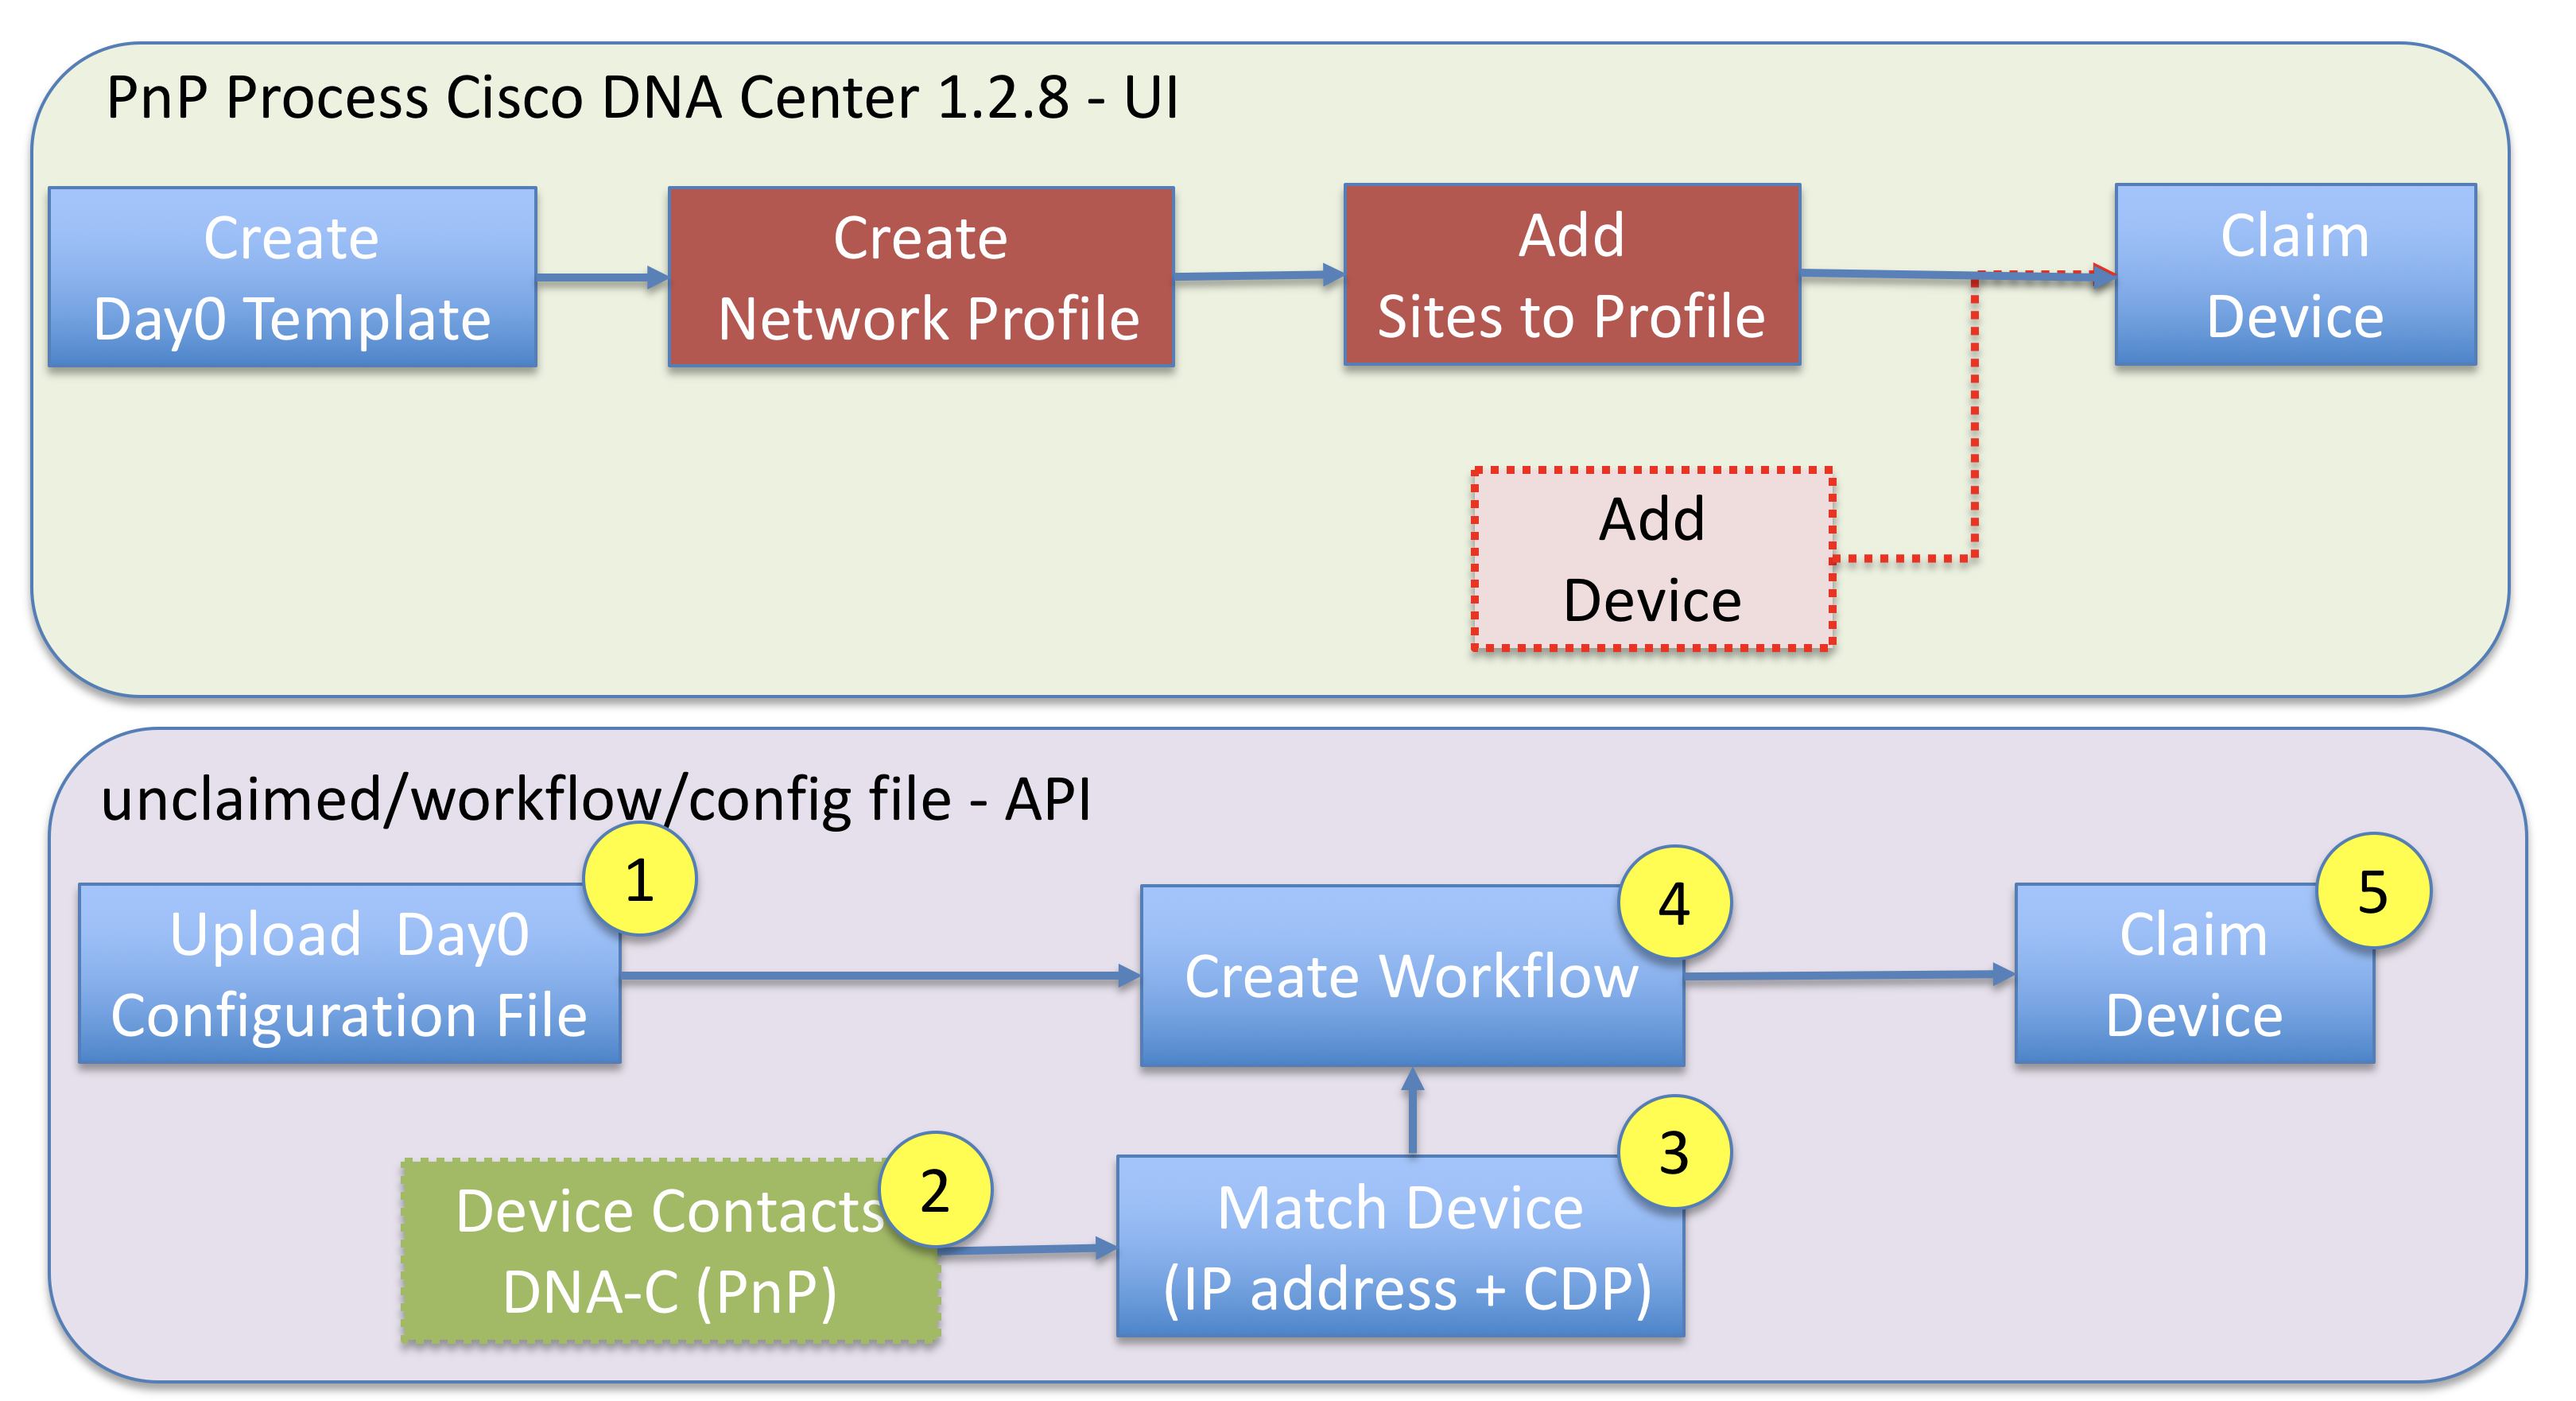
Using the API we can address this use case using the following steps.
- Upload the day0 configuration files using the /file API
- Boot the device and make sure it can discover Cisco DNA Center. Note this is going to be the “unclaimed” flow, as opposed to normal pre-provision.
- Using the pnp-device API look for unclaimed devices and match on IP address of the device as well as the upstream interface on the parent device (obtained via CDP). This is just an example, could also match on the name of the device as well.
- Create a workflow to apply the specific configuration file to the device.
- “Claim” the device by binding the workflow to it. The device will be configured and added to the inventory in DNA Center. Remember you need to add the appropriate credentials so DNA Center can discover it.
How to do it?
I have written some python code to implement this example. You can find it on github. This blog focuses on the mechanics for mapping a tuple of (IP address, CDP neighbour interface) to a configuration file.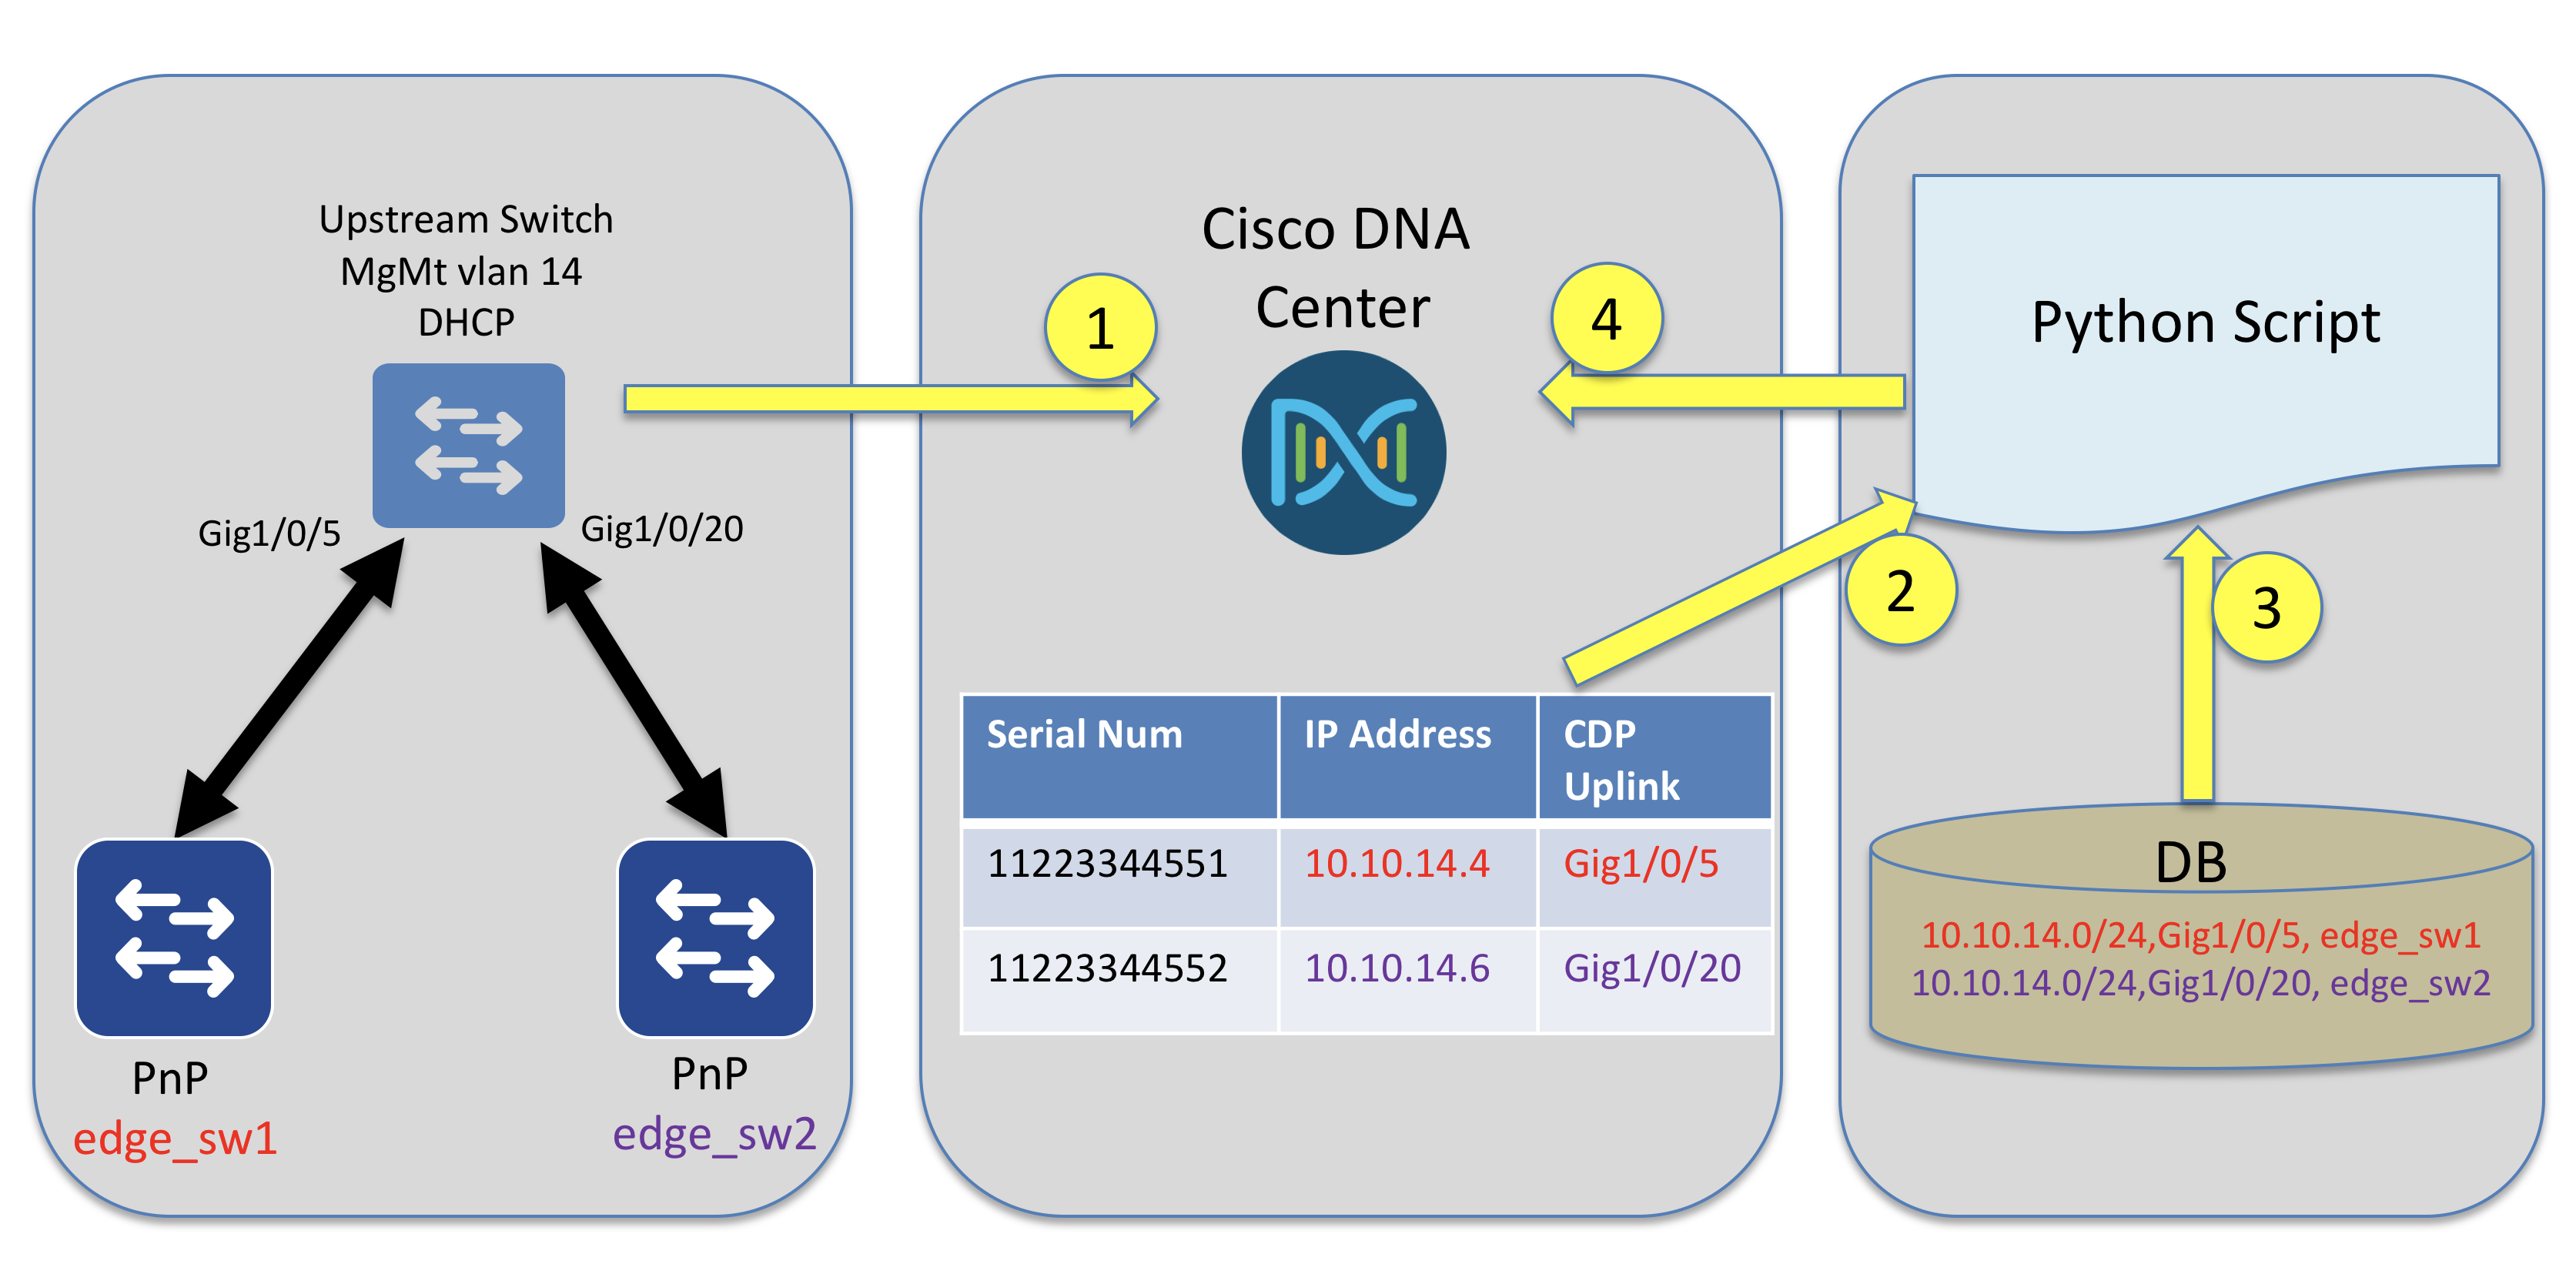
I am going to assume the configuration upload has occurred. There is a script “00_file_sync.py” that will synchronise files in the “work_files/config” directory into Cisco DNA Center. The script checks the hash of the file in DNAC center with that in the directory. If the file does not exist, it uploads it, else modifies the existing version. Two configuration files are uploaded.
$ ./00_file_sync.py
POST https://10.66.104.121:443/api/v1/file/config
Uploaded File:edge_sw2.cfg (ac1ff484-fd03-44f4-b55b-d70ea57801ab)
POST https://10.66.104.121:443/api/v1/file/config
Uploaded File:edge_sw1.cfg (1f81423a-3587-403a-bc98-8d6109105f4a)
Step 1 – Boot the devices
The next step is to boot the devices, so they begin the PnP process. In this scenario, I am using “pnp startup-vlan 14” on the upstream switch. This vlan has DHCP enabled and is using option 43 to direct the switches to DNA Center. Both switches are on the same vlan and will have the same IP subnet, so the upstream CDP information is going to be used to differentiate them.
Step 2 – find unclaimed devices on Cisco DNA Center
Once the switches have booted and found DNA Center, they will appear in the PnP tab as “unclaimed” devices. There is an API call to get a list of all PnP devices. I have also written a script to show them. “00_pnp_devices.py” will show all of the devices and their status.
$ ./00_pnp_devices.py
Name         PID              State       Source  IP Address      Neighbour Interface       Workflow Name
FOC2224Z000  C9300-24P        Provisioned Network 10.10.50.2      GigabitEthernet0/0/0      10.10.50.2:
FCW2220L000  C9300-48U        Unclaimed   Network 10.10.14.6      GigabitEthernet1/0/20
FDO1732Q000  WS-C3650-48PQ-E  Unclaimed   Network 10.10.14.4      gi2,GigabitEthernet1/0/5
Step 3 – read in mapping file
The mapping file links the attributes of the device to a configuration file. In the UI this is a serial number, but using the API it is possible to use the IP address and neighbor interface.
Here is a sample mapping file in the “work_files” directory. The switch with IP address 10.10.14.0/24 and uplink GigabitEthernet1/0/5 will have the configuration file edge_sw1.cfg applied.
$ cat work_files/mapping.adam
subnet,upLink,configFile
10.10.14.0/24,GigabitEthernet1/0/5,edge_sw1.cfg
10.10.14.0/24,GigabitEthernet1/0/20,edge_sw2.cf
Step 4 Create the workflow and claim device
The python script will then create a workflow (with a single step, to use the configuration file) and then claim the device with the newly created workflow.
$ ./no_serial_claim.py work_files/mapping.adam
Using device file: work_files/mapping.adam
##########################
Trying to find mapping for 10.10.14.6/['GigabitEthernet1/0/20']
No Link match upstream link:GigabitEthernet1/0/5
5c6114b1552b2e0007d0490f:10.10.14.0/24:GigabitEthernet1/0/20:ac1ff484-fd03-44f4-b55b-d70ea57801ab
Claiming 10.10.14.6 with file ac1ff484-fd03-44f4-b55b-d70ea57801ab
Deleting Old workflow:10.10.14.6:GigabitEthernet1-0-20
Workflow:10.10.14.6:GigabitEthernet1-0-20 created, id:5c61166f552b2e0007d04957
claiming device
{
  "message": "Device(s) Claimed",
  "statusCode": 200
}
Trying to find mapping for 10.10.14.4/['gi2', 'GigabitEthernet1/0/5']
5c611547552b2e0007d04927:10.10.14.0/24:GigabitEthernet1/0/5:1f81423a-3587-403a-bc98-8d6109105f4a
 Claiming 10.10.14.4 with file 1f81423a-3587-403a-bc98-8d6109105f4a
Deleting Old workflow:10.10.14.4:GigabitEthernet1-0-5
Workflow:10.10.14.4:GigabitEthernet1-0-5 created, id:5c61166f552b2e0007d04959
claiming device
{
  "message": "Device(s) Claimed",
  "statusCode": 200
}
No Link match upstream link:GigabitEthernet1/0/20
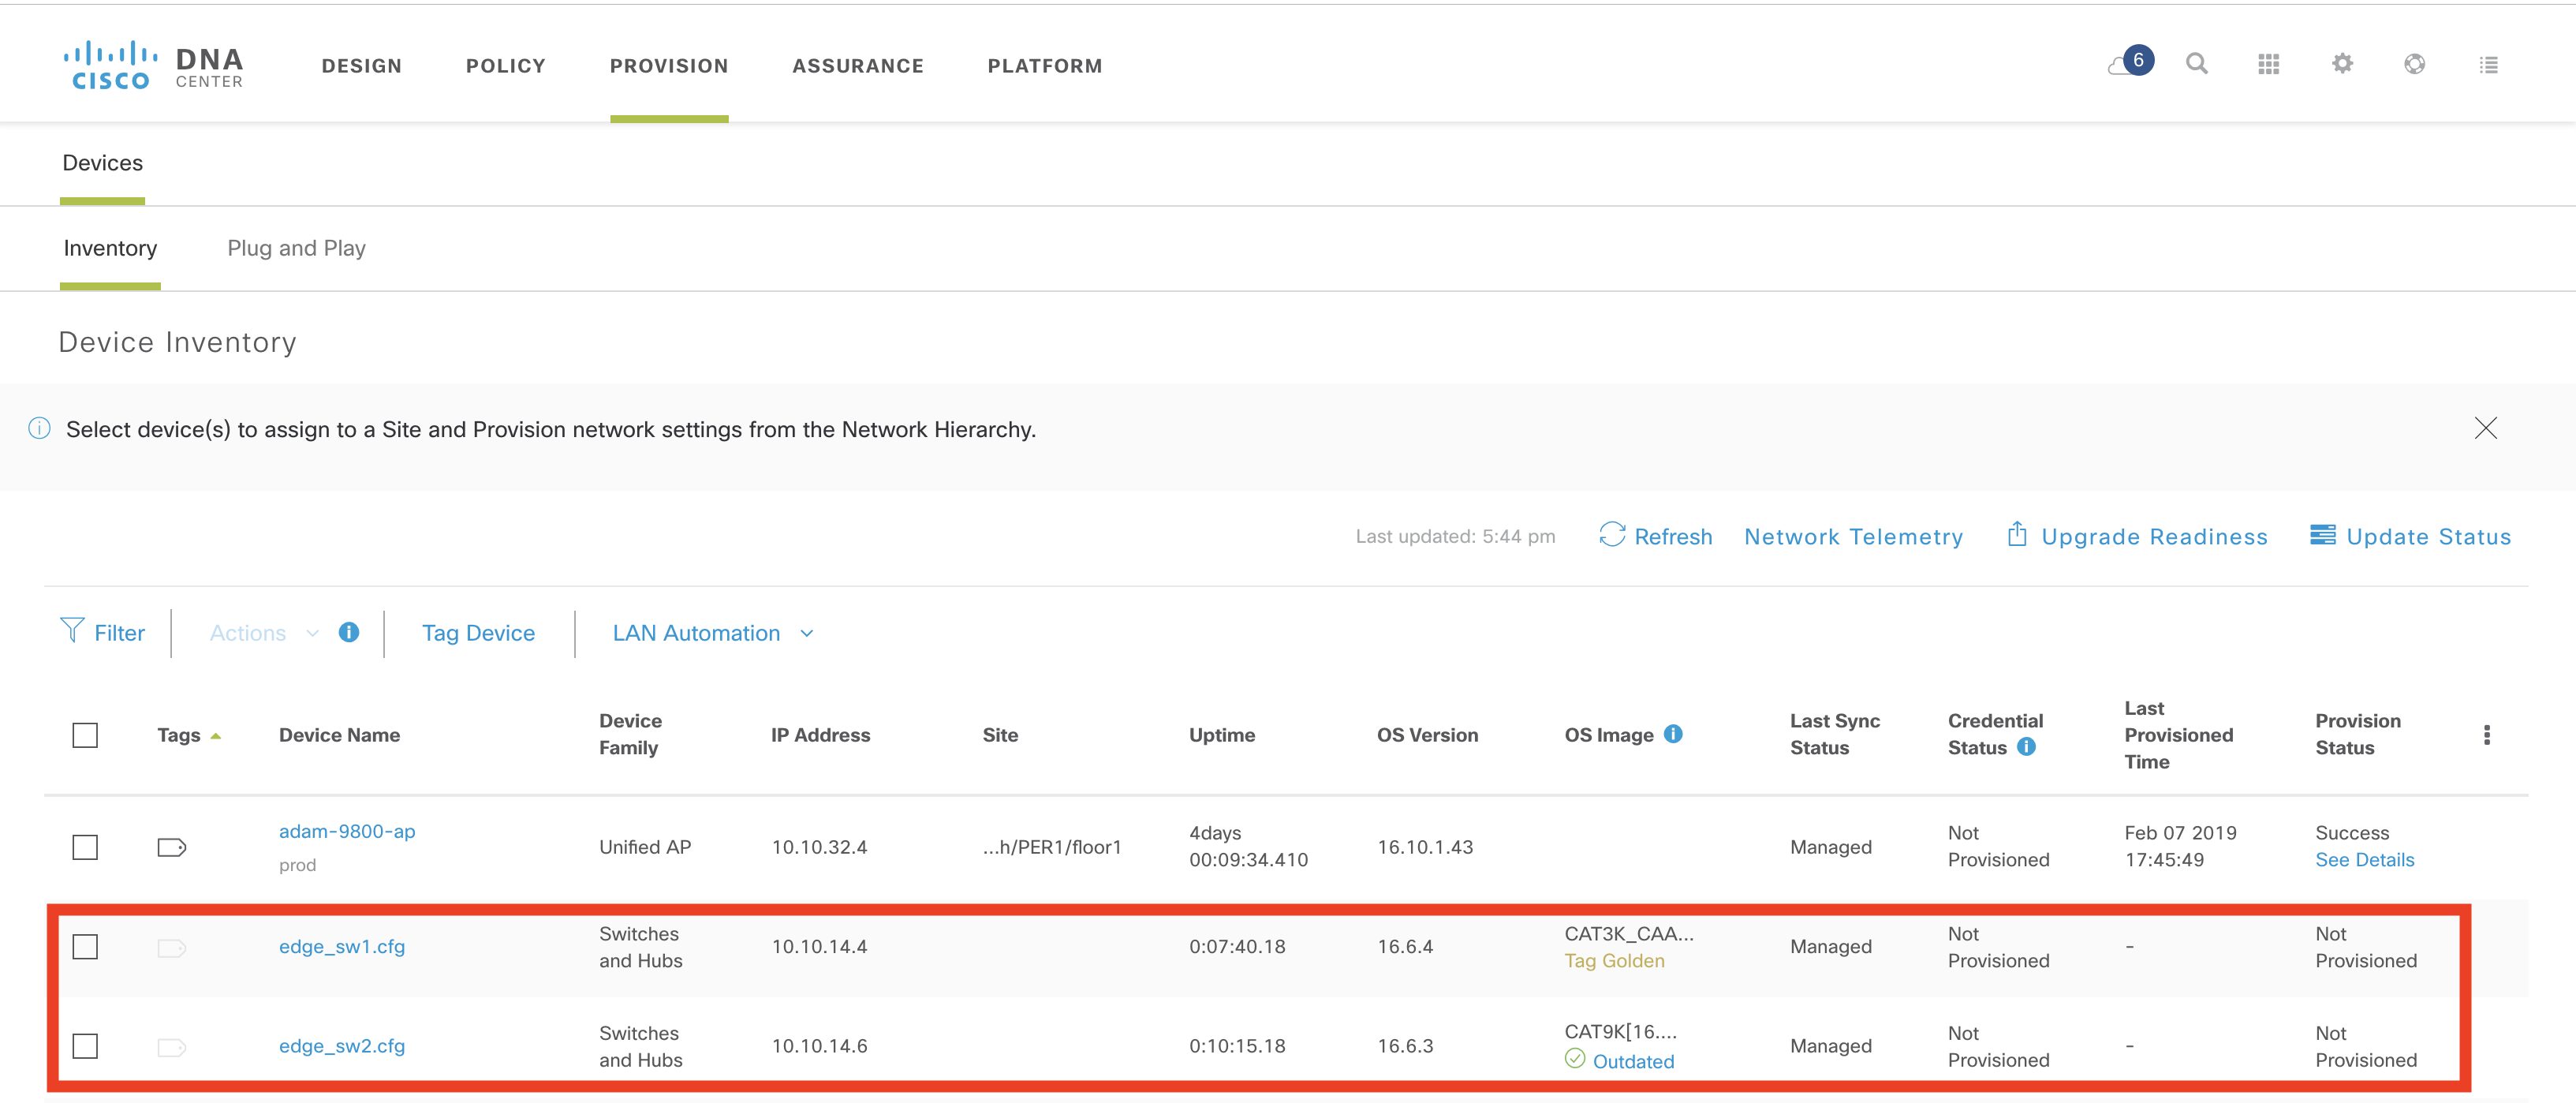
The devices have now been claimed, and the configuration file will loaded and they are added to the inventory. Note that the configuration file needs to contain credentials for DNA Center to connect and manage the device.
How did that happen?
There are two API calls required. The first is to create the workflow. It required a thirty two character file id for the configuration file, as well as a name.
POST "dna/intent/api/v1/onboarding/pnp-workflow"

{
    "name": "testWorkflow",
    "description": "",
    "currTaskIdx": 0,
    "tasks": [
        {
            "configInfo": {
                "saveToStartUp": True,
                "connLossRollBack": True,
                "fileServiceId": "32-char-file-GUID"
            },
            "type": "Config",
            "currWorkItemIdx": 0,
            "name": "Config Download",
            "taskSeqNo": 0
        }
    ],
    "addToInventory": True
}
The second API takes the workflow_id returned when creating the workflow and uses it to claim the device. This maps the workflow_id and device_id together.
POST "dna/intent/api/v1/onboarding/pnp-device/claim"

{
  "workflowId": workflow_id,
  "deviceClaimList": [
    {
      "configList": [
        {
          "configId": "",
          "configParameters": [
          ]
        }
      ],
      "deviceId": device_id
    }
  ],
  "populateInventory": True,
  "imageId": None,
  "projectId": None,
  "configId": None
}
What Next?
In this series here are a number of blog posts on other aspects of Cisco DNA Center. You can read them at any time, and leave me a comment if you have a question.
In the meantime, if you would like to learn more about this, you could visit Cisco DevNet. DevNet has further explanations about other Cisco DNA Center topics. Also, we have a Github repository where you can get examples related to PnP.
We’d love to hear what you think. Ask a question or leave a comment below.
And stay connected with Cisco DevNet on social!
Twitter @CiscoDevNet | Facebook | LinkedIn
Visit the new Developer Video Channel


Great article, Adam. For tuple to map configuration file, it will be great to implement hostname+neighbor port, since sometimes it is unpredictable what is IP in CDP neighbor info especially in multiple IPs in neighbor device.
Thanks Peng, great suggestion. I will add this.