Anecdotally, it would take about a week for a single machine to ping sweep the Internet. That would be approximately 4 billion IP addresses, essentially the whole Internet. In theory, this includes every single military address, every single ISP, every home user, and every mobile device. Such a port sweep does not include all options, UDP, and Nmap Scripts, as that would take too long. But what if I want to run the same scan to my home IPv6 range? It will have a /64 allocated to it, or about 18 quintillion addresses. Let’s compare a sweep of the entire Internet with my home IPv6 range:
- The Internet: 2^32 = 4,294,967,296 [1]
- The home range from my ISP: 2^64 = 18,446,744,073,709,551,616 [2]
A stark difference! So, how will I scan this? Is that just one network? I am Moses Hernandez, and this is one of my tips and tricks in this series. This post is about the venerable Nmap.
Late last year, Nmap 6.25 was released. To those who haven’t seen Nmap since version 5, which was released in 2009, much has changed. Nmap now comes with approximately 433 NSE scripts, 3500 fingerprints, and more IPv6 support, and yet it’s still a low impact installation on most systems and a very powerful tool. In this post, I’ll address three key items that will help you automate, discover, and identify hosts and even vulnerabilities.
Disclaimer: The examples used in this post are taken from my installation using Homebrew on OSX as the installation method for my Nmap. (‘mosherna-mac moses$ brew install nmap’)
Automating the Scanner
The first item I’ll address is automating the scanner. Starting with a simple Nmap scan, I can build an excellent Nmap pipeline for managing network scans. Below is an example of a simple Nmap scan.
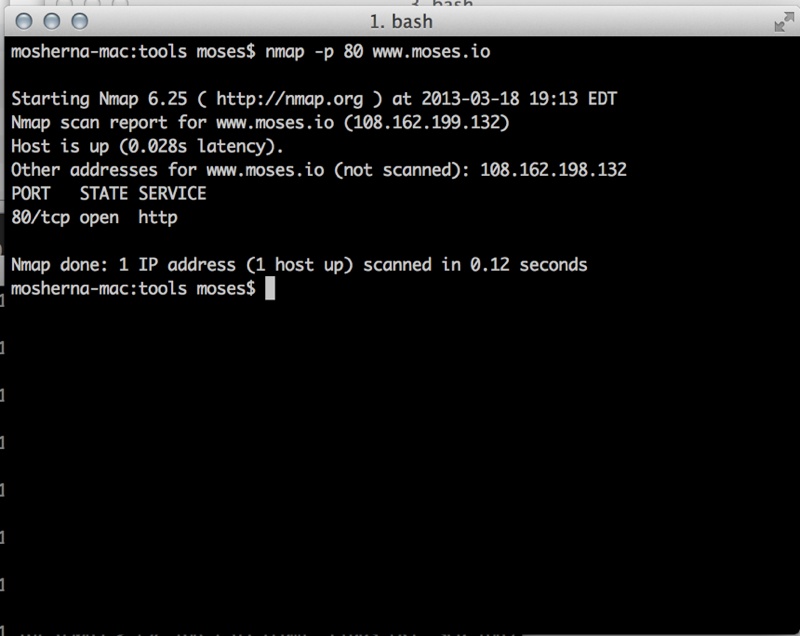
For the uninitiated, the command run is ‘nmap -p 80 www.moses.io’. This is a simple Nmap scan on TCP port 80 to my site. The output is the standard Nmap format. Nmap and the bash shell can be a powerful thing. The -oG switch is Nmap in output grepable format. This allows us to better parse the data, a requirement that makes scripting easier. There’s an xml format as well, which may prove useful to some. The -iL switch will allow a file to be loaded a fed to Nmap. Building a simple output like the following will display the power of Nmap scripting:
$ echo “your.internal.site” >> iplist.txt
$ nmap iL iplist.txt -p 80 -oG –
# Nmap 6.25 scan initiated Mon March 18 19:23:20 2013 as nmap -p 80 -oG – www.moses.io
Host: 1.2.3.4 () Status: Up
Host: 1.2.3.4 () Ports: 80/open/tcp//http//
# Nmap done at Mon Mar 18 19;23:24 2013 — 1 IP addresses (1 host up) scanned in 3.69 seconds
The commands above will form the beginning of our chain. With tools like grep, awk, and bash, automation of the pipeline is easy and will allow for other tools to be used in the chain. One of these tools could be Nikto. Nikto is a handy, yet rudimentary scanner, that can found at www.cirt.net. It’s one of the first freely available web scanners, but not the most robust. For simple operations, Nikto is extremely useful. Here’s how I can use it in our pipeline:
$ nmap iL iplist.txt -p 80 -oG – | grep open | awk ‘{ print $2 }’ | nikto/nikto.pl -host –
– Nikto v2.1.5
———————————————————————————————————————————————————————-
+ Target IP: 1.2.3.4
+ Target Hostname: 1.2.3.4
Note: To do this, you must pass IP addresses into Nikto. If your website is dependent on a hostname, you may not get the results you expect as an IP is being passed to Nikto and not a hostname. Hostname resolution will not be present; therefore, the correct pages may not load.
NSE is the Nmap scripting engine. The Nmap scripting engine leverages a language called Lua to help further automate scans in Nmap. NSE scripts run after the port scanning and OS detection or general Nmap scans are run. To understand the power of the Nmap scripting engine you can run the following command to port scan on port TCP/80 and run all http-based NSE scripts in the NSE directory against any open web servers in the environment.
$ nmap -p 80 -iL iplist.txt –script=”http-*” -oG –
This command will run through all the NSE scripts in the NSE database that start with ‘http.’ The NSE database is found in two locations 1) on your disk, probably in /usr/local/share/nmap/scripts and 2) in an online version of the documentation section of Nmap. The only version running is your local version. To keep NSE updated run the following:
$ nmap –script-updatedb
This command would pull the latest version of the NSE library. For true automation, consider using the power of Bash, Python, or what I use day to day, Ruby. A great little gem is nmap::parser.
Identify and Discover Vulnerable Services
The second item on the list of Nmap tips and tricks is the ability to identify and discover vulnerable services in your network with speed. This is critical given today’s threat landscape, so let’s take a real-time example of such a threat. A few months ago there was talk about a large UPNP vulnerability. Normally UPNP is a difficult protocol to discover and , at times, disable. UPNP will not respond correctly unless a well-formed packet is created; it’s also a UDP-based service. The vulnerability in question spanned almost all network devices and hosts. This posed a problem with identification of potential vulnerabilities. UPNP was potentially open and available externally as well. Based on what we know about Nmap automation from the preceding paragraphs, how can we discover vulnerable UPNP based devices? . Looking at the availability of a UPNP NSE script would be a good first pass. Luckily, upnp-info.nse provides information about a UPNP-enabled device. The trick to this scan? Nmap will not scan UDP by default and will not scan it without root-level privileges. The following command will work on all *nix systems with sudo:
$ sudo nmap 192.168.1.0/24 -p 1900 -sU –script “upnp-*”
With the addition of the ‘—script’ directive and “upnp-*” to the end of the command will allow Nmap to look through its lists of NSE scripts for all scripts that begin with ‘upnp-‘. Nmap will run those NSE scripts when it encounters a device with UPNP open on it. In this manner, I can leverage the power of Nmap and its NSE scripts to discover vulnerable services on the network and rectify issues. Another example would be to scan your network for open non-authenticated or guest Windows shares. Many NAS devices will scan by default using NSE scripts such as smb-enum-shares.nse. For Apple File Protocol (AFP), there are plenty of AFP-based NSE scripts to find Apple File Shares. These are powerful scripts that are freely available to the community in a very fast scanner to help stay secure.
Back to Basics with a Scanning Refresh
The third and final thing I want to dive into is old fashion scanning. This is one of the topics that people don’t realize is still valid and important today. Nmap by default will scan using regular TCP style patterns. When testing Firewalls, IPS, and other network and security devices, you’ll want to test how these devices handle malformed TCP sequences. A few things to test for include:
TCP ACK scan. This will start the conversation assuming that a SYN has already been sent.
$nmap -sA 192.168.1.0/24
TCP Null Scan. No flags are set in the TCP header, causing invisible firewalls to show themselves.
$nmap -sN 192.168.1.0/24
TCP Fin Scan. Sets the FIN bit to elicit a firewall response
$nmap -sF 192.168.1.0/24
Fragment Scans. Instructs Nmap to fragment even ICMP messages. This is very brutal to devices, sub 64K fragmenting.
$map -f 192.168.1.0/24
BadSums. A favorite of mine, sends incorrect checksums deliberately. Why the incorrect checksums? Firewalls don’t have the ability, due to constraints on speed, to check and ensure that checksums are correct. This odd behavior allows Nmap to fingerprint firewall devices.
$nmap –badsum 192.168.1.0/24
The Nmap command that I normally use on a LAN would be the NSE scripts for Broadcast. Many network services are broadcasting and very vocal about what is available and provided on the local LANs you’re on. If you issue the following command, you’ll gain a great deal of knowledge about the hosts on your network.
$nmap -e en0 –script “broadcast-*” 192.168.1.0/24
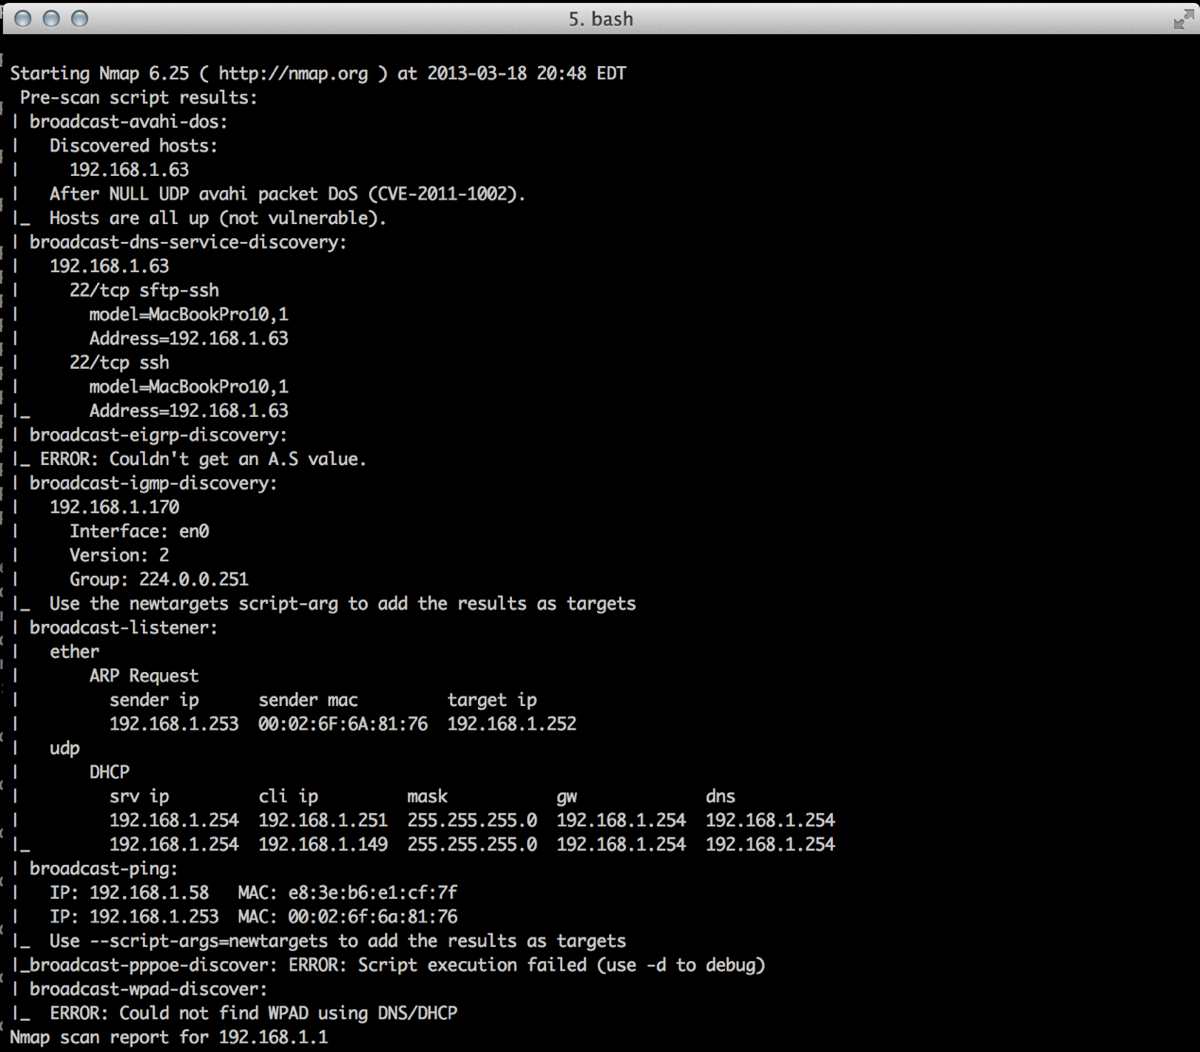
Note: I use the -e command in this Nmap command due to issues with my VMware network adapter and Nmap. To decrease the noise with pcaps, I state the particular interface I plan to use. Use the nmap –iflist command to find what interfaces are available to you.
Did you find this post informative and compelling enough to run a nightly cronjob that emails you the results of your Nmap scans? I invite you to comment below and provide feedback or share your own Nmap tips and tricks.
Thanks and look forward to hearing from you!


Hi,
Good article. I’d like to add that script selection comes in handy when running several scripts. For example:
nmap -p80 –script “http-* and (not(http-brute or http-slowloris))”
I recommend running http-enum if working with web servers. The signatures are more up to date than nikto’s.
Cheers.
Paulino,
I am very happy that you liked the article. I love the ability to have (k,d,ba,a)sh parse and change the ability to comb through the different script options. Thanks for your tip. Many people may not be aware of the ability to have a shell sort through files like this.
I think http-enum is an excellent script. NSE has really grown over the last few years and I am so happy to see it expand. Nikto has some signatures that I had hoped would have been expanded on by now. One of the nicest features, which I find useful at times, is a fingerprint database of favicon’s to try and identify specific rev-levels of things like WordPress or Cpanel.
I do want to highlight however that I was trying to highlight the ability of the Unix pipeline to extend and enhance what Nmap is finding.
Moses